Topic scale drawing autocad: Discover the art of scale drawing in AutoCAD, enhancing precision and productivity in your projects with expert techniques and tips.
Table of Content
- How to create a scale drawing in AutoCAD?
- Understanding the Basics of Scaling in AutoCAD
- Step-by-Step Guide to Scaling Objects
- Choosing the Right Scale for Your Drawing
- Common Scaling Mistakes and How to Avoid Them
- Scaling Techniques for Different Types of Drawings
- Adjusting Scale Factors for Accurate Printing
- YOUTUBE: AutoCAD Scale to Specific Length and Size
- Tips for Efficiently Managing Scaled Drawings
- Advanced Scaling Commands and Shortcuts
- Integrating Scaling into Your AutoCAD Workflow
- FAQs: Addressing Common Queries About Scaling
How to create a scale drawing in AutoCAD?
To create a scale drawing in AutoCAD, follow these steps:
- Open AutoCAD and create a new drawing file.
- Set the units for your drawing by typing \"UNITS\" in the command line. Choose the desired unit type and precision.
- Draw your objects in the model space using the appropriate tools and commands.
- Decide on the scale you want to use for your drawing. For example, if you want to represent 1 inch on paper as 1 foot in reality, the scale would be 1:12.
- Create a layout for your drawing by selecting the \"Layout\" tab at the bottom of the AutoCAD window.
- Click on the \"Layout\" dropdown menu and choose \"Layout1\" to create a new layout.
- Set the paper size and orientation for your layout using the \"Page Setup Manager\" command.
- Insert a viewport onto your layout by typing \"MVIEW\" in the command line. Specify the size and position of the viewport on the layout.
- Double-click inside the viewport to activate it and switch to the \"Paper Space\" where the layout is displayed.
- Type \"SCALE\" in the command line to set the scale for the viewport. Enter the desired scale ratio, such as 1:12 for our example.
- Adjust the position and size of your objects in the viewport as needed to fit the desired scale.
- Exit the viewport by double-clicking outside the viewport boundary.
- To print or export your scaled drawing, go back to the model space by selecting the \"Model\" tab.
- Use the \"Plot\" or \"Export\" commands to print or save your drawing at the desired scale.
READ MORE:
Understanding the Basics of Scaling in AutoCAD
Scaling in AutoCAD allows users to adjust the size of objects or the entire drawing to fit a desired dimension or scale. This fundamental skill is crucial for ensuring that drawings accurately represent real-world dimensions and can be properly interpreted by others.
- Scale Command: Learn to use the \"SCALE\" command, which modifies the size of selected objects around a base point.
- Reference Scaling: Use a reference length to scale objects relative to a known measurement, ensuring precision.
- Uniform Scaling: Maintain the aspect ratio of objects to avoid distortion when changing size.
- Non-Uniform Scaling: Adjust dimensions independently along the X, Y, or Z axis to meet specific requirements.
- Scaling for Layouts: Understand how to scale drawings within viewports in paper space, allowing for accurate representation on physical printouts.
Mastering these basics will empower you to manipulate the scale of your drawings effectively, making your AutoCAD projects more accurate and versatile.
Step-by-Step Guide to Scaling Objects
Scaling objects in AutoCAD is a critical skill for adjusting drawing elements to the correct size. Follow this step-by-step guide to scale objects efficiently and accurately.
- Select the SCALE Command: Type \"SCALE\" into the command line or access it from the modify panel.
- Choose Objects to Scale: Select the objects you wish to scale and press Enter.
- Specify Base Point: Pick a base point around which the objects will be scaled. This point remains fixed during the scaling process.
- Enter Scale Factor: Input a scale factor. Use a number greater than 1 to enlarge objects, or between 0 and 1 to reduce their size.
- Use Reference for Scaling: Alternatively, choose the \"Reference\" option. Select two points to define the original length and then type the new desired length.
- Apply the Scale: Confirm your choices. The selected objects will now be scaled according to the specified factor or reference length.
This guide helps ensure that you can scale objects in AutoCAD with precision, whether you\"re adjusting individual elements or entire drawings.
Choosing the Right Scale for Your Drawing
Choosing the right scale for your AutoCAD drawing is crucial for ensuring that the drawing communicates the design intent clearly and fits appropriately on the chosen paper size. Here are steps and considerations to guide you in selecting the appropriate scale for your drawings:
- Determine the Purpose of the Drawing: Understand whether your drawing is for detailed design, overview plans, or specific components. The purpose influences the level of detail required and, consequently, the scale.
- Consider the Final Output Size: The size of the paper or the medium you plan to use for the final output directly affects the scale choice. Larger paper sizes can accommodate larger scales, allowing for more detail.
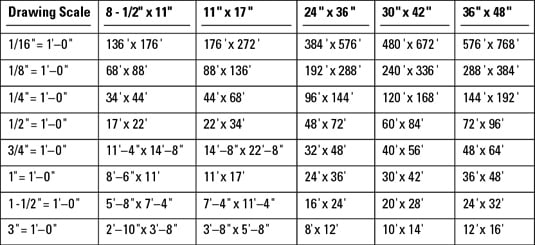
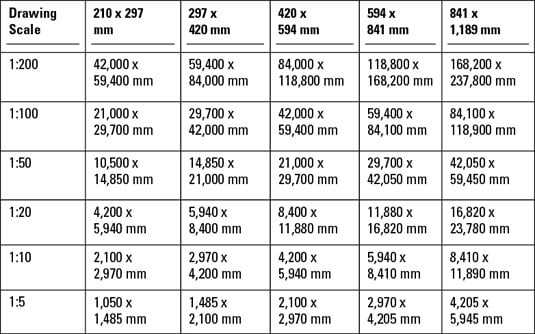
- Analyze the Content of Your Drawing: Evaluate the amount of detail and the size of the objects you need to include. Highly detailed drawings with small components may require a larger scale, such as 1:10, whereas site plans might be suited to smaller scales, such as 1:200.
- Refer to Standard Scales: Certain disciplines and industries follow standard scales. For example, architectural drawings often use scales like 1:50, 1:100, or 1:200, while engineering plans might use 1:10, 1:20, or 1:40. Adhering to these standards can facilitate better communication with other professionals.
- Use Scale Factor to Adjust: If you\"re working on a digital version that will be printed out, consider the scale factor that will be applied during printing. This factor adjusts the drawing size from the digital representation to the physical output without altering the details.
- Test Different Scales: Before finalizing, experiment with different scales to see how your drawing looks on the intended output size. This can help you make a more informed decision.
- Consult with Stakeholders: If your drawing is for a client or part of a larger project, consult with the stakeholders to ensure that the chosen scale meets their needs and expectations.
Remember, the right scale is the one that best communicates the necessary information while fitting the intended medium. It requires a balance between detail visibility and overall drawing size.
Common Scaling Mistakes and How to Avoid Them
Scaling in AutoCAD is a fundamental task, yet it\"s prone to various mistakes that can significantly affect the accuracy and integrity of your drawings. Below are some common scaling mistakes and tips on how to avoid them:
- Incorrect Scale Factor: Using the wrong scale factor can result in drawings that are either too large or too small. To avoid this, double-check the scale factor before applying it and ensure that it matches the intended scale for your drawing.
- Not Using Uniform Scale: Applying different scales to different parts of a drawing can cause inconsistencies and confusion. Always use a uniform scale across the entire drawing to maintain consistency.
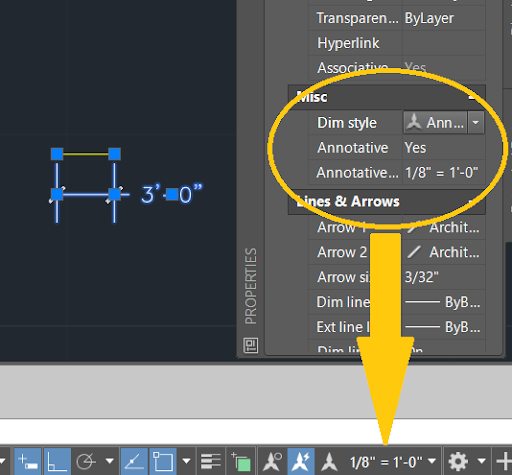
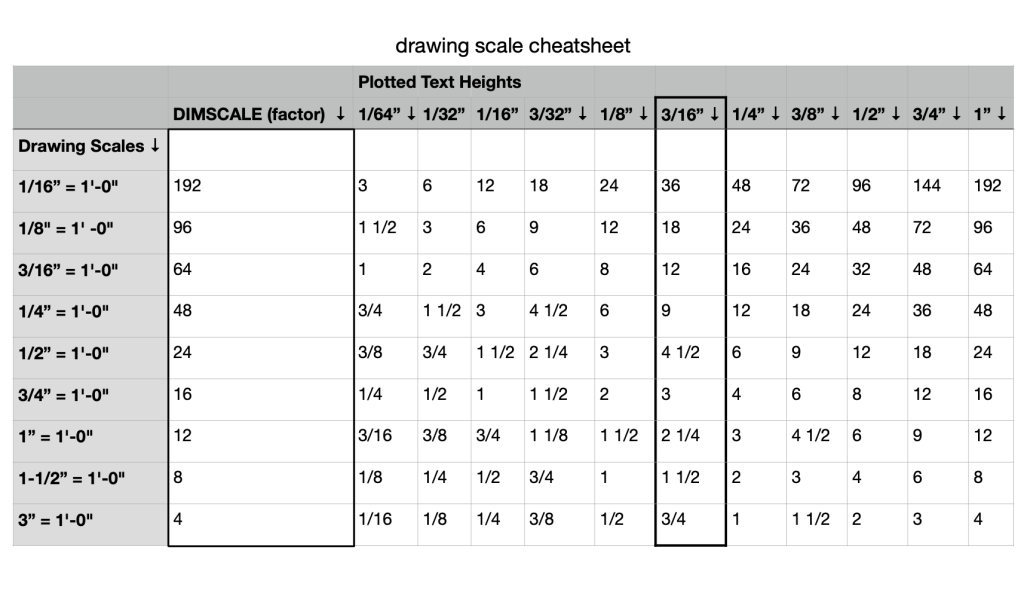
- Forgetting to Scale Text and Dimensions: When scaling a drawing, it\"s crucial to also scale text and dimensions to keep them readable and proportionate to the drawing. Use the \"Annotative\" property for text and dimensions to automatically adjust them to the correct scale.
- Scaling Printed Drawings Instead of CAD Files: Scaling a printed drawing can lead to inaccuracies. Always make scale adjustments within AutoCAD before printing to ensure precision.
- Ignoring Drawing Units: Not setting or misinterpreting the drawing units can lead to scale errors. Verify the drawing units in the AutoCAD settings to ensure they align with the intended measurement system.
- Overlooking Viewport Scales in Layouts: When working in paper space, it\"s important to set the correct viewport scale to ensure that the model space drawing appears at the correct scale on the layout. Check and adjust viewport scales as necessary.
- Not Testing the Scale on a Sample Print: Always print a sample of your drawing at the intended scale to verify that it appears correctly. This can help catch any scaling issues before the final print.
By being mindful of these common mistakes and implementing the suggested precautions, you can enhance the accuracy and professionalism of your scaled drawings in AutoCAD.
_HOOK_
Scaling Techniques for Different Types of Drawings
Scaling in AutoCAD is a fundamental task, yet it\"s prone to various mistakes that can significantly affect the accuracy and integrity of your drawings. Below are some common scaling mistakes and tips on how to avoid them:
- Incorrect Scale Factor: Using the wrong scale factor can result in drawings that are either too large or too small. To avoid this, double-check the scale factor before applying it and ensure that it matches the intended scale for your drawing.
- Not Using Uniform Scale: Applying different scales to different parts of a drawing can cause inconsistencies and confusion. Always use a uniform scale across the entire drawing to maintain consistency.
- Forgetting to Scale Text and Dimensions: When scaling a drawing, it\"s crucial to also scale text and dimensions to keep them readable and proportionate to the drawing. Use the \"Annotative\" property for text and dimensions to automatically adjust them to the correct scale.
- Scaling Printed Drawings Instead of CAD Files: Scaling a printed drawing can lead to inaccuracies. Always make scale adjustments within AutoCAD before printing to ensure precision.
- Ignoring Drawing Units: Not setting or misinterpreting the drawing units can lead to scale errors. Verify the drawing units in the AutoCAD settings to ensure they align with the intended measurement system.
- Overlooking Viewport Scales in Layouts: When working in paper space, it\"s important to set the correct viewport scale to ensure that the model space drawing appears at the correct scale on the layout. Check and adjust viewport scales as necessary.
- Not Testing the Scale on a Sample Print: Always print a sample of your drawing at the intended scale to verify that it appears correctly. This can help catch any scaling issues before the final print.
By being mindful of these common mistakes and implementing the suggested precautions, you can enhance the accuracy and professionalism of your scaled drawings in AutoCAD.
Adjusting Scale Factors for Accurate Printing
Ensuring that your AutoCAD drawings print accurately according to scale is crucial for maintaining the integrity of your design. Adjusting scale factors for accurate printing involves a series of steps to ensure that your drawing dimensions correspond precisely to real-world sizes on paper. Here is a comprehensive guide to help you manage scale factors effectively:
- Understand the Basics of Scale: Before adjusting scale factors, it’s important to have a clear understanding of how scale works in AutoCAD. Scale factors determine how a drawing is represented on paper, and getting this right is key to accurate printing.
- Set Up Your Drawing Units: Ensure that your drawing units match the intended scale. For instance, if you are working on a building plan that will be printed on a 1:100 scale, your drawing units should reflect this.
- Choose the Correct Paper Size: Select the appropriate paper size for your drawing in the Page Setup Manager. This choice will affect how you adjust your scale factors for printing.
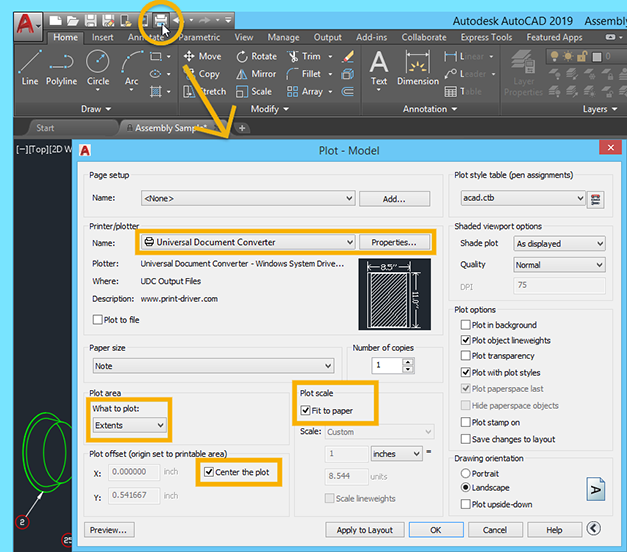
- Adjust the Scale Factor in the Layout View: Go to the Layout tab where you will do most of your printing setup. Here, you can adjust the viewport scale to match the desired scale factor. This is done by selecting the viewport, then in the Properties palette, setting the scale under the Standard Scale list.
- Use the Plot Command for Precision: When you are ready to print, use the Plot command to access the Plot dialog box. Here, you can fine-tune your printing settings, including the scale. Ensure the ‘Fit to Paper’ option is unchecked and manually enter the scale ratio in the ‘Plot Scale’ section to match your drawing’s scale.
- Preview Before Printing: Always preview your drawing before printing. This step allows you to verify that the scale and the layout of the drawing are correctly set. Make any necessary adjustments to ensure that the printed version will accurately represent your digital drawing.
- Consider Line Weights and Styles: Adjusting scale factors isn’t just about dimensions. It also involves ensuring that line weights and styles print correctly at the chosen scale. Check these in the Page Setup Manager under the Plot Style Table.
- Save Page Setups for Future Use: Once you have adjusted your scale factors and other settings for accurate printing, save these settings as a Page Setup. This can be a significant time-saver for future projects with similar printing requirements.
By following these steps, you can ensure that your AutoCAD drawings print accurately, maintaining the fidelity of your design from screen to paper. Adjusting scale factors correctly is a critical skill in drafting that affects the readability and professionalism of your printed drawings.

AutoCAD Scale to Specific Length and Size
\"Discover the surprising benefits of short workouts and how you can achieve amazing results in just a fraction of the time. Watch our video on the power of length and unlock your true fitness potential!\"
AutoCAD How To Scale Guide
\"Looking for the ultimate step-by-step guide to mastering a new skill? Our video breaks it down for you, offering expert advice and practical tips to help you become a pro in no time. Don\'t miss out on this valuable guide!\"
Tips for Efficiently Managing Scaled Drawings
Effectively managing scaled drawings in AutoCAD can streamline your design process, enhance accuracy, and improve productivity. Here are some essential tips for handling scaled drawings more efficiently:
- Organize Your Drawings: Use layers to separate different elements of your drawings. This approach allows you to easily manage visibility, edit specific components without affecting the whole drawing, and apply scales correctly to different parts of your design.
- Use Blocks and Xrefs: For repeating elements within your drawings, such as furniture in architectural plans or components in mechanical drawings, use blocks. For large projects, external references (Xrefs) can keep your files manageable by linking different drawings without embedding them directly. This method ensures consistency across related drawings and simplifies scaling adjustments.
- Implement Named Views: Named views can save you a lot of time, especially when working with complex drawings. By saving specific views, you can quickly navigate to different sections of your drawing that require attention or adjustment, ensuring that scaling is applied consistently across your project.
- Utilize Annotative Objects: Annotative objects automatically adjust their size and scale to match the scale of the viewport they are displayed in. Using annotative text, dimensions, and other annotations ensures that your documentation is legible and accurate across different scales.
- Master the Use of Viewports: In paper space, viewports are essential for controlling the scale at which your model is viewed and printed. Learning how to manipulate viewports effectively can help you present and print various parts of your drawing at different scales on the same sheet.
- Set Up Plot Styles: Plot styles control how your drawing is output to print, including line weights, colors, and styles. By configuring plot styles to work with your scales, you ensure that your drawings convey the intended design information clearly and accurately.
- Create Templates: Develop templates with preset scales, layers, plot styles, and other settings specific to your work. Templates can dramatically reduce setup time for new projects and ensure consistency across your drawings.
- Stay Consistent: Consistency in the application of scales, layers, and styles across your drawings not only makes managing them easier but also ensures clarity and professionalism in your work. Establish conventions for scales and stick to them throughout your project.
- Regularly Review and Update Drawings: As projects progress, regularly review and, if necessary, update your scaled drawings to reflect any changes. This practice helps prevent errors and ensures that all elements are correctly scaled and aligned with the project requirements.
By adopting these tips, you can significantly enhance your efficiency in managing scaled drawings in AutoCAD. Efficient management leads to fewer errors, improved project communication, and a smoother workflow from design to print.
Advanced Scaling Commands and Shortcuts
Mastering advanced scaling commands and shortcuts in AutoCAD can significantly enhance your productivity and accuracy when working with scaled drawings. Here\"s a compilation of essential commands and shortcuts that every AutoCAD user should know:
- SCALE Command: The SCALE command is fundamental for resizing objects in your drawing. You can access it by typing \"SCALE\" or \"SC\" in the command line. After selecting the objects you wish to scale, specify a base point and then enter a scale factor or select two points to define a scale factor.
- Reference Scaling: Use the SCALE command with the reference option by typing \"R\" after selecting your objects. This allows you to scale an object based on a specific reference length. You first specify the reference length directly on the object, then the desired length, allowing for precise scaling to a specific dimension.
- Copy and Scale: Combine copying with scaling by using the COPY command followed by the SCALE command. This technique is useful for creating scaled duplicates of objects without altering the original.
- ALIGN Command: For more complex scaling needs, the ALIGN command can scale objects based on specified points that align with target points. This is particularly useful for fitting objects into irregularly shaped areas or matching objects to a specific part of your drawing.
- Express Tools - Scale to Reference: AutoCAD\"s Express Tools include a \"Scale to Reference\" command, which simplifies the process of scaling objects to match a reference length or dimension found elsewhere in your drawing. This tool is accessed through the Express Tools menu or by typing \"EXTR\" in the command line.
- Batch Processing with Scripts: For advanced users, creating scripts to apply scaling operations to multiple drawings or objects can save time. Scripts can automate the scaling process, applying predefined scale factors to selected objects or layers across different files.
- Custom Shortcuts: AutoCAD allows you to create custom command aliases or keyboard shortcuts through the Customize User Interface (CUI). Assigning shortcuts to frequently used scaling commands can speed up your workflow significantly.
- Dynamic Blocks: Utilize dynamic blocks with parameters and actions that allow for scaling. This enables the creation of block definitions that can be easily resized within your drawings, maintaining proportionality and adherence to predefined scale factors.
Integrating these advanced scaling commands and shortcuts into your AutoCAD workflow will not only save time but also improve the precision and flexibility of your scaled drawings. Practice and familiarity with these tools will enable you to manage complex scaling tasks more efficiently.
Integrating Scaling into Your AutoCAD Workflow
Incorporating effective scaling practices into your AutoCAD workflow is crucial for producing accurate and professional drawings. Scaling ensures that your designs are precisely represented both on screen and in printed formats. Here are key strategies for seamlessly integrating scaling into your AutoCAD projects:
- Standardize Your Scaling Process: Develop a standard procedure for scaling within your organization. This includes setting predefined scale factors for common project types, establishing guidelines for when and how to use different scales, and creating a checklist to ensure all drawings meet the required standards.
- Use Layouts for Consistent Scaling: Layouts are a powerful feature in AutoCAD that allow you to define specific scales for different views of your drawing. By utilizing layout tabs, you can prepare multiple views at different scales, ensuring that each part of your drawing is accurately represented when printed.
- Implement Annotative Objects: Annotative objects automatically adjust their size to appear correctly at different scales in model space and layout views. Using annotative text, dimensions, and symbols can significantly streamline the scaling process and reduce errors.
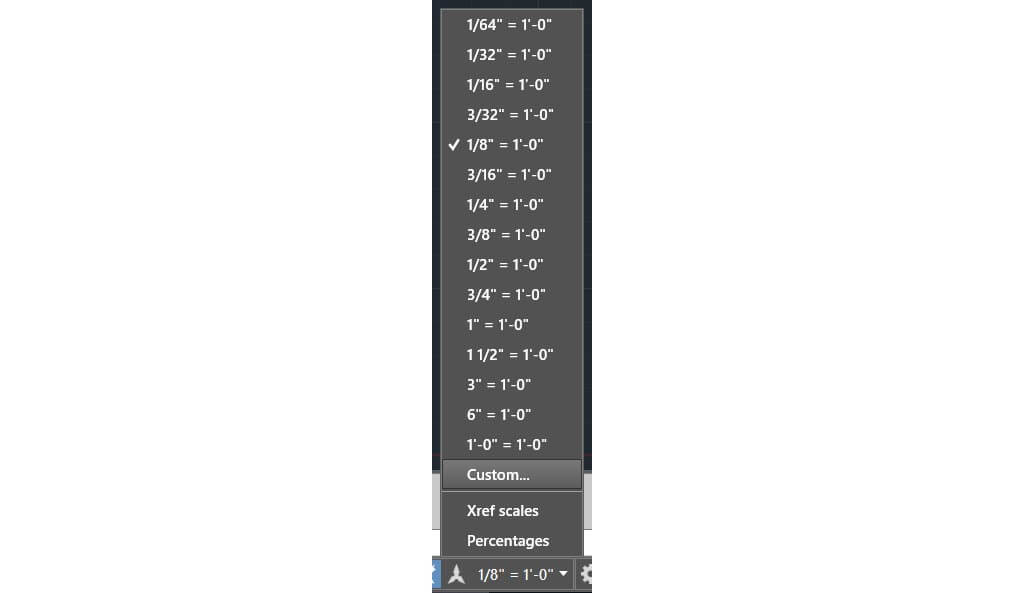
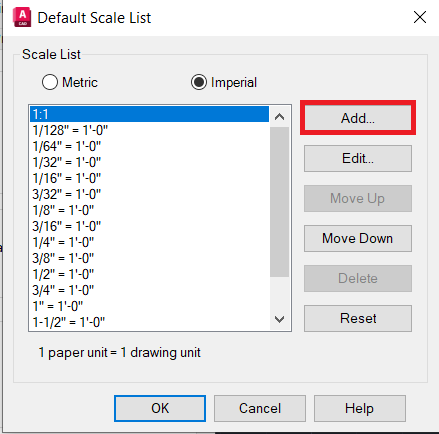
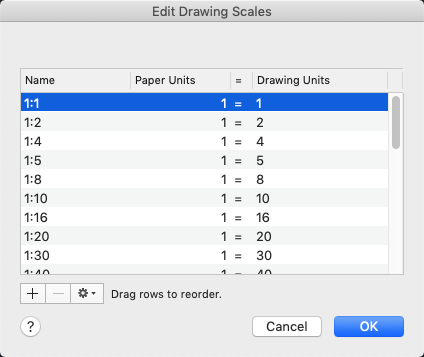
- Customize Scale Lists: AutoCAD allows you to customize the list of scales available in the scale list for model space and layout viewports. By editing this list to include only the scales you commonly use, you can simplify the selection process and maintain consistency across your drawings.
- Train Your Team on Scaling Techniques: Ensure that all team members are trained on the scaling processes and best practices specific to your workflow. This includes understanding how to select the correct scale, apply it to drawings, and adjust objects or elements appropriately.
- Utilize Software Tools and Extensions: Take advantage of AutoCAD\"s built-in tools and third-party extensions that facilitate scaling. Tools like the SCALE command, dynamic blocks, and reference scaling can help automate and simplify the scaling process.
- Regularly Review and Update Scaling Practices: Scaling requirements can evolve as projects become more complex or as industry standards change. Regularly review and update your scaling practices to ensure they remain effective and efficient.
- Document Your Scaling Procedures: Keep a well-documented record of your scaling procedures, including any custom scales or specific techniques used in your projects. This documentation can be a valuable resource for training new team members and ensuring consistency across projects.
By integrating these scaling strategies into your AutoCAD workflow, you can enhance the accuracy and professionalism of your drawings. A systematic approach to scaling not only improves the quality of your work but also streamlines the design process, making it more efficient and effective.

_HOOK_
READ MORE:
FAQs: Addressing Common Queries About Scaling
Scaling in AutoCAD can sometimes be confusing, especially for beginners or those transitioning from other CAD software. Below are answers to some of the most frequently asked questions about scaling in AutoCAD, designed to clarify and assist in your scaling endeavors.
- How do I choose the right scale for my drawing?Choosing the right scale depends on the size of the object you are drawing and the paper size you intend to print on. Generally, you want to choose a scale that allows your drawing to fit on the paper with clear detail. For architectural drawings, scales such as 1:100 for floor plans or 1:50 for details are common. For smaller items, such as mechanical parts, a larger scale (e.g., 1:1 or 1:2) might be necessary to show detail clearly.
- What is the difference between model space and paper space scaling?In model space, you draw your design at 1:1 scale (full size). Scaling in model space is generally not recommended unless adjusting imported objects. Paper space (layout) is where you arrange views of your model at different scales on a virtual paper for printing. Here, you can assign different scales to each viewport to accurately represent how your design will appear on physical paper.
- How do I scale an entire drawing?To scale an entire drawing, use the SCALE command. Select all objects (CTRL+A), choose a base point, and then specify the scale factor. If you’re adjusting a drawing to fit a specific scale, it’s often easier to adjust your viewport scale in paper space rather than scaling the entire model in model space.
- Can I scale text and dimensions automatically?Yes, by using annotative text and dimensions, AutoCAD allows you to scale these elements automatically based on the viewport scale in paper space. Annotative objects are designed to display at the correct size in model space and paper space irrespective of the viewport scale, simplifying the process of maintaining readable text and dimensions across different scales.
- What are some common scaling mistakes to avoid?Common mistakes include scaling objects in model space without considering the impact on dimension accuracy, not using annotative styles for text and dimensions, and forgetting to adjust viewport scales in paper space. Another mistake is not previewing the scaled drawing before printing, which can lead to inaccuracies or misinterpretations of the design.
- How do I ensure my scaled drawing prints accurately?Ensure accurate printing by checking the scale of your viewport in paper space, using the ‘Preview’ option in the Plot dialog to verify the output before printing, and making sure your plot settings match the intended scale. Always double-check the scale indicator in your layout and compare it to the actual dimensions on the paper after printing a test page.
Addressing these FAQs should help clarify the scaling process in AutoCAD, making it easier to create accurate and professional drawings. Remember, practice and familiarity with the software are key to mastering scaling in your designs.
Mastering scale drawing in AutoCAD unlocks the full potential of your designs, ensuring precision and professionalism. Embrace these insights to elevate your skills and bring your architectural or engineering visions to life with unmatched accuracy and efficiency.