Topic isometric drawing autocad: Discover the essentials of isometric drawing in AutoCAD, a vital skill for architects and engineers, to bring precision and depth to your designs with ease and efficiency.
Table of Content
- How to create an isometric drawing in AutoCAD?
- Understanding Isometric Drawing in AutoCAD
- How to Set Up AutoCAD for Isometric Drawings
- Isometric Drawing Techniques and Tools
- Creating Isometric Projections from 3D Models
- Isometric Drawing Commands and Shortcuts
- Practical Tips for Efficient Isometric Drawing
- YOUTUBE: Autocad Isometric Drawing 04
- Common Challenges and Solutions in Isometric Drawing
- Advanced Isometric Drawing Features
- Examples of Isometric Drawing Applications
- Resources and Further Learning
How to create an isometric drawing in AutoCAD?
To create an isometric drawing in AutoCAD, you can follow these steps:
- Select the \"Isometric Drafting\" tool on the status bar or press F5/Ctrl+E to cycle through the isoplane options.
- Choose the desired isoplane for your drawing.
- Enable the isometric snap by typing \"SNAP\" in the Command Line and setting the value to \"isometric\".
- Start drawing your objects using the various AutoCAD tools.
- Ensure that your drawing objects align with the isometric grid by using ortho mode and polar tracking.
- Use the isometric snap to accurately place and align your objects.
- If you need to draw circles or arcs in isometric view, use the \"Ellipse\" button on the Draw ribbon panel and select \"Isocircle\" or \"Isoline\" options.
- Continue drawing and modifying your objects until your isometric drawing is complete.
READ MORE:
Understanding Isometric Drawing in AutoCAD
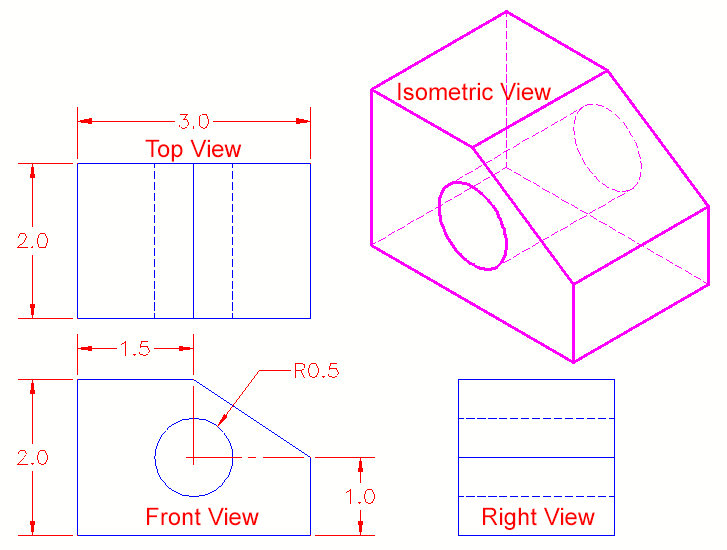
Isometric drawing in AutoCAD is a method of visually representing three-dimensional objects in two dimensions. It is a crucial skill for architects, engineers, and designers to depict their ideas and projects in a clear and detailed manner.
- Isometric drawings are created on a 30-degree angle to the horizontal, providing a semi-3D view that combines accuracy with visual appeal.
- AutoCAD facilitates isometric drawing by offering specialized tools and settings that allow for the creation of precise isometric lines, circles, and shapes.
- Using the SNAP and GRID features, users can easily align objects and elements in the isometric plane, enhancing the accuracy and aesthetics of the drawing.
- The ISODRAFT and ISOSNAP modes in AutoCAD are specifically designed to streamline the process of creating isometric drawings, making it more efficient and user-friendly.
By mastering isometric drawing in AutoCAD, users can effectively communicate complex designs and ideas, bridging the gap between conceptualization and realization.

How to Set Up AutoCAD for Isometric Drawings
Setting up AutoCAD for isometric drawings is a straightforward process that enhances your ability to create detailed, three-dimensional representations on a two-dimensional plane. Follow these steps to prepare your workspace for isometric drawing:
- Open AutoCAD and select a new drawing or open an existing one.
- Activate the isometric snap/grid feature by typing SNAP into the command line, pressing Enter, then typing ISO and pressing Enter again.
- To switch between isometric planes (left, top, right), use the F5 key or type ISOPLANE followed by the plane name (Left, Top, Right).
- Adjust your grid settings to match the scale of your isometric drawing by going to the Drafting Settings window and customizing the grid spacing and snap intervals.
- Utilize the line command with the isometric snap mode enabled to draw isometric lines accurately. For circles, use the ELLIPSE command followed by the option Isocircle to draw perfect isometric circles.
This setup will enable you to accurately depict three-dimensional objects in isometric view, providing a solid foundation for your isometric drawing projects in AutoCAD.
Isometric Drawing Techniques and Tools
Mastering isometric drawing in AutoCAD requires understanding both the techniques and the tools available. These elements work together to help you create precise and visually compelling drawings:
- Isoplane Switching: Use the F5 key to switch between isometric planes (left, top, right) to draw on different facets of your design.
- Isometric Snap/Grid: Enable isometric snap and grid to align objects accurately in the isometric plane. This setting helps in maintaining consistent angles and distances.
- Isocircle Drawing: For drawing isometric circles, use the ELLIPSE command and choose the Isocircle option to draw circles on isometric planes.
- Direct Distance Entry: When drawing, you can directly enter distances to precisely control the length of your lines and shapes.
- Copy and Offset in Isometric: Use the COPY and OFFSET commands to duplicate and space elements precisely in your drawing.
- Trim and Extend in Isometric: The TRIM and EXTEND commands are invaluable for adjusting the lengths of lines and edges to meet other elements perfectly.
Utilizing these techniques and tools will significantly enhance your ability to create detailed and accurate isometric drawings in AutoCAD, making your design process more efficient and effective.
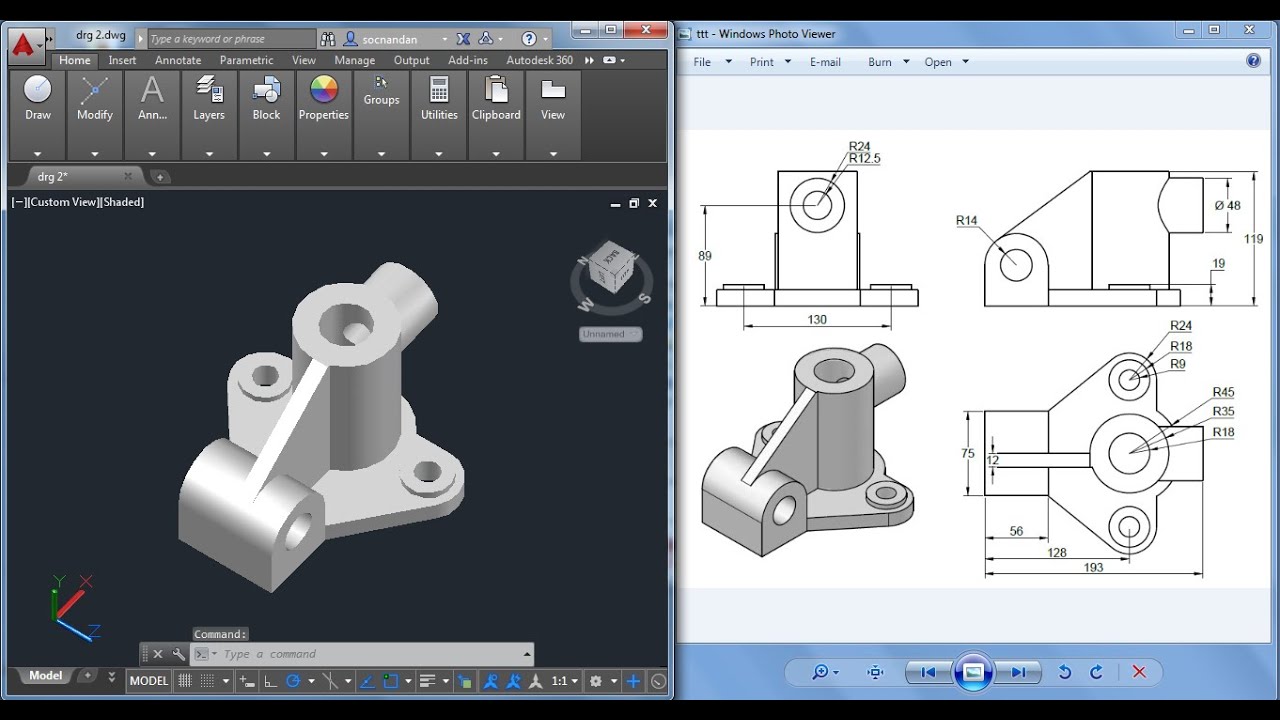
Creating Isometric Projections from 3D Models
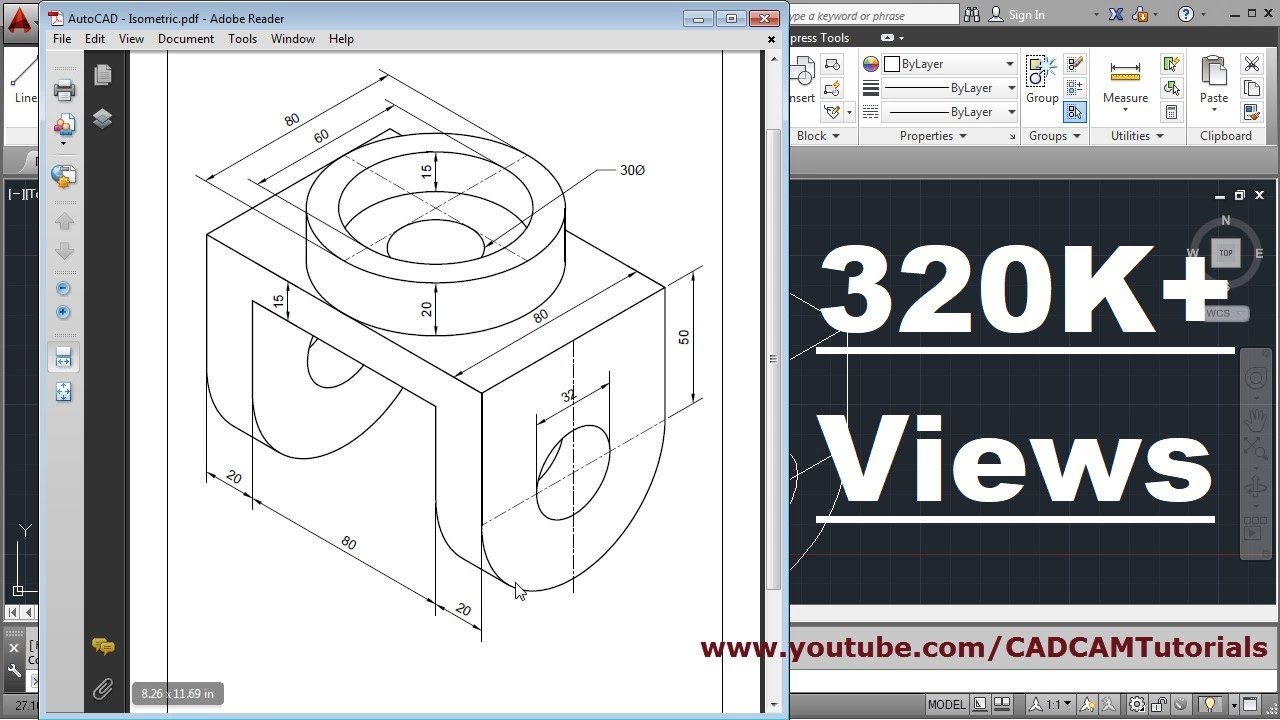
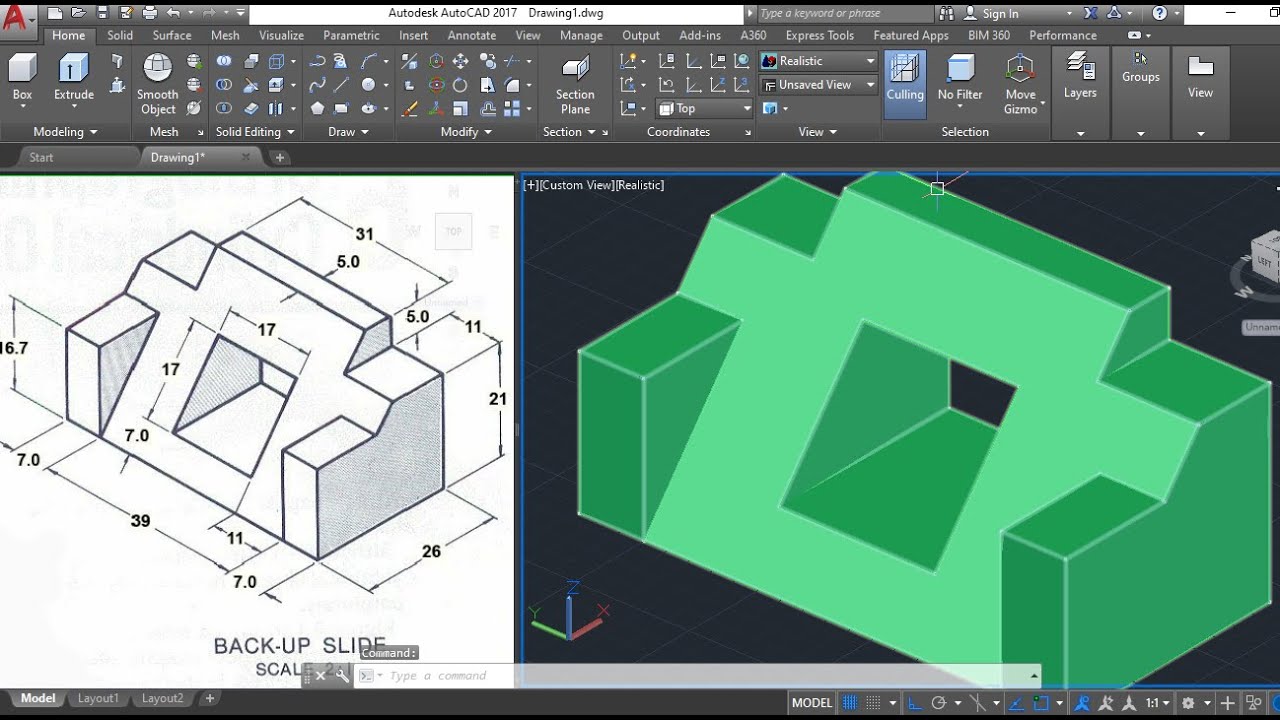
Converting 3D models into isometric projections in AutoCAD allows for a detailed and accurate representation of your design from a specific viewpoint. Follow these steps to create isometric projections from your 3D models:
- Open your 3D model in AutoCAD. Ensure that all the necessary design elements are included and correctly positioned.
- Switch to a southeast isometric view by typing VIEW into the command line, then selecting SW Isometric from the Viewpoint Preset dropdown menu.
- Adjust the visual style to your preference by typing VISUALSTYLES in the command line. Choose a style that best suits the level of detail you need for your projection.
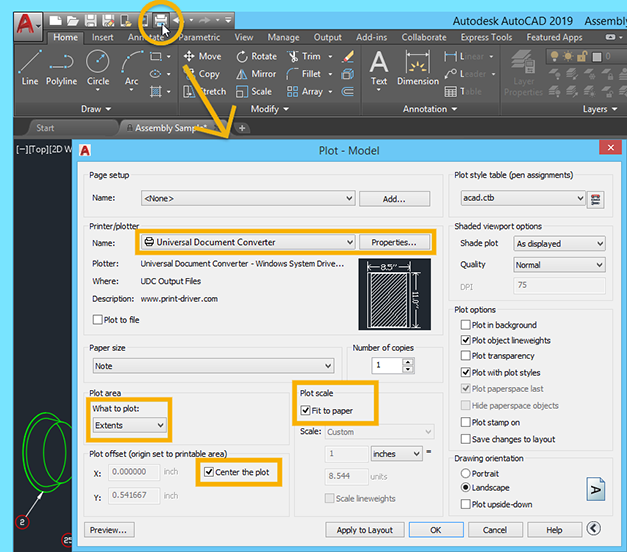
- Use the FLATSHOT command to create a 2D representation of your 3D model. This command allows you to specify the source, destination, and other options for your isometric projection.
- Alternatively, use the EXPORT command with the PDF option to export your isometric view as a PDF file, which can be useful for presentations or documentation purposes.
This process not only simplifies the visualization of complex 3D models but also facilitates communication with clients and team members by providing a clear and detailed isometric view of the project.

_HOOK_
Isometric Drawing Commands and Shortcuts
Efficiency in AutoCAD is often about knowing the right commands and shortcuts, especially when working with isometric drawings. Here are some essential commands and shortcuts that can help streamline your isometric drawing process:
- ISOPLANE (F5): Toggles between the three isoplane orientations (Top, Right, Left), allowing you to draw on different planes without changing the view.
- SNAP (F9): Enables or disables the snap feature. When working in isometric, setting snap to isometric mode can help in aligning drawings accurately.
- ELLIPSE > Isocircle: This command sequence allows you to draw isometric circles based on the current isoplane. It\"s crucial for adding rounded elements to your drawings.
- LINE: The basic drawing tool, but when used with isometric snap, it becomes a powerful way to draw precise isometric lines.
- DIMISO: Creates isometric dimensions that align with the isometric planes, making your drawings more readable and professionally presented.
- COPY, MOVE, and ROTATE: These commands work as they do in non-isometric drawings but are essential for manipulating objects within an isometric perspective.
Mastering these commands and shortcuts can significantly enhance your productivity in creating isometric drawings in AutoCAD, allowing for more accurate and visually appealing designs.
Practical Tips for Efficient Isometric Drawing
Creating isometric drawings in AutoCAD can be both rewarding and challenging. To enhance your efficiency and accuracy, consider these practical tips:
- Plan Your Drawing: Before starting, sketch a rough layout of your design. Planning helps in understanding the space and dimensions, making the digital drawing process smoother.
- Use Layers: Organize different elements of your drawing on separate layers. This approach allows for easier editing and toggling visibility of various components.
- Customize Your Workspace: Tailor AutoCAD\"s interface and toolbars to better suit isometric drawing. Having frequently used tools at your fingertips can save time.
- Utilize Ortho Mode: While drawing lines in isometric view, turning on Ortho Mode (F8) can help maintain straight lines along the isometric axes.
- Apply Isometric Text and Dimensions: Use specialized isometric text and dimension styles to keep your annotations consistent with your isometric drawings.
- Practice Consistent Scaling: Ensure that all elements in your drawing are scaled consistently to avoid discrepancies in size and proportion.
- Save and Reuse Blocks: Create blocks for commonly used objects to streamline your workflow and maintain consistency across projects.
By applying these tips, you can enhance the quality and efficiency of your isometric drawings in AutoCAD, leading to more productive and satisfying design work.

Autocad Isometric Drawing 04
\"Discover the magic of drawing in our captivating video! Learn valuable techniques and unleash your creativity as you watch our talented artist bring stunning illustrations to life. Let the beauty of art inspire you!\"
Autocad Isometric Drawings | Create 2D Isometric Views in Autocad
\"Prepare to be amazed as you immerse yourself in breathtaking views from around the world! Our mesmerizing video takes you on a visual journey to awe-inspiring landscapes that will leave you feeling inspired and in awe of the world\'s natural wonders.\"
Common Challenges and Solutions in Isometric Drawing
Isometric drawing in AutoCAD, while offering a unique perspective for visualizing designs, comes with its own set of challenges. Here are some common issues and how to solve them:
- Difficulty in Visualizing 3D on 2D: Practice sketching your design by hand before creating it in AutoCAD. This practice helps in understanding the spatial relationships and dimensions.
- Aligning Objects Accurately: Use the SNAP and GRID features to align objects precisely. Adjusting these settings to suit the scale of your drawing can significantly improve accuracy.
- Creating Curved Surfaces: Utilize the ELLIPSE command for isocircles and arcs. For more complex curves, consider using spline or polyline commands with specific isometric settings.
- Maintaining Consistent Scale and Proportions: Set a consistent scale at the beginning of your project. Use blocks and references to ensure uniformity across your drawing.
- Editing and Modifying Isometric Drawings: Familiarize yourself with commands like TRIM, EXTEND, and ARRAY in isometric mode. These tools can help adjust and duplicate elements without breaking the isometric perspective.
Overcoming these challenges requires practice, patience, and a thorough understanding of AutoCAD\"s isometric drawing tools. With time, creating detailed and accurate isometric drawings will become a more intuitive and efficient process.

Advanced Isometric Drawing Features
AutoCAD offers a range of advanced features for isometric drawing that can enhance the detail and precision of your work. Exploring these features can open up new possibilities for your isometric designs:
- Dynamic Blocks: Create dynamic blocks for isometric drawings to simplify modifications and adjustments without needing to redraw components.
- 3D Modeling and Visualization: Use AutoCAD’s 3D modeling tools to generate isometric views from 3D models, offering a realistic perspective of the design.
- Custom Isometric Grids and Snap Settings: Adjust the grid and snap settings for specific project requirements to improve drawing accuracy and efficiency.
- Annotation Scaling: Implement annotation scaling to keep text, dimensions, and other notations readable and proportionate across different view scales.
- Layer Management: Utilize advanced layer management techniques to organize and control the visibility of different elements in your isometric drawing.
- Parametric Constraints: Apply parametric constraints to maintain geometric and dimensional relationships in the drawing, even when modifications are made.
Leveraging these advanced features can significantly elevate the quality and functionality of your isometric drawings in AutoCAD, making your design process more versatile and efficient.

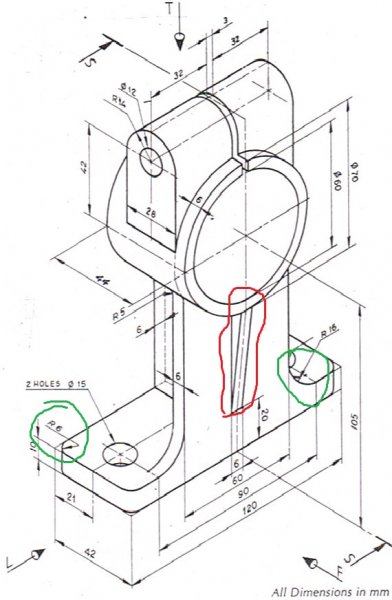
Examples of Isometric Drawing Applications
Isometric drawings are a fundamental part of various industries, providing a clear and detailed view of complex objects. Here are some key applications:
- Architecture: Used for presenting building designs, isometric drawings offer a comprehensive view of the project, showcasing layout, depth, and spatial relationships.
- Engineering: Essential for mechanical parts and assemblies, these drawings detail components in a way that standard two-dimensional drawings cannot.
- Video Game Design: Isometric perspectives are popular in game design, providing a 3D view on a 2D plane that enhances gameplay and visuals.
- Interior Design: Helps in visualizing furniture arrangements and room layouts, offering clients a realistic view of the interior space.
- Manufacturing: Used in product design to convey the details of components, including dimensions, connections, and functionalities.
These applications demonstrate the versatility and value of isometric drawings in professional fields, making them an indispensable tool in the design and visualization process.

_HOOK_
READ MORE:
Resources and Further Learning
To enhance your skills in isometric drawing with AutoCAD, a wealth of resources are available. Here are some recommendations to further your learning:
- AutoCAD Tutorials and Guides: Autodesk’s official website offers tutorials specifically for isometric drawing, providing both beginner and advanced techniques.
- Online Courses: Platforms like Udemy, Coursera, and LinkedIn Learning have comprehensive courses that cover isometric drawing in AutoCAD from the ground up.
- Books: Numerous books delve into the specifics of AutoCAD, offering insights into isometric drawing practices. Titles such as “Mastering AutoCAD” provide valuable knowledge for users at all levels.
- Forums and Communities: Joining AutoCAD forums and online communities can provide support, answers to specific questions, and opportunities to see how others tackle isometric drawing challenges.
- Practice Projects: Engaging in practice projects is crucial. Challenge yourself with a variety of designs to apply what you’ve learned and to discover new techniques.
Utilizing these resources will significantly advance your understanding and ability in creating isometric drawings with AutoCAD, paving the way for more innovative and detailed designs.
Embracing isometric drawing in AutoCAD opens a realm of possibilities, enhancing your design precision and creativity. Dive into this skill to bring your projects to life with unparalleled clarity and detail.