Topic how to save autocad drawing as pdf: Discover the ultimate guide on how to save AutoCAD drawings as PDF, ensuring your designs are easily shared and preserved with the best quality.
Table of Content
- How can I save an AutoCAD drawing as a PDF?
- Exporting a Single Layout
- Using the Output Tab for PDF Export
- Batch Converting Drawings to PDF
- Adjusting PDF Output Settings
- Saving Multiple Layouts as a Single PDF
- Utilizing the PUBLISH Command
- YOUTUBE: Autocad 2017: Quick save in PDF with correct scale
- Exporting with PDF Presets
- Handling PDF Export Options
- Using EXPORTPDF Command
- Optimizing PDFs for Quality and File Size
How can I save an AutoCAD drawing as a PDF?
To save an AutoCAD drawing as a PDF, you can follow these steps:
- Open the AutoCAD file you want to save as a PDF.
- Click on the \"Acrobat\" menu or select \"Tools\" and then \"Create PDF\".
- In the options menu that appears, select \"Single File\" and then click on \"Select a File\".
- Choose the AutoCAD file you want to convert to a PDF and click on \"Upload\".
- In the Acrobat toolbar, click on \"File\" and then \"Save\" to save the PDF file.
Note that these steps may vary slightly depending on the version of AutoCAD and Acrobat you are using, but the general process should be similar.
READ MORE:
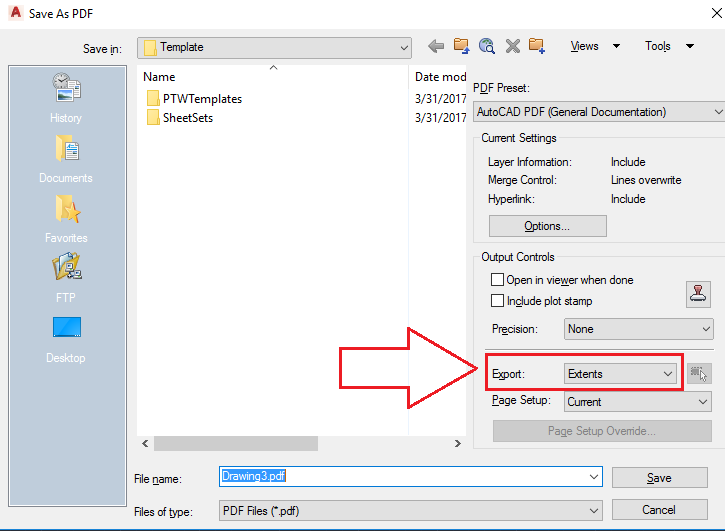
Exporting a Single Layout
Follow these steps to export a single layout from your AutoCAD drawing into a PDF file, ensuring a smooth and straightforward process:
- Open your AutoCAD project and navigate to the layout tab that you wish to export.
- Go to the \"Application Menu\" (the large \"A\" button at the top left), then click \"Export\" and select \"PDF\" from the options.
- In the \"Export to PDF\" dialogue box, adjust the settings according to your needs. This can include the PDF quality, whether to include layer information, and whether to include the paper background.
- Choose the location where you want to save the PDF and enter a filename for your document.
- Click \"Save\" to export the layout. Your selected layout will now be saved as a PDF file in the specified location.
This method allows for precise control over the output, enabling you to share or archive your AutoCAD layouts efficiently.
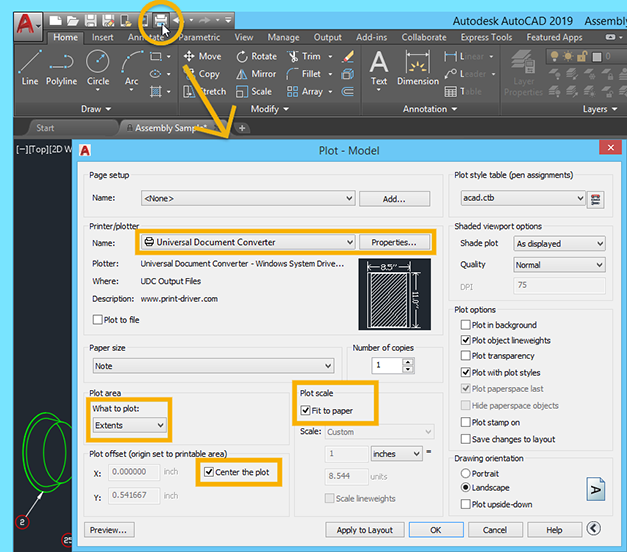
Using the Output Tab for PDF Export
Exporting your AutoCAD drawing to a PDF using the Output tab is an efficient way to create a shareable and printable file. Here\"s how to do it:
- Open the drawing you wish to export in AutoCAD.
- Select the \"Output\" tab located on the Ribbon at the top of the AutoCAD interface.
- Within the \"Plot\" panel of the \"Output\" tab, click on \"PDF Export\" to open the \"Export to PDF\" dialogue box.
- Before exporting, you can adjust several settings to customize the PDF output. These include specifying the range of pages, choosing the paper size, and determining the quality of the PDF.
- Once you\"ve set your preferences, click on \"Export\" and choose a location to save your PDF file. You will also need to provide a file name for your PDF document.
- After configuring all options, click \"Save\" to finalize the export. Your drawing will be exported as a PDF to the chosen location.
This method provides a direct and streamlined approach to converting your AutoCAD drawings into accessible PDF formats right from the Output tab.
Batch Converting Drawings to PDF
Efficiently convert multiple AutoCAD drawings to PDF format in one go, saving time and ensuring consistency across documents. Here\"s how to perform batch conversion:
- Open the AutoCAD application and access the \"Application Menu\" (the large \"A\" at the top left corner), then select \"Publish\".
- In the \"Publish\" dialog, choose \"PDF\" as the publish to format from the drop-down menu at the top right.
- Add the drawings you wish to convert by dragging them into the \"Sheets to Publish\" area or by using the \"Add Sheets\" button.
- For each drawing added, you can specify the page setup to control output settings. If necessary, create or modify a page setup that meets your PDF requirements.
- Confirm the output location by setting the \"PDF publish options\", including file name and path. Here, you can also adjust the PDF quality and other settings as needed.
- Click \"Publish\" to start the batch conversion process. AutoCAD will export each selected drawing into a PDF file according to your configured settings.
This method streamlines the process of converting multiple drawings, making it ideal for large projects or archiving purposes.

Adjusting PDF Output Settings
To ensure your AutoCAD drawings are exported to PDF with the highest quality and correct specifications, it\"s crucial to adjust the PDF output settings appropriately:
- After choosing to export or print to PDF, access the \"PDF Options\" dialog box to see a range of settings that can be customized.
- Under \"Resolution\", you can set the DPI (dots per inch) to ensure your drawings are clear and detailed. A higher DPI is recommended for detailed drawings.
- Adjust the \"Quality\" settings to balance between file size and visual clarity. Lower quality settings will reduce the file size but may affect the detail of your drawing.
- Enable \"Layers\" if you want to retain the layer information in your PDF. This is useful for viewers who need to toggle visibility of various components in your drawing.
- Consider selecting \"Include Hyperlinks\" to preserve any hyperlinks from your drawing in the PDF file.
- Choose whether to include \"Bookmarks\" and \"Fonts\" to enhance the usability and appearance of your PDF document.
- Before finalizing, preview the output settings to ensure they meet your requirements. Make adjustments as necessary.
- Once satisfied with your settings, proceed to save or export the PDF. Your document will be created with these specifications.
By carefully adjusting these settings, you can create PDFs that meet your specific needs, whether for presentation, archiving, or sharing purposes.
_HOOK_
Saving Multiple Layouts as a Single PDF
Combining multiple layouts from an AutoCAD drawing into a single PDF file streamlines the sharing and reviewing process. Follow these steps to efficiently compile your layouts:
- Open the drawing with the layouts you wish to include in the PDF.
- Go to the \"Application Menu\" (big \"A\"), select \"Publish\", then \"Batch Plot\" to start the process.
- In the \"Publish\" dialog box, add the layouts you want to convert to PDF by dragging them into the sheet list or using the \"Add Sheets\" button.
- For \"Publish to\", select \"PDF\" and then choose \"Single-sheet file\" or \"Multi-sheet file\" depending on whether you want each layout as a separate PDF or all in one file.
- Click on \"PDF options\" to adjust settings such as resolution, layer information, and whether to include sheet names as bookmarks.
- Set the location to save the PDF file and name it appropriately.
- Review your settings and click \"Publish\" to start the conversion process. The selected layouts will be compiled into a single PDF file according to your specifications.
This method ensures a streamlined document that is easy to navigate, making it ideal for presentations or submission of multiple designs.

Utilizing the PUBLISH Command
The PUBLISH command in AutoCAD is a powerful tool for efficiently exporting multiple drawings or layouts to a PDF file in one go. Follow these detailed steps to use it effectively:
- Open the drawing(s) you wish to export in AutoCAD.
- Type \"PUBLISH\" in the command line and press Enter. This opens the Publish dialog box.
- In the Publish dialog box, choose the \"Sheets\" tab if it\"s not already selected. Here, you can add or remove drawings and layouts to be published.
- For publishing multiple layouts into a single PDF, ensure all desired layouts are listed and checked in the \"Sheets to Publish\" section.
- Click the \"Publish to\" drop-down menu and select \"PDF\" as the output format.
- Under \"PDF options\", you can specify your preferred settings, such as file location, naming conventions, and whether to create a single PDF file or separate PDFs for each layout.
- Click the \"Options...\" button to access further settings, including the resolution, layer information, and whether to include sheet names as bookmarks.
- After adjusting your settings, click \"Publish\" to start the exporting process. AutoCAD will generate the PDF(s) according to your specifications.
This method is ideal for users needing to compile multiple drawings or layouts into a cohesive PDF document, streamlining the sharing and printing processes.

Autocad 2017: Quick save in PDF with correct scale
\"Unlock your creativity with Autocad drawing! Learn how to create stunning designs and bring your ideas to life with this comprehensive tutorial. Discover the endless possibilities and enhance your design skills today!\"
AutoCAD How to Save or Print As PDF - Quickly & Easily! 2 Minute Tuesday
\"Looking to easily share and preserve your work? Learn how to save your Autocad drawing as a PDF file in just a few simple steps. Watch this video tutorial to streamline your work process and ensure your designs are easily accessible to everyone.\"
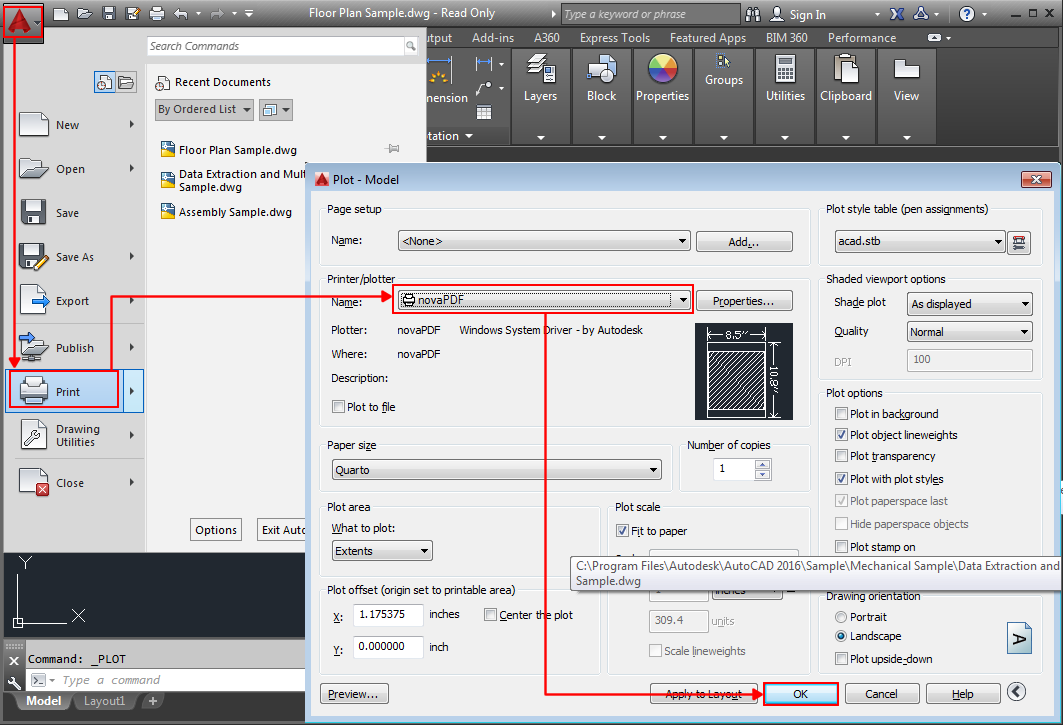
Exporting with PDF Presets
AutoCAD\"s PDF presets make it easier to export drawings with predefined settings, ensuring consistency and efficiency. Here\"s how to use these presets for exporting your drawings:
- Open the drawing you wish to export in AutoCAD.
- Go to the \"Application Menu\" (big \"A\"), then click \"Print\" > \"Manage Plotters\".
- Select \"Add-A-Plotter Wizard\" and choose \"Adobe PDF\" from the list of printers/plotters.
- Follow the wizard to configure your PDF plotter, at which point you can select from various preset PDF options tailored to different needs, such as high quality for presentation or lower quality for quick sharing.
- After setting up your PDF plotter, return to your drawing and press \"CTRL+P\" to bring up the Print dialog.
- In the Printer/Plotter section, select the PDF plotter you just configured.
- Choose the preset from the \"Plotter Configuration\" dropdown that best suits your needs.
- Adjust any additional settings as required, then click \"OK\" to print your drawing to a PDF file.
By leveraging PDF presets, you can streamline your workflow and ensure your PDFs consistently meet your quality standards and requirements.
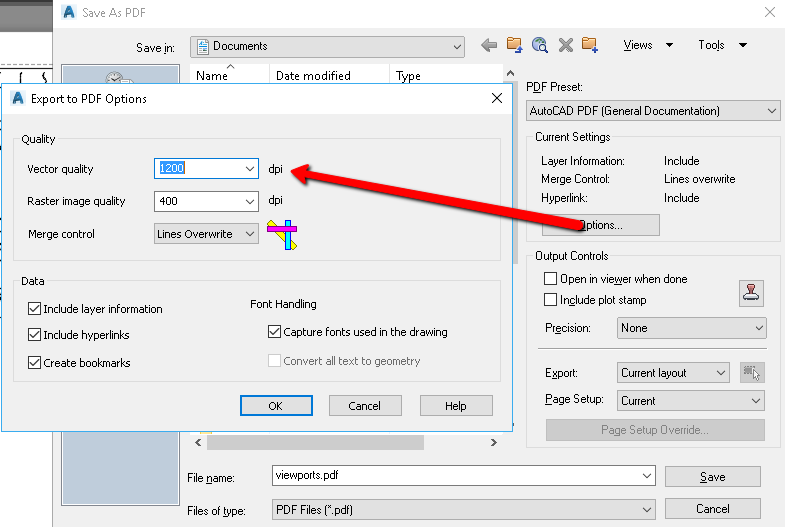
Handling PDF Export Options
Properly managing PDF export options in AutoCAD allows for tailored output files that meet your specific needs. Follow these steps to navigate and adjust the PDF export options effectively:
- Initiate the export process by either using the EXPORTPDF command or accessing the export feature through the Application Menu.
- In the \"Export to PDF\" dialog box, you\"ll find several options that can be adjusted to affect the final output of your PDF file.
- Under \"General Settings\", you can choose the paper size, specify the plot area, and decide whether to export the current layout, all layouts, or a selection.
- \"PDF Options\" allow you to include layer information, control the quality of the PDF, and decide if you want to include hyperlinks and bookmarks in your exported file.
- For detailed drawings, consider adjusting the \"Lines Overwrite\" option to \"Merge Lines\" to prevent overlapping lines from being too prominent.
- Use the \"DPI\" setting to balance between file size and clarity. A higher DPI is recommended for detailed plans or when you need to zoom in on specific areas without losing quality.
- Before completing the export, review your settings in the \"Preview\" area to ensure your PDF will appear as expected.
- Once satisfied with your adjustments, click \"OK\" to proceed with the export. Your drawing will be saved as a PDF file with the specified settings.
By understanding and utilizing the PDF export options, you can ensure that your exported PDFs accurately reflect the quality and detail of your AutoCAD drawings.
Using EXPORTPDF Command
The EXPORTPDF command in AutoCAD allows for direct conversion of drawings to PDF format with simple steps. Here’s how to utilize this command for efficient PDF creation:
- Ensure the drawing you want to export is open in AutoCAD.
- Type ‘EXPORTPDF’ into the command line and press Enter.
- A dialog box will appear, prompting you to select the path and filename for the PDF.
- Before clicking \"Save\", you have the option to adjust the settings by clicking on the \"Options\" button. Here, you can specify the paper size, resolution, what to include in the PDF (like layers, fonts), and more.
- After configuring the options, click \"Save\" to start the export process. AutoCAD will then convert the drawing to a PDF file using the specified settings.
This command is particularly useful for quickly converting drawings without needing to navigate through multiple menus or dialogs, streamlining the PDF creation process.
_HOOK_
READ MORE:
Optimizing PDFs for Quality and File Size
Creating the perfect balance between quality and file size in your PDF exports from AutoCAD is crucial for efficiency and usability. Here\"s how to optimize your PDFs effectively:
- When exporting, choose the \"Custom Properties\" option in the PDF export settings to access detailed configuration options.
- Adjust the DPI (dots per inch) setting based on your needs. A higher DPI is better for detailed drawings but increases file size. For general viewing, a lower DPI may suffice.
- Consider the use of vector graphics over raster where possible, as vector graphics tend to be smaller in size and scale better.
- Minimize the inclusion of unnecessary layers and information. Use layer filters to select only the essential layers for export.
- Compress raster images before embedding them in your drawings to reduce the overall PDF file size without significantly impacting quality.
- Utilize PDF editing software to further compress and optimize the PDF after export, if necessary.
- Experiment with different settings to find the ideal balance for your specific use case, potentially creating a few presets for different types of exports.
By following these steps, you can ensure your PDFs are of high quality while keeping file sizes manageable, making them easier to share and use.
Mastering how to save AutoCAD drawings as PDFs enhances your workflow, ensuring your designs are shared and archived with precision. Embrace these tips to elevate your documentation process to new levels of efficiency and clarity.