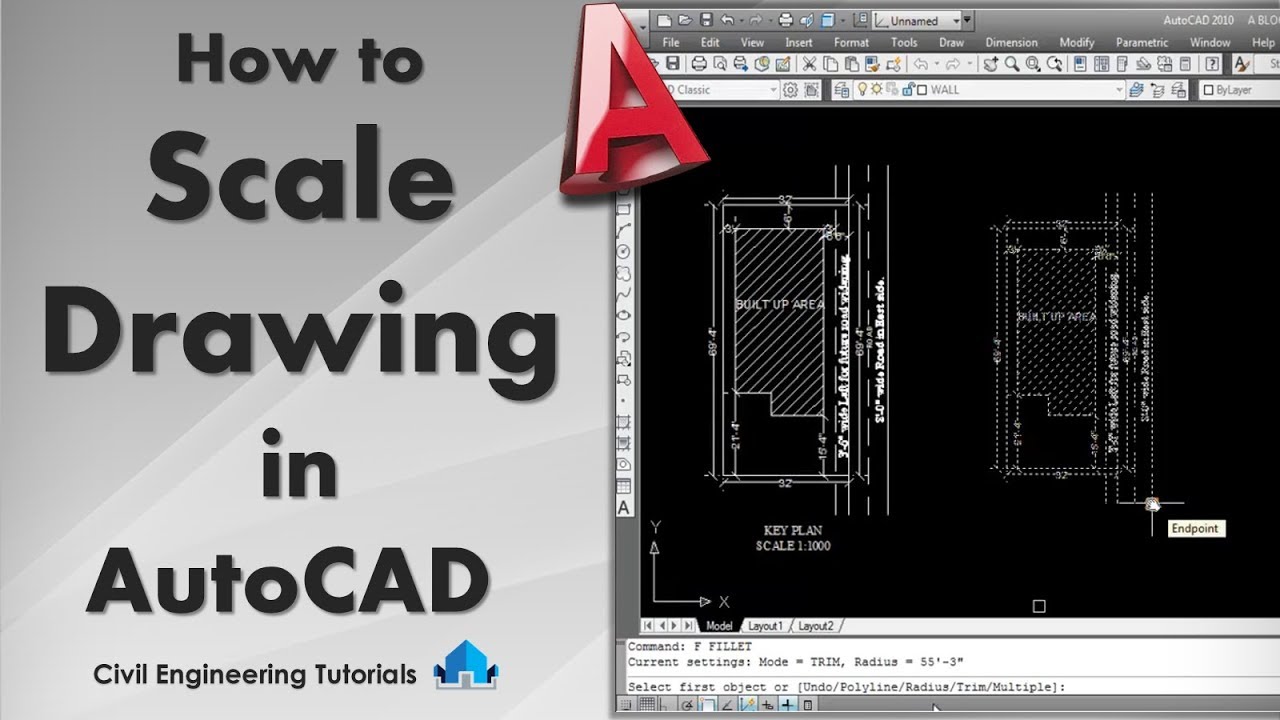
Topic autocad drawing scale: Discover the art of mastering AutoCAD drawing scale to enhance precision in your designs, streamline workflows, and bring your engineering visions to life efficiently.
Table of Content
- What is the default scale for AutoCAD 2D drawings?
- Understanding the Basics of AutoCAD Drawing Scale
- How to Scale Drawings in Model Space
- Setting Up Scale for Layout Viewports
- Converting Between Scales: Tips and Tricks
- Scaling Objects: Step-by-Step Instructions
- YOUTUBE: AutoCAD Scale to Specific Length
- Common Mistakes to Avoid When Scaling in AutoCAD
- Using Scale Factors Effectively
- Plotting Drawings to Scale: A How-To Guide
- Adjusting Dimension Styles for Scaled Drawings
- FAQs: Solutions to Common Scale-Related Questions
What is the default scale for AutoCAD 2D drawings?
The default scale for AutoCAD 2D drawings is typically set to 1:1 or full-size.
- Open AutoCAD and navigate to the drawing you want to work with.
- In the model space, draw your objects or import existing drawings.
To change the scale of a drawing view, follow these steps:
- Move the cursor over the drawing view you want to edit.
- The drawing view border will appear.
- Click on the drawing view.
- A scale control box will be displayed.
- Click the scale control box, and a dropdown menu with predefined scales will appear.
- Select the desired scale from the list or click \"Custom\" to specify a custom scale.
Once the scale is set, the drawing view will be adjusted accordingly to reflect the chosen scale.
READ MORE:
Understanding the Basics of AutoCAD Drawing Scale
AutoCAD\"s drawing scale is fundamental in ensuring that your design work translates accurately to real-world dimensions. It allows users to represent large objects or spaces in a manageable format on paper or digital medium. Grasping this concept is key to effective drafting and design.
At its core, scaling in AutoCAD involves selecting a proportion that relates the dimensions in the drawing to the actual dimensions of the object. For instance, a scale of 1:100 means 1 unit in the drawing equals 100 units in real life.
- Model Space vs. Paper Space: Understand the difference between these two environments. Model space is where you create your design at a 1:1 scale, while paper space is used for arranging views of your model on a sheet for printing.
- Scale Factors: Learning how to calculate and apply scale factors is crucial. They convert your model\"s size to the intended scale on paper.
- Viewport Scaling: When working in paper space, viewports are used to display different views of your model. Each viewport can be scaled differently to show various aspects of your design at the best scale.
Implementing the correct scale from the outset of your project simplifies the design process, ensuring accuracy and clarity in your work. Practice with different scales to understand how they affect your drawings and become comfortable adjusting them as needed for different types of projects.
How to Scale Drawings in Model Space
Scaling drawings in AutoCAD\"s model space is a crucial skill that enables designers to adjust their work to the desired size without altering the design\"s integrity. Here\"s how to effectively scale your drawings in model space:
- Determine the Scale Ratio: Decide on the scale ratio that you want to apply to your drawing. This ratio will dictate how the dimensions in your drawing will relate to real-world measurements.
- Select Your Objects: Use the SELECT command to choose the objects in your drawing that you want to scale.
- Choose the Scale Command: Type SCALE into the command line or select it from the modify toolbar.
- Specify the Base Point: Click on your drawing to choose a base point. This point will serve as the anchor for your scaling operation, meaning it will not move during the scaling process.
- Enter the Scale Factor: Input the scale factor determined in step 1. If you\"re scaling up, use a factor greater than 1. If you\"re scaling down, use a factor less than 1.
- Check Your Work: After applying the scale, review your drawing to ensure that everything has been scaled correctly. Use the MEASURE command to verify specific dimensions.
Remember, scaling in model space is directly related to the drawing\"s intended real-world size. Thus, accuracy in determining the scale ratio and applying it correctly is paramount for maintaining the precision of your design.
Setting Up Scale for Layout Viewports
Layout viewports are an essential feature in AutoCAD, allowing designers to display different aspects of their model at various scales on a single layout. Setting up scale for layout viewports correctly is crucial for producing accurate and professional drawings. Follow these steps to ensure your viewport scales are set precisely:
- Create or Select a Layout Viewport: Begin by either creating a new layout viewport in paper space or selecting an existing one.
- Activate the Viewport: Double-click inside the viewport to activate it. This step allows you to modify the viewport\"s scale and view independently from the rest of the layout.
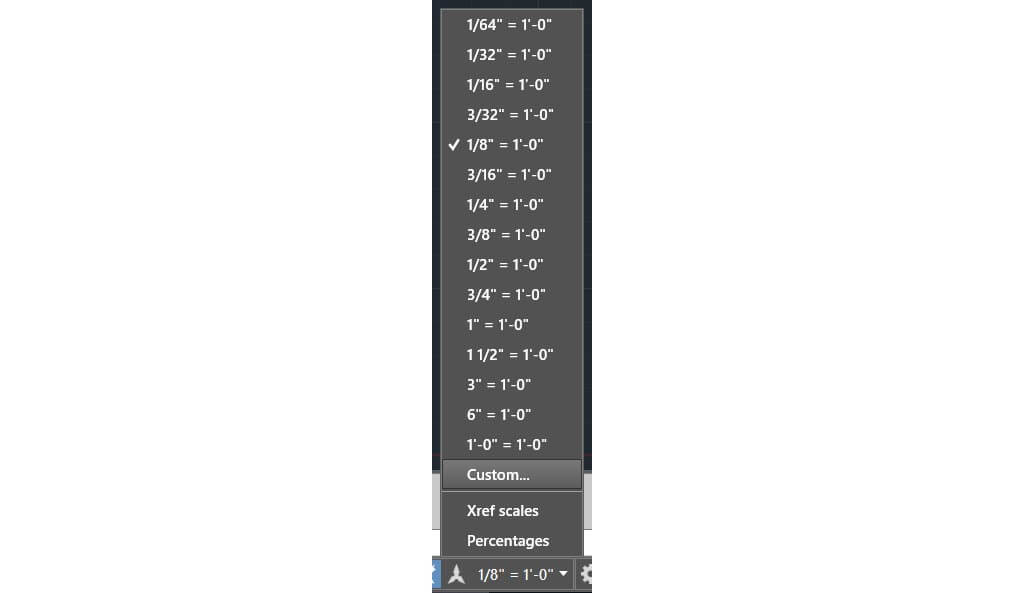
- Choose a Scale for Your Viewport: In the viewport\"s properties, look for the Standard Scale option. You can select a predefined scale from the list or enter a custom scale ratio depending on your project\"s requirements.
- Adjust the View: Zoom and pan within the viewport to focus on the specific area of your model you want to display at the chosen scale.
- Lock the Viewport: To prevent accidental changes to the scale or view, it\"s a good practice to lock the viewport once you have it set up correctly. This can be done through the viewport\"s properties panel.
By following these steps, you can ensure that each layout viewport in your drawing accurately represents different parts of your model at the correct scale, providing a clear and comprehensive overview of your design.
Converting Between Scales: Tips and Tricks
Transitioning between different scales in AutoCAD can be a nuanced process, essential for various stages of design and documentation. Here are some tips and tricks to make converting between scales smoother and more accurate:
- Understand Scale Factors: Grasp the concept of scale factors thoroughly. A scale factor is used to convert a drawing from one scale to another. Knowing how to calculate these can save time and reduce errors.
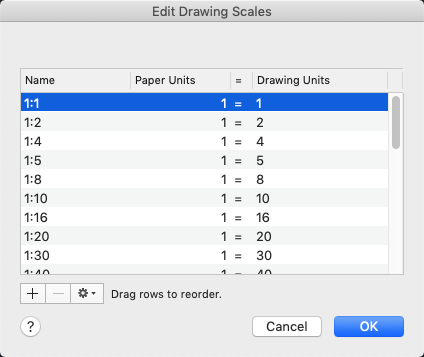
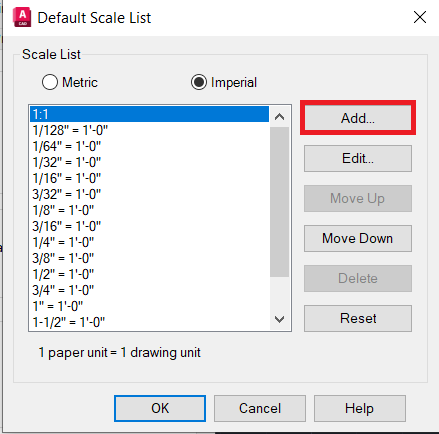
- Use the SCALELISTEDIT Command: This command allows you to add, remove, or modify scales in your drawing. It\"s particularly useful for ensuring that all your drawings maintain consistency in scale application.
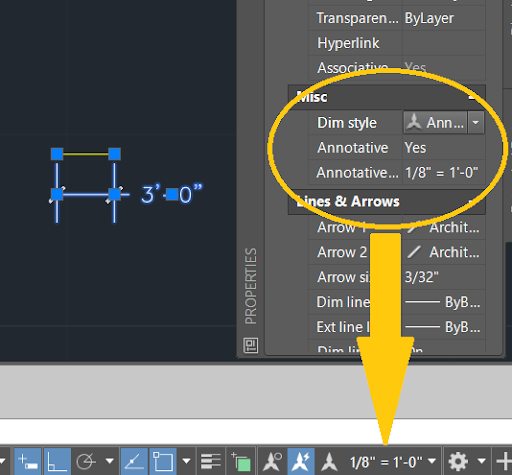
- Reference Scales for Objects: When working with annotations, use the Annotative Property to make texts and dimensions scale automatically to the right size based on the viewport scale.
- Scale with Reference: When you need to resize objects but aren\"t sure of the exact scale factor, use the ‘Scale with Reference’ option. Select a base point, then specify a reference length and the desired length to scale accurately.
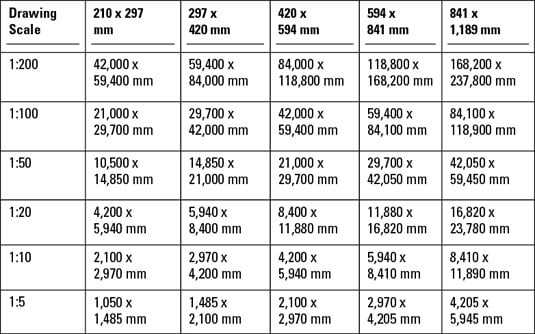
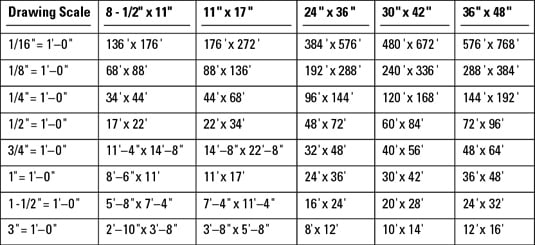
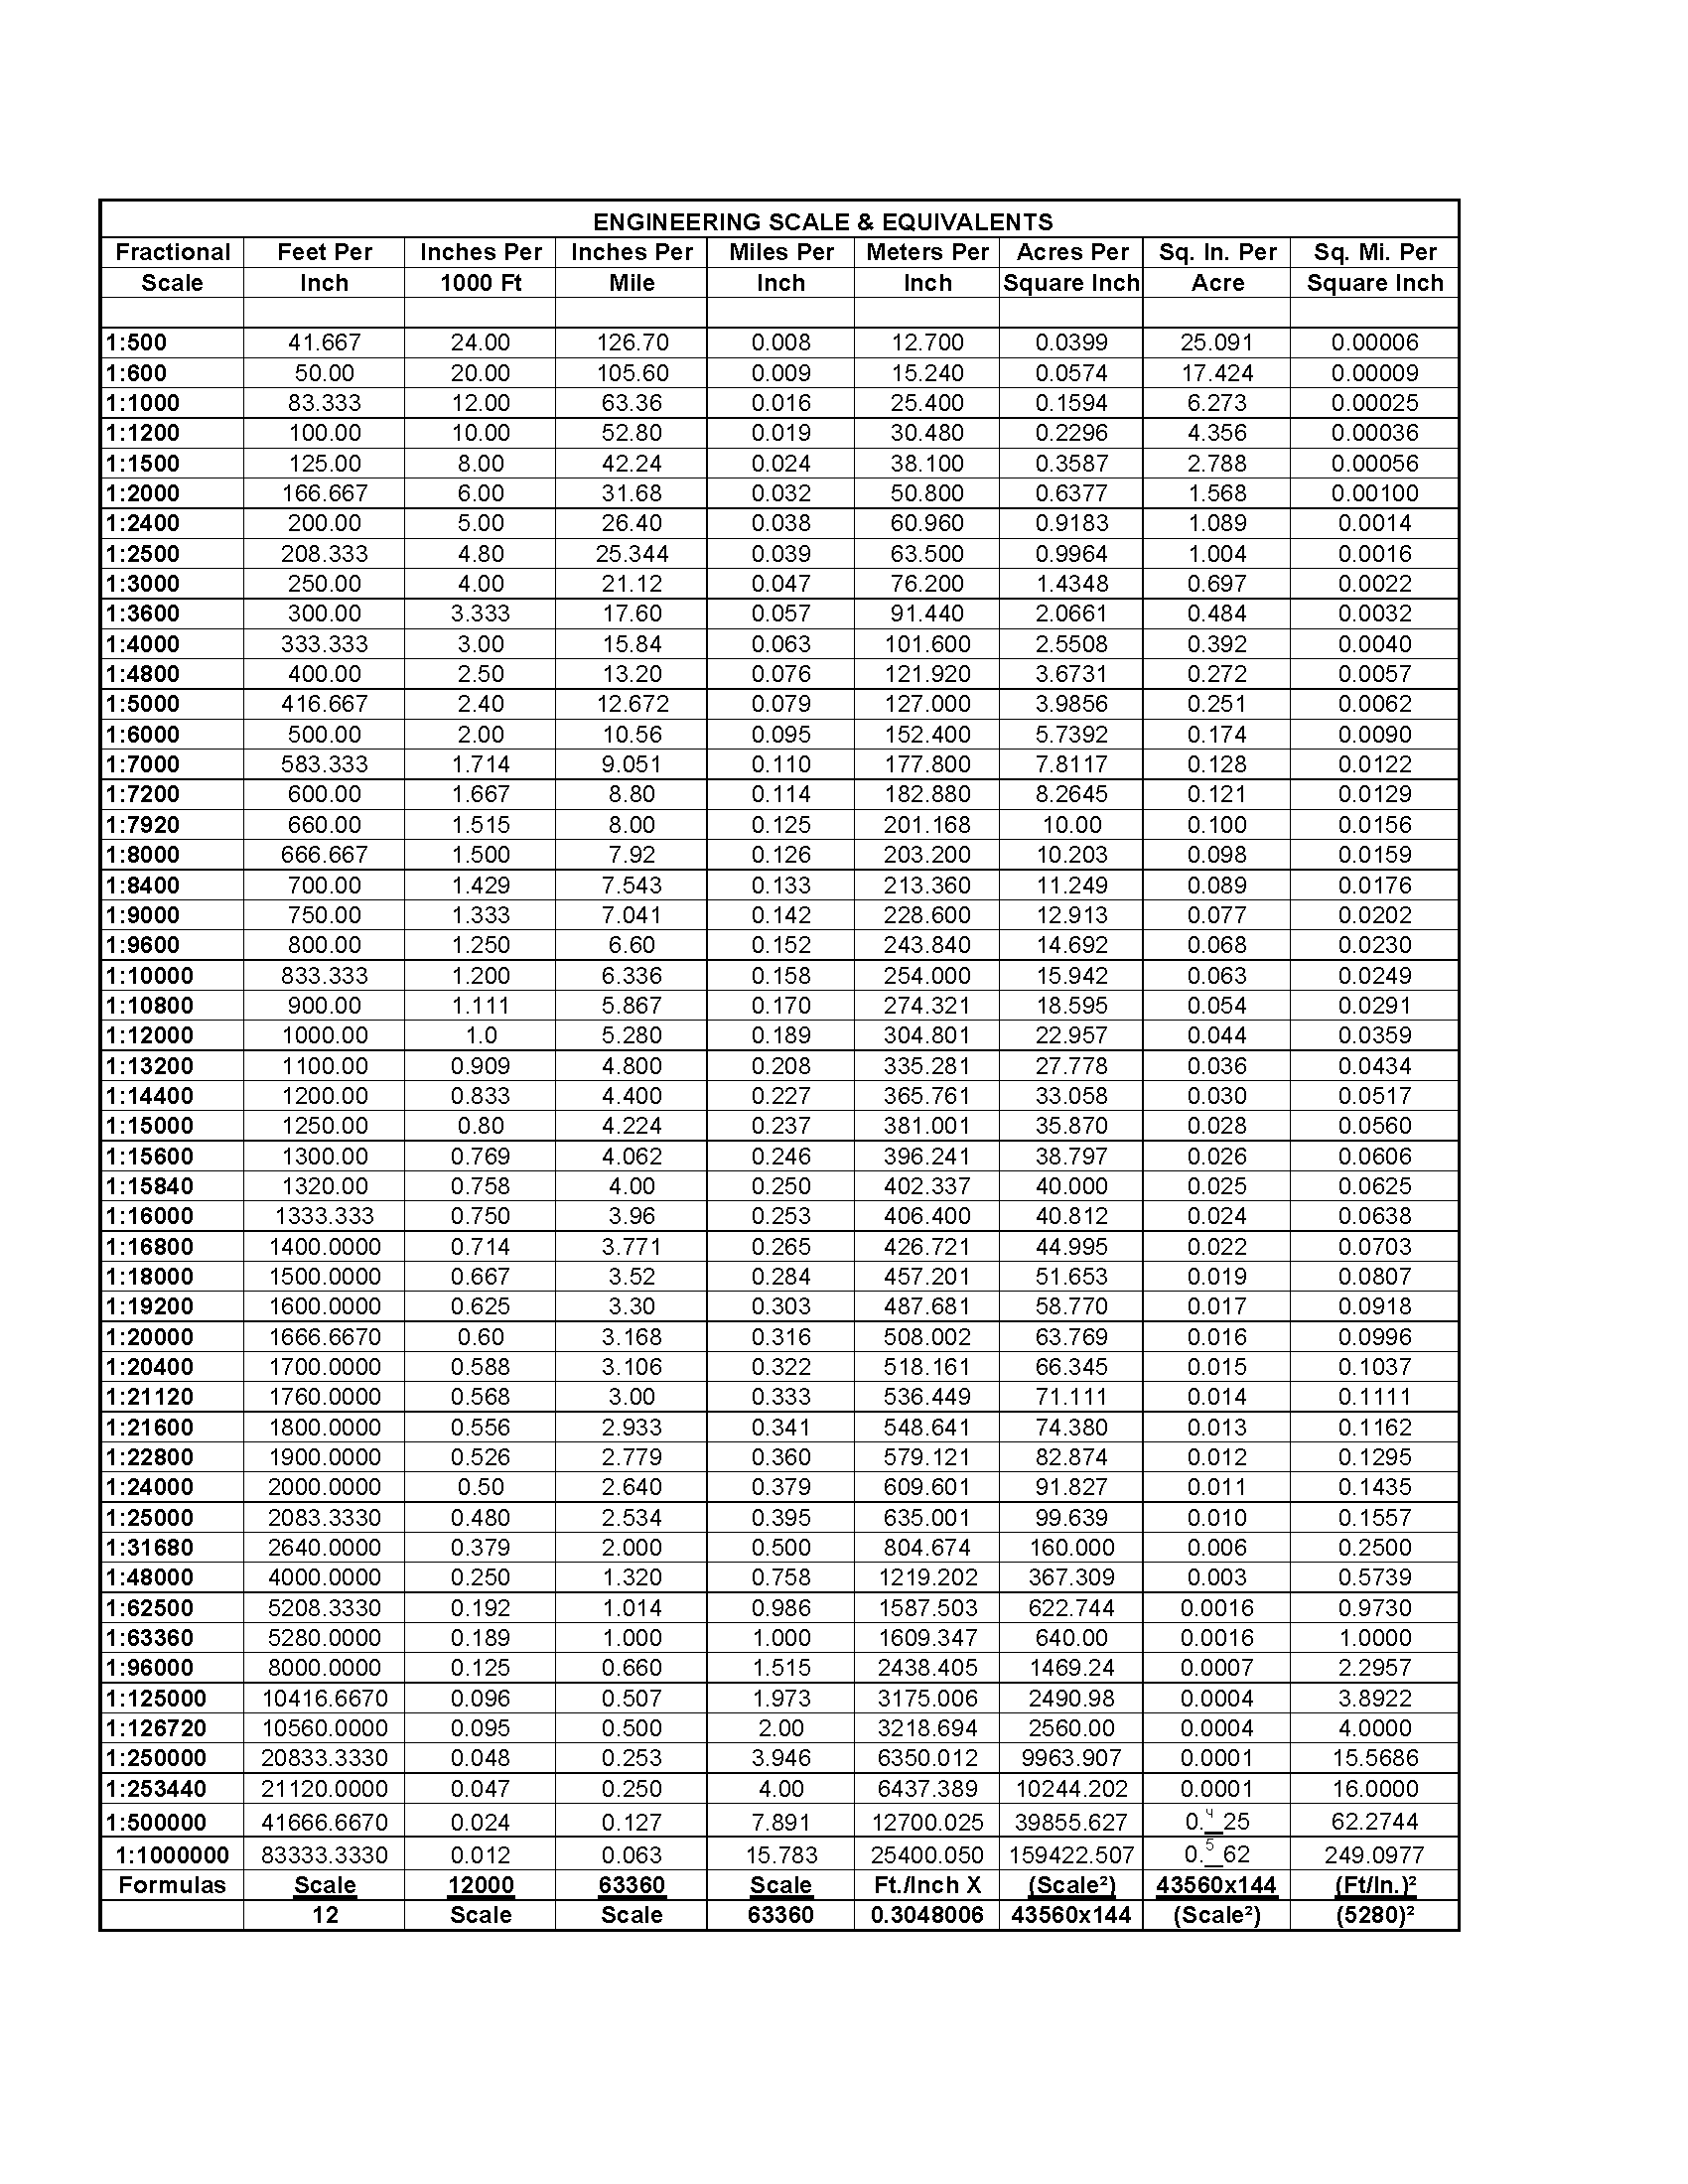
- Keep a Conversion Chart Handy: A conversion chart for common scales can be a quick reference to avoid mistakes. Consider creating a custom chart that includes the specific scales you use most frequently.
- Utilize Layouts for Different Scales: Create different layouts for the same drawing at different scales. This allows for easier management and switching between scales without altering the model space drawing.
Adopting these practices not only streamlines the process of converting between scales but also ensures your drawings remain precise and informative, regardless of the scale change.
_HOOK_
Scaling Objects: Step-by-Step Instructions
Scaling objects in AutoCAD is a fundamental skill that allows for precise adjustments to the size of your design elements. Follow these step-by-step instructions to scale objects efficiently:
- Select the SCALE Command: Begin by typing ‘SCALE’ into the command line or selecting it from the modify panel.
- Choose Your Objects: Click to select the objects you wish to scale. You can also use window or crossing selection methods to select multiple objects.
- Specify the Base Point: After selecting the objects, AutoCAD will prompt you to specify a base point. This point acts as the anchor for the scaling operation and will not move.
- Enter the Scale Factor: Input the scale factor you wish to apply. A factor greater than 1 will enlarge the objects, while a factor less than 1 will reduce their size. You can also scale by reference, choosing two points to define the scale proportionally.
- Apply the Scaling: Once the scale factor is entered, your selected objects will be scaled accordingly. Check the dimensions to ensure the scale has been applied as intended.
- Adjust as Necessary: If the scaling does not meet your requirements, you can undo the operation and repeat the steps with a different scale factor or base point.
By following these instructions, you can precisely scale objects within your AutoCAD drawings, ensuring that your designs maintain proportionality and accuracy.
AutoCAD Scale to Specific Length
Length: Get ready to be amazed by this mind-blowing video that explores the incredible lengths that mother Earth\'s creatures go to survive. From majestic blue whales to tiny hummingbirds, you won\'t believe your eyes!
Common Mistakes to Avoid When Scaling in AutoCAD
Scaling in AutoCAD can sometimes lead to errors if not done carefully. Being aware of common mistakes can help you avoid them and ensure your drawings are accurate and precise. Here are some pitfalls to watch out for:
- Ignoring Drawing Units: Before scaling, always check the drawing units you are working with. Mixing up units can lead to significant discrepancies in scale.
- Forgetting to Lock Viewports: Failing to lock your layout viewports can result in accidental scaling changes. Always lock viewports after setting the scale to maintain consistency.
- Using Incorrect Scale Factors: A common mistake is using the wrong scale factor. Double-check your calculations to ensure the scale factor accurately represents the intended real-world dimensions.
- Scaling Text and Dimensions Improperly: Remember to use annotative styles for text and dimensions so they automatically adjust to the viewport scale, maintaining readability across different scales.
- Overlooking the Reference Option: The ‘Scale with Reference’ option is a powerful tool for scaling objects in relation to a specific measurement. Neglecting this option can lead to less precise scaling.
- Not Using Scale List Cleanup: Over time, your scale list can become cluttered with unused scales. Regularly cleaning up your scale list can help keep your workspace organized and efficient.
By paying attention to these common mistakes and applying best practices, you can enhance your scaling processes in AutoCAD, leading to more accurate and professional results.
Using Proper Scale in AutoCAD Drawings - Part 1
Scale: Prepare to have your perspective of the world forever changed as you witness the awe-inspiring scale of the universe in this captivating video. Journey from the smallest atoms to the largest galaxies and discover the remarkable grandeur of it all.
Using Scale Factors Effectively
Scale factors in AutoCAD are crucial for accurately resizing drawings to match real-world dimensions. Utilizing scale factors effectively requires understanding their impact and applying them correctly. Here\"s how to make the most out of scale factors:
- Understand Scale Factor Basics: A scale factor is a ratio that represents the relationship between the drawing scale and the real-world scale. It\"s imperative to grasp this concept to apply scaling accurately.
- Calculate Scale Factors Correctly: The scale factor is calculated based on the desired output scale. For example, a 1:100 scale means that one unit in the drawing equals 100 units in reality, translating to a scale factor of 0.01 when scaling down.
- Apply Scale Factors to Model Space Objects: When working in model space, use the SCALE command with the calculated scale factor to resize selected objects appropriately.
- Adjust Annotations with Scale Factors: Use annotative objects for texts, dimensions, and other annotations to ensure they scale properly across different viewport scales in paper space.
- Use Viewports to Apply Scale Factors in Paper Space: Set different scales for viewports in paper space to represent various sections of your model at the correct scales without altering the model space drawing.
- Maintain Consistency Across Drawings: Consistently using scale factors across all your projects helps in maintaining accuracy and ensures that all parts of the drawing communicate effectively.
Effectively using scale factors not only enhances the accuracy of your drawings but also improves the communication of your design intentions, ensuring that your projects are understood and executed correctly.
Plotting Drawings to Scale: A How-To Guide
Plotting your AutoCAD drawings to scale is critical for ensuring that the printed output accurately reflects your design intentions. Follow this step-by-step guide to plot your drawings to scale, ensuring precision in your final prints.
- Prepare Your Drawing: Before plotting, make sure your drawing is complete and all elements are correctly scaled in model space or layout space.
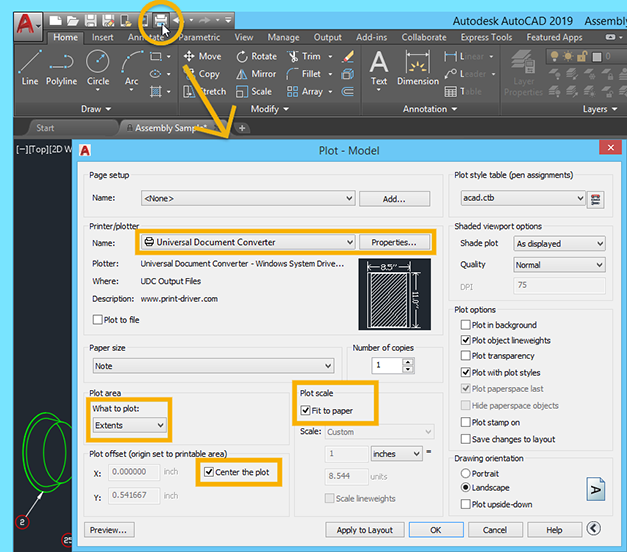
- Access the Plot Dialog: Go to the application menu, click on ‘Print’, then select ‘Plot’. This opens the Plot dialog box where you can set up your printing options.
- Select a Printer/Plotter: Choose the printer or plotter that you will use for printing. Make sure it supports the paper size you intend to use.
- Choose the Paper Size: Select the appropriate paper size from the list. If the desired size is not listed, you may need to configure a custom paper size in your printer settings.
- Set the Plot Area: Specify the area of your drawing that you want to plot. You can plot the entire layout, a window, or a specific layout view.
- Choose the Plot Scale: Ensure the scale is set correctly for your drawing. For layout tabs, use the scale setting from the Page Setup Manager. For model space, you may need to manually adjust the scale to fit the drawing on the selected paper size.
- Adjust Plot Settings: Select the plot style table, and make any necessary adjustments to the plot options, such as line weights, colors, and shading.
- Preview Before Plotting: Always preview your plot to check for any errors or adjustments needed before sending it to the printer.
- Plot Your Drawing: Once everything looks good in the preview, click ‘OK’ to plot your drawing. Make sure to save your plot settings for future use.
By carefully following these steps, you can ensure that your AutoCAD drawings are plotted to scale accurately, providing clear and detailed representations of your designs.
Adjusting Dimension Styles for Scaled Drawings
When working with scaled drawings in AutoCAD, it\"s crucial to adjust dimension styles to ensure that dimensions appear correctly and are easily readable. Follow these steps to customize dimension styles for your scaled drawings:
- Open the Dimension Style Manager: Type ‘DIMSTYLE’ in the command line or access it from the Annotate tab to open the Dimension Style Manager.
- Create or Modify a Dimension Style: You can either modify an existing style or create a new one by clicking the ‘New’ or ‘Modify’ button.
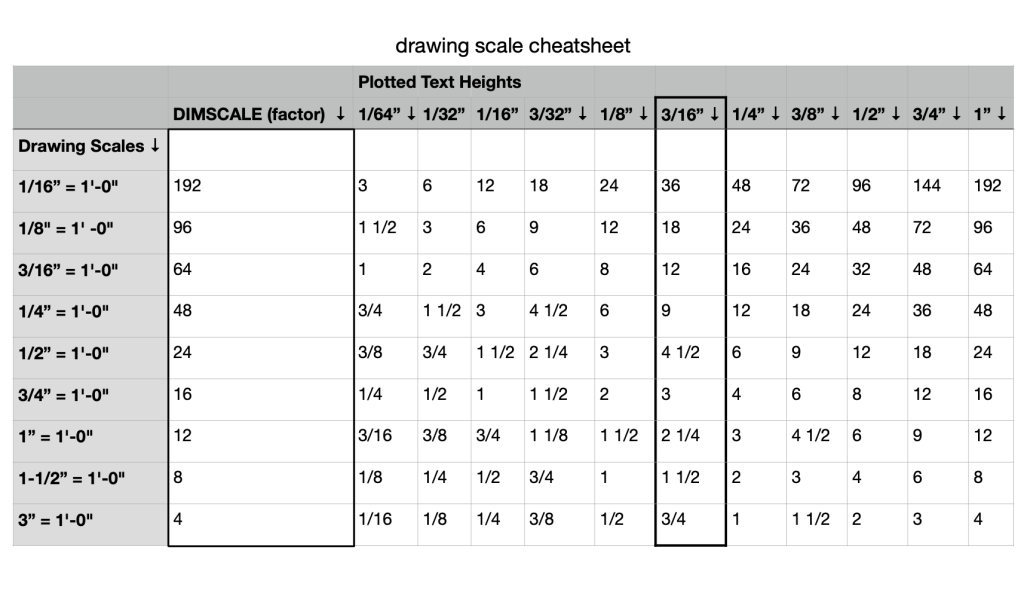
- Adjust Text Settings: In the Text tab, set the text height to be appropriate for the scale of your drawing. Consider the final printed size to ensure readability.
- Configure Lines and Arrows: Go to the Lines and Arrows tabs to adjust the size of arrowheads and the extension lines\" offsets to match the drawing scale.
- Set the Scale for Dimension Features: In the Fit tab, use the ‘Scale for dimension features’ option to scale the dimensions according to the viewport scale in layout viewports.
- Use Annotative Property: Ensure that the ‘Annotative’ property is selected for the dimension style. This makes dimensions scale automatically to match the viewport scale, maintaining consistency across different scaled views.
- Apply and Save Changes: After adjusting the settings, apply them to your dimension style and save. Assign the modified or new dimension style to your dimensions.
By customizing dimension styles for scaled drawings, you ensure that your dimensions are precise, clear, and appropriately scaled, enhancing the professionalism and readability of your AutoCAD projects.
_HOOK_
READ MORE:
FAQs: Solutions to Common Scale-Related Questions
- How do I choose the right scale for my drawing?
- Consider the purpose of your drawing and the level of detail required. Use standard scales for architectural or engineering drawings, such as 1:50, 1:100, etc., to ensure your work aligns with industry norms.
- Can I change the scale of a drawing after it\"s been created?
- Yes, you can change the scale of a drawing by using the SCALE command for individual objects or by adjusting the viewport scale in paper space for overall drawing scale adjustments.
- Why do my dimensions look too big or too small after scaling?
- This often happens when dimension styles are not adjusted to match the drawing scale. Use annotative dimensions or manually adjust dimension styles to correct this issue.
- What\"s the difference between scaling in model space and paper space?
- Scaling in model space affects the actual size of objects, while scaling in paper space adjusts how objects appear in viewports without changing their size in model space.
- How can I ensure that my printed drawing matches the intended scale?
- Always preview your plots using the ‘Plot Preview’ feature and check the ‘Scale to Fit’ box is unchecked. Ensure the plot scale matches the viewport scale or the intended scale for model space plots.
Addressing these common questions can help you manage scale issues more effectively in AutoCAD, leading to more accurate and professional drawings.
Mastering AutoCAD drawing scale is essential for precision and efficiency in your projects. Embrace these insights to elevate your designs, ensuring accuracy and professionalism in every detail of your work.