Topic autocad drawing examples: Explore the world of AutoCAD drawing examples to enhance your design skills and bring your architectural visions to life with precision and creativity.
Table of Content
- What are some websites that provide AutoCAD drawing examples?
- Introduction to AutoCAD Drawing Types and Formats
- Essential 2D AutoCAD Drawing Examples for Practice
- Advanced 3D Modeling Techniques with AutoCAD
- Architectural Design Samples in AutoCAD
- Engineering and Mechanical Drawing Examples
- YOUTUBE: Wrench in Auto CAD Practice Drawing
- AutoCAD Blocks and Symbol Libraries
- Civil and Structural Engineering Drawings in AutoCAD
- Electrical and Plumbing Drawing Samples for AutoCAD
- Creating and Managing AutoCAD Drawing Templates
- Best Practices for Layer Management and Annotation
- Utilizing AutoCAD for Interior Design and Space Planning
- Tips for Efficient AutoCAD Drawing and Editing Techniques
What are some websites that provide AutoCAD drawing examples?
There are several websites that provide AutoCAD drawing examples. Here are a few:
- SourceCAD: This website offers free and paid AutoCAD courses and also provides example drawings for practice. You can find a variety of 2D and 3D practice drawings on their website.
- GrabCAD: GrabCAD is a community-driven platform where engineers and designers share their CAD files. You can find a wide range of AutoCAD drawing examples uploaded by the community members.
- AutoCAD Sample Files on Autodesk Knowledge Network: Autodesk, the company behind AutoCAD, provides sample files on their official website. These files demonstrate various features and functionalities of AutoCAD.
- AutoCAD Block Library: There are several websites that offer blocks and symbols for AutoCAD. These blocks can be used as examples to understand how to create and use blocks in your drawings.
These websites are a great resource to find AutoCAD drawing examples for practicing and learning purposes.
READ MORE:
Introduction to AutoCAD Drawing Types and Formats
AutoCAD, a cornerstone in the design and drafting industry, offers a wide array of drawing types and formats to accommodate the diverse needs of professionals. Understanding these types and formats is crucial for effective design communication and documentation. In this section, we explore the fundamental categories of AutoCAD drawings and the formats used to create, share, and manage these drawings efficiently.
- 2D Drawings: The foundation of AutoCAD drafting, focusing on plans, elevations, and details. Essential for architects, engineers, and designers.
- 3D Models: Offers a spatial understanding of designs, used for visualization, simulation, and rendering architectural, mechanical, and civil engineering projects.
Formats play a significant role in how drawings are saved, shared, and published:
- DWG: AutoCAD\"s native file format, offering high precision and compatibility with numerous CAD applications.
- DXF: Enables drawing interoperability between AutoCAD and other CAD programs.
- DWF/DWFx: Designed for sharing and publishing digital design data without the need for original CAD software.
By mastering these drawing types and understanding their appropriate formats, professionals can leverage AutoCAD\"s full potential to create comprehensive and precise design documents that stand out in the industry.
Essential 2D AutoCAD Drawing Examples for Practice
Mastering 2D drawing in AutoCAD is a fundamental skill that is essential for anyone looking to advance in architectural, engineering, or design professions. To help you get started, we\"ve compiled a list of essential 2D AutoCAD drawing examples that cover a wide range of basic to intermediate skills. These examples are designed to enhance your understanding of AutoCAD\"s 2D drawing capabilities and improve your drafting efficiency.
- Basic Shapes and Lines: Start with drawing basic shapes (circles, rectangles, polygons) and lines of different types (straight, polyline, dashed). This will help you get accustomed to using AutoCAD\"s drawing tools.
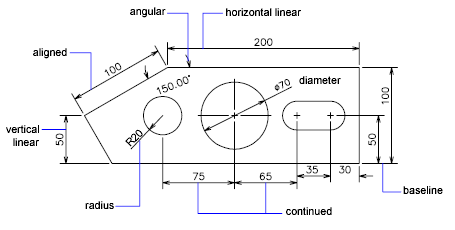
- Dimensioning and Text: Learn how to add dimensions and text to your drawings. This practice is crucial for creating clear and readable plans that convey all necessary information.
- Layer Management: Understand how to organize your drawings using layers. This includes creating new layers, setting layer properties, and learning how to manage layer visibility.
- Architectural Floor Plan: Develop a simple architectural floor plan. This should include walls, doors, windows, and furniture. It\"s a great exercise for understanding how to layout spaces efficiently.
- Mechanical Parts: Try drawing basic mechanical parts such as gears, bolts, and brackets. This introduces you to precision drawing and the use of AutoCAD\"s snap and grid features for accuracy.
- Electrical Schematics: Draft a basic electrical schematic. Include symbols for outlets, switches, and lights to familiarize yourself with electrical drawing standards.
- Site Plans: Create a simple site plan that includes basic landscaping, pathways, and site boundaries. This helps in understanding scale and the representation of outdoor spaces.
- Section Views: Practice drawing section views of simple objects or structures. This is essential for understanding how to represent the interior details of an object or building.
As you work through these examples, remember to utilize AutoCAD\"s extensive help resources and tutorials available online to deepen your understanding of specific tools and features. Practice is key to becoming proficient in 2D drawing with AutoCAD, and these examples provide a solid foundation for developing your drafting skills.
Advanced 3D Modeling Techniques with AutoCAD
Mastering 2D drawing in AutoCAD is a fundamental skill that is essential for anyone looking to advance in architectural, engineering, or design professions. To help you get started, we\"ve compiled a list of essential 2D AutoCAD drawing examples that cover a wide range of basic to intermediate skills. These examples are designed to enhance your understanding of AutoCAD\"s 2D drawing capabilities and improve your drafting efficiency.
- Basic Shapes and Lines: Start with drawing basic shapes (circles, rectangles, polygons) and lines of different types (straight, polyline, dashed). This will help you get accustomed to using AutoCAD\"s drawing tools.
- Dimensioning and Text: Learn how to add dimensions and text to your drawings. This practice is crucial for creating clear and readable plans that convey all necessary information.
- Layer Management: Understand how to organize your drawings using layers. This includes creating new layers, setting layer properties, and learning how to manage layer visibility.
- Architectural Floor Plan: Develop a simple architectural floor plan. This should include walls, doors, windows, and furniture. It\"s a great exercise for understanding how to layout spaces efficiently.
- Mechanical Parts: Try drawing basic mechanical parts such as gears, bolts, and brackets. This introduces you to precision drawing and the use of AutoCAD\"s snap and grid features for accuracy.
- Electrical Schematics: Draft a basic electrical schematic. Include symbols for outlets, switches, and lights to familiarize yourself with electrical drawing standards.
- Site Plans: Create a simple site plan that includes basic landscaping, pathways, and site boundaries. This helps in understanding scale and the representation of outdoor spaces.
- Section Views: Practice drawing section views of simple objects or structures. This is essential for understanding how to represent the interior details of an object or building.
As you work through these examples, remember to utilize AutoCAD\"s extensive help resources and tutorials available online to deepen your understanding of specific tools and features. Practice is key to becoming proficient in 2D drawing with AutoCAD, and these examples provide a solid foundation for developing your drafting skills.

Architectural Design Samples in AutoCAD
Exploring architectural design through AutoCAD offers a comprehensive understanding of how this powerful software can be utilized to create detailed, accurate, and aesthetically pleasing architectural drawings. Below, we delve into several key examples and practices that highlight the versatility and efficiency of AutoCAD in architectural design.
- Residential Building Layouts: Begin with the basics of residential design, showcasing floor plans, elevation views, and section drawings. These examples should detail the arrangement of rooms, door and window placements, and the relationship between different spaces.
- Commercial Building Designs: Expand into commercial projects such as office buildings, retail outlets, and educational facilities. Highlight how AutoCAD aids in designing complex structures, focusing on spatial allocation, public and private zones, and integration with urban landscapes.
- Landscape Architecture and Site Planning: Illustrate the use of AutoCAD in outdoor spaces, including parks, garden designs, and urban planning. Emphasize on topography, plant selection, walkways, and the integration of natural and built environments.
- Architectural Detailing: Dive into the intricacies of architectural detailing with AutoCAD. Present examples of detailed door and window designs, staircases, and furniture layouts. Highlight how these details contribute to the overall aesthetic and functionality of the design.
- 3D Modeling and Visualization: Demonstrate AutoCAD\"s capabilities in creating 3D models of architectural designs. Show how these models provide a realistic visualization of the project, allowing for better client presentations and improved design decisions.
- Sustainable Design Features: Discuss the role of AutoCAD in designing buildings with sustainability in mind. Include examples that feature energy-efficient layouts, materials selection, and the incorporation of renewable energy sources.
- Renovation and Restoration Projects: Present case studies on how AutoCAD is used for the renovation and restoration of historic buildings. Focus on the challenges of preserving architectural integrity while updating for modern use.
In conclusion, AutoCAD\"s robust features and tools offer architects a dynamic platform for creating and experimenting with architectural designs. From initial sketches to detailed construction documents and 3D visualizations, AutoCAD facilitates every step of the architectural design process, ensuring precision, efficiency, and creativity.
_HOOK_
Engineering and Mechanical Drawing Examples
AutoCAD is an indispensable tool in the field of engineering and mechanical design, facilitating the creation of detailed and precise drawings that are essential for the manufacturing process. This section highlights several key examples of engineering and mechanical drawings produced using AutoCAD, demonstrating the software\"s versatility and power in technical drafting.
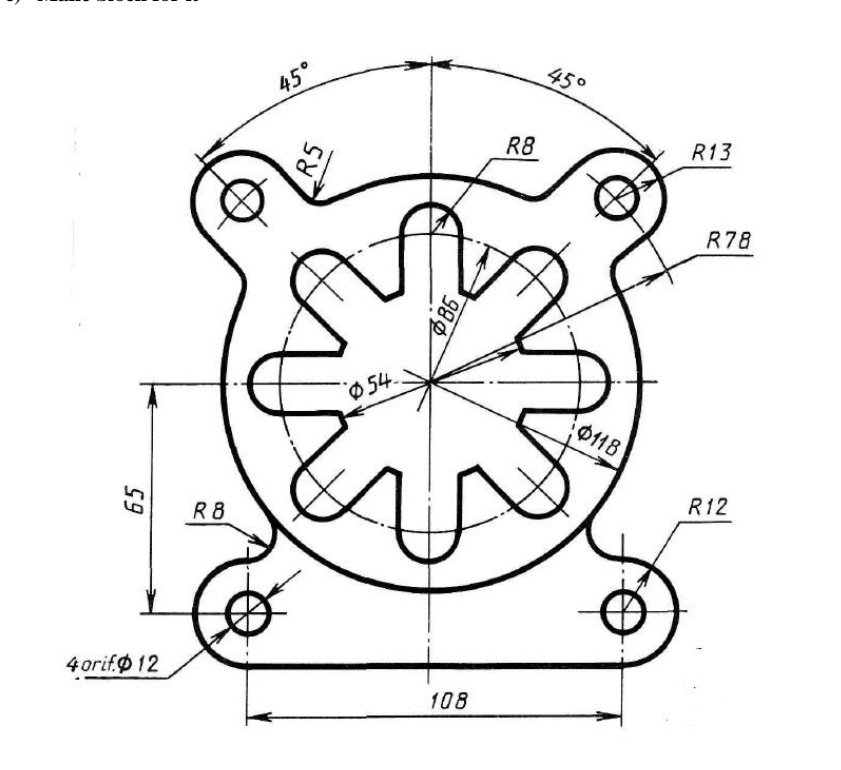
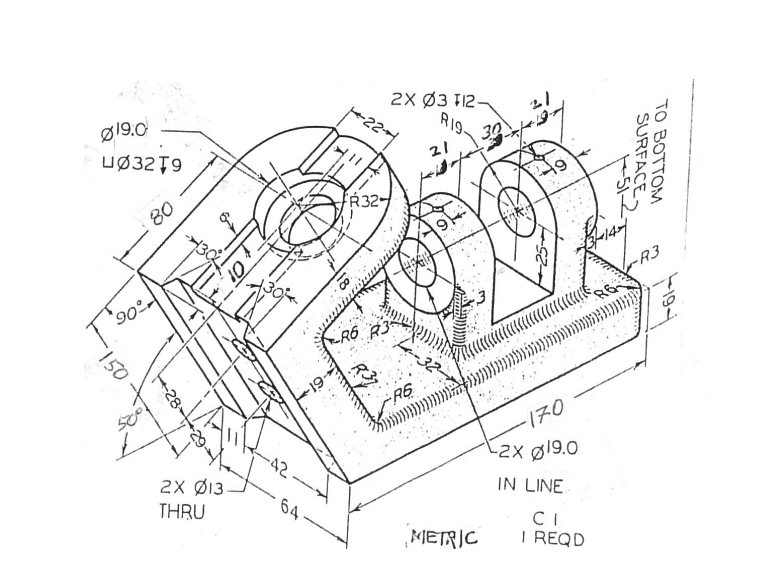
- Machine Parts and Assemblies: Showcasing detailed drawings of individual machine parts and their assembly. This includes dimensions, tolerances, and specifications necessary for manufacturing, along with exploded views to illustrate how parts fit together.
- Automotive Components: Featuring design blueprints of automotive parts such as engine components, gearbox mechanisms, and suspension systems. These drawings highlight the intricate details required in automotive engineering, including material specifications and surface finishing processes.
- Structural Steelwork: Illustrating the use of AutoCAD in designing structural frameworks for buildings, bridges, and other infrastructure. This encompasses beam layouts, connection details, and load-bearing calculations to ensure safety and compliance with engineering standards.
- Electrical Schematics: Detailing electrical diagrams and circuit layouts for both residential and commercial projects. AutoCAD aids in the precise placement of electrical components, routing of wiring, and adherence to electrical codes and standards.
- Plumbing and HVAC Systems: Providing examples of detailed layouts for plumbing and HVAC (Heating, Ventilation, and Air Conditioning) systems. These drawings include piping arrangements, fixture locations, and ductwork schematics, critical for building design and construction.
- Technical Documentation and Bill of Materials: Demonstrating how AutoCAD is used to create comprehensive technical documentation and bills of materials (BOMs). This includes all necessary information for manufacturing and assembly, such as part numbers, descriptions, quantities, and materials.
- Custom Fabrications: Showcasing custom fabrication designs tailored to specific projects. This highlights AutoCAD\"s flexibility in creating unique solutions for complex engineering challenges, including bespoke machinery, equipment modifications, and prototype development.
These examples underscore the critical role of AutoCAD in engineering and mechanical design, offering unparalleled precision and efficiency. From concept to completion, AutoCAD streamlines the design process, ensuring that engineers and designers can bring their innovative ideas to life with accuracy and detail.

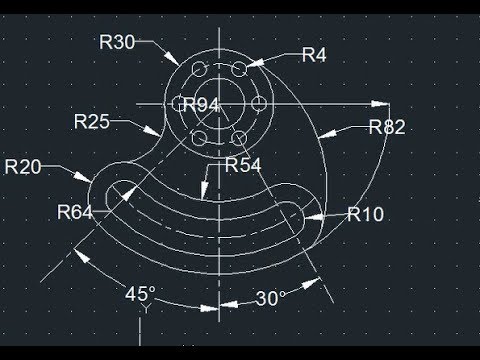
Wrench in Auto CAD Practice Drawing
\"Discover the incredible versatility and power of the wrench in our captivating video. Watch as we showcase the multitude of tasks this amazing tool can tackle effortlessly, making it an essential addition to any toolbox.\"
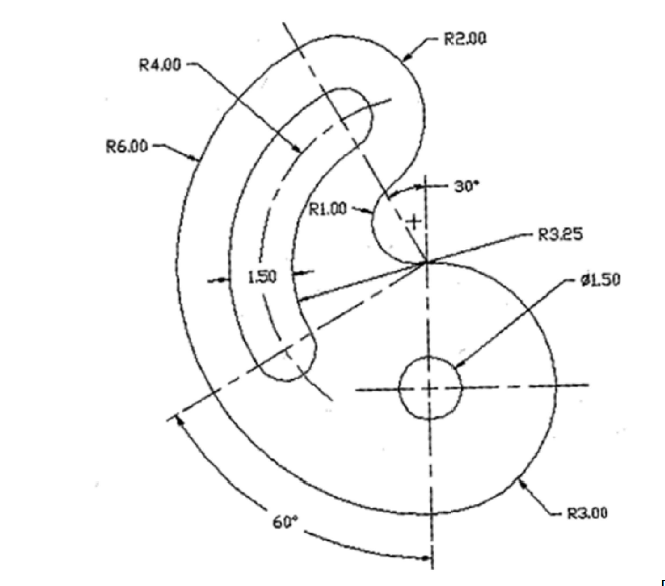
AutocAD 2D Practice Drawing Crane Hook Basic & Advance Tutorial
\"Prepare to be amazed by the sheer strength and precision of the crane hook in action. Our captivating video highlights the impressive capabilities of this vital component, offering a fascinating glimpse into the world of heavy lifting and construction.\"
AutoCAD Blocks and Symbol Libraries
One of the most powerful features of AutoCAD is its ability to use blocks and symbols to streamline the drafting process. Blocks and symbol libraries allow users to create, store, and reuse complex objects and annotations across multiple projects, significantly enhancing productivity and consistency. This section explores the various aspects and benefits of utilizing AutoCAD blocks and symbol libraries.
- Standard Blocks and Symbols: Discusses the vast array of pre-designed blocks and symbols available within AutoCAD. These include common elements such as furniture, fixtures, vehicles, trees, and people, which can be easily inserted into drawings to save time and ensure standardization.
- Creating Custom Blocks: Guides on how to create custom blocks tailored to specific project needs. This involves drawing the desired object, defining its base point, and converting it into a block that can be inserted repeatedly in various drawings.
- Dynamic Blocks: Introduces dynamic blocks and their capabilities, such as the ability to modify the shape, size, or configuration of a block within a drawing without the need to create multiple block variants. This flexibility is ideal for components that come in various sizes or forms.
- Symbol Libraries: Covers the organization and management of symbol libraries, which are collections of blocks grouped by category or project type. This section emphasizes the importance of maintaining a well-organized library to streamline the drafting process and improve efficiency.
- Attributed Blocks: Explains attributed blocks, which contain additional information such as part numbers, specifications, or descriptions. These attributes can be extracted to create schedules, bills of materials, or lists directly from the drawing, enhancing documentation and project management.
- Sharing Blocks and Libraries: Discusses best practices for sharing blocks and symbol libraries within a team or across projects. This includes tips on using cloud storage or network drives for easy access and collaboration, ensuring consistency across multiple users and projects.
- Importing and Exporting Blocks: Provides guidance on importing blocks from external sources and exporting custom blocks for use in other projects or to share with the AutoCAD community. This helps in expanding the available resources and incorporating industry-specific elements into designs.
By effectively utilizing AutoCAD blocks and symbol libraries, designers and drafters can significantly reduce drawing time, ensure accuracy and consistency, and enhance collaboration among team members. Whether for architectural, engineering, or design projects, mastering the use of blocks and symbols is essential for maximizing the potential of AutoCAD.
Civil and Structural Engineering Drawings in AutoCAD
AutoCAD is a cornerstone tool in civil and structural engineering, offering the precision and flexibility needed to design infrastructure that is both robust and sustainable. This section highlights the types of civil and structural engineering drawings that can be created using AutoCAD, demonstrating its critical role in planning, designing, and executing engineering projects.
- Site Plans: Detailed drawings that provide an overview of the entire project site, including boundaries, access points, existing structures, and proposed modifications. Site plans are essential for understanding the scope and constraints of a project before detailed design work begins.
- Topographical Maps: Utilize AutoCAD\"s advanced tools to create topographical maps that represent the terrain of a project area. These maps are crucial for planning drainage, landscaping, and the positioning of structures, ensuring that they integrate seamlessly with the natural environment.
- Foundation Plans: Foundation plans are critical for ensuring the stability and durability of a structure. These drawings detail the size, depth, and construction of the foundation, including footings, slabs, and piers, tailored to the soil conditions and load requirements of the project.
- Structural Layouts: Detailed layouts showing the arrangement of structural elements such as beams, columns, trusses, and girders. These drawings specify material specifications, dimensions, and connections, ensuring the structural integrity of buildings and other constructions.
- Reinforcement Details: Precise detailing of reinforcement in concrete structures, including the placement of rebar, mesh, and post-tension cables. These details are essential for ensuring the strength, durability, and safety of the structure.
- Drainage and Sewer Systems: Design and layout of drainage and sewer systems, including pipes, manholes, catch basins, and outfalls. These plans are essential for managing water flow around and within structures, preventing flooding and environmental contamination.
- Utility Layouts: Drawings that show the routing of utilities such as water, gas, electricity, and telecommunications. These layouts must consider accessibility for maintenance, potential interference with other structures, and compliance with codes and regulations.
- Construction Details: Detailed drawings that provide specific construction techniques and materials for various components of the project. These include specifications for joints, connections, finishes, and other critical aspects that influence the construction process and final quality of the project.
AutoCAD enables civil and structural engineers to create detailed, accurate, and comprehensive drawings that are essential for the successful completion of engineering projects. Its wide array of tools and features supports the complex needs of these disciplines, from initial concept through to construction documentation and beyond.

Electrical and Plumbing Drawing Samples for AutoCAD
AutoCAD is an essential tool for professionals in the electrical and plumbing sectors, facilitating the creation of clear, detailed, and standardized drawings. This section outlines the types of electrical and plumbing drawing samples that can be efficiently designed with AutoCAD, showcasing the software\"s capability to handle the complexities of these systems.
- Electrical Layouts: Detailed floor plans indicating the placement of electrical outlets, switches, light fixtures, and major appliances. These layouts are critical for ensuring that electrical systems are accessible, logical, and meet safety standards.
- Circuit Diagrams: Schematic drawings that represent the electrical connections and circuitry of a building. Circuit diagrams are essential for understanding the functionality of the electrical system and for troubleshooting.
- Panel Schedules: Organized tables that detail the distribution of circuits in an electrical panel. Panel schedules are vital for the installation, maintenance, and inspection of electrical systems.
- Plumbing Schematics: Diagrams that show the routing of pipes, the location of fixtures, and the connection to water and sewage systems. Plumbing schematics are crucial for ensuring efficient water flow and waste removal within a building.
- Drainage Systems: Detailed designs of drainage systems, including the layout of pipes, traps, vents, and cleanouts. These drawings ensure that wastewater is effectively removed from the premises, preventing blockages and sewage backups.
- HVAC Systems: Although primarily mechanical, HVAC system designs often overlap with plumbing and electrical work, detailing the distribution of heating, ventilation, and air conditioning systems. AutoCAD drawings for HVAC systems include ductwork layouts, placement of vents, and electrical connections to HVAC equipment.
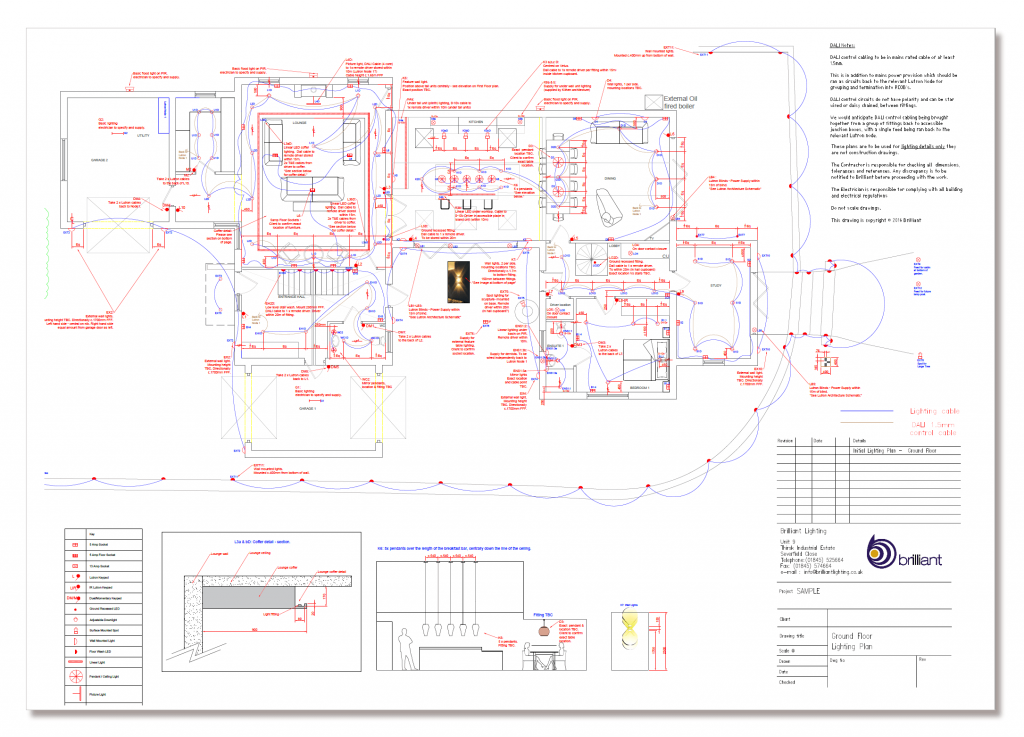
- Lighting Plans: Designs that specify the location, type, and control of lighting fixtures. Lighting plans are essential for creating functional and energy-efficient lighting schemes in both residential and commercial buildings.
- Water Supply and Sewerage Layouts: Comprehensive plans showing the supply of fresh water to fixtures and appliances, as well as the removal of waste water. These layouts are essential for ensuring public health and sanitation standards are met.
Through AutoCAD, professionals can create precise and informative electrical and plumbing drawings that adhere to industry standards, facilitating effective communication among architects, builders, and contractors. This ensures that electrical and plumbing systems are designed and installed with accuracy, efficiency, and safety in mind.
Creating and Managing AutoCAD Drawing Templates
AutoCAD drawing templates are foundational elements that streamline the creation of new drawings by pre-defining settings, styles, and objects, thus ensuring consistency and efficiency across projects. This section provides a comprehensive guide on how to create and manage AutoCAD drawing templates, facilitating a standardized approach to drafting and design.
- Understanding Template Basics: A drawing template, or DWT file, stores all your settings including units, layers, line types, dimensions, and text styles. Starting with a template saves time and promotes uniformity in your work.
- Creating Your First Template: Begin by opening a new file in AutoCAD and setting up everything you want to include in your template, such as drawing units, layer names and properties, text styles, dimension styles, and plot settings. Once configured, save this file as a DWT to use as your base template for future projects.
- Customizing Layer Standards: Layers organize your drawing and control the visibility of its components. Define a comprehensive set of layers in your template, each with appropriate colors, line types, and line weights, to reflect different elements of your designs, such as electrical, plumbing, and structural layers.
- Setting Up Layouts and Title Blocks: Layouts represent the paper size and plot settings. Customize one or more layouts in your template with preset viewports and scaled title blocks. Ensure your title blocks contain placeholders for information like the project name, date, and drawn by details.
- Incorporating Standard Blocks and Symbols: Include commonly used blocks and symbols in your template to further expedite the drawing process. This could range from furniture and fixtures to electrical symbols and company logos.
- Defining Dimension and Text Styles: Consistent dimension and text styles ensure that your drawings are easy to read and understand. Define these styles in your template, including font types, sizes, and dimension line and arrowhead styles.
- Implementing Best Practices for Template Management: Maintain a library of templates for different project types or standards. Regularly update these templates to reflect changes in design standards or to incorporate new efficiencies discovered through project work.
- Sharing Templates with Your Team: Ensure that everyone on your team has access to the latest templates by storing them in a shared, easily accessible location. This promotes consistency across all projects and team members.
By effectively creating and managing AutoCAD drawing templates, you can significantly enhance the efficiency and consistency of your design process. Templates not only save time but also ensure that all projects adhere to the same high standards and conventions, laying the groundwork for successful project execution.
_HOOK_
Best Practices for Layer Management and Annotation
Effective layer management and annotation are crucial for maintaining clarity, organization, and efficiency in AutoCAD drawings. This section outlines best practices for utilizing layers and annotations, ensuring that your drawings are easy to navigate, edit, and understand.
- Establish a Layer Naming Convention: Implement a clear and consistent naming convention for layers based on their content, such as walls, electrical, plumbing, etc. This makes it easier to identify and manage layers within your drawings.
- Use Color Coding Wisely: Assign different colors to layers to visually distinguish between various types of information. However, keep color schemes simple and consistent across projects to avoid confusion.
- Maintain Layer Standards: Adhere to industry or company-specific layer standards, such as the AIA (American Institute of Architects) layer guidelines, to ensure compatibility and ease of collaboration with other professionals.
- Utilize Layer Filters: Use layer filters to manage complex drawings with many layers. Filters allow you to display only the layers relevant to the task at hand, simplifying the drawing view and improving focus.
- Keep Annotation Layers Separate: Place text, dimensions, and other annotations on separate layers from geometry. This separation allows for easier adjustments and visibility control, especially when plotting or sharing drawings.
- Standardize Text and Dimension Styles: Create and apply consistent styles for text and dimensions. This includes font selection, size, color, and line weight. Consistency in annotations enhances readability and professionalism in your drawings.
- Use Annotative Objects: Take advantage of AutoCAD’s annotative objects for text, dimensions, and other annotations. Annotative objects automatically adjust their size and scale to match the view, ensuring legibility across different drawing scales.
- Organize with Layer States: Save and restore different layer configurations using layer states. This feature allows you to quickly switch between different views of your drawing, facilitating reviews, edits, and presentations.
- Regularly Review and Purge Unused Layers: Periodically review your drawings to remove or merge unused layers. This practice reduces clutter and file size, making your drawings more manageable and performant.
By following these best practices for layer management and annotation, you can create AutoCAD drawings that are not only more organized and efficient but also easier to communicate and collaborate on with clients and colleagues.

Utilizing AutoCAD for Interior Design and Space Planning
AutoCAD is a versatile tool that interior designers and space planners use to bring their visions to life. It enables the creation of detailed, accurate layouts and designs, ensuring that spaces are both beautiful and functional. This section explores how AutoCAD can be utilized effectively in the realm of interior design and space planning.
- Creating Floor Plans: Start by drafting precise floor plans in AutoCAD. This is the foundation of any interior design project, allowing designers to map out the spatial arrangement and understand the limitations and possibilities of the space.
- Designing Furniture Layouts: Use AutoCAD to design furniture layouts that optimize space usage and traffic flow. This involves placing furniture pieces in the digital model to ensure they fit the space and meet the client\"s needs.
- Custom Furniture and Fixture Design: Beyond placement, AutoCAD can be used to design custom furniture and fixtures. This allows for unique elements that are perfectly tailored to the space and the client\"s preferences.
- Elevations and Section Views: Create detailed elevations and section views to visualize the design in three dimensions. This helps in understanding the vertical elements of a space, such as window treatments, wall art, and cabinetry.
- Material and Finish Selections: Incorporate material and finish selections into your AutoCAD drawings. This includes flooring, wall finishes, and other textures to provide a complete visual representation of the intended design.
- Lighting Design: Plan and visualize lighting designs, ensuring that spaces are well-lit and that lighting fixtures contribute to the aesthetics of the interior. AutoCAD helps in specifying the locations, types, and styles of lighting fixtures.
- Collaborating with Clients and Contractors: AutoCAD drawings facilitate clear communication with clients and contractors. Share detailed plans and elevations to convey design intent and ensure accurate implementation.
- Creating Presentation Boards: Use AutoCAD to generate presentation boards that compile floor plans, elevations, material selections, and furniture layouts. These boards are essential for presenting the design concept to clients or stakeholders.
AutoCAD streamlines the interior design and space planning process, from conceptualization to execution. By leveraging AutoCAD\"s comprehensive tools and features, designers can create functional, aesthetically pleasing spaces that meet the specific needs of their clients.
READ MORE:
Tips for Efficient AutoCAD Drawing and Editing Techniques
Maximizing efficiency in AutoCAD not only speeds up the drafting process but also enhances the quality of your work. Here are several tips and techniques for efficient drawing and editing in AutoCAD, designed to improve workflow and productivity for users of all levels.
- Use Keyboard Shortcuts: Learn and utilize AutoCAD\"s keyboard shortcuts for common commands. This can significantly reduce the time spent navigating through menus and increase your drawing speed.
- Master the Use of Layers: Organize your drawings by using layers effectively. Assigning specific elements to different layers makes your drawings more manageable and simplifies the editing process.
- Apply Block and Dynamic Block: Create and use blocks for repeating elements within your drawings. Dynamic blocks with adjustable parameters can further streamline the design process by reducing the need for multiple block variations.
- Utilize the Command Line: The command line is a powerful tool in AutoCAD. Familiarize yourself with command aliases and use them to quickly execute commands without lifting your hands from the keyboard.
- Implement Object Snaps: Object snaps (osnaps) are essential for precision drawing. Use them to snap to specific points on objects, ensuring accuracy in your work.
- Customize the User Interface: Tailor the AutoCAD workspace to fit your needs. Customizing toolbars, palettes, and ribbons can make the tools you use most more accessible, improving your efficiency.
- Use Templates: Start your projects with templates that include your preferred settings, layers, and objects. This saves time by eliminating the need to set up each new drawing from scratch.
- Employ External References: For large projects, use external references (xrefs) to reference other drawings instead of inserting them. This keeps the file size down and makes collaborative work easier.
- Practice Regular File Maintenance: Keep your AutoCAD files organized and perform regular maintenance, such as purging unused elements and auditing files to fix errors. This helps in keeping your files clean and reduces lag.
- Stay Updated on New Features: AutoCAD is constantly evolving, with new tools and features being introduced. Stay updated with the latest versions and learn about new functionalities to improve your drafting techniques.
By incorporating these tips into your daily work, you can significantly improve your proficiency and efficiency in AutoCAD. Remember, mastering AutoCAD is a continual process of learning and adaptation, aimed at enhancing your capabilities and output quality.
Explore the vast possibilities of AutoCAD through our comprehensive examples, from basic 2D drawings to advanced 3D models, and enhance your skills in architectural, engineering, and design projects to bring your creative visions to life.