Topic how to convert autocad drawing into pdf: Discover the ultimate guide on how to convert AutoCAD drawings into PDF, ensuring a seamless transition for architects and engineers to share their work effectively.
Table of Content
- How to convert an AutoCAD drawing into a PDF file?
- Step-by-Step Guide to Converting AutoCAD Drawings to PDF within AutoCAD
- Using Online Conversion Tools for DWG to PDF Conversion
- Converting AutoCAD Files to PDF with Adobe Acrobat
- Batch Converting Multiple AutoCAD Drawings to PDF
- Adjusting PDF Output Settings for AutoCAD Files
- Exporting AutoCAD Drawings with Layers to PDF
- YOUTUBE: Convert AutoCAD DWG to PDF - Tutorial
- Tips for Maintaining Drawing Quality in the PDF Conversion Process
- Common Issues and Solutions in AutoCAD to PDF Conversion
- Using AutoCAD\"s Built-in PDF Export Features for Efficient Workflow
- Advanced Techniques: Custom Scripting and Automation in AutoCAD to PDF Conversion
How to convert an AutoCAD drawing into a PDF file?
To convert an AutoCAD drawing into a PDF file, you have a few options: using the AutoCAD software itself, using Adobe Acrobat, or an online converter. Here are the step-by-step instructions for each method:
Method 1: Using AutoCAD
- Open the AutoCAD software on your computer.
- Open the AutoCAD drawing that you want to convert to PDF.
- Click on the \"File\" menu and select \"Save As\".
- In the \"Save As\" dialog box, choose a location to save the PDF file.
- In the \"Save as type\" drop-down menu, select \"PDF (*.pdf)\" as the file format.
- Click on the \"Save\" button to convert the AutoCAD drawing into a PDF file.
Method 2: Using Adobe Acrobat
- If you have Adobe Acrobat installed on your computer, open it.
- Click on the \"Tools\" menu and select \"Create PDF\".
- Choose the option to create a single PDF file.
- Select the AutoCAD drawing file that you want to convert.
- Click on the \"Open\" button to convert the AutoCAD drawing into a PDF file.
- Choose a location to save the PDF file and click on the \"Save\" button.
Method 3: Using an Online Converter
- Open a web browser and search for \"AutoCAD to PDF converter\".
- Select a reliable online converter from the search results.
- On the online converter website, click on the \"Select File\" or similar button.
- Browse and select the AutoCAD drawing file from your computer.
- Follow the website\'s instructions to convert the AutoCAD drawing into a PDF file.
- After conversion, download the PDF file to your computer.
These are the step-by-step instructions for converting an AutoCAD drawing into a PDF file using different methods. Choose the method that is most convenient for you and follow the instructions accordingly.
READ MORE:
Step-by-Step Guide to Converting AutoCAD Drawings to PDF within AutoCAD
Converting AutoCAD drawings into PDF files within AutoCAD is a straightforward process that enhances the shareability and security of your designs. Follow this detailed guide to ensure your drawings are converted successfully.
- Open your drawing in AutoCAD.
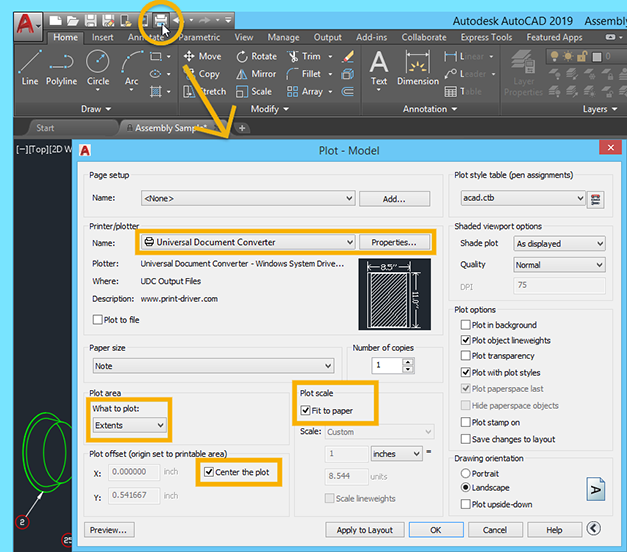
- Go to the Application menu (a large A in the top left corner) and select Print > Plot.
- Choose PDF as the printer/plotter from the list.
- Select the Paper size that matches the desired output.
- Under the Plot area, select what you want to convert to PDF. You can choose to plot the current view, a specific layout, or the entire drawing.
- Adjust the Plot scale to ensure your drawing scales correctly in the PDF. This can be done by selecting the scale from the dropdown or entering a custom scale.
- Click on Plot Options if you need to adjust further settings like drawing orientation, plot style, and quality.
- Click OK to proceed with plotting.
- In the Save As dialog box, choose where you want to save the PDF file and enter a file name.
- Click Save to start the conversion process. Your drawing will be converted and saved as a PDF file in the location you specified.
By following these steps, you can easily convert any AutoCAD drawing into a PDF file directly within AutoCAD, making it easier to share and protect your work.
Using Online Conversion Tools for DWG to PDF Conversion
For those who do not have AutoCAD installed or seek a quick and easy alternative, online conversion tools offer a convenient solution for converting DWG files to PDF. Here\"s how to use these tools effectively:
- Find a reputable online DWG to PDF conversion tool. There are many available, so choose one that best fits your needs.
- Visit the website of the chosen conversion tool.
- Upload your DWG file by clicking on the \"Upload\" button or dragging and dropping the file into the designated area.
- After uploading, select PDF as the output format if the website requires such a selection.
- Click on the \"Convert\" button to start the conversion process. The tool will convert your DWG file to PDF format.
- Wait for the conversion to complete. This may take a few seconds to several minutes, depending on the file size and the server load of the online tool.
- Download the converted PDF file once the process is complete. The website should provide a link or button to download the file.
Using online conversion tools is a straightforward and accessible method for anyone needing to convert DWG files to PDF without AutoCAD. It\"s ideal for quick conversions and when working on devices without AutoCAD installed.

Converting AutoCAD Files to PDF with Adobe Acrobat
Adobe Acrobat offers a powerful and reliable method for converting AutoCAD files (DWG) to PDF, providing users with an array of advanced features to ensure the fidelity of the conversion. Follow these steps to convert your AutoCAD files using Adobe Acrobat:
- Ensure Adobe Acrobat is installed on your computer. Adobe Acrobat DC is recommended for the most comprehensive features.
- Open the AutoCAD file you wish to convert in AutoCAD. Make sure it is the active document if you have multiple files open.
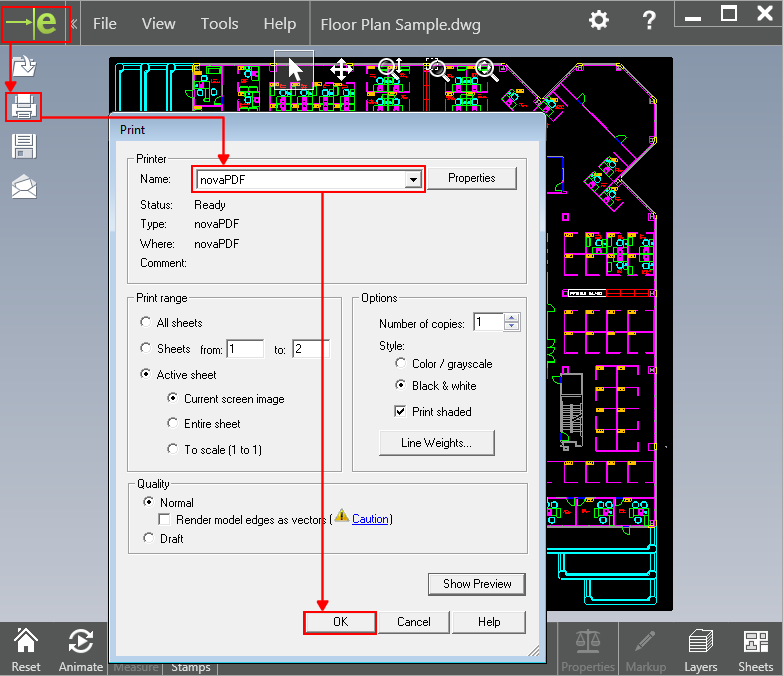
- Click on the \"File\" menu in AutoCAD, then select \"Print\" or use the \"CTRL+P\" shortcut. This action opens the Print dialog.
- In the printer/plotter section, select \"Adobe PDF\" as your printer.
- Configure your print settings as needed, such as paper size, scale, and plot area. These settings will affect the final PDF, so adjust them according to your requirements.
- Click on \"OK\" or \"Print\" to start the conversion process. Adobe Acrobat will then convert the visible drawing into a PDF.
- Once the conversion process has started, Adobe Acrobat might prompt you to save the file. Choose a location and file name for your PDF document and click \"Save.\"
This method not only converts your AutoCAD drawings to PDF but also preserves the layers, making it ideal for detailed designs and drawings. Using Adobe Acrobat for conversion ensures high-quality PDFs suitable for printing, sharing, and archiving.
Batch Converting Multiple AutoCAD Drawings to PDF
Batch conversion is a time-saving method when you need to convert multiple AutoCAD drawings to PDF format simultaneously. This process can be accomplished within AutoCAD or using third-party software. Here\"s how to perform batch conversions within AutoCAD:
- Open AutoCAD and ensure all the drawings you wish to convert are accessible.
- Use the \"PUBLISH\" command in AutoCAD. This command can be accessed from the Application menu under \"Publish\" or by typing \"PUBLISH\" into the command line.
- In the Publish dialog box, click on \"Add Sheets\" to add the drawings you want to convert to the list.
- Select all the drawings you wish to convert and add them to the sheet list.
- Choose \"PDF\" as the publish to format from the \"Publish to:\" dropdown menu.
- Adjust the settings for your PDF output, such as location where the PDF files will be saved, the naming convention, and whether to publish all sheets to a single PDF file or to individual files.
- Click \"Publish\" to start the batch conversion process. AutoCAD will convert each drawing to PDF according to your settings.
This method allows for efficient conversion of multiple drawings, saving valuable time and ensuring consistency across your PDF documents. Batch converting is particularly useful for large projects or when preparing a series of drawings for review or archival purposes.
_HOOK_
Adjusting PDF Output Settings for AutoCAD Files
Optimizing the PDF output settings for AutoCAD files is crucial for achieving the desired quality and file size, which is especially important for sharing and printing purposes. Here are steps and tips to adjust your PDF output settings effectively:
- Open the drawing in AutoCAD you wish to convert to PDF.
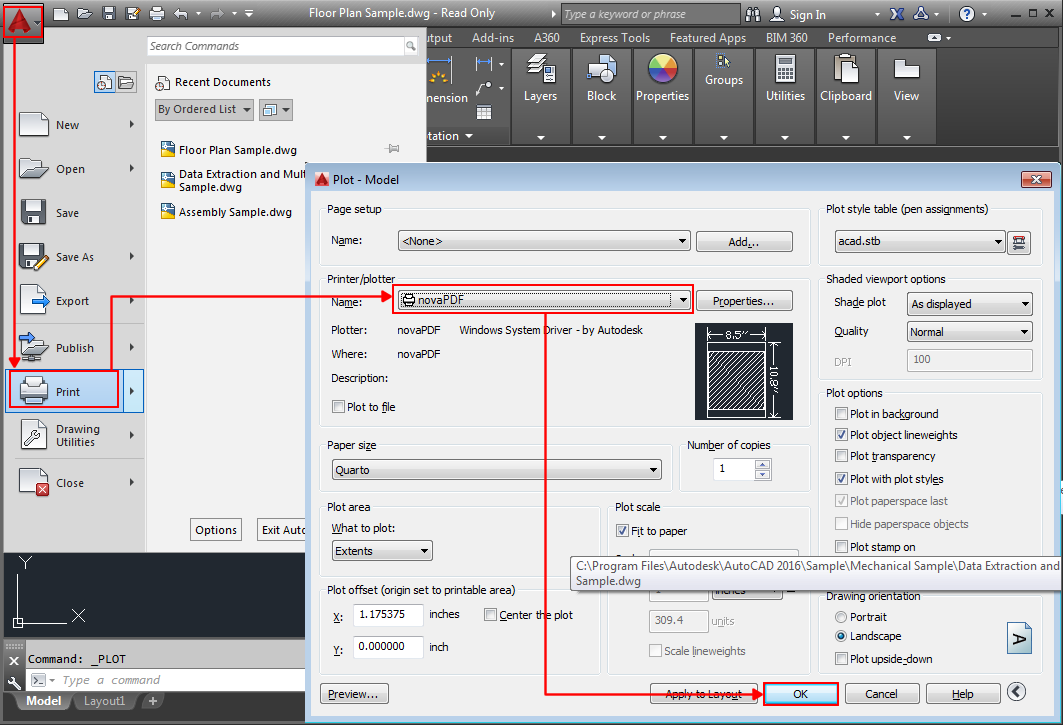
- Access the Plot dialog by typing \"PLOT\" into the command line or navigating through the application menu to \"Print\" > \"Plot\".
- Select \"Adobe PDF\" or another PDF plotter as your printer/plotter from the drop-down menu.
- Under the \"Paper size\" drop-down, choose the paper size that matches your desired output.
- In the \"Plot area\" section, specify what part of the drawing to convert. You can select the current view, a specific layout, or the extents of your drawing.
- Adjust the \"Plot scale\" to ensure your drawing scales correctly. You can use the predefined scales or enter a custom scale.
- Click on \"Plot Options\" and explore the available options such as \"Plot with plot styles\" to control the appearance of your drawing in the PDF. This includes line weights, colors, and other stylistic elements.
- Consider selecting the \"Optimize for\" option tailored to your needs, such as \"Print\" or \"Web\", which will adjust the resolution and other settings for your intended use.
- Before finalizing, preview the output by clicking on \"Preview\" to ensure everything looks as expected.
- Click \"OK\" or \"Plot\" to convert your drawing to PDF with the adjusted settings.
Adjusting PDF output settings allows for greater control over the final document, ensuring that the PDFs generated from your AutoCAD files meet your specific requirements for quality, appearance, and file size.

Exporting AutoCAD Drawings with Layers to PDF
Exporting AutoCAD drawings with layers to PDF maintains the layered structure, allowing for more interactive and manageable PDF documents. This is particularly useful for viewing, printing, and reviewing detailed designs. Follow these steps to ensure your layers are preserved when converting AutoCAD drawings to PDF:
- Open the AutoCAD drawing you wish to convert.
- Go to the \"File\" menu and select \"Plot\" or press \"CTRL+P\" to open the Plot dialog box.
- Select \"DWG to PDF.pc3\" as the printer/plotter. The .pc3 file is specifically designed for creating PDF files that retain AutoCAD information.
- In the Plot dialog box, click on the \"Properties\" button next to the printer/plotter name to access the \"DWG To PDF Properties\" dialog.
- Navigate to the \"Custom Properties\" button and then click on the \"Custom Properties\" dialog.
- In the \"Custom Properties\" dialog, ensure the \"Include Layer Information\" option is checked. This setting ensures that layers are included in the PDF.
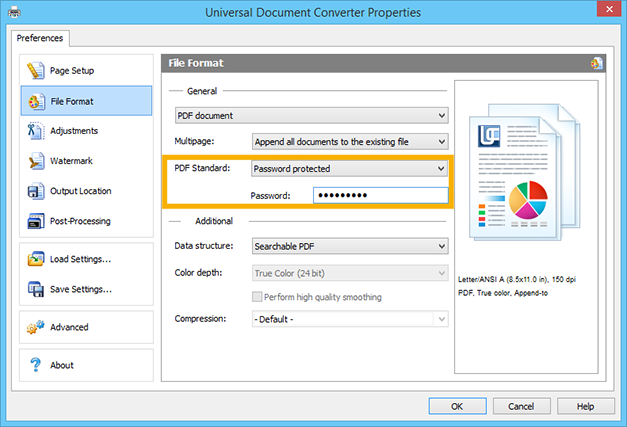
- Adjust other PDF options as needed, such as resolution, paper size, and whether to include hyperlinks, bookmarks, and fonts in your PDF.
- Confirm all settings and click \"OK\" to close the dialog boxes.
- Back in the Plot dialog, select the appropriate paper size, scale, and plot area for your drawing.
- Click on \"Plot\" to start the conversion process. Your drawing will be saved as a PDF with layers intact, allowing for easy navigation and management of your design.
By following these steps, you can efficiently export AutoCAD drawings to PDFs with layers, enhancing the usability and functionality of your documents for all stakeholders involved.
Convert AutoCAD DWG to PDF - Tutorial
\"Learn how to convert any file format effortlessly with our step-by-step tutorial. Discover the easy way to transfer your favorite videos and documents with just a few clicks!\"
AutoCAD 2017: Quick Save in PDF with Correct Scale
\"Save time and energy with our quick save tutorial! Discover the secret tricks and shortcuts to instantly download and save your favorite online content, so you can enjoy it anytime, anywhere.\"
Tips for Maintaining Drawing Quality in the PDF Conversion Process
Maintaining the quality of your AutoCAD drawings during the PDF conversion process is essential for ensuring that the final document accurately reflects your design intent. Here are some tips to help preserve the integrity and quality of your drawings:
- Use the \"DWG to PDF.pc3\" plotter configuration when converting within AutoCAD to ensure optimal compatibility and quality.
- Before converting, review and adjust the plot settings, including the plot scale and paper size, to ensure they match the intended output.
- Enable the \"Lines Overwrite\" option in the plot settings to avoid unwanted line merges and to maintain the clarity of overlapping lines.
- Adjust the PDF resolution in the plotter configuration to balance between file size and detail. Higher resolutions are recommended for detailed drawings.
- When exporting, choose to include layer information if the PDF will be used for review or editing to preserve the drawing\"s organizational structure.
- Check the \"Plot with plot styles\" option to ensure that the visual fidelity of the drawing is maintained, including line weights and colors.
- If using online conversion tools, select a high-quality conversion setting if available to prevent loss of detail or distortion.
- Review the final PDF by zooming in on detailed sections to ensure that lines, text, and other elements are clear and accurately represented.
By following these tips, you can significantly improve the quality of the PDFs generated from your AutoCAD drawings, ensuring that they serve their intended purpose effectively, whether for presentation, archiving, or further editing.
Common Issues and Solutions in AutoCAD to PDF Conversion
Converting AutoCAD drawings to PDF can sometimes present challenges. Below are some common issues encountered during the conversion process, along with their solutions to ensure smooth and successful PDF creation.
- Issue: Blurry or pixelated images in PDF.
- Solution: Increase the DPI setting in the plotter configuration to enhance image quality.
- Issue: Missing lines or elements in the PDF.
- Solution: Ensure all layers are turned on and thawed in AutoCAD before converting. Check the \"Plot with plot styles\" option to make sure all elements are included.
- Issue: Incorrect colors or line weights in the PDF.
- Solution: Adjust the plot style settings in AutoCAD to ensure accurate representation of colors and line weights in the PDF.
- Issue: Large PDF file size.
- Solution: Reduce the resolution in the PDF settings or use the \"Reduce File Size\" option in Adobe Acrobat after conversion.
- Issue: PDF not plotting to the correct scale.
- Solution: Double-check the plot scale settings in the Plot dialog box to ensure they match the intended scale for the PDF.
- Issue: Layers not appearing in the PDF.
- Solution: Use the \"DWG to PDF.pc3\" plotter and ensure the \"Include Layer Information\" option is selected in the plotter configuration.
Addressing these common issues can help ensure that your AutoCAD drawings are converted to PDF with the intended quality and accuracy, making your documents more reliable and professional.
Using AutoCAD\"s Built-in PDF Export Features for Efficient Workflow
Converting AutoCAD drawings to PDF can sometimes present challenges. Below are some common issues encountered during the conversion process, along with their solutions to ensure smooth and successful PDF creation.
- Issue: Blurry or pixelated images in PDF.
- Solution: Increase the DPI setting in the plotter configuration to enhance image quality.
- Issue: Missing lines or elements in the PDF.
- Solution: Ensure all layers are turned on and thawed in AutoCAD before converting. Check the \"Plot with plot styles\" option to make sure all elements are included.
- Issue: Incorrect colors or line weights in the PDF.
- Solution: Adjust the plot style settings in AutoCAD to ensure accurate representation of colors and line weights in the PDF.
- Issue: Large PDF file size.
- Solution: Reduce the resolution in the PDF settings or use the \"Reduce File Size\" option in Adobe Acrobat after conversion.
- Issue: PDF not plotting to the correct scale.
- Solution: Double-check the plot scale settings in the Plot dialog box to ensure they match the intended scale for the PDF.
- Issue: Layers not appearing in the PDF.
- Solution: Use the \"DWG to PDF.pc3\" plotter and ensure the \"Include Layer Information\" option is selected in the plotter configuration.
Addressing these common issues can help ensure that your AutoCAD drawings are converted to PDF with the intended quality and accuracy, making your documents more reliable and professional.
_HOOK_
READ MORE:
Advanced Techniques: Custom Scripting and Automation in AutoCAD to PDF Conversion
For professionals looking to streamline their workflow and improve efficiency in converting AutoCAD drawings to PDF, custom scripting and automation offer powerful solutions. By leveraging AutoCAD\"s scripting capabilities, users can automate repetitive tasks, customize the conversion process, and achieve consistent results across multiple files. This section delves into the advanced techniques that can significantly enhance your productivity and ensure high-quality PDF outputs from AutoCAD drawings.
- Understanding AutoLISP for Automation
- AutoLISP is a specific dialect of the LISP programming language built for use with the full version of AutoCAD. It allows you to create custom commands and automate tasks. Begin by learning the basics of AutoLISP syntax and how to write simple scripts that can automate tasks such as opening drawings, setting up plot configurations, and executing the plot command to convert drawings to PDF.
- Creating Script Files for Batch Processing
- For converting multiple drawings to PDF, script files (.scr) can be created containing a series of command line instructions for AutoCAD. These scripts can open drawings, set plot parameters, and save them as PDFs. Use a text editor to create a script file with commands like OPEN, PLOT, and SAVEAS, then run the script in AutoCAD using the SCRIPT command.
- Utilizing the Batch Plot Feature
- AutoCAD\"s Batch Plot utility allows for the plotting of multiple drawings into PDFs. Although not scripting, this feature can be part of an automated workflow by pre-selecting a set of drawings and applying the same plot settings to all of them, saving time and ensuring consistency.
- Automating with .NET and ObjectARX
- For more complex automation and customization, the .NET Framework and ObjectARX (a C++ class library) provide robust APIs for interacting with AutoCAD. These tools allow for deep integration and automation capabilities beyond what\"s possible with AutoLISP and script files. Developers can create custom plugins and applications that automate the conversion process, including setting up plot configurations, executing batch conversions, and customizing the PDF output.
- Implementing Third-Party Tools and Utilities
- Several third-party tools and utilities can enhance AutoCAD\"s PDF export capabilities, offering features such as batch processing, advanced PDF settings, and layer management. These tools often come with their own scripting languages or APIs, enabling further automation and customization of the PDF conversion process.
Incorporating these advanced techniques into your workflow can significantly increase efficiency and output quality when converting AutoCAD drawings to PDF. By automating repetitive tasks, customizing the conversion process, and utilizing powerful scripting and API capabilities, professionals can save time, reduce errors, and maintain consistency across multiple document conversions.
Mastering the conversion of AutoCAD drawings to PDF can significantly enhance your project\"s presentation and efficiency. Explore these comprehensive guides to unlock advanced techniques and ensure your conversions are seamless, high-quality, and tailored to your needs.