Topic mechanical drawing autocad: Unlock the full potential of AutoCAD for mechanical drawing, enhancing precision, efficiency, and creativity in your engineering designs.
Table of Content
- How can I create and document mechanical drawings using AutoCAD?
- Understanding AutoCAD Mechanical Toolset
- Getting Started with AutoCAD for Mechanical Drawing
- Creating Basic Mechanical Drawings in AutoCAD
- Advanced Techniques for Mechanical Drawings in AutoCAD
- Using AutoCAD\"s Mechanical Library for Efficient Design
- Customizing AutoCAD Settings for Mechanical Design
- YOUTUBE: AutoCAD 3D Practice Mechanical Drawing using Box and Cylinder Command | AutoCAD 3D Modeling Mechanical
- Dimensioning and Annotation Techniques in Mechanical Drawings
- Best Practices for Drawing Assembly in AutoCAD
- 3D Modeling in AutoCAD for Mechanical Engineers
- Resources and Further Learning for AutoCAD Mechanical Drawing
How can I create and document mechanical drawings using AutoCAD?
To create and document mechanical drawings using AutoCAD, follow these steps:
- Open AutoCAD and start a new drawing.
- Set up the drawing units to the desired measurement system (e.g., inches or millimeters) by typing UNITS in the command line and selecting the appropriate settings.
- Use the Line, Arc, and other drawing tools to sketch out your mechanical design. Ensure that your lines and arcs are accurate and precise.
- To add dimensions to your drawing, select the Dimension tool from the toolbar or type DIMENSION in the command line. Click on the points you want to dimension and place the dimension lines.
- Add annotations, such as text labels or explanatory notes, to your drawing using the Text tool or by typing TEXT in the command line. Position the text and adjust its properties as necessary.
- To create standard mechanical parts, utilize the AutoCAD Mechanical toolset. Access it by typing MECH in the command line or through the Mechanical Layer Manager button on the ribbon.
- Apply appropriate layers to your drawing to organize different elements. You can manage the layers through the AutoCAD Mechanical Layer Manager, accessible by typing AMLAYER in the command line or using the Manager button on the ribbon.
- Ensure your drawing complies with industry standards and specifications. Check the AutoCAD Mechanical toolset library for commonly used standards-based parts.
- To document your drawing, create a title block and add necessary information, such as project name, date, scale, and drawing number. This can be done using blocks or by drawing the title block manually.
- Finally, save your drawing regularly to avoid losing any progress. Use the Save or Save As commands to save the file in the desired format (.dwg or other file formats).
By following these steps, you can effectively create and document mechanical drawings using AutoCAD. Make sure to practice regularly to improve your skills and efficiency in using the software.
READ MORE:
Understanding AutoCAD Mechanical Toolset
The AutoCAD Mechanical toolset is an enhanced version of the standard AutoCAD software, specifically designed to expedite mechanical design and drafting processes. It offers a comprehensive suite of tools that cater to the needs of mechanical engineers and designers, enabling the creation of more complex and precise mechanical drawings with ease.
- Introduction to the Interface: Familiarize yourself with the user-friendly interface designed for mechanical projects.
- Standard Parts Library: Access to over 700,000 standard parts and features that can be easily inserted into your drawings.
- Layer Management: Utilize intelligent layer management that automatically places items on the correct layer with the correct color and line type.
- Calculation Tools: Built-in calculation tools for complex operations like mass, center of gravity, and moment of inertia.
- Dimensioning: Advanced dimensioning tools that adhere to engineering standards.
- Drawing Tools: Specific tools for creating standard mechanical elements such as gears, shafts, and fasteners.
- Documentation: Generate accurate bill of materials and parts lists directly from your drawings.
- Collaboration Features: Share and collaborate on designs with project stakeholders using cloud-based technology.
By harnessing the power of the AutoCAD Mechanical toolset, professionals can significantly reduce drafting times, increase accuracy, and improve the communication of design intent and details. This toolset is a must-have for anyone involved in mechanical design and engineering.
Getting Started with AutoCAD for Mechanical Drawing
Embarking on mechanical drawing with AutoCAD opens a world of precision and efficiency. Here’s how to get started:
- Install the Software: Obtain the latest version of AutoCAD with the Mechanical toolset from the official Autodesk website.
- Explore the Interface: Familiarize yourself with the workspace, toolbars, and command line to navigate through the software efficiently.
- Set Up Your Project: Begin by setting up your drawing units, limits, and layers to match your project requirements.
- Learn Basic Commands: Master key commands such as LINE, CIRCLE, RECTANGLE, and TRIM to create basic geometric shapes.
- Use Mechanical Toolset: Dive into the Mechanical toolset’s specialized features like gear, shaft, and spring generators for more complex designs.
- Practice Dimensioning: Apply dimensioning tools to provide accurate measurements and ensure your design meets specific requirements.
- Explore Libraries: Utilize the extensive libraries of standard parts to quickly insert components into your drawings.
- Create Your First Mechanical Drawing: Combine your skills and tools to create your first mechanical drawing, applying best practices for layout and design.
- Review and Revise: Evaluate your drawing for accuracy and completeness, making adjustments as necessary.
- Save and Share: Learn how to save, export, and share your mechanical drawings in various formats for collaboration or manufacturing.
With dedication and practice, you\"ll soon be proficient in using AutoCAD for mechanical drawing, ready to tackle any design challenge with confidence.
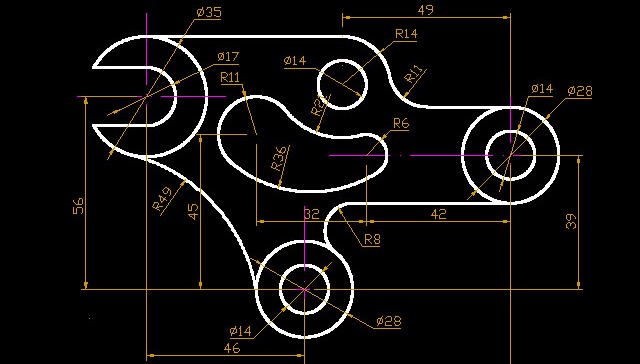
Creating Basic Mechanical Drawings in AutoCAD
Creating basic mechanical drawings in AutoCAD is a foundational skill for any mechanical designer or engineer. Follow these steps to begin crafting precise and detailed designs:
- Start a New Drawing: Open AutoCAD and start a new drawing using a template that matches your project\"s standards for units and drawing scales.
- Set Up the Drawing Environment: Adjust the drawing settings, such as units, limits, and grid spacing, to suit the requirements of your mechanical design.
- Draw Basic Shapes: Use commands like LINE, CIRCLE, and POLYGON to draw the basic geometric shapes that form the foundation of your mechanical part or assembly.
- Apply Precision Tools: Utilize AutoCAD\"s object snaps, tracking, and coordinate input to place your shapes accurately and ensure precision in your design.
- Modify and Edit: Learn how to use modify commands such as TRIM, EXTEND, and MIRROR to refine your shapes and achieve the desired layout of your drawing.
- Add Dimensions: Use the DIMENSION command to add necessary dimensions to your drawing, ensuring that the size and relationships between parts are clearly communicated.
- Insert Text Labels: Label parts and provide additional design notes with the TEXT command to enhance the clarity and usability of your drawing.
- Layer Management: Organize your drawing by placing different elements on separate layers, allowing for better visibility and editing control.
- Save Your Work: Regularly save your drawing to prevent data loss, and utilize AutoCAD\"s version control to keep track of changes over time.
By following these steps, you can create basic mechanical drawings that serve as the groundwork for more complex designs and engineering projects. Practice and familiarity with AutoCAD\"s toolset will enhance your efficiency and precision in mechanical drafting.
Advanced Techniques for Mechanical Drawings in AutoCAD
Enhance your mechanical drawing capabilities in AutoCAD with these advanced techniques, designed to improve efficiency, accuracy, and the overall quality of your designs:
- 3D Modeling: Progress from 2D drawings to 3D models to better visualize and communicate your designs. Utilize commands like EXTRUDE, REVOLVE, and SWEEP to create complex shapes and assemblies.
- Parametric Constraints: Apply parametric constraints to your designs to maintain relationships between objects automatically, ensuring that changes to one part update related parts accordingly.
- Dynamic Blocks: Create and use dynamic blocks with adjustable parameters and actions, allowing for more versatile and reusable design components.
- Sheet Sets: Organize your drawings into sheet sets for easier management, printing, and sharing of your CAD projects.
- Custom Tool Palettes: Customize tool palettes to streamline your workflow by adding frequently used commands, blocks, and tools for quick access.
- Data Linking: Link your drawings to external data sources, like Excel spreadsheets, to automate updates and maintain consistency across documents.
- Rendering and Visualization: Use AutoCAD’s rendering tools to create realistic images of your models, enhancing presentations and design reviews.
- Automation with Scripts and Macros: Learn to write scripts and macros to automate repetitive tasks, saving time and reducing errors in large projects.
- Collaboration Tools: Leverage collaboration features to work with team members in real-time, share feedback, and manage versions efficiently.
Mastering these advanced techniques will elevate your mechanical drawing skills in AutoCAD, allowing you to tackle more complex projects with confidence and precision.

_HOOK_
Using AutoCAD\"s Mechanical Library for Efficient Design
AutoCAD\"s Mechanical Library is a powerful feature that enhances the efficiency and quality of mechanical design projects. Here’s how to make the most of this resource:
- Access the Library: Navigate to the Content Library tab within AutoCAD Mechanical to access thousands of standard parts and features.
- Browse Components: Use the intuitive interface to browse or search for components by category, such as bolts, gears, and bearings.
- Insert Components: Select and insert components directly into your drawing, automatically adapting them to the correct size and specifications.
- Customize Components: Modify components within the library to fit specific design requirements, saving customized versions for future use.
- Leverage Standard Parts: Utilize the extensive range of standard parts to ensure compliance with international design standards and reduce design time.
- Automate Documentation: Generate parts lists and BOMs (Bills of Materials) directly from the drawings, ensuring accuracy and saving time on documentation.
- Update and Manage: Keep your library up to date with the latest standards and components to ensure your designs remain current.
By incorporating the Mechanical Library into your design process, you can significantly reduce design time, ensure accuracy, and streamline the documentation process, allowing you to focus on innovation and problem-solving.

Customizing AutoCAD Settings for Mechanical Design
Optimizing AutoCAD settings for mechanical design can significantly enhance productivity and accuracy. Here are steps to tailor AutoCAD to your mechanical design needs:
- Set Up Drawing Units: Configure your drawing units to match the engineering standards you work with, ensuring precision in your designs.
- Customize the Workspace: Tailor the AutoCAD workspace by organizing toolbars, palettes, and command shortcuts to suit your workflow.
- Adjust Snap and Grid Settings: Fine-tune the snap and grid settings to align with the precision requirements of mechanical parts and assemblies.
- Layer Management: Create a standardized layer naming convention to organize and manage different elements of your mechanical drawings efficiently.
- Dimension Style Manager: Customize dimension styles to ensure that all dimensions conform to industry or company standards.
- Block Library Setup: Develop and organize a block library of frequently used mechanical components for quick insertion into drawings.
- Template Creation: Save time by creating templates with pre-set layers, styles, and settings specific to mechanical design projects.
- Macro and Script Use: Automate repetitive tasks by creating macros or scripts, enhancing efficiency and reducing manual errors.
- Performance Optimization: Adjust performance settings to balance between drawing complexity and software responsiveness, especially for large or detailed designs.
By customizing AutoCAD to fit the specific needs of mechanical design, you can streamline your design process, improve accuracy, and increase overall efficiency.

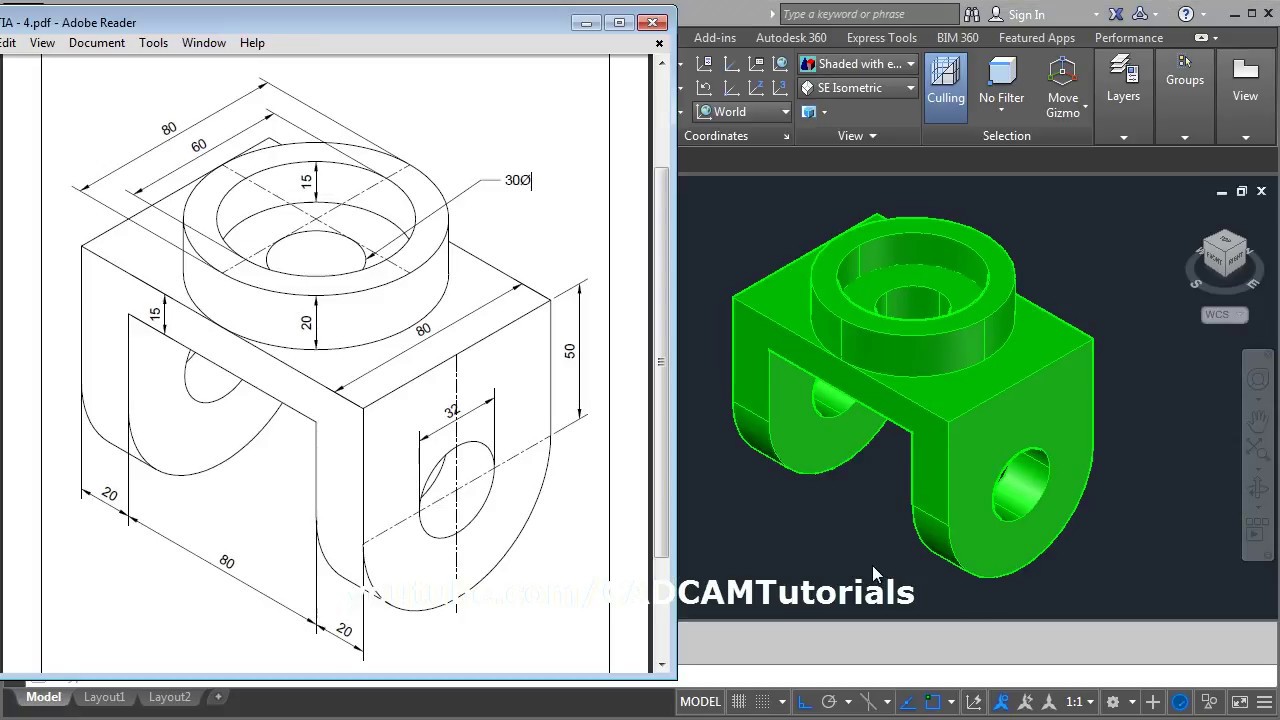
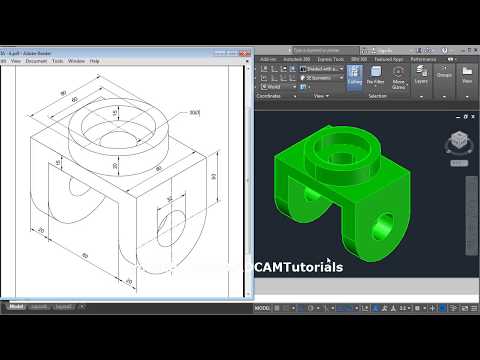
AutoCAD 3D Practice Mechanical Drawing using Box and Cylinder Command | AutoCAD 3D Modeling Mechanical
Immerse yourself in the world of precision and creativity with mechanical drawing! Watch our video to unveil the art of technical illustrations and see how these intricate designs come to life on paper. Get ready to be amazed by the meticulous details and infinite possibilities mechanical drawing offers.
Introduction to the Mechanical Toolset
Get ready to discover the power of Autocad! Join us in our video as we explore the ultimate software for precision drafting and design. Witness how Autocad revolutionizes the way engineers, architects, and designers bring their visions to reality. Enhance your skills and expand your creative horizons with Autocad\'s endless tools and functionalities.
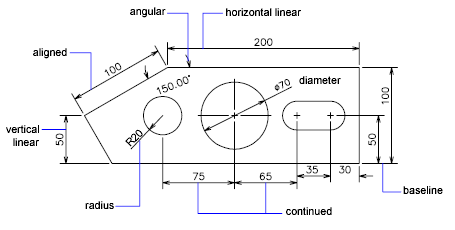
Dimensioning and Annotation Techniques in Mechanical Drawings
Effective dimensioning and annotation are crucial for the clarity and accuracy of mechanical drawings. These techniques ensure that your designs are easily understood and can be accurately manufactured:
- Standard Dimensioning Practices: Adhere to industry standards for dimensioning, such as ASME Y14.5, to ensure your drawings are universally understood.
- Linear Dimensions: Use linear dimensions for most features, placing dimensions outside the part outline whenever possible to reduce clutter.
- Angular Dimensions: Clearly indicate angular dimensions for parts that are not orthogonal, ensuring the precise orientation of features.
- Datum References: Establish datum points, lines, or planes as reference points for dimensions to provide a clear basis for measurement.
- Tolerance Indication: Include tolerances with dimensions to specify the acceptable variation range, critical for manufacturing accuracy.
- Notes and Labels: Use notes and labels to provide additional information about materials, surface finishes, and manufacturing processes.
- Leaders and Callouts: Employ leaders and callouts to connect notes to specific parts or features without cluttering the drawing.
- Section Views and Detail Drawings: Utilize section views and detail drawings for complex areas, providing a clearer view of internal features.
- Revision Blocks: Implement revision blocks to track changes over time, ensuring all stakeholders are working with the latest drawing version.
Mastering these dimensioning and annotation techniques will enhance the effectiveness of your mechanical drawings, facilitating better communication with manufacturers and team members.

Best Practices for Drawing Assembly in AutoCAD
Creating assembly drawings in AutoCAD requires attention to detail and adherence to best practices to ensure clear, accurate, and functional designs. Here are key practices to follow:
- Use Layers Strategically: Organize different components of your assembly into layers to simplify visibility control and editing.
- Maintain Consistent Scale: Keep a consistent scale across all views of the assembly to avoid confusion and misinterpretation.
- Apply Clear Annotations: Label each component clearly and provide a parts list or bill of materials for easy identification and reference.
- Implement Standard Views: Use standard orthographic views (front, top, right side) and isometric views to provide comprehensive perspectives of the assembly.
- Detail Section Views: Include section views for complex components to reveal internal features not visible in standard views.
- Highlight Connections and Fits: Clearly show how parts fit together, indicating types of fits, welds, and assembly sequences if necessary.
- Dimensioning for Assembly: Provide dimensions that are relevant to the assembly process, such as spacing between parts and alignment specifications.
- Check Interferences: Use AutoCAD\"s interference checking tools to ensure that parts do not incorrectly overlap or interfere with each other.
- Review and Revise: Regularly review your drawings with the assembly team or stakeholders to identify any potential issues or improvements.
Following these best practices will help in creating clear, functional, and manufacturable assembly drawings, facilitating smoother transitions from design to production.
3D Modeling in AutoCAD for Mechanical Engineers
Creating assembly drawings in AutoCAD requires attention to detail and adherence to best practices to ensure clear, accurate, and functional designs. Here are key practices to follow:
- Use Layers Strategically: Organize different components of your assembly into layers to simplify visibility control and editing.
- Maintain Consistent Scale: Keep a consistent scale across all views of the assembly to avoid confusion and misinterpretation.
- Apply Clear Annotations: Label each component clearly and provide a parts list or bill of materials for easy identification and reference.
- Implement Standard Views: Use standard orthographic views (front, top, right side) and isometric views to provide comprehensive perspectives of the assembly.
- Detail Section Views: Include section views for complex components to reveal internal features not visible in standard views.
- Highlight Connections and Fits: Clearly show how parts fit together, indicating types of fits, welds, and assembly sequences if necessary.
- Dimensioning for Assembly: Provide dimensions that are relevant to the assembly process, such as spacing between parts and alignment specifications.
- Check Interferences: Use AutoCAD\"s interference checking tools to ensure that parts do not incorrectly overlap or interfere with each other.
- Review and Revise: Regularly review your drawings with the assembly team or stakeholders to identify any potential issues or improvements.
Following these best practices will help in creating clear, functional, and manufacturable assembly drawings, facilitating smoother transitions from design to production.
_HOOK_
READ MORE:
Resources and Further Learning for AutoCAD Mechanical Drawing
Embarking on a journey to master AutoCAD for mechanical drawing offers an array of resources and learning paths to enhance your skills. Whether you are a beginner or looking to advance your expertise, the following resources are invaluable for your learning curve:
- AutoCAD Official Tutorials: Start with AutoCAD’s free guides and tutorials to understand the basics and develop your skills further. These resources are tailored to help beginners and advanced users alike, covering everything from simple drawings to complex mechanical designs.
- AutoCAD Mechanical Toolset: Leverage the AutoCAD Mechanical toolset, which increases productivity by up to 55% with over 700,000 intelligent parts and features. It offers specialized tools for mechanical engineering, including standards-based parts and customizable layer management to automate tasks such as creating bills of materials.
- Online Courses and Webinars: Explore various online platforms offering courses and webinars that delve into AutoCAD mechanical drawing\"s nuances. These sessions can range from introductory lessons to advanced techniques, including 3D modeling and automation.
- YouTube Tutorials: YouTube is a treasure trove of tutorial videos where experienced professionals share their insights and tips on using AutoCAD for mechanical drawing. From basic functionalities to advanced features, these videos can significantly aid in self-paced learning.
- AutoCAD Forums and Communities: Join forums and online communities where you can ask questions, share your work, and get feedback from AutoCAD professionals worldwide. Engaging with a community can provide practical advice and solutions to common challenges.
- Books and eBooks: Numerous books and eBooks offer comprehensive coverage on AutoCAD, from fundamental concepts to advanced mechanical drawing techniques. These resources are great for in-depth study and reference.
- AutoCAD Support and Documentation: Autodesk provides extensive support and documentation for AutoCAD Mechanical, including a detailed help section, tutorials, and technical support for troubleshooting.
By exploring these resources, you can build a solid foundation in mechanical drawing with AutoCAD, enhance your skills, and stay updated with the latest trends and techniques in the field.
Embark on your journey to mastering mechanical drawing with AutoCAD, where creativity meets precision. Discover a wealth of resources, tips, and expert guidance to elevate your designs and bring your engineering visions to life.