Topic how to animate roblox in blender: Discover the secrets of bringing your Roblox characters to life with Blender, the free 3D animation software. This guide will walk you through every step to animate effortlessly and creatively.
Table of Content
- What is the process for animating Roblox in Blender?
- Setting Up Blender for Roblox Animation
- Downloading and Installing Necessary Plugins
- Importing Roblox Characters into Blender
- Basic Blender Animation Tools Overview
- Creating Your First Animation in Blender
- Advanced Animation Techniques
- YOUTUBE: Roblox Blender Animation Tutorial
- Exporting Animations from Blender to Roblox
- Tips for Smooth Animation Workflows
- Common Problems and Solutions
- Resources for Further Learning
What is the process for animating Roblox in Blender?
To animate Roblox in Blender, you can follow these steps:
- Make sure you have Blender installed on your computer. If not, download and install it from the official website: https://www.blender.org/.
- Next, you\'ll need a plugin called \"Roblox Importer\" for Blender. Download the plugin from the following link: https://drive.google.com/file/d/1ZUe74ebFjEQ9d8jaSiDZlXcgG4z45OY8/view.
- Once you have the plugin downloaded, open Blender on your computer.
- In Blender, go to \"Edit\" on the top menu bar and select \"Preferences\".
- In the preferences window, click on the \"Add-ons\" tab.
- Click on the \"Install…\" button and navigate to the location where you downloaded the Roblox Importer plugin. Select the plugin file and click \"Install Add-on\".
- After installation, make sure the checkbox next to the \"Roblox Importer\" plugin is enabled. This will activate the plugin in Blender.
- Now, you can import Roblox assets and rigs into Blender. To import a Roblox rig, go to \"File\" on the top menu bar and select \"Import\" > \"Roblox Rig\".
- Select the Roblox rig file you want to import and click \"Import Roblox Rig\".
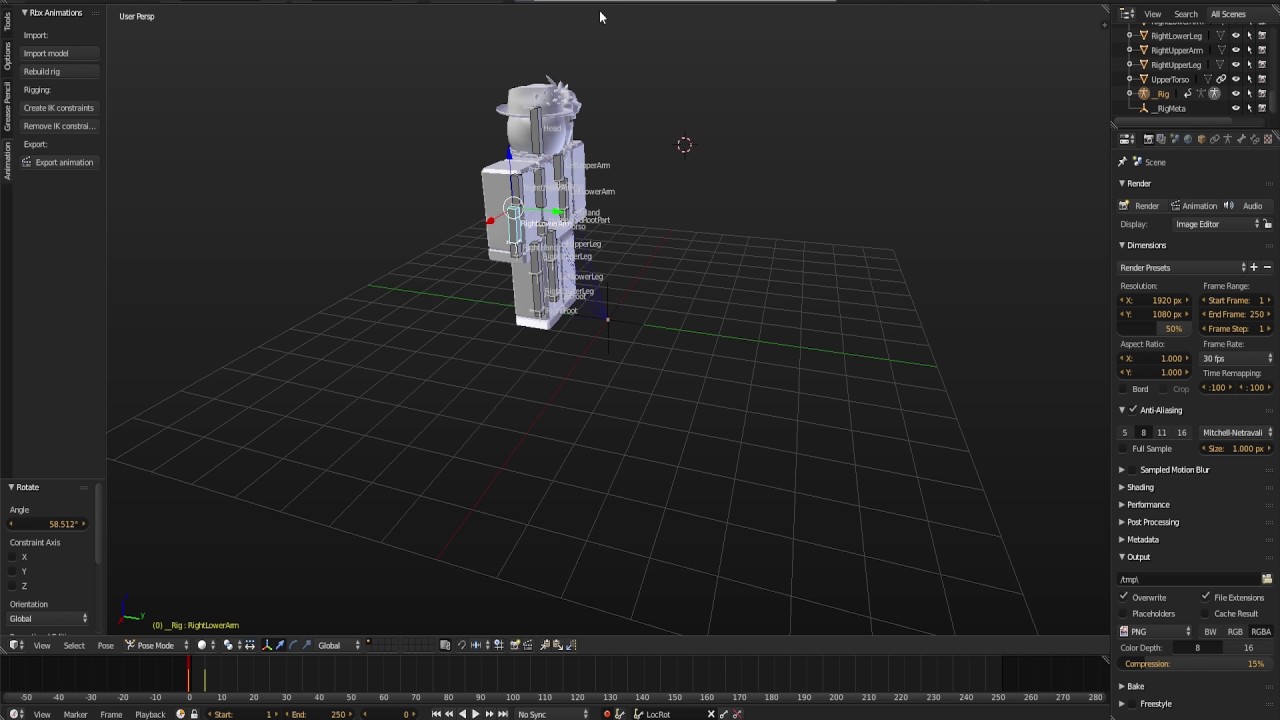
- The Roblox rig will be imported into Blender, and you can start animating it using Blender\'s animation tools.
- Once you have finished animating your Roblox rig, you can export the animation as a FBX file. Go to \"File\" > \"Export\" > \"FBX\" and save the file.
- Finally, you can import the FBX animation into Roblox Studio to use it for your Roblox game or project.
Remember to save your work regularly and experiment with the animation tools in Blender to create the desired effects for your Roblox animations.
READ MORE:
Setting Up Blender for Roblox Animation
Starting your journey into animating Roblox characters in Blender begins with setting up your environment. Here\"s how to get started:
- Download and Install Blender: Ensure you have the latest version of Blender installed on your computer from the official Blender website.
- Install the Roblox Studio Plugin: This plugin allows you to export models from Roblox Studio into Blender. Search for \"Roblox Studio Plugin for Blender\" and follow installation instructions.
- Configure Blender Preferences: Open Blender and go to Edit > Preferences. Under the Add-ons tab, enable the Roblox Studio Plugin you installed.
- Prepare Your Roblox Model: In Roblox Studio, select the model you wish to animate. Use the plugin to export this model as an .rbxm file.
- Import Your Model into Blender: In Blender, go to File > Import, then select the .rbxm file you exported from Roblox Studio. Your model should now appear in Blender\"s 3D viewport.
- Set Up the Armature: Rigging your model correctly is crucial for animation. If your model does not already have an armature, you will need to create one or adjust the existing rig to suit your animation needs.
With these steps, you\"ve successfully set up Blender for Roblox animation. You\"re now ready to dive into the actual animation process, where your creativity can truly shine.

Downloading and Installing Necessary Plugins
To animate Roblox models in Blender effectively, you will need to install specific plugins that facilitate the import/export process between Roblox and Blender. Follow these detailed steps to ensure you have everything you need:
- Find the Required Plugins: The essential plugin for this process is the \"Roblox Studio Plugin for Blender.\" This tool helps in exporting models from Roblox to Blender and vice versa.
- Download the Plugin: Visit the official Roblox or Blender community forums or the GitHub page where the plugin is hosted. Ensure you are downloading the latest version compatible with your Blender version.
- Install the Plugin in Blender: Open Blender, go to Edit > Preferences, and switch to the Add-ons tab. Click \"Install\" and navigate to the plugin file you downloaded. Select it and press \"Install Add-on.\"
- Enable the Plugin: After installation, ensure the plugin is enabled by ticking the checkbox next to its name in the Add-ons tab. You may need to restart Blender for the changes to take effect.
- Verify Plugin Functionality: To ensure the plugin was installed correctly, try exporting a simple model from Roblox Studio and importing it into Blender. If the model appears correctly, the plugin is working as intended.
With the necessary plugins installed and enabled, you are one step closer to animating your Roblox models in Blender. These tools bridge the gap between Roblox\"s proprietary formats and Blender\"s versatile animation capabilities, making your creative process smoother and more integrated.

Importing Roblox Characters into Blender
Bringing your Roblox characters into Blender for animation involves a few specific steps. Follow this guide to ensure a smooth import process:
- Export Character from Roblox Studio: Open Roblox Studio and select the character you wish to animate. Use the Roblox Studio Plugin to export the character as an .rbxm or .rbxl file.
- Convert to a Supported Format: Blender does not natively support .rbxm or .rbxl files. Use a conversion tool available online to convert your Roblox character file into an FBX or OBJ file, which Blender can import.
- Open Blender: Launch Blender and prepare for importing your character model.
- Import the Character Model: In Blender, go to File > Import and select the appropriate format (FBX or OBJ) for your converted character file. Navigate to your file location, select your character file, and click \"Import.\"
- Adjust Scale and Position: Roblox characters may import at a different scale or orientation than expected. Use Blender\"s scale and rotate tools to adjust your character to the correct size and orientation.
- Check for Issues: After importing, inspect your character for any missing parts or textures. You may need to manually add any missing textures or make adjustments to the character model in Blender.
Following these steps will bring your Roblox character into Blender, ready for rigging and animation. This process bridges the gap between Roblox\"s gaming platform and Blender\"s powerful animation toolkit, enabling you to create dynamic and engaging animations for your Roblox games.

Basic Blender Animation Tools Overview
Blender offers a comprehensive set of tools for animating Roblox characters, making it possible to bring your creations to life with dynamic movements and expressions. Familiarize yourself with these basic tools to start animating:
- Timeline: The Timeline is where you can manage your animation frames, play back your animation, and navigate through your scene.
- Dope Sheet: The Dope Sheet provides an overview of all keyframes in your animation, allowing you to easily edit timing and sequencing.
- Graph Editor: Use the Graph Editor to fine-tune the interpolation and timing of your animations for smooth, natural motion.
- Armature and Bones: Blender uses an armature system for character rigging. Bones are used to deform your character model in a realistic manner.
- Automatic Keyframe Insertion: With this feature, Blender can automatically create keyframes for any changes made to your character\"s pose.
- Shape Keys: Shape keys are used for creating facial expressions and other fine-tuned deformations without affecting the overall rig.
- Non-Linear Animation (NLA) Editor: For complex animations, the NLA Editor allows you to layer and blend different actions together.
Understanding these tools is the first step in creating engaging and lifelike animations for your Roblox characters in Blender. Practice using these tools to master the art of animation and bring your digital creations to life.
_HOOK_
Creating Your First Animation in Blender
Creating your first animation in Blender is an exciting step towards bringing your Roblox characters to life. Follow these steps to start animating:
- Position Your Character: Start with your imported Roblox character in Blender. Ensure it is correctly positioned and rigged.
- Open the Timeline: At the bottom of the Blender window, find the Timeline. This is where you\"ll create and edit your animation frames.
- Insert Keyframes: Move to the frame where you want your animation to start. Select your character or a part of it, make a pose, and press I to insert a keyframe. Choose \"Location\" and \"Rotation\" for basic movements.
- Create Your Animation: Move the timeline cursor to another frame, adjust your character\"s pose for that moment, and insert another keyframe. Repeat this process to create a sequence of movements.
- Play Your Animation: Press the Play button in the Timeline to see your animation in action. Adjust the keyframes as needed for smoother movements.
- Refine Your Animation: Use the Dope Sheet and Graph Editor to refine your animation. You can adjust the timing and interpolation of keyframes for more natural movements.
- Export Your Animation: Once satisfied with your animation, export it from Blender. Use the appropriate format for Roblox or any platform you\"re designing for.
By following these steps, you\"ll create a basic animation in Blender. Practice with different movements and expressions to enhance your skills and bring your Roblox characters to dynamic life.

Advanced Animation Techniques
Once you\"re comfortable with basic animations in Blender, elevate your Roblox character animations with these advanced techniques:
- Using Inverse Kinematics (IK): IK simplifies the animation of complex movements by allowing you to manipulate the end effector (like a hand or foot) and having the system calculate the positions of the joints automatically.
- Motion Capture Integration: For more realistic animations, consider using motion capture data. Blender allows you to import motion capture files and apply them to your character rig.
- Shape Key Animation: Beyond rigging, use shape keys to animate facial expressions and other non-rigid transformations directly on your model mesh.
- Custom Bone Shapes: Customize the appearance of your rig\"s bones for easier selection and manipulation. This can streamline your animation process, especially for complex rigs.
- Non-Linear Animation (NLA): Use the NLA editor to mix and blend multiple animation actions. This powerful feature lets you create complex sequences from simpler animations.
- Graph Editor Tricks: Master the Graph Editor for fine control over interpolation and easing. Advanced techniques like \"F-Curve Modifiers\" can add automated oscillations or randomness to your animations, making them more dynamic.
- Physics and Simulation: For animations involving cloth, hair, or dynamic interactions, explore Blender\"s physics simulations. These can add a layer of realism to your animations with natural movements that would be time-consuming to keyframe manually.
Advancing your skills with these techniques will significantly enhance the quality and realism of your Roblox animations in Blender, allowing for more expressive and engaging character movements.
Roblox Blender Animation Tutorial
\"Discover the immersive world of Roblox and join millions of players who are creating their own virtual adventures! Check out this captivating video that showcases the endless possibilities and excitement that Roblox offers.\"
How To Create Your First Blender Animation For Roblox
\"Enter the enchanting realm of Blender Animation and unlock your creative potential! Dive into this mesmerizing video that will take you on a journey through the incredible world of 3D animation and bring your imagination to life.\"
Exporting Animations from Blender to Roblox
After creating your animation in Blender, the next step is to export it into Roblox to bring your character to life in your game. Follow these steps to export your animations properly:
- Finalize Your Animation: Ensure your animation is complete and all keyframes are correctly set. Play through your animation in Blender to check for any issues.
- Choose the Correct Export Format: Roblox animations need to be in a format that Roblox Studio can import. Typically, this means exporting your animation as an FBX file.
- Export Your Animation: In Blender, go to File > Export and select FBX (.fbx). In the export options, ensure that you select \"Armature\" and \"Mesh\" and check the \"Bake Animation\" box. Choose a location to save your FBX file.
- Import Animation into Roblox: Open Roblox Studio and the game you want to add the animation to. Go to the \"Plugins\" tab and select the \"Animation Editor\". Within the Animation Editor, choose to import an animation, and select your FBX file.
- Adjust the Animation Settings: After importing, you may need to adjust the animation settings in Roblox Studio to ensure it plays correctly. This includes setting the animation\"s priority, loop settings, and playback speed.
- Test Your Animation: Attach the animation to a character or model in your game and test it in play mode to ensure it works as expected. Make any necessary adjustments in either Blender or Roblox Studio.
By following these steps, you can successfully export animations from Blender and integrate them into your Roblox games, adding dynamic and engaging content for your players to enjoy.

Tips for Smooth Animation Workflows
Creating smooth and captivating animations in Blender for Roblox requires more than just technical skill—it requires workflow optimization. Here are some tips to enhance your animation process:
- Organize Your Workspace: Customize Blender\"s layout to suit your animation workflow. Having the Timeline, Dope Sheet, and Graph Editor readily accessible can streamline your process.
- Use Shortcuts: Blender is packed with keyboard shortcuts that can speed up your animation work. Learning these can save you a significant amount of time.
- Master Keyframe Types: Understand the difference between automatic, location, rotation, and scaling keyframes. Use them appropriately to reduce unnecessary keyframe clutter.
- Implement Libraries: Build and use libraries of reusable assets and animations. Blender allows you to link or append actions from other files, enabling efficient reuse of animations.
- Block Out Major Motions First: Start by blocking out your animation\"s major movements before refining with smaller, more detailed movements. This approach helps in achieving a cohesive motion flow.
- Preview Regularly: Frequently preview your animation at different stages. This helps in catching and correcting errors early, ensuring a smoother final animation.
- Use Reference Material: Whether it\"s video footage or live models, reference material can guide your animation, making movements more realistic and believable.
- Stay Patient and Practice: Smooth animations come with time and practice. Don\"t rush the learning process; each animation project is a step towards improvement.
By incorporating these tips into your animation workflow, you\"ll not only enhance the smoothness and quality of your Roblox animations but also enjoy a more efficient and enjoyable creation process in Blender.
Common Problems and Solutions
Animating Roblox characters in Blender can present some challenges, especially for those new to the process. Here are common problems you might encounter and their solutions:
- Problem: Importing Roblox Models: Sometimes, Roblox models do not import correctly into Blender.
- Solution: Ensure you\"re using the latest version of the Roblox Studio plugin for Blender. Also, check that the model is exported from Roblox Studio in a format that Blender supports, like FBX or OBJ.
- Problem: Texture Issues: Textures may not appear correctly on imported models.
- Solution: Manually reapply textures in Blender. Make sure the texture files are correctly linked in the shader editor.
- Problem: Animation Not Playing in Roblox: Animations created in Blender may not play as expected when imported back into Roblox.
- Solution: Double-check the animation export settings in Blender. Use the FBX format and ensure \"Bake Animation\" is enabled. Verify the animation frame rate matches Roblox\"s requirements.
- Problem: Rigging Issues: Incorrectly rigged models can result in unnatural movements.
- Solution: Use the automatic weighting feature carefully and manually adjust the weight paints in Blender for more accurate deformation.
- Problem: Export Size: Exported animations might be too large or incorrectly scaled.
- Solution: Check the scale settings before exporting from Blender. Ensure the scale matches what Roblox expects, typically 1.0 in all dimensions.
Addressing these common issues will help smooth out your animation process, leading to better results and a more enjoyable experience animating Roblox characters in Blender.

_HOOK_
READ MORE:
Resources for Further Learning
Enhancing your skills in animating Roblox characters in Blender takes practice and the right resources. Here are some valuable resources for further learning:
- Blender Official Tutorials: The Blender Foundation offers a comprehensive series of tutorials for beginners to advanced users on their official website and YouTube channel.
- Roblox Developer Hub: Roblox\"s own Developer Hub provides guidelines and tutorials on creating and importing animations for Roblox games, including specific tips for Blender users.
- YouTube Tutorials: YouTube is a goldmine for tutorials. Channels like Blender Guru, CG Geek, and Darrin Lile offer tutorials that range from basic to advanced animation techniques.
- Online Courses: Platforms like Udemy, Coursera, and Skillshare feature courses on Blender animation, including how to animate characters specifically for game development.
- Blender Community Forums: Engage with the Blender community through forums and discussion boards. Websites like Blender Artists Forum and the Blender subreddit are great places to ask questions and share knowledge.
- Roblox Animation Plugins: Explore plugins created by the community for Roblox animation in Blender. These can streamline the workflow and introduce new functionalities.
- Books on Blender: Comprehensive guides and books like \"Blender For Dummies\" and \"Learning Blender: A Hands-On Guide to Creating 3D Animated Characters\" offer in-depth knowledge and tutorials for animating in Blender.
Utilizing these resources can significantly advance your animation skills, allowing you to create more dynamic and engaging animations for your Roblox games.
Embarking on the journey to animate Roblox characters in Blender opens up a world of creativity and possibility. With practice and the right resources, you can bring your unique visions to life in the Roblox universe.