Topic blender tutorial animation beginner: Embark on a creative journey with our Blender Tutorial Animation Beginner guide, designed to transform novices into skilled animators through easy-to-follow steps and practical examples.
Table of Content
- What are some free HDRIs available for beginners in Blender animation tutorials?
- Understanding Blender\"s Interface and Basics
- Starting with Simple Animations: Moving and Rotating Objects
- Introduction to Keyframe Animation
- Working with Blender\"s Physics for Realistic Animations
- YOUTUBE: Blender Tutorial: Animation for Beginners
- Creating Basic 3D Models for Animation
- Learning Sculpting for Character Animation
- Mastering Lighting and Materials for Lifelike Scenes
- Advanced Animation Techniques: Rigging and Skinning
- Animating with Grease Pencil for 2D Animation
- Rendering and Exporting Your Animations
- Resources and Communities for Ongoing Learning
What are some free HDRIs available for beginners in Blender animation tutorials?
Here is a detailed answer to your question:
When it comes to free HDRIs available for beginners in Blender animation tutorials, you can consider using the following resources:
- Poly Haven: This website offers a wide range of high-quality HDRIs that you can use for free in your Blender animations. You can browse through their collection and choose the HDRIs that best suit your project.
By utilizing these free HDRIs, you can enhance the lighting and environment of your Blender animations, giving them a more realistic and visually appealing look.
READ MORE:
Understanding Blender\"s Interface and Basics
Blender\"s interface may seem daunting at first, but it\"s designed to streamline the 3D animation process. This section introduces you to the essentials, ensuring a solid foundation for your animation journey.
- Workspace Layout: Blender\"s default layout includes 3D Viewport, Timeline, Outliner, and Properties. Learn to navigate these areas to locate tools and features efficiently.
- 3D Viewport: The heart of Blender, where you\"ll spend most of your time. Here, you can view, create, and interact with your 3D models.
- Timeline: Located at the bottom, it allows you to control the animation playback, set keyframes, and manage the timing of your animations.
- Outliner: A hierarchical list of all objects in your scene, making it easy to select and organize your models.
- Properties Panel: This section contains various tabs for modifying object properties, material settings, render settings, and more.
Start by customizing your workspace to suit your workflow. Blender is highly customizable, allowing you to adjust and save layouts based on your project needs.
- Practice navigating the 3D viewport using mouse controls: rotate (middle mouse button), pan (shift + middle mouse button), and zoom (scroll wheel).
- Learn to select objects with left-click (default setting) and right-click to open context menus.
- Experiment with adding and deleting objects using the Add menu in the 3D viewport or the delete key.
- Understand object transformation tools (move, rotate, scale) accessible from the toolbar or using hotkeys (G for grab/move, R for rotate, S for scale).
Mastering Blender\"s interface is the first step towards unlocking your creative potential in 3D animation. Spend time familiarizing yourself with these basics, and you\"ll find the rest of your animation journey much more intuitive.
Starting with Simple Animations: Moving and Rotating Objects
Creating basic animations in Blender is a straightforward process, ideal for beginners to get hands-on experience. This section guides you through the steps of animating objects by moving and rotating them within your scene.
- Object Selection: Begin by selecting the object you wish to animate in the 3D viewport.
- Inserting Keyframes: With your object selected, move to the frame on the timeline where you want your animation to start. Press I to insert a keyframe, choosing \"Location\" for movement or \"Rotation\" for turning the object. This captures the starting position or orientation.
- Animating Movement: Move the timeline to another frame, then manually move or rotate your object to its final position. Press I again and insert the corresponding keyframe. Blender will automatically create the animation between these two keyframes.
Repeat this process to add more complexity to your animation, like adding scale transformations or combining movements and rotations.
- Playback: Use the play button in the timeline to review your animation. Adjust keyframes as needed by moving them on the timeline or by updating the object\"s position and reinserting the keyframe.
- Looping Animations: To create a looping animation, ensure the object’s final position matches its initial one. Adjust the end frame of the animation in the timeline for a seamless loop.
Starting with simple animations will not only help you understand the key concepts of animation in Blender but also set a strong foundation for more complex projects. Experiment with different objects and keyframe types to enhance your skills.

Introduction to Keyframe Animation
Keyframe animation is a fundamental technique in Blender that allows animators to create movement over time. By defining key points at specific frames, you can control how objects transform throughout your scene. This section introduces you to the basics of creating keyframe animations.
- Understanding Keyframes: A keyframe marks the start or end point of a transition, storing the position, rotation, and scale of an object. Blender interpolates the frames in between, creating smooth motion.
- Setting Your First Keyframe: Move your object to the desired starting point, select it, and then go to the frame where you want the animation to begin. Press I and choose the attribute you wish to animate (e.g., Location, Rotation, Scale).
- Creating Motion: Move to another frame in the timeline, adjust your object\"s position, rotation, or scale, and insert another keyframe. Blender will animate the transition between these keyframes.
- Interpolation: Blender uses interpolation to fill in the motion between keyframes. The default setting is Bezier, creating smooth, natural transitions. You can adjust this in the Graph Editor for different effects.
Experiment with different types of keyframes and interpolation to achieve various animation styles. Remember, the more you practice, the more intuitive keyframe animation will become. Start with simple movements and gradually introduce more complex sequences as you grow more comfortable with the process.
- Tips for Effective Keyframe Animation: Use the dope sheet to manage keyframes easily, experiment with auto keyframing for quicker animation setups, and utilize the graph editor to refine your animations for maximum impact.
Mastering keyframe animation is a critical step towards creating dynamic and engaging 3D animations in Blender. With practice, you can bring any scene to life, from subtle movements to complex sequences.
Working with Blender\"s Physics for Realistic Animations
Blender\"s physics engine enables the creation of stunningly realistic animations, simulating natural movements and interactions. This section explores how to utilize Blender\"s physics to enhance your animations.
- Introduction to Physics Simulations: Understand the types of physics simulations available in Blender, including rigid bodies, fluids, cloth, and smoke. Each type offers unique settings for creating different effects.
- Rigid Body Simulation: Learn how to apply rigid body physics to objects that do not deform, making them interact with gravity and collide with each other. This is perfect for simulating falling objects, collisions, and stacking scenarios.
- Fluid Simulation: Dive into fluid dynamics to create realistic water, liquid spills, or flowing rivers. Blender\"s fluid simulator allows for detailed customization, from viscosity to flow rate.
- Cloth Simulation: Simulate fabrics and clothing on characters or objects. Adjust properties like stiffness, damping, and friction to achieve lifelike cloth behavior.
- Smoke and Fire Simulation: Create dramatic effects using smoke and fire simulations. Learn to control the spread, density, and color of smoke, as well as the intensity and spread of fire.
For each type of simulation, it\"s important to start with simple scenes to understand how different settings affect the outcome. Experimentation is key to mastering realistic animations with Blender\"s physics.
- Key Tips: Always preview your simulations at a lower resolution to save time. Once satisfied, increase the resolution for the final render.
- Integrating Physics with Animation: Combine physics simulations with keyframe animations for more complex scenes, such as a character interacting with a simulated environment.
By mastering Blender\"s physics engine, you can add a new level of realism to your animations, making them more engaging and believable. Start experimenting with different simulations to discover the vast potential of your animations.
_HOOK_
Blender Tutorial: Animation for Beginners
Animation: Get ready to be mesmerized by the enchanting world of animation! Step into a realm where creativity knows no bounds, as stunning visuals come to life in this captivating video. Prepare to have your imagination ignited and be transported to a magical universe filled with vibrant characters and extraordinary storytelling.
Blender Tutorial: Simple Animation for Beginners in 2.8
Blender: Discover the limitless potential of Blender – the ultimate 3D software that will revolutionize your creative journey! Unleash your artistic prowess as you delve into the incredible features and tools of Blender, allowing you to create breathtaking visuals and bring your wildest ideas to life. Whether you\'re a professional or just starting out, this video is your gateway to mastering the art of Blender and becoming a digital Picasso.
Creating Basic 3D Models for Animation
Before diving into animation, it\"s crucial to start with solid 3D models. This section guides beginners through the process of creating basic 3D models in Blender, laying the foundation for future animations.
- Starting with Primitive Shapes: Learn to create your first 3D model by using Blender’s primitive shapes like cubes, spheres, cylinders, and cones as building blocks.
- Modifying Shapes: Discover how to modify these basic shapes using tools such as extrude, scale, and rotate to form more complex models.
- Adding Detail: Increase the complexity of your models by adding more geometry. Use loop cuts to add more edges and vertices, allowing for more detailed modifications.
- Using Modifiers: Explore Blender\"s modifier stack to apply non-destructive transformations like Subdivision Surface for smoother geometry and Mirror for symmetrical designs.
- Materials and Textures: Apply basic materials and textures to give your models color and detail. Learn the difference between procedural textures and image textures, and how to apply them to your model.
Remember, the key to successful modeling is patience and practice. Start with simple projects to familiarize yourself with Blender’s modeling tools and gradually move on to more complex creations.
- Practice Exercises: Create a simple object like a chair or table to apply the techniques you\"ve learned. Try to model objects from your environment to improve your observational skills.
- Exploring Blender’s Asset Library: Utilize Blender’s built-in asset library for ready-made models and materials that can help speed up your learning process.
By mastering the basics of 3D modeling in Blender, you\"ll set a strong foundation for bringing your animations to life. Each model you create is a step closer to realizing your creative visions in 3D animation.

Learning Sculpting for Character Animation
Sculpting in Blender is a powerful technique for creating detailed and lifelike characters for animation. This section introduces the basics of sculpting, guiding you through the process of shaping your first character.
- Understanding Sculpt Mode: Begin by exploring Sculpt Mode in Blender. Learn about its various brushes and how they can be used to mold and shape your 3D model.
- Setting Up Your Workspace: Adjust your viewport and settings for optimal sculpting. Consider using a graphics tablet for more precise control over your brush strokes.
- Basic Sculpting Techniques: Familiarize yourself with fundamental sculpting techniques such as adding volume, carving details, and smoothing surfaces. Practice using different brushes to achieve various effects.
- Dynotopo for Dynamic Topology: Discover the power of dynamic topology (Dynotopo) to add more geometry where needed, allowing for finer details without affecting the entire model.
- Refining Your Sculpt: Learn to refine your character by adding intricate details like facial features, muscles, and clothing. This step is crucial for bringing your character to life.
- Retopology for Animation: Understand the importance of retopology, the process of creating a new, optimized mesh that follows the flow of your sculpture. This is essential for efficient animation.
- Texturing and Materials: Apply textures and materials to your character to add color and realism. Explore how to paint directly onto your 3D model within Blender.
Character sculpting is both an art and a science, requiring patience and practice. Start with simple shapes and gradually move on to more complex figures as you become more comfortable with the tools and techniques.
- Practice Exercise: Begin with a basic humanoid shape and focus on sculpting the head and facial features. Pay attention to proportions and anatomy for realism.
- Resources for Further Learning: Explore online tutorials, forums, and Blender\"s community for additional tips, tricks, and insights on character sculpting.
By dedicating time to learn sculpting in Blender, you\"ll be well on your way to creating dynamic and engaging characters for your animations.

Mastering Lighting and Materials for Lifelike Scenes
Lighting and materials are essential in creating realistic scenes in Blender. This section will guide you through the process of using lights and materials to add depth, realism, and mood to your animations.
- Understanding Blender\"s Lighting System: Get to know the different types of lights available in Blender, such as Point, Sun, Spot, and Area lights, and how they can be used to simulate real-world lighting conditions.
- Basics of Material Properties: Learn how to apply and customize materials in Blender, using the Shader Editor to adjust properties like color, roughness, and metallic for varied effects.
- Creating Realistic Textures: Explore the process of creating and applying textures to give your materials detail and realism. Utilize both procedural textures and UV mapping for complex surfaces.
- Utilizing HDRIs for Environment Lighting: Discover how to use HDRI images to simulate realistic environmental lighting, adding depth and atmosphere to your scenes.
- Implementing Three-Point Lighting: Master the three-point lighting technique to enhance your models and scenes, providing a balanced and professional look.
- Adjusting Light Settings for Mood: Learn how to adjust the color, intensity, and position of lights to set the mood and tone of your scenes, from bright and cheerful to dark and dramatic.
- Optimizing Render Settings for Lighting: Understand how to optimize your render settings to achieve the best balance between quality and render time, focusing on settings that affect lighting and shadows.
Experimentation is key to mastering lighting and materials in Blender. Try different setups and adjustments to see how they affect your scene, and don\"t be afraid to experiment with bold choices.
- Practice Exercise: Create a simple scene and experiment with various lighting setups and material properties. Observe how changes in lighting and materials affect the mood and realism of the scene.
- Exploring Advanced Techniques: As you become more comfortable, delve into more advanced topics like volumetric lighting, subsurface scattering, and the use of nodes for complex material creation.
By mastering the art of lighting and materials, you can bring your Blender scenes to life with stunning realism and detail.

Advanced Animation Techniques: Rigging and Skinning
Rigging and skinning are crucial steps in bringing your 3D characters to life with realistic movements. This section delves into the advanced techniques of rigging and skinning in Blender, ensuring your animations are as lifelike as possible.
- Understanding Rigging: Rigging is the process of creating a skeleton (armature) for a model. This skeleton consists of bones that are used to control the movement of different parts of the model.
- Creating an Armature: Learn how to add an armature to your model and place bones accurately to match the model’s geometry. Each bone controls specific parts of the model, such as limbs or facial expressions.
- Basics of Skinning: Skinning, or vertex weighting, involves assigning vertices of your model to different bones. This determines how the movement of a bone affects the surrounding mesh.
- Weight Painting: Explore weight painting tools in Blender to fine-tune the influence of each bone on the model. This allows for smoother and more controlled deformations during animation.
- Inverse Kinematics (IK) vs. Forward Kinematics (FK): Understand the difference between IK and FK, and how they can be used to automate movements and create more natural animations.
- Adding Constraints: Learn about adding constraints to bones for more advanced control over movements, such as limiting rotation or simulating mechanical joints.
- Testing and Refining: Test your rig by posing the model and making adjustments as needed. This step is essential to ensure the rig behaves as expected and provides the desired level of control.
Rigging and skinning are complex but rewarding processes that can bring a high level of realism to your animations. Practice these techniques with simple models before moving on to more detailed characters.
- Practice Exercise: Start with a basic humanoid model to practice rigging and skinning. Focus on creating a functional armature and experimenting with weight painting to understand the effects on animation.
- Advanced Techniques: As you become more comfortable, explore advanced rigging techniques such as custom bone shapes, automatic rigging tools like Rigify, and facial rigging for expressions.
Mastering these advanced animation techniques in Blender will enable you to create dynamic and complex animations, bringing your characters to life with realistic movements and expressions.
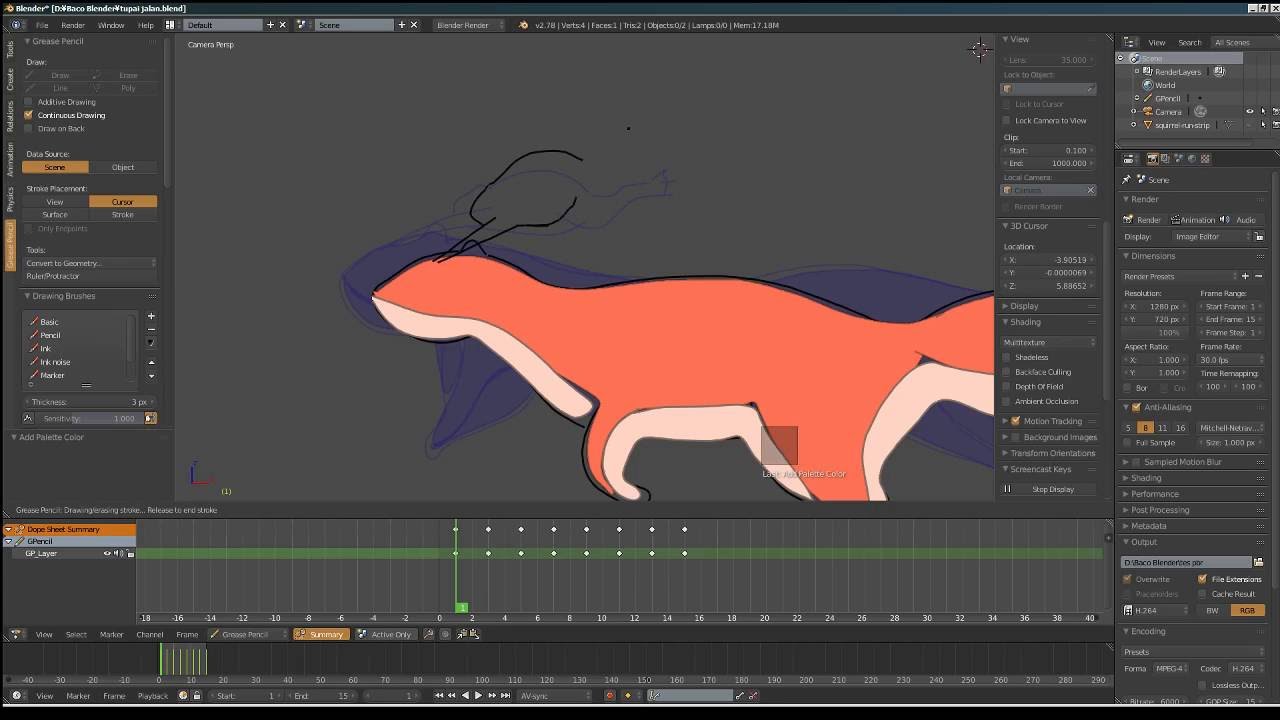
Animating with Grease Pencil for 2D Animation
The Grease Pencil tool in Blender bridges the gap between 2D drawing and 3D animation, offering a unique platform for 2D animators. This section walks you through the process of creating 2D animations using the Grease Pencil.
- Getting Started with Grease Pencil: Familiarize yourself with the Grease Pencil object and its purpose. Learn how to add a Grease Pencil object to your scene and the basics of drawing in 2D.
- Drawing Frames: Explore the different drawing modes available, such as Draw, Edit, and Sculpt, to create your animation frames. Understand the use of layers and frames within the Grease Pencil context.
- Animating Your Drawings: Learn how to animate your drawings by creating keyframes. Discover how to use the dope sheet and the timeline to manage your animation\"s timing and sequence.
- Using Sculpt and Edit Modes: Use Sculpt and Edit modes to refine your drawings and animations. These tools allow you to adjust the strokes and shapes for dynamic and fluid movements.
- Adding Colors and Fills: Dive into the material properties to add colors and fills to your drawings, bringing your 2D animations to life with vibrant visuals.
- Effects and Post-Processing: Experiment with various effects available in Blender, such as blur or glow, to enhance your 2D animations. Learn how to apply these effects directly to the Grease Pencil object.
Blender\"s Grease Pencil is a powerful tool for 2D animation, offering a seamless blend of drawing and animation capabilities. With practice, you can create complex and beautiful 2D animations directly within Blender.
- Practice Exercise: Start with a simple animation, such as a bouncing ball or a walking cycle, to get a feel for drawing and animating with the Grease Pencil.
- Exploring Advanced Techniques: As you grow more comfortable, explore more advanced Grease Pencil features like weight painting for 2D characters and using modifiers for unique effects.
Mastering the Grease Pencil tool will expand your animation capabilities, allowing you to produce stunning 2D animations with the flexibility and power of Blender\"s 3D environment.
_HOOK_
Rendering and Exporting Your Animations
After creating your animation in Blender, the next steps are rendering it into a video or sequence of images and then exporting it for sharing or further production. This section outlines the essential steps for rendering and exporting your animations effectively.
- Choosing the Right Render Engine: Decide between Blender’s render engines—Eevee for fast, real-time rendering, and Cycles for more realistic, ray-traced results. Consider your project needs and the trade-off between speed and quality.
- Setting Up Render Properties: Adjust the render properties to suit your project. This includes resolution, frame rate, and output format. Pay attention to the sampling rate in Cycles for image quality versus render time.
- Applying Lighting and Materials: Ensure all materials and lighting are correctly set up for your scene. Rendering is the process that brings out the visual qualities of your materials and the effects of your lighting setup.
- Previewing Your Animation: Use Blender’s viewport rendering to preview your animation before the final render. This can save time by allowing you to spot and correct any issues.
- Rendering Your Animation: Once satisfied with your setup, proceed to render your animation. You can render it as a sequence of images for maximum quality and flexibility or directly as a video file.
- Exporting Your Animation: If rendered as a sequence of images, use Blender’s Video Sequence Editor to compile the images into a video file. Choose your preferred video codec and container format for the final export.
Rendering and exporting are resource-intensive processes. It\"s recommended to use a powerful computer and to render large or complex projects in sections or overnight to optimize your workflow.
- Practice Exercise: Render a simple animation you\"ve created, experimenting with both Eevee and Cycles to see the differences in output and render times.
- Optimization Tips: Explore Blender\"s render settings for options that can reduce render times without significantly impacting quality, such as reducing the resolution for test renders or adjusting the light bounces in Cycles.
By mastering the rendering and exporting processes in Blender, you can achieve professional-quality animations ready for presentation or integration into larger projects.
READ MORE:
Resources and Communities for Ongoing Learning
The journey to mastering Blender is ongoing, and fortunately, there are numerous resources and communities available to support your learning. Below, we list some essential platforms where you can find tutorials, courses, and engage with fellow Blender enthusiasts.
- Blender Official Website: Start with Blender.org for official tutorials, documentation, and forums. It\"s a great place to understand the fundamentals and new features directly from the source.
- Blender Artists Community: Blender Artists is an online community where users share their work, ask questions, and provide feedback to one another. It\"s an excellent place for beginners and professionals alike.
- YouTube Channels: YouTube is a goldmine for Blender tutorials. Channels like Blender Guru, CG Geek, and Darrin Lile offer tutorials ranging from beginner to advanced levels.
- Udemy and Coursera: These online learning platforms offer comprehensive Blender courses that cover everything from basic 3D modeling to advanced animation and scripting.
- BlenderNation: Stay updated with Blender news, tutorials, and art showcases to get inspired and learn new techniques.
- Blender Stack Exchange: A Q&A site for people who use Blender to create 3D graphics, animations, or games. It\"s the perfect place to find answers to specific questions you might have.
Engaging with the Blender community and utilizing these resources can significantly accelerate your learning process. Remember, practice and persistence are key. Don\"t hesitate to share your work for feedback and always be open to learning new techniques.
- Practice Projects: Apply what you learn by working on projects. Challenges and contests hosted by community forums are great for this.
- Contribute to Open Projects: Participate in open projects or volunteer for non-profit projects to gain real-world experience while contributing to the community.
With the vast array of resources available, you have everything you need to continue growing your skills in Blender. Whether you\"re a beginner or looking to polish advanced techniques, the Blender community is an invaluable resource on your journey.
Embark on your Blender journey with confidence, equipped with the knowledge from our beginner\"s guide. Your creative potential is limitless, and with practice, you\"ll bring stunning animations to life. Let\"s animate the future together!