Topic blender 3d text animation tutorial: Embark on a creative journey with our Blender 3D Text Animation Tutorial, designed to unlock your potential in crafting stunning, animated text effects for any project.
Table of Content
- How to create a cinematic text animation using UV tricks in Blender 3D?
- Getting Started with Blender for 3D Text Animation
- Understanding Blender\"s Interface and Basic Controls
- Creating Your First 3D Text in Blender
- Applying Materials and Textures to 3D Text
- Animating Your 3D Text: Keyframe Animation Basics
- YOUTUBE: Everything You Need to Know about 3D Text in Blender
- Advanced Text Animation Techniques: Using Modifiers and Physics
- Lighting and Rendering Your Animated 3D Text
- Exporting Your Animation for Use in Other Projects
- Tips and Tricks for Efficient 3D Text Animation Workflow
- Common Problems and Solutions in 3D Text Animation
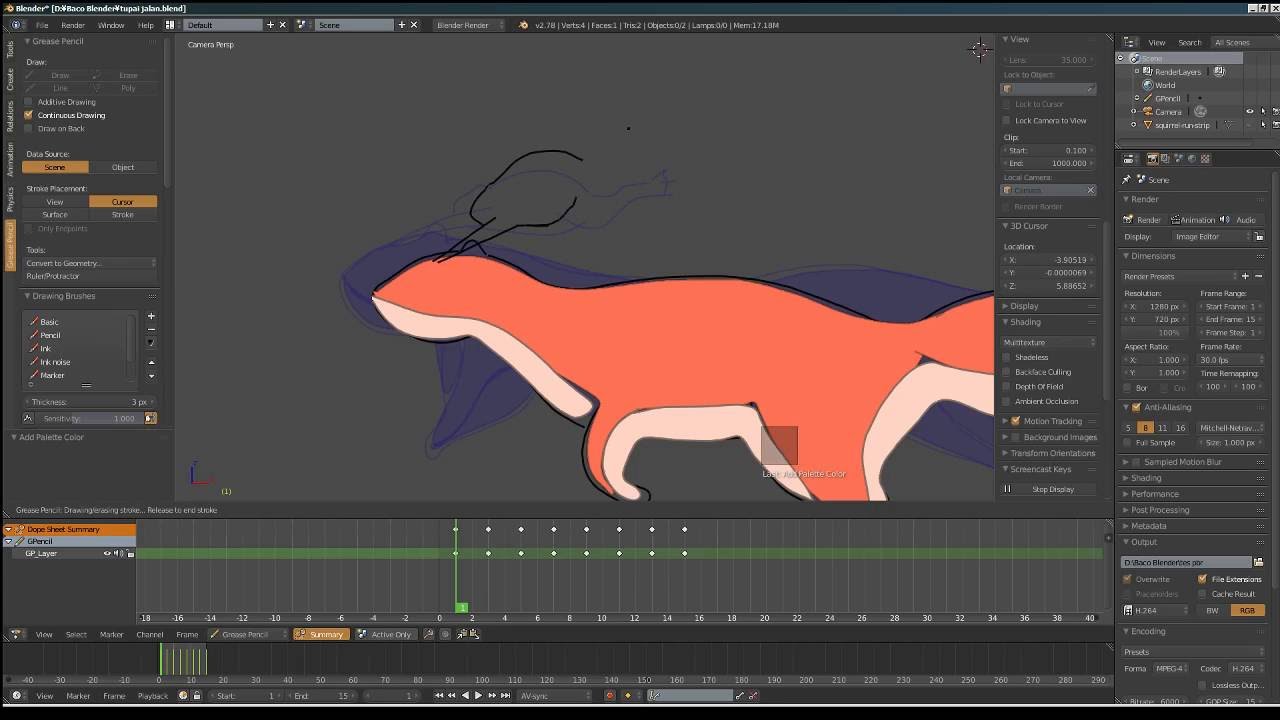
How to create a cinematic text animation using UV tricks in Blender 3D?
To create a cinematic text animation using UV tricks in Blender 3D, you can follow these steps:
- Open Blender and delete the default cube by selecting it and pressing the Delete key.
- Select the Text tool from the toolbar on the left or press Shift + A and choose Text from the menu.
- Click on the 3D Viewport to add a text object. You can then enter the desired text in the Text tab of the Properties panel on the right.
- To edit the appearance of the text, you can adjust the Font, Size, and other settings in the Text tab.
- Next, switch to the Object Data tab in the Properties panel and scroll down to the Geometry section.
- Adjust the Extrude value to give the text some thickness.
- To add UV mapping to the text, navigate to the Material Properties tab in the Properties panel.
- Click on the New button in the Material section to create a new material.
- Switch to the Shading workspace to see a more detailed view of the shading nodes.
- Add a Text Texture node and connect it to the Color input of the Principled BSDF node.
- In the Text Texture node, set the Mapping to UV coordinates.
- If you haven\'t already unwrapped the text, select it in Edit Mode, press U, and choose Unwrap to unwrap the UVs.
- Back in the Shading workspace, add a Texture Coordinate node and connect the UV output to the Vector input of the Text Texture node.
- Adjust the Scale values in the Texture Coordinate node to control the size and placement of the texture on the text.
- You can apply additional textures and effects by adding nodes and connecting them to the Principled BSDF node.
- To animate the text, go to the Layout workspace and select the Text object in the 3D Viewport.
- Press I to add a keyframe, then move to a later frame and make any adjustments to the text\'s position or appearance.
- Press I again to add another keyframe, creating an animation between the two keyframes.
- Repeat this process to add more keyframes and create a smooth animation.
- Finally, render the animation by going to the Render menu and choosing Render Animation.
READ MORE:
Getting Started with Blender for 3D Text Animation
Welcome to the exciting world of 3D text animation with Blender! Whether you\"re a beginner or looking to enhance your skills, this guide will help you get started on creating stunning 3D text animations. Blender is a powerful, open-source 3D creation suite that supports the entirety of the 3D pipeline—modeling, rigging, animation, simulation, rendering, compositing, and motion tracking.
- Download and Install Blender: If you haven\"t already, download Blender from the official website. It\"s available for Windows, macOS, and Linux. Follow the installation instructions for your operating system.
- Familiarize Yourself with the Interface: Upon opening Blender, you\"ll be greeted with its default layout, which includes areas such as the 3D viewport, timeline, and outliner. Spend some time navigating through Blender\"s interface to familiarize yourself with its components.
- Basic Navigation: Learning to navigate the 3D viewport is crucial. Use the middle mouse button to orbit around, scroll wheel to zoom in and out, and shift + middle mouse button to pan the view.
- Create Your First 3D Text: To create 3D text, press Shift + A in the 3D viewport, select Text, and a default text object will appear. Enter edit mode by pressing Tab, delete the default text, and type your desired text.
- Experiment with Fonts and Text Properties: In the properties panel, you can change the font, size, and other properties of your text. Experiment with these settings to get the look you desire.
- Save Your Project: Don\"t forget to frequently save your work. Use File > Save As to save your project to your preferred location.
Now that you\"re familiar with the basics of Blender and how to create 3D text, you\"re ready to move on to more advanced topics, such as applying materials, animating your text, and rendering. Let\"s dive in and start bringing your creative visions to life!

Understanding Blender\"s Interface and Basic Controls
Blender\"s interface might seem daunting at first, but it\"s designed to enhance your workflow and provide quick access to its powerful features. Here\"s a breakdown of the main areas and basic controls to help you navigate Blender more effectively.
- 3D Viewport: This is the heart of Blender, where you\"ll spend most of your time. It displays your 3D scene and allows for modeling, animating, and interacting with objects. Use the mouse to orbit (middle mouse button), zoom (scroll wheel), and pan (Shift + middle mouse button).
- Timeline: Located at the bottom of the default layout, the Timeline allows you to control animation playback, set keyframes, and change the current frame.
- Outliner: The Outliner, usually found on the top right, provides a hierarchical view of all objects in your scene. It\"s useful for selecting and organizing your objects, layers, and collections.
- Properties Panel: This panel, also on the right, holds various settings for your active object and scene, including materials, modifiers, physics, and render settings.
- Toolbar: Located to the left of the 3D Viewport, the Toolbar contains tools for interacting with objects in your scene, like move, rotate, scale, and more specialized tools for specific tasks.
- Editor Type Selector: Blender\"s interface is highly customizable. Each area of the screen can be changed to a different editor type, like the Node Editor, UV/Image Editor, or Text Editor, using the editor type selector in the corner of each panel.
Key Controls:
- Selection: Right-click to select objects in the 3D Viewport. Shift + right-click allows for multiple selections.
- Object Mode and Edit Mode: Toggle between Object Mode (manipulate entire objects) and Edit Mode (manipulate vertices, edges, and faces of a mesh) using the Tab key.
- Gizmo Controls: Use the move (G), rotate (R), and scale (S) shortcuts for quick transformations. Adding X, Y, or Z after pressing G, R, or S restricts the transformation to that axis.
By understanding these basics, you\"ll be better equipped to explore Blender\"s capabilities. As you become more comfortable with the interface, you\"ll find that Blender offers an incredibly flexible and powerful platform for your 3D creation needs.

Creating Your First 3D Text in Blender
Creating 3D text in Blender is a straightforward process that opens up a world of creative possibilities. Follow these steps to create your first piece of 3D text.
- Open Blender and Create a New Scene: Start Blender and select \"General\" to open a new scene. This provides you with a default cube, camera, and light.
- Delete the Default Cube: Right-click the default cube to select it and press Delete to remove it, making space for your text.
- Add Text: Press Shift + A to open the Add menu, hover over \"Text\", and click to add a text object to the scene. By default, it will display \"Text\".
- Edit the Text: With the text object selected, press Tab to enter Edit Mode. Now, you can delete the default text and type your desired message. Press Tab again to exit Edit Mode.
- Adjust the Text Properties: In the Properties Panel, navigate to the \"Object Data Properties\" tab (represented by an \"A\" icon) to access text settings. Here, you can change the font, alignment, size, and more to customize your text\"s appearance.
- Convert Text to Mesh: To apply 3D operations like extrusion or modifiers, you need to convert the text to a mesh. With the text selected, press Alt + C and choose \"Mesh from Curve/Meta/Surf/Text\". This allows for more advanced modeling techniques to be applied.
- Extrude the Text: With the text now a mesh, go to the \"Modifiers\" tab in the Properties Panel, add a \"Solidify\" modifier to give your text thickness, and adjust the thickness to your liking.
- Apply Materials: In the \"Material Properties\" tab, click \"New\" to add a material to your text. You can customize the color, specularity, and other properties to make your text visually striking.
- Adjust the Lighting: Ensure your text is well-lit by adjusting the existing light or adding new lights from the \"Add\" menu. Lighting plays a crucial role in how your text looks in the final render.
- Render Your Text: Once satisfied with your text, navigate to the \"Render Properties\" tab, select your preferred render engine (Eevee or Cycles), and click \"Render\" to see your 3D text come to life.
Congratulations! You\"ve just created your first 3D text in Blender. Experiment with different fonts, materials, and lighting setups to discover the vast possibilities Blender offers for 3D text creation.

Applying Materials and Textures to 3D Text
Applying materials and textures is an essential step in bringing your 3D text to life in Blender. This process adds color, depth, and realism to your text, making it visually appealing. Follow these steps to apply materials and textures to your 3D text.
- Select Your 3D Text: Ensure your 3D text object is selected. If you\"ve converted your text to mesh, this will allow for more complex material applications.
- Open the Material Properties Tab: In the Properties Panel, click on the Material Properties tab (icon that looks like a checkered sphere).
- Add a New Material: Click the \"New\" button to create a new material. This will be applied to your selected text object.
- Customize the Material: You can now adjust various properties such as the Base Color, Specular, Roughness, and more. Experiment with these settings to achieve the desired appearance for your text.
- Adding Textures: To add a texture, switch to the Shader Editor window. You can do this by changing one of your existing panels to the Shader Editor from the editor type selector.
- Create a Texture Node: In the Shader Editor, press Shift + A to add a node. Select \"Texture\" and then choose the type of texture you want to apply, like \"Image Texture\" if you want to use an image as a texture.
- Connect the Texture Node: Connect the Color output of your texture node to the Base Color input of the Principled BSDF shader. This will apply the texture to your material.
- Adjust the Texture Settings: With the texture node selected, you can adjust settings like the Vector and Color to fit your text properly. You might need to use additional nodes like \"Mapping\" and \"Texture Coordinate\" for more control over the texture placement.
- Preview Your Material: Use the viewport shading mode to preview how your material and texture look on the 3D text. You can switch to rendered view for a more accurate preview of the final result.
- Refine Your Material: Adjust the material and texture settings as needed based on your preview. You can add more nodes to create complex materials, like combining textures or adjusting the material\"s reflectivity.
By following these steps, you can create visually compelling materials and textures for your 3D text in Blender. Don\"t hesitate to experiment with different settings and textures to discover unique looks for your projects.
_HOOK_
Animating Your 3D Text: Keyframe Animation Basics
Animating 3D text in Blender brings your projects to life, adding movement and interest. Keyframe animation is a fundamental technique that involves defining specific points in time for your object\"s properties. Here’s how you can start animating your 3D text with keyframes.
- Prepare Your Scene: Ensure your 3D text is ready for animation. This means applying any materials, textures, and ensuring it\"s positioned correctly in your scene.
- Select Your Text Object: Click on your 3D text object to select it. Ensure it\"s the active object in the scene.
- Choose the Property to Animate: Decide on the property you want to animate. This could be the object\"s location, rotation, scale, or even material properties.
- Insert the First Keyframe: Move to the frame where you want your animation to start. Adjust your text object\"s property to its starting state. With the text object selected, hover over the property field (for example, the location field in the Object Properties panel) and press I to insert a keyframe.
- Insert Additional Keyframes: Move to another frame in your timeline where you want to create a change. Adjust the property to its new state and press I again while hovering over the property field to insert another keyframe.
- Review Your Animation: Use the playback controls in the Timeline or press Spacebar to play back your animation. You should see your text object move, rotate, or scale between the keyframes you\"ve set.
- Adjusting Keyframes: If you need to adjust the timing or values of your keyframes, open the Graph Editor or Dope Sheet from the editor type selector. This allows you to select and move keyframes or edit their values for precise control over the animation.
- Looping and More Complex Animations: To create looping animations or more complex sequences, continue adding keyframes along the timeline. You can also use the Graph Editor to adjust the interpolation and easing of your animations for smoother transitions.
- Render Your Animation: Once satisfied with your animation, go to the Render Properties tab, set your output settings, and click \"Render Animation\" to create your animated sequence.
With these steps, you\"ve learned the basics of keyframe animation in Blender. Experiment with different properties and keyframe placements to create dynamic and engaging animations for your 3D text.

Everything You Need to Know about 3D Text in Blender
Blender: Discover the amazing world of blending with this incredible video! Learn how to create mouthwatering smoothies, soups, and even desserts using the powerful and versatile blender. Get ready to be blown away by its capabilities!
Blender 3D Tutorial: Create Glass Dispersion Text Animation
Glass dispersion: Dive into the mesmerizing world of glass dispersion with this captivating video! Explore the intricate patterns and stunning colors that occur when light passes through various glass materials. Prepare to be mesmerized as this video unveils the beauty of glass dispersion like you\'ve never seen before!
Advanced Text Animation Techniques: Using Modifiers and Physics
Blender offers advanced animation techniques through the use of modifiers and physics simulations, allowing for more dynamic and complex animations of your 3D text. These tools can add realism, motion, and intricate effects to your animations. Here\"s how to utilize these advanced techniques.
- Convert Text to Mesh: Before applying most modifiers and physics, you\"ll need to convert your 3D text to a mesh. Select your text object, press Alt + C, and choose \"Mesh from Curve/Meta/Surf/Text\".
- Using Modifiers for Animation:
- Wave Modifier: Adds a waving motion to your text, simulating a flag in the wind. Adjust the width, height, and speed of the waves in the modifier properties.
- Displace Modifier: Distorts your text based on a texture. Use it for effects like text melting or warping. The effect is controlled by the texture you choose and the strength of the displacement.
- Simple Deform Modifier: Allows for bending, twisting, or stretching the text. This is great for creating animations where the text morphs into different shapes.
- Animating Modifiers: You can animate the properties of modifiers by inserting keyframes. Hover over a property field in the modifier tab and press I to insert a keyframe at the current frame.
- Using Physics for Animation:
- Cloth Simulation: Apply a Cloth modifier to your text mesh and run a physics simulation to make it behave like fabric. This can create effects where text drapes over objects or blows in the wind.
- Particle Systems: Add a Particle System to your text mesh for effects like exploding or disintegrating text. Control the direction, speed, and behavior of the particles in the particle settings.
- Rigid Body Simulation: Make your text interact with other objects in a physically accurate way, such as falling or colliding. Enable Rigid Body in the Physics properties for your text and other objects in the scene.
- Customizing Simulations: Adjust the settings in the Physics tab to customize your simulations. Factors like mass, friction, and air resistance can dramatically affect the outcome of your animation.
- Combining Techniques: For more complex animations, combine modifiers and physics simulations. For example, use a Displace Modifier with a Cloth simulation to create text that warps and flows like liquid.
- Rendering Your Animation: Physics simulations and modifiers can be computationally intensive. Ensure your scene is set up correctly and preview your animations before rendering. Adjust render settings in the Render Properties tab for the best balance between quality and performance.
By mastering these advanced text animation techniques in Blender, you can create stunning, professional-level animations that stand out. Experiment with different modifiers and physics settings to find unique and creative ways to animate your 3D text.

Lighting and Rendering Your Animated 3D Text
Lighting and rendering are crucial steps in the 3D animation process, turning your animated text into a polished, visually appealing piece. Proper lighting highlights your text\"s features, while rendering transforms your animation into a final video or image. Follow these steps to light and render your animated 3D text in Blender.
- Choose a Lighting Setup: Start by deciding on a lighting setup. Three-point lighting is a popular choice for its versatility and ability to highlight the subject from all sides. This setup includes a key light, fill light, and back light.
- Add Lights to Your Scene: Use the Shift + A menu to add lights. For a three-point lighting setup, add an Area light as the key light, another Area light with lower intensity as the fill light, and a Spot light for the back light. Position these lights around your text to achieve the desired effect.
- Adjust Light Properties: In the Light Properties tab, adjust the properties of each light, such as color, intensity, and size. Experiment with different settings to see how they affect the appearance of your text.
- Set Up Camera: Position the camera to frame your animated text appropriately. Select the camera, then use the G key to move it and the R key to rotate it. Use the camera\"s view (Numpad 0) to adjust the framing until you\"re satisfied with the composition.
- Choose a Render Engine: Blender offers different render engines, including Eevee and Cycles. Eevee is a real-time render engine, great for quick previews and faster renders. Cycles produces more photorealistic results but takes longer. Choose the one that best suits your project\"s needs.
- Render Settings: In the Render Properties tab, adjust the render settings. Set the resolution, frame rate, and output format. For animations, choose a video format like MPEG or AVI. For still images, formats like PNG or JPEG are suitable.
- Apply Post-Processing Effects: Use the Compositor in Blender to apply post-processing effects such as color correction, glare, or bloom. This can enhance the visual appeal of your final render.
- Render Your Animation: With everything set up, it\"s time to render your animation. Go to Render > Render Animation or press Ctrl + F12. Rendering can take some time, depending on the complexity of your scene and the settings you\"ve chosen.
By carefully setting up lighting and rendering options, you can greatly enhance the impact of your animated 3D text. Experiment with different light setups and render settings to achieve the best possible result for your project.

Exporting Your Animation for Use in Other Projects
Once you\"ve completed your animated 3D text in Blender, you may want to export it for use in other projects, whether it\"s for video editing, game development, or another 3D application. Blender supports various export formats, allowing you to integrate your animations into different workflows. Follow these steps to export your animation effectively.
- Choose the Right Format: Determine the best format for your needs. For video projects, exporting as a movie file (e.g., AVI, MPEG) is common. For use in other 3D software, formats like FBX, OBJ, or DAE are more suitable.
- Prepare Your Scene: Ensure your animation is finalized, including all animations, materials, and textures. Check the animation playback to ensure everything is as expected.
- Adjust Export Settings: Go to File > Export and select your desired format. Each format has its own set of options, such as scale, which layers to export, and whether to include animations. For video formats, you\"ve likely already set the output settings in the Render Properties tab.
- Exporting for Video Editing: If exporting for video editing, ensure your render settings are correct for resolution, frame rate, and format. Then, render your animation to a video file or an image sequence.
- Exporting for 3D Applications: When exporting for use in other 3D applications, choose a format like FBX or OBJ. In the export options, select \"Include Animation\" if you want to export the animation keyframes. Also, check \"Apply Transform\" if you need to ensure that scale and rotation are correctly applied.
- Include Textures: If your animation includes textures, ensure you select the option to include them in the export file, or prepare to export them separately, depending on your chosen format\"s capabilities.
- Check Compatibility: Before exporting, check the compatibility of your export format with the destination software. This might require adjusting export settings or preparing your assets differently.
- Perform the Export: Once you\"ve adjusted all settings, click \"Export\" to create your file. For large scenes or complex animations, this process may take some time.
Exporting your animation from Blender allows you to bring your creative work into a variety of other projects and platforms. By following these steps, you can ensure your animated 3D text is ready for further use, whether it\"s in a video production, a game, or another 3D modeling application.

Tips and Tricks for Efficient 3D Text Animation Workflow
Creating 3D text animations in Blender can be both fun and challenging. Here are some tips and tricks to help streamline your workflow, save time, and enhance the quality of your animations.
- Use Templates: Save commonly used settings, objects, or materials as templates. This can significantly speed up the process of creating new projects by providing a starting point that already has a set of predefined elements.
- Keyboard Shortcuts: Blender is known for its extensive use of keyboard shortcuts. Familiarize yourself with these shortcuts to speed up your workflow significantly. Key shortcuts for transforming objects (G, R, S), switching between modes (Tab), and accessing the add menu (Shift + A) are especially useful.
- Modifiers Are Your Friends: Modifiers can automate repetitive tasks and create complex effects with minimal effort. Use them creatively to add depth and complexity to your 3D text animations without manually modeling every detail.
- Batch Rendering: If you\"re working on multiple animations or need to render several versions of a project, consider using batch rendering. This allows you to render multiple scenes or animations back-to-back automatically.
- Organize Your Scene: Use collections and layers to organize your scene. This not only helps in keeping your project tidy but also makes it easier to manage visibility and render settings for different objects or groups of objects.
- Preview Renders: Use low-resolution preview renders to test animations or lighting setups before committing to a full render. This can save a lot of time, especially for complex scenes or high-resolution projects.
- Use the Asset Browser: Blender\"s Asset Browser allows you to easily store and reuse assets, including models, materials, and animations. Building up a library of assets can greatly accelerate the production of new projects.
- Stay Updated: Blender is constantly being updated with new features and improvements. Keeping your software up to date can provide access to more efficient workflows and tools.
- Community Resources: The Blender community is vast and supportive. Utilize forums, tutorials, and shared assets from the community to learn new techniques and solve problems more efficiently.
- Customize Your Interface: Blender allows for a highly customizable interface. Arrange panels and windows in a way that suits your workflow best. This can help keep the tools you use most often within easy reach.
By incorporating these tips into your 3D text animation projects, you can streamline your workflow, making it more efficient and enjoyable. Remember, practice and experimentation are key to mastering Blender and unlocking its full potential.

_HOOK_
READ MORE:
Common Problems and Solutions in 3D Text Animation
In the journey of creating 3D text animations with Blender, you may encounter several common problems. Here are some of the most frequent issues and their solutions to help you navigate through your projects smoothly.
- Text Not Appearing as Expected:
- If your text isn\"t displaying correctly, ensure you\"ve converted it from a text object to a mesh if you\"re trying to apply certain modifiers or physics. Use Alt + C to convert the text to mesh.
- Difficulty with Texturing:
- Applying textures to 3D text can sometimes result in unexpected results. Make sure your text mesh has been properly UV unwrapped. If you\"re new to UV mapping, Blender has an \"Unwrap\" option in the UV Editing layout that can automate this process for you.
- Animations Look Stiff:
- To create more natural-looking animations, use the Graph Editor to adjust the interpolation of your keyframes. Bezier interpolation often provides smoother transitions between keyframes.
- Render Times Are Too Long:
- High render times can be due to complex materials, high subdivision levels, or extensive use of lighting and shadows. Optimize your scene by reducing polygon count, using simpler shaders, or adjusting render settings like resolution and samples.
- Materials Look Unrealistic:
- For materials that look more realistic, ensure you\"re using the Principled BSDF shader and adjusting its settings according to the material you\"re trying to simulate. Incorporating HDRI images for lighting can also significantly improve realism.
- Animation Doesn\"t Loop Smoothly:
- If your animation needs to loop but doesn\"t do so smoothly, check the keyframes at the beginning and end of your loop. Ensure they match perfectly, and adjust the animation curves in the Graph Editor for seamless transitions.
- Text Intersecting with Other Objects:
- For text intersecting with other objects in your scene, consider using the Boolean modifier to subtract or combine mesh objects cleanly. This can be particularly useful for creating complex scenes with 3D text interacting with other elements.
- Problems with Lighting:
- If your scene\"s lighting doesn\"t highlight your text well, experiment with different light types and positions. Three-point lighting is a versatile setup that can enhance the appearance of your text.
Encountering problems is a normal part of the learning process in 3D animation. With patience and practice, you can overcome these challenges and create stunning 3D text animations in Blender.
Embark on a creative journey with our comprehensive Blender 3D text animation tutorial, designed to guide you from basics to advanced techniques. Unlock your artistic potential and bring your digital visions to life with ease and confidence.