Topic blender tutorial for beginners animation: Embark on a creative journey with our Blender tutorial for beginners, designed to teach you animation from the ground up. Discover the thrill of bringing your ideas to life in 3D!
Table of Content
- What are the basics of animation in Blender for beginners?
- Getting Started with Blender for Animation
- Understanding Blender\"s Interface and Basic Tools
- Introduction to Keyframing and Animation Principles
- Creating Your First Simple Animation in Blender
- Working with Blender\"s Timeline and Dope Sheet
- YOUTUBE: Animation for Beginners (Blender Tutorial)
- Animating Objects and Using Modifiers for Effects
- Character Animation Basics: Rigging and Skinning
- Adding Materials and Textures to Your Animation
- Lighting and Rendering Your Animation
- Exporting Your Animation for Sharing
- Additional Resources and Communities for Learning
What are the basics of animation in Blender for beginners?
The basics of animation in Blender for beginners include:
- Understanding the Blender interface and familiarizing yourself with the different panels and tools.
- Creating a simple object or character to animate.
- Setting keyframes to define the starting and ending positions of the object or character.
- Using the timeline to control the animation.
- Adjusting the timing and easing of the animation to create smooth and realistic motion.
- Adding secondary motion or additional movements to enhance the animation.
- Rendering the animation to create a final video output.
READ MORE:
Getting Started with Blender for Animation
Starting your journey in Blender for animation is an exciting step towards creating your own 3D animations. This section will guide you through the initial steps to get Blender set up and introduce you to the basics of animation.
- Download and Install Blender: Visit the official Blender website to download the latest version. Installation is straightforward, follow the prompts.
- Familiarize Yourself with the Interface: Upon launching Blender, take some time to familiarize yourself with the layout. Identify key areas such as the 3D viewport, timeline, and properties panel.
- Basic Navigation: Learn to navigate the 3D viewport. Practice zooming, panning, and rotating the view to comfortably explore your 3D space.
- Adding Objects: Discover how to add basic objects to your scene, which is essential for creating any animation. Use the \"Add\" menu or shortcuts to place meshes like cubes and spheres.
- Introduction to Keyframes: Keyframes are the backbone of animation in Blender. Learn to insert keyframes for object properties like location, rotation, and scale to start animating.
- Play Around with Simple Animations: Try creating a basic animation by changing the position of an object over time using keyframes. Experiment with the timeline to adjust the timing and flow of your animation.
- Rendering Your First Animation: Explore the rendering options to export your first simple animation. Understand the difference between rendering a single image and an animation sequence.
By following these steps, you will have taken your first strides in Blender animation. Remember, practice is key to mastering the software\"s extensive capabilities.

Understanding Blender\"s Interface and Basic Tools
Blender\"s interface might seem daunting at first, but with a bit of guidance, you\"ll find it intuitive and powerful for creating animations. This section breaks down the essentials to get you comfortable with the workspace and basic tools.
- 3D Viewport: The heart of Blender, where you visually interact with your models. You can view, edit, and animate objects here.
- Timeline: Located at the bottom of the default layout, it controls the animation playback, allowing you to scrub through keyframes.
- Properties Panel: This panel provides access to all the properties of the selected object, including modifiers, materials, and physics settings.
- Outliner: A hierarchical list of all objects in the scene, helping you to organize and select different elements quickly.
- Toolshelf (T) and Properties Shelf (N): Accessible in the 3D Viewport for quick access to tools and object properties.
Key Tools for Beginners:
- Move, Rotate, Scale: Fundamental tools for manipulating objects in your scene. Use hotkeys G (move), R (rotate), and S (scale) for efficiency.
- Edit Mode: Access this mode by pressing Tab. It allows you to modify the vertices, edges, and faces of your object.
- Extrude: A crucial tool in modeling, used to extend faces, edges, or vertices to add complexity to your mesh.
- Modifiers: Non-destructive tools that alter your object\"s geometry in various ways, like adding smoothness (Subdivision Surface modifier) or mirroring (Mirror modifier).
- Materials: Use the Material properties tab to add color and texture to your objects, making them look more realistic or stylized according to your vision.
Understanding these components and tools is your first step towards mastering Blender. Experiment with each tool to see how it affects your models and animations.
Introduction to Keyframing and Animation Principles
Keyframing is the cornerstone of animation in Blender, allowing you to create movement and change over time. Understanding this concept, along with fundamental animation principles, will set the foundation for all your animation projects.
- What is a Keyframe? A keyframe marks the start or end point of any transition in Blender. It records the position, rotation, and scale of an object at a particular frame in your timeline.
- Inserting Keyframes: To create an animation, you place keyframes at different points in the timeline for the properties you want to animate. Press \"I\" while your object is selected to insert a keyframe.
- Animation Principles: Familiarize yourself with basic animation principles such as Anticipation, Timing, Squash and Stretch, and Follow Through. These principles bring life and realism to your animations.
- Animating with Interpolation: Blender automatically calculates the frames between your keyframes, known as interpolation. This creates the illusion of motion in your animation.
- Graph Editor: Use the Graph Editor to refine your animations. It displays the interpolation curves of your keyframes, allowing you to adjust the speed and timing of animations for smoother results.
Practice these key concepts by animating simple objects. Experiment with different types of animations and apply the principles you\"ve learned to see how they affect your work. As you become more comfortable with keyframing and these foundational principles, you\"ll be well on your way to creating more complex and engaging animations in Blender.
Creating Your First Simple Animation in Blender
Creating your first animation in Blender is an exciting milestone. This guide will walk you through the process step-by-step, from setting up your scene to rendering your animation. Let’s animate a basic object to understand the workflow.
- Setting Up Your Scene: Open Blender and delete the default cube. Add a new object, like a sphere, by going to Add > Mesh > UV Sphere.
- Positioning Your Object: Place your object at the starting point of the animation. Use the move tool (G) to position it.
- Inserting the First Keyframe: Decide on the property you want to animate (e.g., location). With your object selected, press \"I\" and choose \"Location\" to insert your first keyframe at frame 1.
- Moving the Timeline: Drag the timeline to a later frame, such as frame 30. Move your object to its final position in the animation and insert another keyframe.
- Animating Rotation or Scale: Follow the same process to animate other properties like rotation (R) and scale (S). Insert keyframes for these transformations at different points in your timeline.
- Previewing Your Animation: Press the play button in the timeline to see your animation. Adjust the keyframes as needed for smoother motion.
- Rendering the Animation: Go to the Output Properties tab. Set your output settings, such as file format and destination. Press Ctrl + F12 to render your animation.
With these steps, you\"ve created your first simple animation in Blender. Experiment with different objects and animations to continue learning and exploring the powerful capabilities of Blender.

_HOOK_
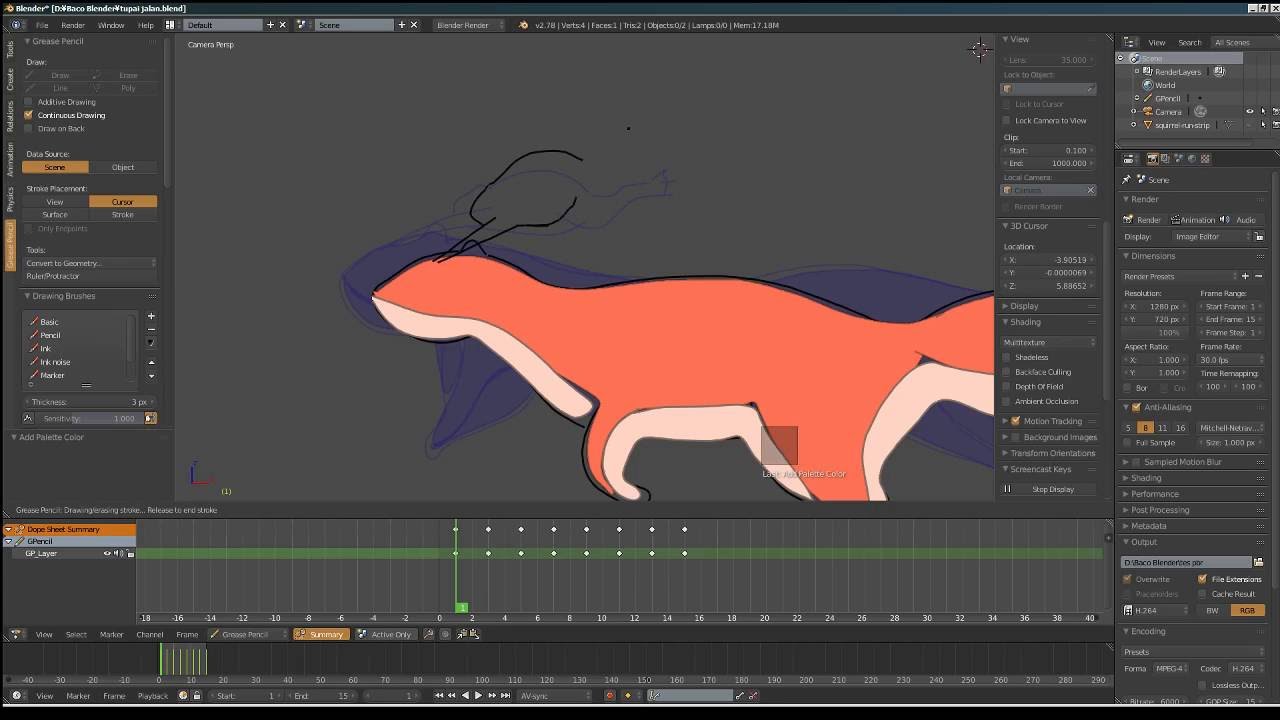
Working with Blender\"s Timeline and Dope Sheet
The Timeline and Dope Sheet in Blender are crucial for animation, offering control over keyframes and animation sequences. Understanding how to use these tools effectively is key to creating smooth and complex animations.
- Timeline Overview: The Timeline at the bottom of the Blender interface allows you to play back your animation, set the start and end frames, and navigate through keyframes. It\"s essential for controlling the overall timing of your animation.
- Using the Dope Sheet: The Dope Sheet provides a detailed view of all keyframes and their timing. It\"s particularly useful for adjusting the spacing between keyframes, which in turn affects the speed of the animation.
- Adding and Removing Keyframes: In both the Timeline and Dope Sheet, you can insert keyframes by selecting an object, moving to the desired frame, and pressing \"I\" to insert a keyframe for the chosen property. Remove keyframes by right-clicking them and selecting \"Delete Keyframes\".
- Moving Keyframes: Click and drag keyframes in the Dope Sheet to adjust their timing. This is helpful for synchronizing actions or creating smoother transitions.
- Keyframe Types: Blender uses different color codes for keyframes to indicate their type, such as movement, rotation, or scaling. This visual cue helps you quickly identify the nature of the animation at each keyframe.
- Animating Multiple Objects: The Dope Sheet displays keyframes for all objects in your scene. This makes it easier to manage complex animations involving multiple elements.
- Interpolation and Keyframe Handles: Use the Graph Editor in conjunction with the Dope Sheet to adjust the interpolation between keyframes. This allows for more nuanced control over the animation\"s pace and flow.
By mastering the Timeline and Dope Sheet, you gain the ability to refine your animations with precision, creating more dynamic and engaging results.

Animation for Beginners (Blender Tutorial)
Dive into the world of 3D animation with this comprehensive Blender tutorial, where you\'ll learn all the essential tools and techniques to bring your creative visions to life. Don\'t miss out on this opportunity to master the art of Blender!
Blender Tutorial: Simple Animation For Beginners in 2.8
Discover the magic of animation with this easy-to-follow tutorial that will guide you step-by-step in creating simple yet captivating animations. Unleash your creativity and join us on this exciting journey into the world of motion and storytelling!
Animating Objects and Using Modifiers for Effects
Animating objects in Blender and using modifiers can significantly enhance your projects, adding complexity and visual appeal with relatively simple techniques. Here\"s how to start animating objects and applying modifiers for effects.
- Basic Object Animation: Begin by animating basic object properties like location, rotation, and scale. Use keyframes to define these properties at different points in time, creating motion.
- Modifiers for Animation: Modifiers can be animated to add effects such as deformation or to automate part of the animation process. For example, the Wave modifier can create a ripple effect on a plane, simulating water.
- Using the Array Modifier: The Array modifier creates copies of your object in an array. Animate the offset or count for dynamic effects, such as objects moving in a pattern or growing in number over time.
- Animating Materials: Properties of materials can also be animated. Keyframe changes in color, emission, or transparency to add life to your scenes.
- Shape Keys for Mesh Deformation: Shape keys are powerful for animating mesh deformations. Create different \"shapes\" of your mesh and animate between them for complex transformations or facial expressions.
- Using the Armature Modifier for Character Animation: The Armature modifier allows you to rig and animate characters. By attaching a mesh to a skeleton, you can animate the character with realistic movement.
- Physics and Particles: Blender\"s physics and particle systems can be animated for natural phenomena like smoke, fire, or rain. These systems add a layer of realism and dynamic behavior to your animations.
By combining object animation with the strategic use of modifiers, you can create captivating animations that stand out. Experiment with different modifiers and animation techniques to discover the full potential of your creativity in Blender.

Character Animation Basics: Rigging and Skinning
Character animation is a fascinating aspect of Blender that involves bringing characters to life through rigging and skinning. These steps are essential for creating animations that are realistic and engaging.
- Understanding Rigging: Rigging is the process of creating a skeleton (armature) for a character. This skeleton is made up of bones that control specific parts of the character\"s body.
- Creating an Armature: Start by adding bones within your character model. Each bone represents a part of the body that will move independently. Use the Armature object type to begin this process.
- Naming Bones: Properly name each bone to reflect the part of the body it controls, such as \"LeftArm\" or \"RightLeg\". This step is crucial for organization and ease of animation later on.
- Parenting Mesh to Armature: Once your armature is complete, you need to connect (parent) your character\"s mesh to the armature. This process is known as skinning. Select your mesh, then the armature, and press Ctrl+P to parent them with automatic weights.
- Weight Painting: After skinning, you may need to adjust how much influence each bone has on the mesh. Use Weight Painting to fine-tune these influences for more realistic movements.
- Posing Your Character: With the rigging and skinning complete, you can now pose your character. Select the armature, switch to Pose Mode, and move the bones to see how your character responds.
- Animating Your Character: Similar to animating objects, insert keyframes for the bones at different frames to create motion. Experiment with basic actions like walking or waving.
Rigging and skinning are foundational skills for character animation in Blender. With practice, you can create characters that move in believable and compelling ways, bringing your animations to life.

Adding Materials and Textures to Your Animation
Materials and textures bring your Blender animations to life, adding color, detail, and realism. This section guides you through the process of enhancing your animated objects and characters with materials and textures.
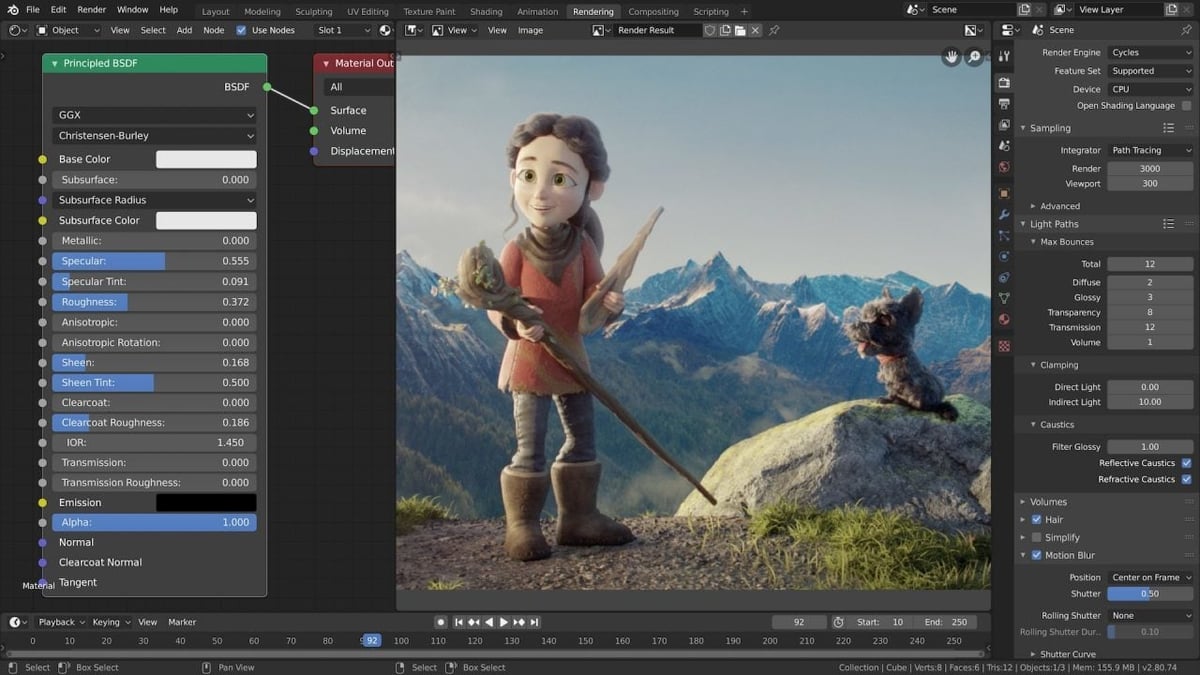
- Understanding Materials: Materials define the color and surface properties of your objects. In Blender\"s Shader Editor, you can create and assign materials using nodes.
- Creating a New Material: Select your object and go to the Material Properties tab. Click \"New\" to create a material. Customize its color, metallic property, and roughness to achieve the desired look.
- Applying Textures: Textures are images or procedural patterns that add detail to your materials. Add a texture node in the Shader Editor and connect it to the Base Color of the material node.
- UV Unwrapping: For image textures, UV unwrapping is necessary to correctly map the 2D texture onto the 3D object. Enter Edit Mode, select all faces, and use the UV > Unwrap option.
- Adjusting Texture Settings: Use the Shader Editor to adjust the texture\"s mapping, scale, and rotation. This fine-tuning is crucial for achieving realistic effects.
- Using Normal Maps for Detail: Normal maps can add the illusion of complexity and detail without adding geometry. Apply a normal map through the Normal Map node connected to the Normal input of the material.
- Animating Materials: You can animate almost any aspect of your materials and textures. Keyframe the values in the Shader Editor to change over time, such as color shifts or opacity changes.
With materials and textures, your animations will have more depth and appeal. Experiment with different settings and techniques to discover the vast possibilities for enhancing your Blender projects.
Lighting and Rendering Your Animation
Lighting and rendering are crucial steps in the animation process that bring your Blender projects to life. Proper lighting can add depth, emotion, and realism to your scenes, while rendering transforms your 3D models and animations into shareable videos or images. Follow these steps to effectively light and render your animation in Blender.
- Understanding Blender\"s Lighting System:
- Blender offers various types of lights such as Point, Sun, Spot, and Area lights. Each has its own characteristics and uses. Experiment with different lights to see how they affect your scene.
- Adding Lights to Your Scene:
- Start by adding a light source to your scene. You can do this by going to Add > Light and choosing the type of light you need. Place the light in a position that best highlights your models and creates the desired shadows.
- Adjusting Light Settings:
- Each light type has settings that can be adjusted, such as color, intensity, and distance. These settings allow you to fine-tune how the light interacts with your objects, enhancing the mood and depth of your scene.
- Using Three-Point Lighting:
- A common and effective lighting setup is three-point lighting. This involves using three light sources: the key light, fill light, and back light, each placed at strategic points around your subject to create dimension and reduce flatness.
- Exploring Environmental Lighting:
- For more global illumination, consider using environmental lighting. This involves adding a sky texture or HDR image in the World settings, which can provide a more natural and consistent light across your entire scene.
- Setting Up Cameras:
- Position your camera(s) in the scene to capture the desired angles and compositions. You can add a camera by going to Add > Camera. Adjust the camera settings, such as focal length and depth of field, to achieve the desired shot.
- Rendering Your Animation:
- To render your animation, go to the Render tab and adjust your render settings. Choose your output format, resolution, and frame rate. For animations, you\"ll likely use the \"Animation\" button to render the entire sequence.
- Render Engines: Blender includes different render engines like Eevee (real-time) and Cycles (ray-traced). Choose the one that best suits your project\"s needs.
- Optimizing Render Settings: Adjust settings such as sampling, light bounces, and denoising to balance render quality with time.
- Post-Processing:
- After rendering, you can use Blender\"s Compositor to apply post-processing effects such as color correction, blurs, and glows to enhance your final animation.
- Exporting Your Animation:
- Once you\"re satisfied with your rendering, export your animation. Blender supports exporting to various formats, including AVI, MPEG, and MOV. Choose the format that works best for your distribution platform.
By carefully planning your lighting and rendering settings, you can dramatically improve the quality of your animations, making them more vibrant, realistic, and engaging for your audience.
_HOOK_
Exporting Your Animation for Sharing
After you\"ve created your animation in Blender, the final step is to export it so you can share your work with others. This process involves several key steps to ensure your animation looks its best on any platform. Follow this guide to successfully export and share your Blender animations.
- Choosing the Right Format:
- Blender supports various export formats, including AVI, MPEG, and MOV for videos, and PNG, JPEG, and TIFF for still images. Consider your target platform and audience when choosing the format. For example, MP4 is widely used for its balance of quality and file size.
- Setting Export Options:
- In the Output Properties panel, you can set your desired resolution, frame rate, and aspect ratio. High-definition resolutions like 1080p or 4K offer better quality but result in larger file sizes. Adjust these settings based on where you plan to share your animation.
- Configuring Video Encoding:
- To export your animation as a video, go to the Output Properties panel and find the Encoding section. Here, you can select the video codec (such as H.264 for MP4 files), audio codec, and bitrate. A higher bitrate generally means better quality but also a larger file size.
- Audio Export:
- If your animation includes audio, ensure the audio codec is set correctly and that the output file format supports audio. Blender allows you to export both video and audio in sync if the correct settings are applied.
- Rendering and Exporting Your Animation:
- Once all settings are configured, it\"s time to render your animation. Click on the \"Render\" menu and select \"Render Animation\" or press Ctrl+F12. Blender will render each frame of your animation, which may take some time depending on the complexity and length of your animation.
- Checking the Final Output:
- After rendering, locate your animation file in the output folder you specified. Play the file to ensure the animation renders as expected and the quality meets your standards.
- Sharing Your Animation:
- Now that your animation is exported, it\"s ready to be shared. You can upload it to video sharing platforms like YouTube or Vimeo, share it on social media, or embed it in websites. Consider compressing the file with a video compression tool if the file size is too large for your sharing needs.
Exporting your animation is the final step in the creative process, allowing you to share your vision with the world. By carefully selecting the right settings and formats, you can ensure that your animation reaches your audience in the best possible quality.

READ MORE:
Additional Resources and Communities for Learning
Embarking on your Blender animation journey can be exciting and, at times, challenging. Fortunately, a wealth of resources and communities are available to support your learning and development. Whether you\"re looking for tutorials, feedback on your work, or just a bit of inspiration, these platforms can help you grow as an animator.
- Blender Official Website:
- The Blender official website offers tutorials, documentation, and forums. It\"s a great starting point for beginners to understand the basics and for advanced users to stay updated on new features.
- YouTube Channels:
- Many experienced Blender artists share their knowledge through YouTube tutorials. Channels like Blender Guru, CG Geek, and Ducky 3D provide step-by-step guides for various skill levels, covering everything from basic modeling to complex animations.
- Blender Artists Community:
- The Blender Artists forum is a vibrant community where users share their work, ask for feedback, and help each other with technical issues. It\"s a great place to connect with fellow Blender enthusiasts.
- Online Courses and Workshops:
- Websites like Udemy, Coursera, and Skillshare offer structured Blender courses ranging from beginner to advanced levels. These platforms often provide comprehensive learning paths, including projects to practice your new skills.
- Blender Network:
- The Blender Network connects Blender professionals and enthusiasts worldwide. It\"s an excellent resource for finding mentors, collaborative projects, and job opportunities.
- Social Media Groups:
- Facebook, Reddit, and LinkedIn have active Blender groups where members share tips, tricks, and tutorials. Joining these groups can help you stay motivated and informed about the latest Blender trends.
- Blender Conferences and Meetups:
- Annual Blender conferences and local meetups offer opportunities to learn from expert speakers, participate in workshops, and network with other Blender users. These events are perfect for gaining insights and inspiration.
By exploring these resources and engaging with the Blender community, you can accelerate your learning process and take your animation skills to the next level. Remember, the journey of learning Blender is a marathon, not a sprint, so take your time, practice regularly, and don\"t hesitate to seek help when needed.
Embark on a creative journey with our Blender tutorial for beginners, designed to transform your animation dreams into reality. Discover the power of Blender and join a community of artists who share your passion for bringing stories to life.