Topic blender shortcuts for mac: Unlock your creative potential with our comprehensive guide to Blender shortcuts for Mac, designed to streamline your 3D modeling process and enhance productivity.
Table of Content
- What are the keyboard shortcuts for Blender on a Mac?
- Overview of Blender Shortcuts on Mac
- Basic Navigation and 3D Viewport Shortcuts
- Object Mode and Edit Mode Switching
- Modeling and Sculpting Shortcuts
- Camera and Viewport Navigation Shortcuts
- Animation and Timeline Control Shortcuts
- YOUTUBE: Blender for MacOS Users: 3-Buttons Mouse Viewport Navigation Not Required
- Rendering and Scene Setup Shortcuts
- Customizing Blender Shortcuts on Mac
- Common Issues and Troubleshooting Shortcuts
- Advanced Tips for Using Blender Shortcuts
What are the keyboard shortcuts for Blender on a Mac?
Here is a list of keyboard shortcuts for Blender on a Mac:
- Cmd + Option + Click - Select multiple objects
- Cmd + Click - Select/deselect individual objects
- A - Deselect all objects
- G - Grab/move selected objects
- S - Scale selected objects
- R - Rotate selected objects
- E - Extrude selected faces, edges, or vertices
- F - Fill selected faces
- X - Delete selected objects, faces, edges, or vertices
- Cmd + Z - Undo
- Cmd + Shift + Z - Redo
Please note that most of the shortcuts are similar to the Windows version of Blender, but you need to replace \"Ctrl\" with \"Cmd\" on a Mac.
Keep in mind that Blender\'s shortcuts are highly customizable, so these are just the default shortcuts. You can modify them to suit your needs by going to Preferences > Keymap.
READ MORE:
Overview of Blender Shortcuts on Mac
Blender shortcuts for Mac are essential for efficient 3D modeling, animation, and rendering. These keyboard shortcuts are designed to facilitate quick access to Blender\"s numerous features, improving workflow and productivity. Whether you\"re a beginner or a seasoned professional, mastering these shortcuts can significantly enhance your creative process.
- Basic Navigation: Use shortcuts for zooming, panning, and rotating the view in the 3D viewport to navigate your scene effortlessly.
- Object and Edit Modes: Quickly switch between Object and Edit modes to streamline your modeling and editing tasks.
- Modeling Shortcuts: Access a variety of tools for creating and modifying geometry with simple keystrokes.
- Animation Controls: Utilize shortcuts for playing back animations, setting keyframes, and manipulating the timeline for efficient animation creation.
- Rendering and Scene Setup: Speed up your rendering and scene setup process with dedicated shortcuts for rendering scenes and adjusting camera views.
- Customization: Blender allows for customization of shortcuts, enabling you to tailor the interface to fit your workflow.
Understanding and using these shortcuts on your Mac can greatly accelerate your 3D projects, making Blender an even more powerful tool in your creative arsenal.
Basic Navigation and 3D Viewport Shortcuts
Navigating the 3D viewport efficiently is crucial for modeling, texturing, and animating in Blender. Mastering these shortcuts will help you move through your scene with ease, allowing for a smoother creative process on your Mac.
- Rotate View: Hold down the Option key and drag with the left mouse button.
- Pan View: Hold down the Shift + Option and drag with the left mouse button.
- Zoom: Scroll up or down with the mouse wheel, or Ctrl + Option and drag with the left mouse button.
- Zoom to Object: Select an object and press Shift + C to center the view on the object.
- View Selected: With an object selected, press Numpad . (or Fn + Option + . on Macs without a numpad) to focus the view on the selected object.
- Switch between Perspective/Orthographic View: Press Numpad 5 or Fn + Option + 5 on Macs without a numpad.
- View Front/Back: Numpad 1 for front view, Ctrl + Numpad 1 for back view, or use Fn + Option + 1 for Macs without a numpad.
- View Top/Bottom: Numpad 7 for top view, Ctrl + Numpad 7 for bottom view, or use Fn + Option + 7 for Macs without a numpad.
- View Right/Left: Numpad 3 for right view, Ctrl + Numpad 3 for left view, or use Fn + Option + 3 for Macs without a numpad.
Utilizing these shortcuts will drastically reduce the time you spend navigating in Blender, giving you more time to focus on the creative aspects of your projects.

Object Mode and Edit Mode Switching
Switching between Object Mode and Edit Mode is a fundamental aspect of Blender, enabling artists to toggle between manipulating entire objects and editing individual vertices, edges, or faces. These modes are pivotal for detailed modeling and scene arrangement.
- Switch to Object Mode: Press Tab when in Edit Mode, or use the mode selector in the 3D viewport\"s header.
- Switch to Edit Mode: Press Tab while an object is selected in Object Mode, or select Edit Mode from the mode selector.
- Direct Mode Switching: Use the pie menu by pressing Ctrl + Tab to switch directly to other modes, including Sculpt, Vertex Paint, Weight Paint, and more, without cycling through.
- Tips for Efficiency: Familiarizing yourself with these shortcuts will significantly speed up your workflow, allowing for quick toggles between modes as you refine your models.
These shortcuts are essential for efficient navigation through Blender\"s complex interface, enabling a seamless transition between broad object manipulation and detailed mesh editing on your Mac.

Modeling and Sculpting Shortcuts
Mastering Blender shortcuts can significantly enhance your modeling and sculpting efficiency on Mac. Here\"s a comprehensive guide to key shortcuts and tips.
- General Modeling Shortcuts:
- Tab - Toggle between Object Mode and Edit Mode.
- Ctrl + B - Bevel edges.
- Shift + Ctrl + B - Bevel vertices.
- A/AA - Select/Deselect all objects.
- H/Alt + H - Hide/Unhide objects.
- Shift + R - Repeat the last action.
- Sculpting Mode Shortcuts:
- DKEY - Use the Draw brush.
- FKEY/SHIFT + FKEY - Show/change brush size/strength.
- GKEY - Use the Grab brush.
- IKEY - Use the Inflate brush.
- LKEY - Use the Layer brush.
- SKEY - Use the Smooth brush.
- VKEY - Toggle brush direction (add/subtract).
- XKEY, YKEY, ZKEY - Toggle X, Y, Z symmetry.
- Customizing Shortcuts: Blender allows customization of shortcuts through its Preferences panel. Navigate to Keymap in the Preferences panel to view or change assigned hotkeys. You can assign new shortcuts directly in the Blender UI or via the Keymap library for more control.
- Useful Tips:
- For quick access to tools, use the Quick Favorites menu (Q) and add frequently used tools for faster workflow.
- Utilize the pie menu (~ or `) for rapid view switching.
- Enable Python tooltips in Preferences to see the Python command for each tool, aiding in custom shortcut creation.
Embrace these shortcuts to streamline your Blender workflow on Mac, improving both your modeling and sculpting productivity.

_HOOK_
Camera and Viewport Navigation Shortcuts
Navigating the camera and viewport efficiently is crucial for a smooth workflow in Blender. This guide compiles essential shortcuts for camera and viewport navigation tailored for Mac users, enabling you to manipulate your view and objects with precision and ease.
- Viewport Navigation:
- Shift + Middle Mouse Button (MMB) - Pan the view.
- Ctrl + Numpad 2/4/6/8 - Pan left, right, up, down.
- Ctrl + Middle Mouse Button (MMB) - Zoom in/out.
- Mouse Wheel - Scroll to zoom in/out.
- Numpad 5 - Toggle between Perspective and Orthographic view.
- Numpad 0 - Switch to camera view.
- Camera View Shortcuts:
- Ctrl + Alt + Numpad 0 - Align active camera to view.
- Numpad . (Period) - Center view on the selected object or vertex group.
- Shift + C - Center cursor and frame all objects.
- Orthographic Views:
- Numpad 1/3/7 - Front, right, top view respectively.
- Ctrl + Numpad 1/3/7 - Back, left, bottom view respectively.
- Rotation and Orbiting:
- Middle Mouse Button (MMB) - Rotate the view/orbit.
- Numpad 2/4/6/8 - Rotate view (Up/Left/Right/Down).
- Additional Tips:
- For Mac users without a numpad, enable \"Emulate Numpad\" in Preferences to use main keyboard numbers as numpad keys.
- Use \"Emulate 3 Button Mouse\" in Preferences if using a one-button mouse or trackpad.
These shortcuts are designed to improve your navigation and interaction with the 3D space in Blender, making your modeling, animation, or rendering tasks more efficient.

Animation and Timeline Control Shortcuts
Blender offers a powerful suite of tools for 3D animation, streamlining the animation process with an array of shortcuts. These shortcuts enable quick access to keyframe insertion, timeline navigation, and more, enhancing your animation workflow.
- Keyframe Management:
- I - Insert a keyframe for the active object or property.
- X (Timeline and Dope Sheet) - Delete selected keyframe.
- Alt + I - Clear the current keyframe.
- Shift + Alt + I - Clear all keyframes for hovered values.
- Timeline Navigation:
- Spacebar - Play/Pause the animation.
- Arrow keys - Move the playhead one frame (left/right) or jump to the next/previous keyframe (up/down).
- Shift + Left/Right Arrow - Jump to the first/last frame of the animation.
- Timeline and Dope Sheet Shortcuts:
- A - Select/Deselect all keyframes.
- M - Add marker for organizing animations.
- Shift + D - Duplicate selected keyframes.
- Graph Editor and NLA Editor Enhancements:
- T - Open interpolation method menu for selected keyframe.
- V - Change handle type for finer control over animation curves.
- Ctrl + E - Modify easing type for selected keyframes.
Utilizing these shortcuts can significantly accelerate your animation process in Blender, allowing for a more efficient and productive workflow.
Blender for MacOS Users: 3-Buttons Mouse Viewport Navigation Not Required
\"Discover the endless possibilities of MacOS and unlock a world of creativity, productivity, and seamless integration. Join us to explore its intuitive interface and advanced features that will revolutionize your digital experience.\"
How to Enable Blender Numpad Hotkeys on Mac
\"Experience effortless number crunching and data entry like never before with the ultra-responsive and compact numpad. Master the art of swift calculations and boost your productivity with this indispensable tool. Let\'s explore together!\"
Rendering and Scene Setup Shortcuts
Optimizing your rendering and scene setup process in Blender can greatly improve your workflow. Here\"s a compilation of essential shortcuts for rendering and scene setup on Mac, which will help you streamline your 3D projects.
- General Rendering Shortcuts:
- F12 - Start rendering the active camera view.
- Cmd + F12 - Start rendering an animation.
- Shift + F2 - Export the scene as a VRML1 file.
- Cmd + F2 - Save a rendered picture with the format indicated in the display settings.
- Ctrl + Alt + S or via the image menu - Save the rendered image after completion.
- Scene Setup Shortcuts:
- Cmd + P - Make selected objects the children of the active object.
- Alt + P - Clear parent relation, with a prompt to keep or clear parent-induced transforms.
- Shift + O - Toggle the subsurf modifier on or off if the selected object is a mesh.
- Rendering Engine and Output Settings:
- To switch between Cycles and Eevee rendering engines, access the camera icon in the properties panel and select from the render engine dropdown.
- Set the resolution of your render in the output properties tab, just below the render settings tab.
- For animations, ensure to specify an output folder in the output properties tab to store rendered frames.
- Viewport Rendering:
- To preview your render in the viewport, press the rendered viewport shading button in the top right corner of the 3D viewport.
- Use Ctrl + B to draw a box around the area you wish to render in the viewport for a focused render preview.
These shortcuts and tips should help you efficiently manage your rendering tasks and scene setups in Blender on Mac, saving time and improving your 3D modeling experience.

Customizing Blender Shortcuts on Mac
Blender\"s flexibility allows users to customize their workflow to suit their preferences, especially when it comes to keyboard shortcuts. Customizing shortcuts can significantly enhance efficiency and comfort while working on projects. Here\"s how you can customize Blender shortcuts on a Mac.
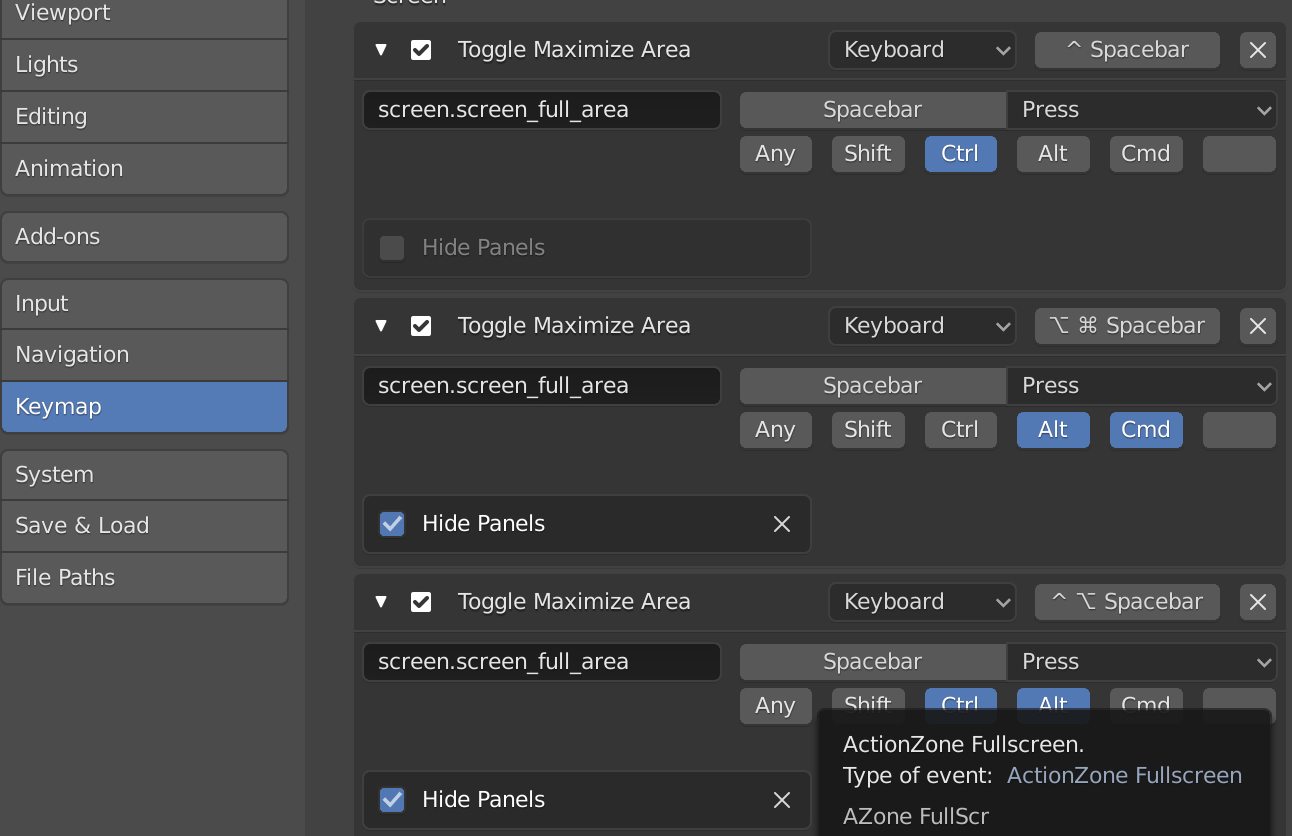
- Accessing Keymap Preferences:
- To begin customizing your shortcuts, navigate to the Preferences menu within Blender. This can be accessed through Blender\"s main menu.
- Within Preferences, find the Keymap tab. Here, you will see a list of all the actions within Blender that can have shortcuts assigned to them.
- Modifying Shortcuts:
- Explore the categories to find the action you want to create or modify a shortcut for. Blender organizes actions by editor types and functions to make finding them easier.
- Once you\"ve found an action, you can either change its existing shortcut or add a new one if it doesn\"t have a shortcut assigned yet.
- To modify a shortcut, click on the action and then click on the shortcut key field to enter a new key combination.
- Industry Compatible Keymap:
- For users transitioning from other software or those who prefer a more standardized set of shortcuts, Blender offers an Industry Compatible Keymap.
- This preset can be selected from the Keymap section in Preferences and offers a keymap layout familiar to users of other 3D software.
- Exporting and Importing Keymaps:
- Once you\"ve customized your keymap, you can export it to share with others or to use on another system. Similarly, you can import keymaps designed by others.
- This functionality ensures that you can maintain a consistent workflow across different machines or collaborate with others by sharing keymap preferences.
Blender\"s interface and keymap customization features empower users to tailor the software to their workflow, making 3D modeling, animation, and rendering tasks more intuitive and efficient.
Common Issues and Troubleshooting Shortcuts
While using Blender on a Mac, users might encounter several issues with shortcuts not functioning as expected. Here are some common problems and their solutions:
- Shortcuts Not Working: If shortcuts stop working, try resetting Blender\"s preferences to default. Go to Blender\"s Preferences, under the File tab, and click on \"Load Factory Settings.\" This will reset all settings, including shortcuts, to their defaults.
- Conflicting Shortcuts with Mac OS: Some Blender shortcuts may conflict with Mac OS shortcuts. To resolve this, you can change the conflicting shortcuts in Blender\"s Preferences under the Keymap tab. Alternatively, modify Mac\"s shortcuts in System Preferences under Keyboard > Shortcuts.
- Custom Shortcuts Not Saving: If your custom shortcuts are not saving, make sure to click the \"Save Preferences\" button in Blender\"s Preferences. This ensures your changes are saved and persist between sessions.
- Shortcuts Acting Differently: If a shortcut behaves differently than expected, check if you\"re in the correct mode for the shortcut to work. Some shortcuts only work in specific modes (e.g., Edit Mode, Object Mode).
- Keymap Configuration Issues: For complex issues with keymaps, consider exporting your keymap configuration, resetting to default, and then importing your configuration again. This can help clear any corrupt settings.
- Software or Hardware Issues: Sometimes, issues with shortcuts can stem from software conflicts or hardware problems. Updating Blender and your Mac OS, checking for conflicts with other software, or even testing with another keyboard can help identify the issue.
- Using Emulated Numpad: If your Mac doesn\"t have a numpad, enable the \"Emulate Numpad\" option in Blender\"s Preferences under the Input tab. This allows you to use the number row at the top of your keyboard as a numpad.
For more specific issues or if these solutions don\"t work, consider seeking help from Blender\"s official forums or community support channels, where you can find assistance from experienced users and developers.
_HOOK_
READ MORE:
Advanced Tips for Using Blender Shortcuts
Maximizing efficiency in Blender on a Mac involves mastering a range of shortcuts and understanding how to customize them for your workflow. Here are some advanced tips for using Blender shortcuts that can elevate your 3D modeling, animation, or rendering projects:
- Layered Shortcuts: Use layered shortcuts to perform complex actions quickly. For instance, pressing Shift + D duplicates an object, but combining it with Alt can duplicate along a constraint, enhancing your modeling efficiency.
- Context-Sensitive Shortcuts: Understand that some shortcuts change their function based on the context. For example, G generally means grab/move, but its behavior can vary depending on whether you\"re in Object Mode, Edit Mode, or another mode.
- Custom Pie Menus: Customize pie menus to include your most used shortcuts. This can be done within the Keymap settings by assigning a new pie menu to a specific key combination, streamlining your workflow significantly.
- Macro Creation: Blender allows the creation of macros, which are sequences of commands that can be executed with a single shortcut. This is particularly useful for repetitive tasks that involve multiple steps.
- Use of Add-ons for Extended Shortcuts: Explore add-ons that offer extended shortcut functionalities or new shortcuts tailored to specific tasks like sculpting, animation, or UV mapping. Some add-ons are designed to enhance workflow efficiency with new shortcut schemes.
- Shortcut Layers: Utilize the concept of shortcut layers by assigning different sets of shortcuts for different tasks. This allows you to switch between sets of keybindings depending on the phase of your project, such as modeling, texturing, or animating.
- Time-Saving Shortcuts for Animation: For animators, shortcuts like Shift + Right Arrow to skip to the next keyframe or I to insert a keyframe can save a lot of time. Customize these shortcuts to fit your animation workflow for quicker access.
- Viewport Navigation Enhancements: Master viewport navigation shortcuts like Numpad . to focus on the selected object or Shift + ~ for fly/walk mode. These shortcuts can dramatically improve how you inspect or navigate your scenes.
- Scripting Shortcuts: For users comfortable with scripting, consider creating Python scripts that can be executed with shortcuts. This allows for automation of repetitive tasks and can significantly boost productivity.
- Learning Resources: Continuously explore learning resources and tutorials to discover new shortcuts and techniques. The Blender community is vast and often shares insights into improving workflow with shortcuts.
Implementing these advanced tips can significantly enhance your speed and efficiency in Blender, allowing you to focus more on the creative aspects of your projects.
Mastering Blender shortcuts on Mac can revolutionize your 3D creation process, enhancing efficiency and creativity. Embrace these tips to navigate Blender like a pro, and unleash your full artistic potential in this powerful software.