Topic blender 3d clothing tutorial: Embark on a creative journey with our Blender 3D Clothing Tutorial, designed to empower artists and designers to craft stunning, lifelike garments in the digital world. Unlock the secrets of 3D fashion creation today!
Table of Content
- How to create clothing in Blender 3D using tutorials?
- Understanding Blender\"s Cloth Simulation
- Setting Up Your Workspace for Clothing Design
- Basic Clothing Modeling Techniques
- Advanced Cloth Sculpting and Detailing
- Texturing and Material Setup for Realistic Clothes
- Utilizing Cloth Physics for Dynamic Clothing
- YOUTUBE: Easy Clothing Creation in Blender 3.4 | Blender Basics
- Tips for Efficient Workflow and Troubleshooting
- Creating Specific Clothing Items: Tutorials Overview
- Incorporating Cloth into Character Rigging
- Exporting and Optimizing Clothes for Gaming and Animation
How to create clothing in Blender 3D using tutorials?
The process of creating clothing in Blender 3D can be accomplished by following tutorials that provide step-by-step instructions. Here\'s a general outline of the steps involved:
To create clothing in Blender 3D using tutorials, follow these steps:
- Search for a suitable tutorial that specifically covers creating clothing in Blender 3D.
- Choose a tutorial that matches your skill level and requirements.
- Read/view the tutorial carefully to understand the steps involved.
- Gather any necessary reference images or resources mentioned in the tutorial.
- Open Blender and import any base model or character that you intend to create the clothing for.
- Follow the tutorial\'s instructions to create the clothing using Blender\'s cloth sewing feature or other techniques provided.
- Pay attention to details such as seams, stitches, and fabric simulation to achieve a realistic result.
- Adjust the clothing\'s shape, size, and fit according to your desired style and design.
- Refine the clothing\'s appearance by applying materials, textures, and colors.
- Continue following the tutorial\'s guidance to complete the clothing creation process.
- Save your progress regularly to avoid losing your work.
- Once the clothing is fully created, you can further refine it by adding finer details, accessories, or additional simulations if desired.
- Finally, render your scene to see the clothing in its intended environment and make any necessary adjustments to achieve the desired result.
Remember to take your time and practice regularly to improve your skills in creating clothing using Blender 3D. Each tutorial may have its own specific steps and techniques, so it\'s important to follow the one you choose carefully.
READ MORE:
Understanding Blender\"s Cloth Simulation
Blender\"s Cloth Simulation is a powerful tool for creating realistic garments and fabric animations. This section delves into how to effectively use this feature to bring your 3D clothing to life.
- Setting Up the Cloth Simulation: Begin by selecting the object you wish to simulate as cloth. In the Physics tab, choose \"Cloth\" to enable the cloth simulation for your selected mesh.
- Material and Weight: Adjust the material properties to define how the cloth behaves. Use the weight paint mode to influence the simulation, highlighting areas of the cloth that should be more affected by gravity or other forces.
- Cloth Properties: Experiment with properties like Mass, Structural Stiffness, and Bending to get the desired cloth behavior. These settings mimic the real-world physics of fabric and can be adjusted to simulate different types of materials.
- Collision and Self-Collision: Enable collision with other objects, including the cloth itself, to prevent clipping and ensure realistic interactions between the cloth and surrounding objects.
- Wind and External Forces: Add wind or other forces to create dynamic movements. The Force Fields settings allow you to simulate environmental effects on the cloth.
- Baking the Simulation: Once satisfied with the setup, bake the simulation to calculate the cloth\"s movement over time. Baking ensures smooth playback and allows for fine-tuning of the final animation.
By understanding and utilizing these fundamental aspects of Blender\"s Cloth Simulation, you can create stunningly realistic and dynamic garments that enhance your 3D models and animations.

Setting Up Your Workspace for Clothing Design
Creating realistic clothing in Blender begins with a properly configured workspace. This section guides you through setting up your Blender workspace to streamline your clothing design process.
- Choose the Right Blender Version: Ensure you\"re using the latest version of Blender to take advantage of all the clothing design features and improvements.
- Customize Your Layout: Organize your workspace by customizing the layout. Include windows for the 3D viewport, UV/Image Editor, and the Shader Editor for efficient workflow.
- Import Reference Images: Use the \"Background Images\" feature in the N-panel to import reference images of your clothing designs. This will help you model clothes with accuracy.
- Setup the 3D Cursor: Place the 3D cursor where you plan to start creating your garment. This cursor acts as a pivot point for modeling and can be crucial for symmetrical designs.
- Enable Necessary Add-ons: Blender offers several add-ons that can enhance your clothing design process, such as Cloth Weaver. Go to Preferences > Add-ons to enable them.
- Prepare Your Model: If you\"re designing clothes for a character, ensure your character model is ready and positioned correctly in the workspace.
- Materials and Textures Setup: Pre-select materials and textures for your clothing to have them readily available in the Shader Editor as you design.
By carefully setting up your workspace, you can create an efficient and effective environment for clothing design in Blender, allowing you to focus on creativity and precision in your garment creation.

Basic Clothing Modeling Techniques
Mastering the art of clothing modeling in Blender sets the foundation for creating realistic and stylish garments. This section covers essential techniques to start your journey in 3D clothing design.
- Starting with a Base Mesh: Begin by creating a simple base mesh that outlines the basic shape of your garment. Use planes or cubes and modify them with the Edit Mode to match your design.
- Subdivision and Sculpting: Use the Subdivision Surface modifier to smooth out your mesh, then switch to Sculpt Mode to add details like folds and wrinkles, enhancing the realism of your clothing.
- Retopology for Clean Topology: After sculpting, retopologize your mesh to ensure a clean, animation-ready topology. This step is crucial for clothes that will deform with character movement.
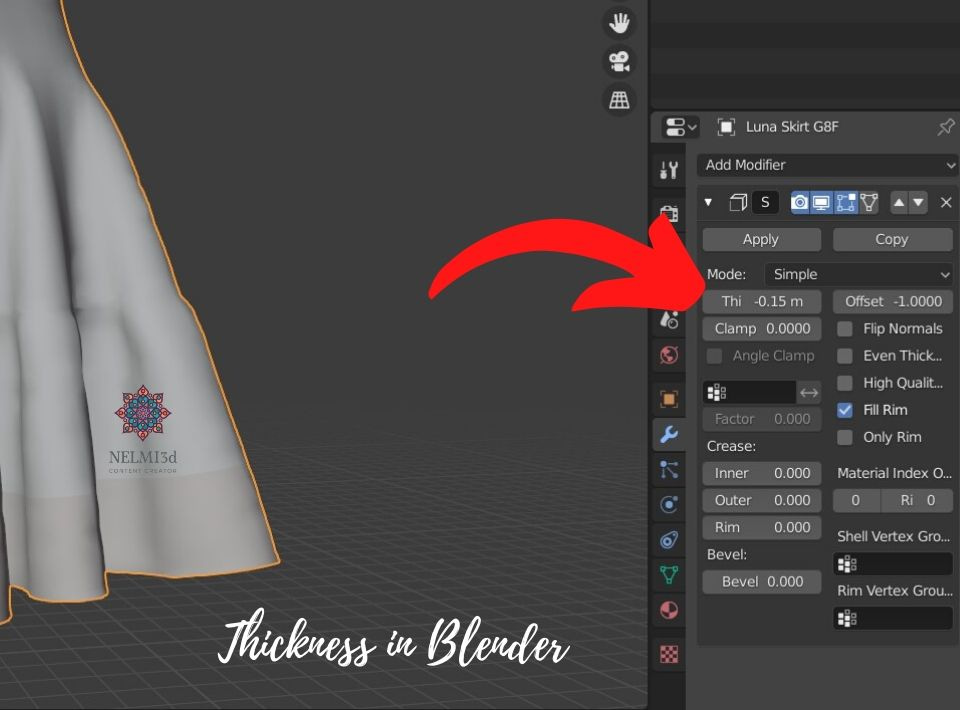
- Extruding for Thickness: Clothes are not infinitely thin. Use the Extrude tool to add thickness to your garment, making sure to adjust normals for a realistic appearance.
- Adding Seams and Details: Utilize the Knife and Loop Cut tools to add seams and intricate details. These small touches can significantly enhance the garment\"s realism.
- UV Unwrapping for Textures: Properly unwrap your model to apply textures. This process involves mapping the 3D surface to a 2D space, essential for realistic texturing.
- Material and Texture Application: Finally, apply materials and textures to your clothing. Use the Shader Editor to fine-tune the appearance, simulating various fabric types and details like patterns or logos.
By following these basic modeling techniques, you can create detailed and lifelike clothing in Blender, ready for animation or static renders. Practice and experimentation are key to mastering these skills.

Advanced Cloth Sculpting and Detailing
For those looking to push the boundaries of realism in their 3D clothing designs, advanced sculpting and detailing techniques in Blender are essential. This section explores how to add intricate details and lifelike textures to your garments.
- Utilizing the Multiresolution Modifier: Apply the Multiresolution modifier to your mesh before sculpting to add more geometry. This allows for finer detail without initially compromising the model\"s structure.
- Sculpting Fabric Folds: Use the Sculpt Mode\"s various brushes, like the Crease, Grab, and Pinch brushes, to sculpt realistic fabric folds and wrinkles. Study real-life fabric behavior to understand how folds form.
- Adding Microdetails: For microdetails such as fabric texture or embroidery, use the texture painting tools or custom sculpting brushes. These details can significantly enhance the realism of your cloth.
- Simulating Wear and Tear: Create a more lived-in look by adding signs of wear and tear, such as frayed edges or holes. This can be achieved through sculpting or by using alpha textures.
- Dynamic Topology for Local Detailing: Use the Dyntopo (Dynamic Topology) feature in Sculpt Mode for areas that require high detail. Dyntopo adds geometry dynamically as you sculpt, allowing for localized detail without affecting the entire mesh.
- Creating Custom Brushes: For unique textures or repetitive details, create custom brushes. You can use photographs or textures as brush stencils to stamp or paint details onto your clothing.
- Baking High to Low Poly: Once your high-detail sculpting is complete, bake the details onto a lower-poly version of your mesh. This technique is crucial for animation or game assets, allowing you to maintain visual quality while optimizing performance.
Mastering these advanced techniques will elevate your Blender clothing designs, adding a layer of complexity and realism that stands out. Remember, patience and practice are key to developing these sculpting and detailing skills.
_HOOK_
Texturing and Material Setup for Realistic Clothes
To bring your 3D clothing creations to life, a detailed approach to texturing and material setup is crucial. This section will guide you through the process of applying realistic textures and materials to your Blender clothing models.
- Understanding Fabric Textures: Begin by researching the types of fabrics you want to simulate. Consider their unique characteristics, such as weave patterns, glossiness, and opacity, to choose appropriate textures.
- Creating or Sourcing Textures: You can create your own textures using image editing software or source them from online libraries. High-resolution images are recommended for more realistic results.
- UV Mapping Your Model: Proper UV unwrapping is essential for accurately applying textures to your clothing model. Ensure that the UV layout maximizes texture space and minimizes stretching.
- Applying Textures in the Shader Editor: Use Blender\"s Shader Editor to apply and tweak your textures. Connect your texture nodes to the appropriate shader inputs, such as Base Color, Normal, or Roughness.
- Adjusting Material Properties: Modify material properties to match the real-world behavior of the fabric. Adjust settings like Specularity, Roughness, and Sheen to simulate different fabric types.
- Using Normal and Displacement Maps: For added realism, use normal and displacement maps to simulate the fabric\"s surface detail and depth. These can add the appearance of stitches, embossing, or fabric weave.
- Simulating Transparency and Sheer Fabrics: If your garment includes sheer materials, use the Alpha channel in your material settings to simulate transparency. Adjust the Alpha value and consider using a Fresnel node to enhance the effect.
- Lighting and Rendering Setup: Finally, adjust your scene\"s lighting to highlight the textures and materials of your clothing. Proper lighting can significantly impact how materials appear in your final render.
With careful attention to texturing and material setup, you can achieve highly realistic clothing in Blender that looks vibrant and lifelike in any scene.

Utilizing Cloth Physics for Dynamic Clothing
Dynamic clothing brings a level of realism to animations that static models cannot match. Blender\"s cloth physics system allows for the creation of clothing that reacts naturally to movements and environmental factors. Follow these steps to incorporate dynamic cloth physics into your 3D clothing designs.
- Preparing Your Model for Cloth Simulation: Ensure your clothing mesh is clean and has sufficient topology for the simulation. Avoid overly dense meshes to optimize performance.
- Applying the Cloth Modifier: Select your clothing mesh and add a Cloth modifier from the Physics tab. This modifier transforms your mesh into a fabric-like material that reacts to physics.
- Adjusting Cloth Settings: In the Cloth settings, tweak properties such as Mass, Structural Stiffness, and Damping to simulate different types of fabrics. Use Presets as a starting point for common materials.
- Setting Up Collision Objects: For the clothing to interact with other objects (like a character model), ensure those objects have a Collision modifier applied. This prevents the cloth from passing through them.
- Working with Wind and Force Fields: To add environmental effects, use Force Fields like Wind to create dynamic movements in the clothing. Adjust the strength and direction to achieve the desired effect.
- Pin Group for Controlled Simulation: Use vertex groups to pin parts of your clothing, keeping them stationary while the rest of the garment moves dynamically. This is useful for simulating garments that are partially fixed, like a tied scarf.
- Baking the Simulation: Once you\"re satisfied with the setup, bake the simulation to calculate the cloth\"s movements over time. Baking ensures the simulation\"s consistency across renders and animations.
By leveraging Blender\"s cloth physics, you can create clothing that moves believably with your characters, adding an extra layer of immersion to your 3D projects.
Easy Clothing Creation in Blender 3.4 | Blender Basics
\"Discover the incredible versatility and power of Blender, the ultimate tool for 3D modeling, animation, and special effects. Whether you\'re a beginner or advanced user, this video will showcase the endless possibilities of Blender, giving you the skills to bring your imagination to life!\"
Digital Fashion Design in Blender
\"Step into the glamorous world of fashion with this captivating video that takes you behind the scenes of a high-end runway show. From gorgeous garments to stunning models and cutting-edge trends, you\'ll be inspired and mesmerized by the breathtaking artistry that goes into creating unforgettable fashion moments.\"
Tips for Efficient Workflow and Troubleshooting
Creating clothing in Blender can be a complex process, but with the right approach, you can streamline your workflow and solve common problems efficiently. Here are some essential tips to enhance your productivity and tackle challenges in clothing design.
- Keep Your Mesh Clean: Start with a clean, well-organized mesh. Avoid unnecessary vertices that can complicate the modeling and simulation process. Use tools like Merge by Distance to eliminate doubles.
- Use Layers and Collections: Organize your scene using layers and collections. This practice helps manage different parts of your clothing and character models, making it easier to focus on specific aspects without distraction.
- Save Iterative Versions: Regularly save different versions of your project. This approach allows you to experiment freely and revert to previous states if needed.
- Utilize Modifiers Wisely: Modifiers like Mirror, Solidify, and Subdivision Surface can speed up your workflow. However, apply them judiciously to maintain control over your mesh\"s topology.
- Preview in Low Resolution: When working with simulations or heavy textures, preview your work in a lower resolution to save time. Increase the resolution for final renders or detailed inspections.
- Troubleshooting Cloth Simulation: If your cloth simulation behaves unexpectedly, check for inverted normals, ensure collision objects are correctly set up, and verify that the cloth\"s physics properties match the intended fabric type.
- Keep Learning and Experimenting: The world of 3D design is always evolving. Stay updated with the latest Blender updates, tutorials, and forums to continuously improve your skills and solve new challenges.
Adopting these workflow strategies and troubleshooting tips can significantly enhance your efficiency and creativity in Blender clothing design, allowing you to achieve professional-level results more smoothly.

Creating Specific Clothing Items: Tutorials Overview
Delving into the creation of specific clothing items can elevate your Blender projects, giving them a personalized and detailed touch. This section provides an overview of tutorials for designing various types of garments, from basic shirts to intricate dresses.
- Basic T-Shirt: Learn to model a basic t-shirt using simple mesh editing and subdivision surfacing techniques. Focus on achieving the right fit and drape over a character model.
- Formal Pants: This tutorial guides you through creating formal pants, emphasizing the structure and folds that give them a realistic appearance. Learn about cloth simulation for natural movement.
- Dynamic Skirts: Explore how to use Blender\"s cloth physics to create dynamic skirts that move naturally. This tutorial covers material selection and wind force application for realistic animation.
- Detailed Jackets: Master the art of modeling detailed jackets with zippers, buttons, and textures. This advanced tutorial also delves into sculpting for added realism.
- Accessories: Scarves and Hats: Expand your clothing repertoire by creating accessories. Learn techniques for modeling scarves and hats, including cloth simulation and texture painting for intricate designs.
- Footwear: Shoes and Boots: Tackle the challenge of footwear by modeling shoes and boots. Discover methods for achieving accurate shapes and applying materials for various types of footwear.
- Complex Garments: Dresses and Suits: Dive into the creation of complex garments such as dresses and suits. These tutorials focus on advanced modeling techniques, fabric simulation, and detailing for formal wear.
Each tutorial offers step-by-step guidance, empowering you to expand your skillset and incorporate a wide range of clothing items into your 3D projects with confidence and creativity.

Incorporating Cloth into Character Rigging
Integrating cloth dynamics with character rigging can bring unparalleled realism to your animations. This section explores how to effectively combine Blender\"s cloth simulation with character rigs for dynamic clothing that moves naturally with your characters.
- Preparing Your Character Model: Ensure your character model is fully rigged and skinned before adding clothing. A well-rigged character provides a solid foundation for cloth simulation.
- Creating the Clothing Mesh: Model the clothing as a separate object that closely fits the character model. Pay special attention to areas of high movement, like joints, to avoid clipping.
- Applying Cloth Simulation: Add a Cloth modifier to your clothing mesh. Adjust the cloth physics settings to match the desired fabric behavior, ensuring it interacts realistically with the character\"s movements.
- Setting Up Collision: Apply Collision modifiers to both the character model and the clothing. This prevents the cloth from intersecting with the character during animations.
- Weight Painting for Cloth Control: Use weight painting to define how the cloth simulation interacts with the character rig. Paint areas where you want more or less influence from the character\"s movements.
- Adjusting Cloth Constraints: Incorporate Shape Keys or Cloth Constraints for areas that require specific control, such as a cape pinned to shoulders or a skirt\"s hemline influenced by leg movements.
- Animating and Testing: Animate your character to test the cloth\"s behavior in motion. Adjust the simulation settings as needed to refine how the clothing moves and folds.
- Baking the Simulation: Once satisfied with the cloth\"s dynamics, bake the simulation to finalize the animation. Baking ensures the cloth\"s movements are consistent and smooth across the entire sequence.
By carefully integrating cloth simulations with character rigs, you can create animations where clothing behaves as naturally as it does in the real world, adding depth and realism to your Blender projects.

_HOOK_
READ MORE:
Exporting and Optimizing Clothes for Gaming and Animation
Creating clothing in Blender for use in gaming and animation requires careful optimization and export practices to ensure compatibility and performance. This section outlines the steps to prepare your 3D clothing models for use in game engines and animation software.
- Reducing Polygon Count: Use modifiers like Decimate or manual techniques to reduce the polygon count of your clothing models without significantly affecting their visual quality. Aim for the lowest poly count that maintains the desired level of detail.
- Optimizing UV Maps: Efficiently unwrap your models to create UV maps that make the most of the texture space. This reduces the need for large textures, which can impact performance.
- Creating LODs (Levels of Detail): Generate multiple levels of detail for your clothing items to ensure they remain performant at various distances from the camera. Most game engines automatically switch between LODs based on the camera\"s distance.
- Baking Textures: Bake detailed textures, including normal maps, from high-poly models to their low-poly counterparts. This process captures the details of the high-poly model in textures that can be applied to the optimized low-poly version.
- Applying Rigging and Weight Painting: Ensure that your clothing models are properly rigged and weight-painted to match the character rigs in your game or animation project. This step is crucial for seamless integration and movement.
- Exporting Models: Export your clothing models in a format compatible with your target software or game engine, such as FBX or OBJ. Include all necessary texture maps and ensure that the scale and orientation match the requirements of your project.
- Testing in Engine: Import your optimized clothing models into the game engine or animation software to test their appearance and performance. Make any necessary adjustments to ensure they meet your project\"s standards.
Following these steps for exporting and optimizing your Blender clothing models can significantly enhance the performance and integration of your garments in gaming and animation environments.
Embark on a journey to master Blender 3D clothing design, where creativity meets technology. With patience and practice, transform your digital fashion visions into reality, enhancing your animations and games with stunning, lifelike garments.