Topic autocad drawing view: Discover the world of AutoCAD Drawing View, enhancing your design precision and efficiency with advanced visualization techniques for professionals and enthusiasts alike.
Table of Content
- How to create drawing views from AutoCAD 3D models?
- Understanding AutoCAD Drawing Views
- Types of Drawing Views in AutoCAD
- Creating a Base View from 3D Models
- Projecting Orthogonal and Isometric Views
- Using the ViewCube for 3D Navigation
- Viewing and Editing Drawings Online
- YOUTUBE: AutoCAD Orthographic Projection Example 1 - Multi View Drawing
- Free Tools for Viewing AutoCAD Drawings
- Converting DWG Files for Compatibility
- Best Practices for Managing Drawing Views
- Advanced Tips for Customizing Views
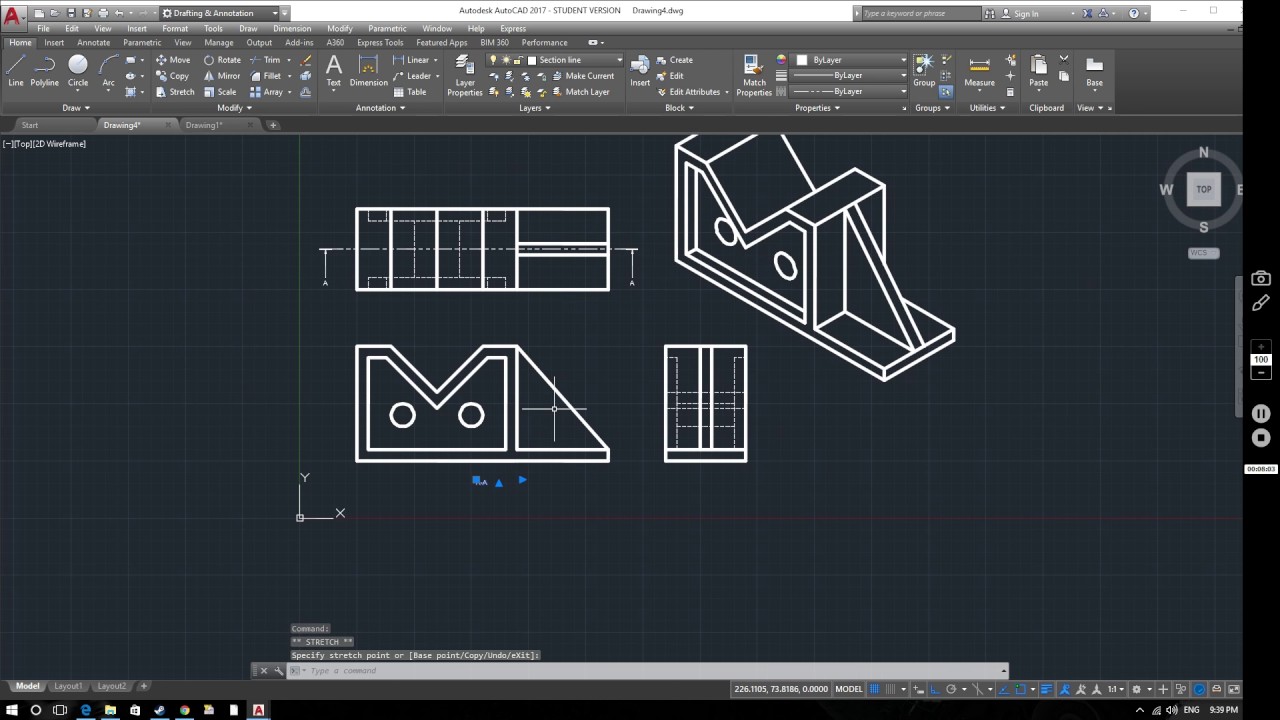
How to create drawing views from AutoCAD 3D models?
To create drawing views from AutoCAD 3D models, follow these steps:
- Click on the \"Drawing View Creation\" tab.
- Select the \"Model Space\" selection from the panel.
- Use the SHIFT key and click on the objects that you want to include in the drawing view.
READ MORE:
Understanding AutoCAD Drawing Views
AutoCAD drawing views are essential for drafting, design, and engineering professionals, facilitating a comprehensive understanding of 3D models and technical drawings. These views help in visualizing the design from various angles and perspectives, ensuring accuracy and efficiency in the creation and modification of drawings.
- Base View: The foundation of drawing views, generated from the model space, representing the primary perspective of your design.
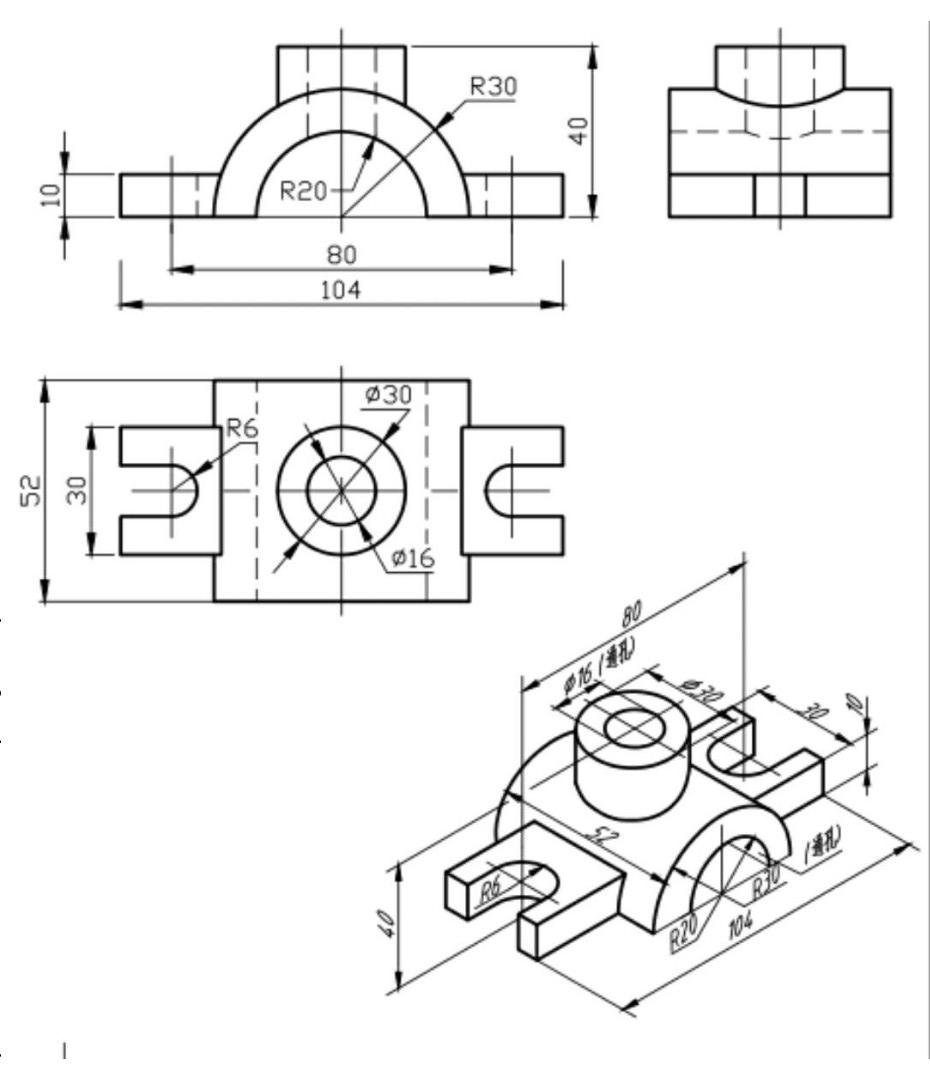
- Projected View: Derived from the base view, it includes orthographic (side, top, etc.) and isometric views to provide comprehensive visualization.
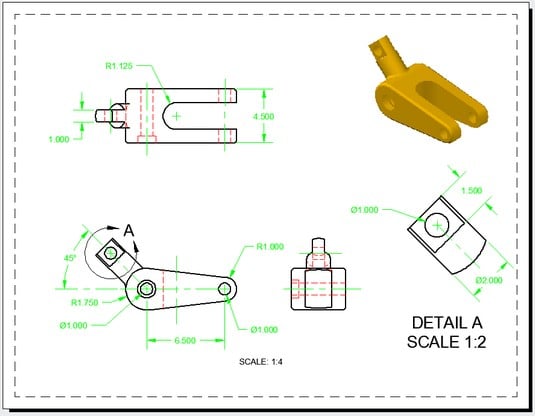
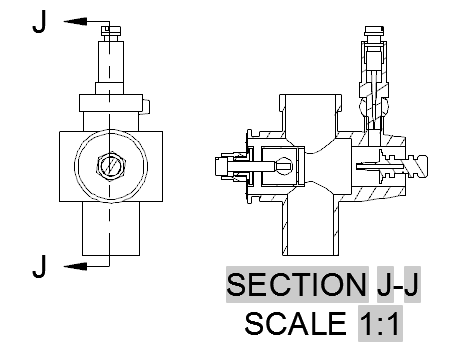
- Section View: A cut-through representation of the model, offering insights into the internal features by slicing through the object.
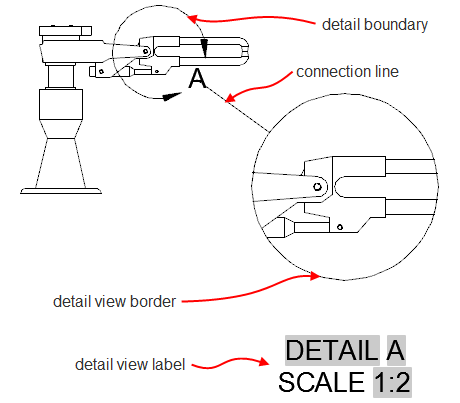
- Detail View: Focuses on a small, specific area of the drawing to highlight intricate details or complex components.
Understanding these views is crucial for effectively communicating the dimensions, shapes, and features of your design, allowing for a smoother workflow from conceptualization to finalization. Utilizing the ViewCube for 3D navigation and the layout tabs for organizing views enhances the drawing process, making it more intuitive and productive.
Types of Drawing Views in AutoCAD
AutoCAD offers a variety of drawing views to cater to the specific needs of designers and engineers, enabling detailed and precise representation of projects. Understanding these view types is crucial for effective drafting and visualization of designs.
- Base View: The initial view from the 3D model, setting the stage for additional projections.
- Projected View: Generates orthogonal or isometric views from the base view to provide different perspectives of the design.
- Section View: Offers an internal look at the design by cutting through it, revealing hidden details.
- Detail View: Zooms in on a particular area of the design to show intricate details more clearly.
- Layout Viewports: Allows the creation of multiple views within a single layout, facilitating simultaneous viewing of different sections of a design.
- Named Views: Save specific views of a design for easy access and reference, enhancing workflow efficiency.
- 3D Views: Utilizes the ViewCube tool for navigating and displaying the design in three dimensions, offering a comprehensive overview of the entire project.
These views are integral to managing and interpreting complex designs, providing the tools necessary for thorough examination and presentation of engineering and architectural projects.
Creating a Base View from 3D Models
Creating a base view from 3D models in AutoCAD is a fundamental step in drafting that allows for detailed and accurate representation of designs in two dimensions. This process converts complex 3D models into simplified 2D views that are easier to interpret and share.
- Start by opening your 3D model in AutoCAD. Ensure you are in a layout tab suitable for creating base views.
- Activate the \"Base View\" command from the \"Layout\" tab under the \"Create View\" panel or by typing \"VIEWBASE\" in the command line.
- Select the 3D model from which you want to create the base view. If your model is in a different file, you may need to import it first.
- Choose the type of projection you prefer (e.g., orthographic, isometric) to represent your 3D model in 2D form.
- Adjust the scale and orientation of the base view to fit your requirements. This can involve specifying the projection angle, scale factor, and other display settings to ensure the view accurately represents the model.
- Place the base view in your layout. You can move and resize it as needed to fit your document\"s layout.
Creating a base view is just the beginning. You can further add projected views, section views, and detail views to complement the base view and provide a comprehensive representation of your 3D model in 2D form.
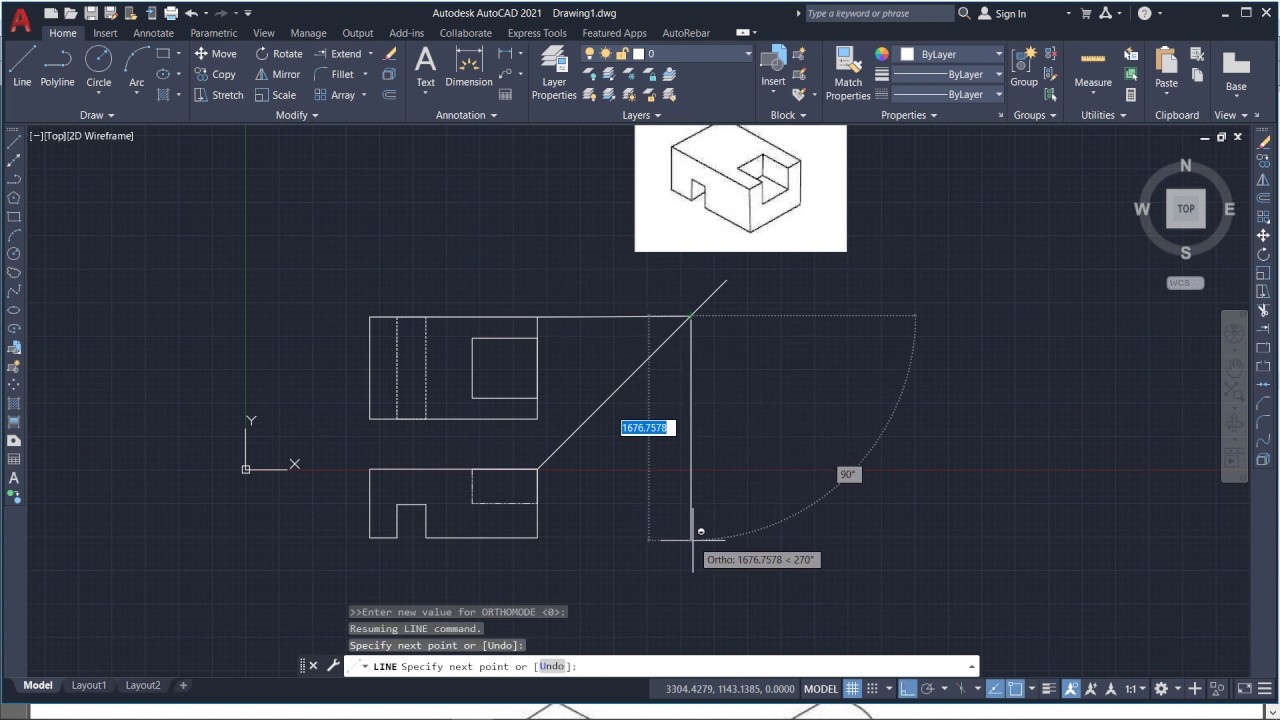
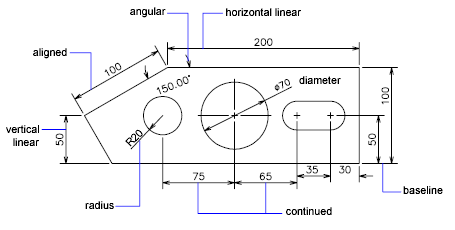
Projecting Orthogonal and Isometric Views
Projecting orthogonal and isometric views in AutoCAD is a critical skill for visualizing designs in both two and three dimensions. These projection types offer distinct perspectives, enhancing the clarity and comprehensibility of technical drawings.
- Select the Base View: Begin by choosing a base view of your 3D model. This view serves as the starting point for projecting additional views.
- Choose Projection Type: Decide whether you need an orthogonal or isometric view. Orthogonal projections include top, front, and side views, offering a flat representation of the object. Isometric projections provide a three-dimensional representation, showing the object\"s sides at a 30-degree angle to give depth.
- Use the \"Projected View\" Command: In the \"Layout\" tab, find the \"Create View\" panel and select \"Projected View.\" Click on your chosen base view, then move the cursor to where you want the projected view placed.
- Adjust the View Settings: Customize the projected view by adjusting its scale, orientation, and other properties to suit your drawing\"s requirements.
- Placement: Place the projected view on the drawing area. For orthogonal views, ensure they are correctly aligned with the base view to maintain the drawing\"s accuracy.
- Repeat for Additional Views: Repeat the process to add more views as needed, using the base view as a reference point for consistency and accuracy.
Mastering these steps enables designers to create comprehensive sets of drawings that accurately represent the physical characteristics of the design, facilitating better understanding and communication of complex ideas.
_HOOK_
Using the ViewCube for 3D Navigation
The ViewCube is a powerful 3D navigation tool in AutoCAD that facilitates the rotation and orientation of the drawing view in 3D space. It allows users to quickly switch between standard and isometric views, enhancing the efficiency of the design process.
- Activate the ViewCube: Ensure the ViewCube is enabled in your workspace. It is typically visible in the top-right corner of the drawing area when working in a 3D visual style.
- Navigate the Model: Click and drag the ViewCube to rotate your model. You can also click on the faces, edges, or corners of the cube to jump to predefined views such as top, front, or isometric.
- Set a Home View: Right-click on the ViewCube to set a \"Home\" view, which can be a customized or preferred view of your model for easy access.
- Use the ViewCube Menu: Access additional options by right-clicking on the ViewCube. Here, you can change settings, switch between parallel and perspective projection, or restore the home view.
- Link with Navigation Bar: The ViewCube can be linked with the navigation bar for synchronized navigation, enhancing your control over the 3D space.
Utilizing the ViewCube effectively can significantly improve your ability to navigate and understand complex 3D models, making it an indispensable tool for designers and engineers working in AutoCAD.
Viewing and Editing Drawings Online
The flexibility to view and edit AutoCAD drawings online has revolutionized how professionals access, share, and collaborate on projects. Utilizing web-based platforms and apps, users can now easily make modifications, view changes, and share their designs from anywhere, without the need for powerful desktop software.
- Accessing Drawings: Use the AutoCAD Web App or other online DWG viewers to open and review your drawings directly in your web browser.
- Editing Online: These platforms offer a range of editing tools that mimic the AutoCAD desktop experience, allowing for basic to advanced modifications.
- Collaboration: Share your designs with team members or clients by sending links, enabling them to view or edit drawings without needing their own AutoCAD licenses.
- Cloud Storage: Save your drawings to cloud services like Autodesk Drive, Dropbox, Google Drive, or OneDrive for easy access and backup.
- Mobile Accessibility: With mobile apps, access and edit your drawings on the go, ensuring that your projects move forward no matter where you are.
Embracing online tools for viewing and editing AutoCAD drawings not only enhances flexibility but also streamlines the workflow, making it more efficient and collaborative.
AutoCAD Orthographic Projection Example 1 - Multi View Drawing
Discover the fascinating world of orthographic projection in this captivating video! Learn how engineers and architects use this technique to create precise and detailed drawings, giving you an insight into the inner workings of their creative process.
Create Orthographic 2D Views from 3D Drawing - AutoCAD Tutorial
Dive into the world of 2D views with this visually stunning video! Experience the magic of seeing objects from multiple perspectives as they come to life on your screen. Whether you\'re an artist or simply curious about the art of representation, this video will surely spark your imagination.
Free Tools for Viewing AutoCAD Drawings
There are several free tools available that allow users to view AutoCAD drawings without the need for AutoCAD software. These tools provide a convenient way to access, review, and share DWG files.
- Autodesk DWG TrueView: An official Autodesk tool that supports viewing of DWG and DXF files, offering tools for plotting and converting files.
- Autodesk Viewer: A web-based viewer that supports over 80 file types for easy remote collaboration, including DWG, DWF, and more.
- DWG FastView: Offers web, mobile, and Windows versions for viewing and editing CAD drawings, supporting online and offline work modes.
- ShareCAD: A free online CAD viewer that supports various formats including DWG, DXF, and DWF without any file size limits.
- eDrawings Viewer: Allows users to view and share 3D models and 2D drawings, providing a platform for efficient collaboration.
These tools are invaluable for professionals who need to view and share AutoCAD drawings but do not have access to the full AutoCAD software suite, making collaboration and project sharing more accessible and efficient.
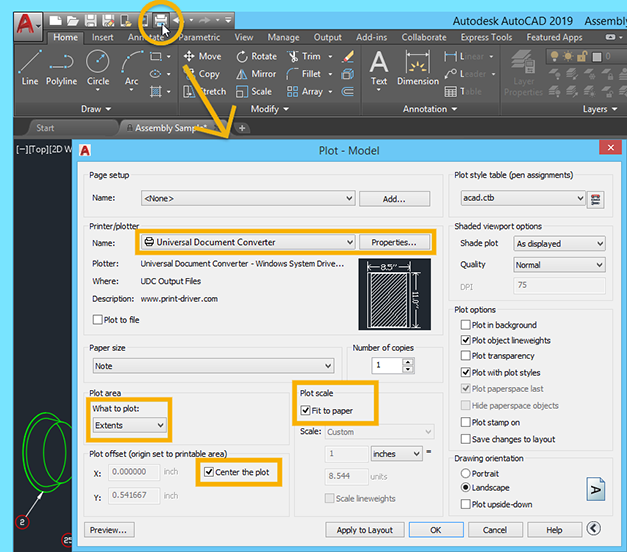
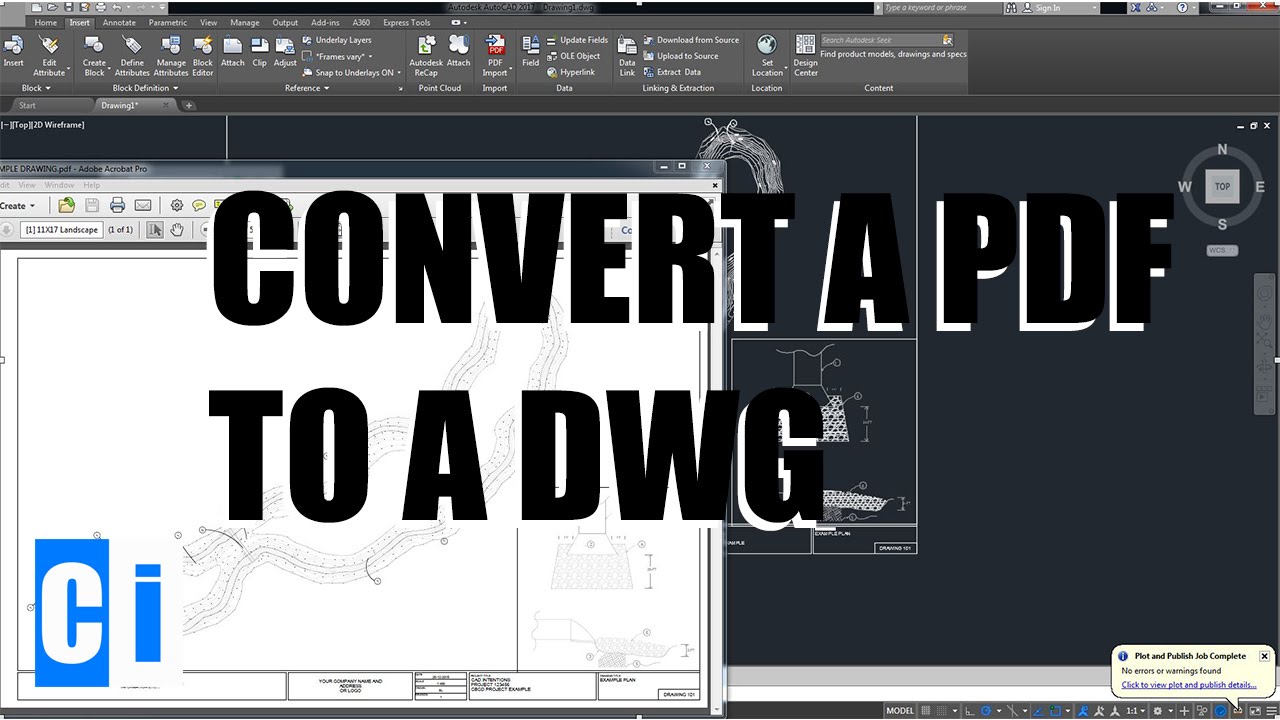
Converting DWG Files for Compatibility
Converting DWG files for compatibility is an essential task for professionals who need to share AutoCAD drawings across different software versions or platforms. Here\"s how you can ensure your DWG files are accessible and compatible with various CAD programs.
- Identify the DWG File Version: Check the DWG file version you\"re working with. Newer AutoCAD versions can save files in formats compatible with older versions.
- Use Autodesk DWG TrueView: Autodesk provides a free tool called DWG TrueView. In addition to viewing DWG files, it can convert them to different DWG formats or to DXF format, ensuring compatibility across different versions of AutoCAD.
- Online Conversion Tools: Utilize online converters like CloudConvert or Convertio to easily convert DWG files to other formats. These tools support various file conversions and can be a quick solution for compatibility issues.
- AutoCAD’s Save As Feature: Within AutoCAD, use the \"Save As\" feature to save your drawing to an earlier DWG version. This is particularly useful when you need to share files with users who have older versions of AutoCAD.
- Third-Party CAD Software: Some third-party CAD programs offer compatibility with DWG files and may include tools for converting and managing DWG files. Programs like DraftSight and FreeCAD are popular alternatives.
By following these steps, you can ensure that your DWG files are compatible with different versions of AutoCAD and other CAD software, facilitating smoother collaboration and file sharing.

Best Practices for Managing Drawing Views
Effectively managing drawing views in AutoCAD is crucial for maintaining the integrity and clarity of your designs. By adhering to a set of best practices, you can streamline your workflow, reduce errors, and improve collaboration. Here are key strategies to enhance your drawing view management:
- Organize with Layers: Use layers to separate different types of information, making it easier to manage visibility and edit specific elements of your drawing without affecting others.
- Utilize Layouts and Viewports: Create multiple layouts for various views of your project. Within each layout, use viewports to display different aspects of your model at varying scales.
- Save and Name Views: Save frequently used views to quickly access specific perspectives of your model. Naming views logically helps in identifying them easily for future reference.
- Implement CAD Standards: Develop and adhere to CAD standards for layers, text styles, dimensions, and more. Consistency across drawings simplifies management and collaboration.
- Use Sheet Sets: Sheet sets organize your drawings and layouts into a single project file, making it easier to publish, transmit, and archive your work.
- Regularly Update Blocks and Xrefs: Ensure that all blocks and external references are up to date to avoid discrepancies between views and the final output.
- Optimize Performance: Use the PURGE command regularly to remove unused elements and reduce file size, improving the performance of your AutoCAD session.
By integrating these best practices into your daily routines, you can achieve a more efficient and error-free design process, enhancing the overall quality of your AutoCAD projects.
_HOOK_
READ MORE:
Advanced Tips for Customizing Views
Customizing views in AutoCAD can greatly enhance your productivity and the visual quality of your designs. Here are some advanced tips to tailor your views precisely to your needs.
- Save Named Views: Use the \"VIEW\" command to save and name specific views. This allows you to quickly return to a specific perspective or zoom level without manually adjusting the view each time.
- Custom Viewports in Layouts: Create custom-shaped viewports in your layout tabs. Instead of sticking with rectangular viewports, use the \"MVIEW\" command with the \"Polygonal\" option to tailor your viewport to any shape, enhancing the presentation of your design.
- Layer Visibility per Viewport: Control layer visibility separately in each viewport. This feature allows you to highlight different aspects of your design in each viewport, providing a clearer understanding of complex projects.
- Use ViewCube for Custom Angles: Utilize the ViewCube for setting up custom view angles that are not standard isometrics. You can then save these as named views for future reference.
- Configure Visual Styles: Visual styles can be applied to each view to control the appearance of your drawing. Experiment with different visual styles to find the best presentation for your design.
- Set Up Camera Views: Use the \"CAMERA\" command to create camera objects that define a specific viewpoint and target. Cameras can be adjusted for lens length, enabling you to simulate realistic perspectives.
- Use the \"PLAN\" Command: The \"PLAN\" command aligns the UCS with the selected object or viewport, providing a straight-on view of non-planar surfaces, ideal for detailed work on specific parts of your model.
Implementing these tips can significantly improve how you view, present, and work on your AutoCAD projects, making your workflow more efficient and your presentations more impactful.
Mastering AutoCAD drawing views unlocks new levels of precision and creativity in your designs. Explore these tips to enhance your projects, elevating your drafting skills to new heights and bringing your visionary ideas to life.