Topic import autocad to revit: Discover the seamless integration of importing AutoCAD into Revit, enhancing your architectural designs and improving collaboration in your projects.
Table of Content
- How to import AutoCAD files into Revit?
- Step-by-Step Process for Importing AutoCAD Files into Revit
- Common Issues and Solutions When Importing AutoCAD to Revit
- Best Practices for a Smooth Transition from AutoCAD to Revit
- Understanding the Coordination Between AutoCAD and Revit
- Optimizing Your Workflow: Tips and Tricks
- Managing Layers and Elements Post-Import
- YOUTUBE: 5 Tips and Tricks for Importing DWG files into Revit
- How to Preserve AutoCAD Details in Revit
- Advanced Techniques: Linking vs. Importing
- Customizing Settings for Optimal Performance
- Case Studies: Successful AutoCAD to Revit Transitions
- Frequently Asked Questions About Importing AutoCAD into Revit
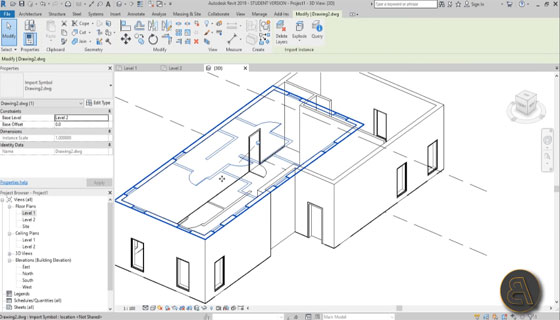
How to import AutoCAD files into Revit?
Here are the steps to import AutoCAD files into Revit:
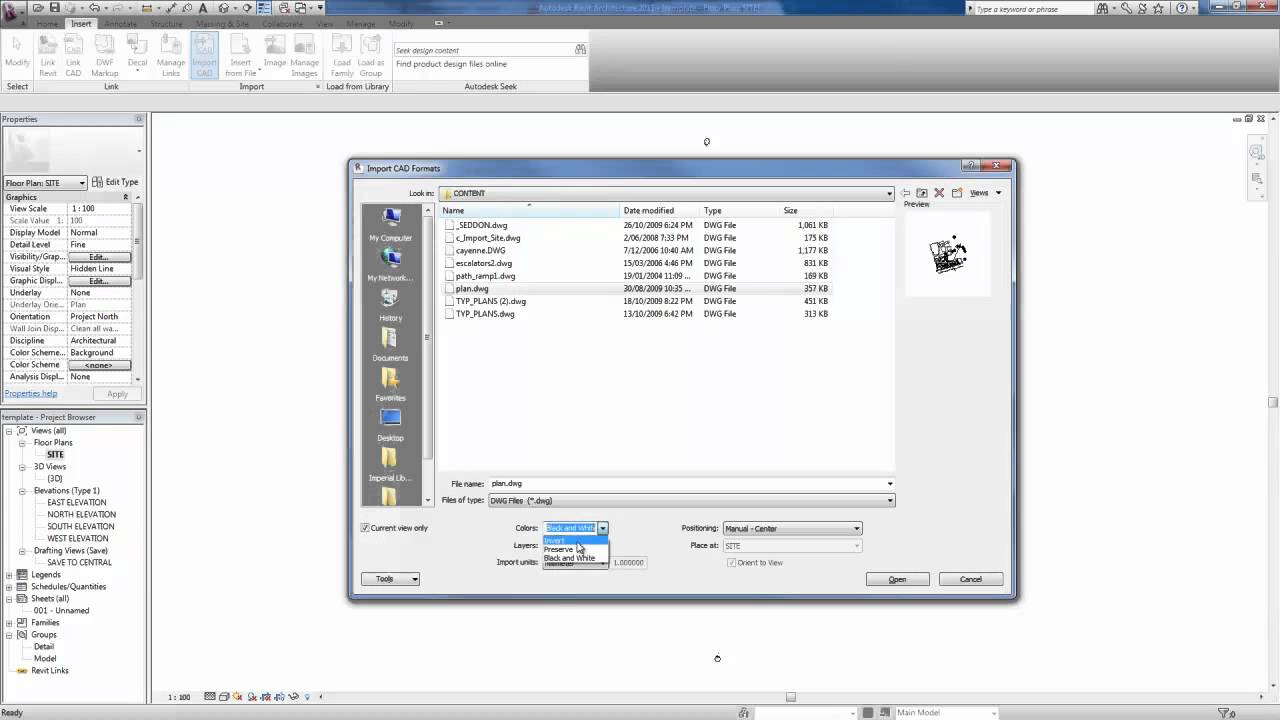
- Open your Revit project.
- Click on the \"Insert\" tab.
- Go to the \"Import\" panel and click on \"Import CAD\".
- In the dialog box that appears, select the desired file type from the \"Files of type\" dropdown menu.
- Navigate to the folder that contains the AutoCAD file you want to import.
- Select the AutoCAD file and click \"Open\".
- Specify the import options in the dialog box.
- Click \"OK\" to import the AutoCAD file into your Revit project.
READ MORE:
Step-by-Step Process for Importing AutoCAD Files into Revit
Transitioning from AutoCAD to Revit is streamlined by following a systematic approach. Here\"s how to efficiently import your drawings:
- Prepare Your AutoCAD File: Simplify the drawing by removing unnecessary elements, optimizing layers, and purging unused items.
- Choose the Correct Import Method: Decide between linking or importing the file directly into your Revit project based on your project needs.
- Set Up the Correct Units: Ensure that the units in your AutoCAD file match those in your Revit project to maintain consistency in scale and dimensions.
- Import or Link the DWG File: Go to the \"Insert\" tab in Revit, select \"Link CAD\" or \"Import CAD\", and choose the appropriate settings for your file.
- Position the Drawing: Place your AutoCAD file accurately within your Revit project, aligning and scaling it as needed.
- Check and Adjust Layers/Elements: Fine-tune the visibility and graphics of the imported elements, adjusting layers and elements to fit your project structure.
- Save and Audit Your Project: Regularly save your work and use Revit\"s auditing features to ensure the integrity of your project data.
Following these steps ensures a smooth and effective integration of AutoCAD drawings into your Revit workflows.

Common Issues and Solutions When Importing AutoCAD to Revit
Importing AutoCAD files into Revit can sometimes present challenges. Understanding these common issues will prepare you to handle them efficiently:
- Issue: Incorrect Scaling - AutoCAD drawings may not match the scale in Revit.
- Solution: Verify and adjust the units in both software before importing to ensure consistency in scale and dimensions.
- Issue: Missing Elements - Some elements from AutoCAD do not appear in Revit.
- Solution: Check layer visibility and element compatibility. Ensure all necessary layers are turned on and properly mapped during the import process.
- Issue: File Performance - Large or complex AutoCAD files can slow down Revit performance.
- Solution: Optimize the AutoCAD file before importing by purging unused elements, reducing file complexity, and splitting large files into smaller, more manageable sections.
- Issue: Coordination Errors - Misalignment between AutoCAD and Revit elements.
- Solution: Utilize Revit\"s coordinate system to properly align and position the imported CAD file, ensuring that all elements are correctly oriented and placed.
- Issue: Layer Management - Difficulty managing and controlling the visibility of imported layers.
- Solution: Utilize Revit\"s visibility/graphic overrides to manage the display of imported layers, keeping your project organized and efficient.
Addressing these issues proactively will streamline the process of integrating AutoCAD drawings into your Revit projects, ensuring a smoother workflow and more accurate outcomes.

Best Practices for a Smooth Transition from AutoCAD to Revit
Adopting best practices can significantly enhance the transition process from AutoCAD to Revit. Here are essential strategies to ensure a smooth conversion:
- Clean Up the AutoCAD File: Simplify your CAD drawings by removing unnecessary elements, purging unused items, and organizing layers effectively before importing.
- Understand Revit\"s Functionality: Familiarize yourself with Revit\"s tools and features. Knowing how Revit handles elements differently than AutoCAD can guide you in preparing your CAD file for import.
- Link Instead of Import: Whenever possible, link the CAD file instead of importing it directly. This method helps maintain a reference to the original file and keeps the Revit file size smaller.
- Use Correct Import Settings: Pay attention to detail when choosing import settings, such as the correct scale, positioning, and layer options, to ensure the CAD data integrates well with your Revit model.
- Organize with Worksets: Utilize worksets in Revit to manage and control the visibility of imported CAD files, especially in large projects with multiple team members.
- Maintain Consistent Coordination: Establish and maintain a consistent coordinate system between AutoCAD and Revit to avoid misalignment and discrepancies.
- Train Your Team: Ensure that all team members are trained and comfortable with both AutoCAD and Revit workflows to ensure a seamless transition and efficient collaboration.
Implementing these best practices will not only smooth the transition from AutoCAD to Revit but also enhance the overall design and collaboration process in your projects.

Understanding the Coordination Between AutoCAD and Revit
Effective coordination between AutoCAD and Revit is crucial for successful project management and execution. Here are key points to understand for harmonizing these powerful tools:
- Compatibility: Recognize the intrinsic differences between AutoCAD\"s geometry-based modeling and Revit\"s parametric building modeling to ensure a smooth data exchange.
- Data Integration: Understand how Revit handles CAD imports, including layer management, line weights, and color mapping, to maintain the integrity of the original design.
- Reference Management: Utilize the linking feature in Revit to reference AutoCAD files without embedding them, allowing for easy updates and file management.
- Coordinate Systems: Align the coordinate systems and drawing origins between AutoCAD and Revit to avoid misplacement and scaling issues.
- Element Conversion: Be aware of how AutoCAD elements are represented in Revit, including the conversion of blocks to families and lines to walls or other components.
- Collaboration Workflow: Develop a clear workflow for team collaboration, ensuring that changes in AutoCAD are correctly updated and reflected in the Revit model.
- Training and Support: Invest in training for team members to understand the nuances of working with both AutoCAD and Revit, reducing errors and enhancing efficiency.
Mastering the coordination between AutoCAD and Revit paves the way for a more integrated, accurate, and efficient design and construction process.
_HOOK_
Optimizing Your Workflow: Tips and Tricks
Maximizing efficiency when working with AutoCAD and Revit can save time and enhance the quality of your projects. Here are some tips and tricks to optimize your workflow:
- Template Usage: Create and use templates in both AutoCAD and Revit with predefined settings, layers, and views to ensure consistency and save time on project setup.
- Batch Processing: When dealing with multiple files or repetitive tasks, utilize batch processing scripts in AutoCAD or Revit to automate and speed up your workflow.
- Custom Families and Blocks: Develop custom Revit families and AutoCAD blocks for frequently used elements to streamline the design process and maintain consistency across projects.
- Regular Audits: Periodically audit your Revit models and AutoCAD drawings to clean up unnecessary elements, fix errors, and optimize performance.
- Utilize Add-Ins: Explore and integrate powerful add-ins for both AutoCAD and Revit that can automate complex tasks, perform advanced analysis, or enhance visualization.
- Effective Layer Management: Keep your layers well-organized and consistently named in AutoCAD to ensure clear and straightforward imports into Revit.
- Continuous Learning: Stay updated with the latest features and best practices for both software by participating in forums, attending webinars, and undergoing continuous training.
Incorporating these strategies into your daily routine can significantly improve the efficiency and effectiveness of your AutoCAD to Revit workflow.
Managing Layers and Elements Post-Import
After importing AutoCAD drawings into Revit, effective management of layers and elements is crucial for maintaining an organized and efficient model. Here\"s how to handle layers and elements post-import:
- Layer Visibility: Utilize the \"Visibility/Graphics\" settings in Revit to control the visibility of imported layers, ensuring that only relevant layers are displayed in your model views.
- Element Categorization: Properly categorize imported elements into Revit families and categories. This allows for better control and management within the Revit environment.
- Line Weights and Styles: Adjust line weights, styles, and colors in Revit to match your project standards and ensure consistency across your documentation.
- Clean Up: Remove unnecessary or redundant elements from the imported CAD data to keep your Revit model lean and performance-optimized.
- Use Filters: Create and apply view filters in Revit to manage and display specific sets of imported elements based on certain criteria or conditions.
- Update Strategy: Develop a clear strategy for updating the linked CAD files. Decide how often and under what circumstances the linked files should be updated to reflect changes.
- Documentation: Ensure that all modifications, layer settings, and element categorizations are well-documented for future reference and team collaboration.
By effectively managing layers and elements after importing, you can ensure that your Revit model remains structured, accurate, and easy to navigate.
5 Tips and Tricks for Importing DWG files into Revit
Learn the ins and outs of importing goods from around the world with this captivating video. Discover the secrets to sourcing high-quality products and expanding your business globally. Don\'t miss out on the incredible opportunities in the importing industry!
How to Export AutoCAD DWG to Revit – Quick & Easy Export and Import for DWG to Revit
Unlock the potential of international trade by exploring the exciting world of exporting. This video will guide you through the steps to take your products to customers worldwide. Embrace the chance to reach new markets and boost your profits with exporting!
How to Preserve AutoCAD Details in Revit
Preserving the integrity of AutoCAD details when importing into Revit is vital for maintaining the accuracy and richness of your designs. Here are strategies to ensure that your details transition smoothly:
- Accurate Mapping: Ensure that layers, line types, and colors in AutoCAD are accurately mapped to their counterparts in Revit, maintaining the visual aspects of your design.
- Detailed Families: Convert detailed AutoCAD blocks into Revit families to retain the complexity and parametric control of your design elements.
- Consistent Scales: Work with consistent scales between AutoCAD and Revit to ensure that details are imported at the correct size and proportion.
- Element Breakdown: Break down complex elements into simpler components if necessary, to optimize performance in Revit while preserving essential details.
- Annotation Transfer: Carefully transfer annotations, tags, and text, ensuring they are correctly scaled and positioned within the Revit environment.
- Review and Refine: After importing, thoroughly review your Revit model, refining and adjusting details to match the original AutoCAD design as closely as possible.
- Use Detail Views: Utilize Revit\"s detail view feature to add additional detailing where the imported CAD data may not suffice, ensuring comprehensive documentation.
By following these steps, you can maintain the richness and precision of your AutoCAD details, ensuring they contribute effectively to your Revit projects.

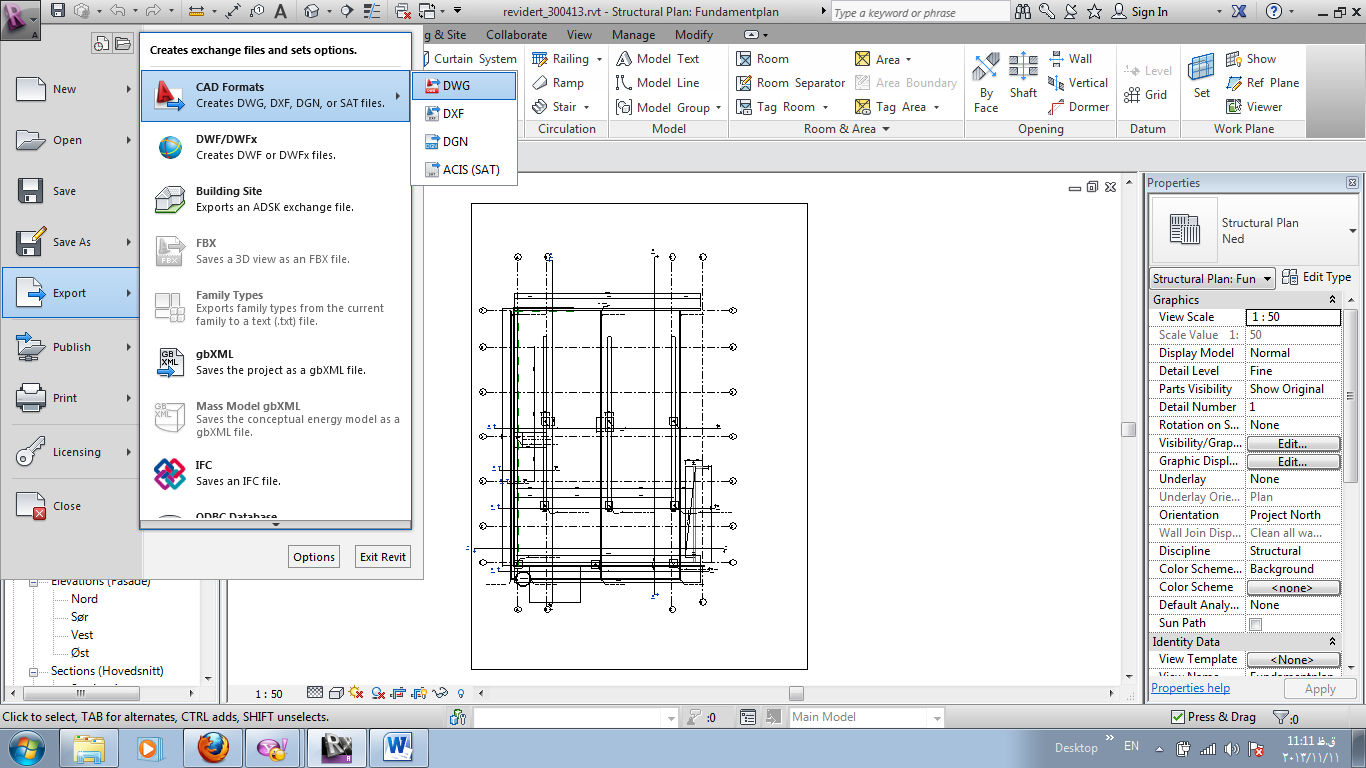
Advanced Techniques: Linking vs. Importing
Choosing between linking and importing AutoCAD files into Revit can significantly impact your project\"s workflow and performance. Understanding the nuances of each technique is key:
- Linking CAD Files:
- Linking creates a reference to the original AutoCAD file, keeping your Revit file size smaller and allowing for easy updates.
- Changes made in the AutoCAD file can be reflected in the Revit model, ensuring consistency and reducing manual update tasks.
- Linked files can be unloaded or reloaded as needed, optimizing performance and allowing for flexible management of external references.
- Importing CAD Files:
- Importing embeds the AutoCAD data directly into your Revit project, making it part of the Revit file without the need for the original CAD file.
- Imported data is best for static background elements that don\"t require updates, ensuring they remain constant throughout the project.
- While importing increases file size and can impact performance, it eliminates the dependency on external files, which can be beneficial for sharing or archiving projects.
Deciding whether to link or import depends on your project\"s needs, collaboration requirements, and how often your CAD drawings will need updates. Weigh these factors carefully to optimize your workflow in Revit.
Customizing Settings for Optimal Performance
Enhancing the performance of your Revit model when working with imported AutoCAD files involves fine-tuning settings and preferences. Here\"s how you can customize settings for optimal performance:
- Manage View Templates: Use view templates in Revit to control the visibility and graphical representation of imported CAD layers, minimizing unnecessary detail in complex views.
- Purge Unused Elements: Regularly purge unused elements, both in AutoCAD before importing and in Revit, to reduce file size and improve performance.
- Optimize Hardware: Ensure that your hardware is capable of handling large files and complex models by investing in a powerful CPU, ample RAM, and a high-performance graphics card.
- Revit Worksharing: Leverage worksharing features for team projects to allow multiple users to work on different components of a model simultaneously, reducing file contention and enhancing collaboration.
- Adjust Visual Settings: Modify visual fidelity settings for views where high detail is not required, reducing rendering load and improving model responsiveness.
- Utilize Design Options: Manage different design scenarios within the same project by using design options, keeping the overall model more organized and efficient.
- Regular Maintenance: Schedule regular maintenance sessions to review model integrity, fix errors, and optimize the project file to ensure smooth performance throughout the project lifecycle.
By customizing these settings, you can maintain a balance between high-quality representations of your designs and the performance required for a smooth workflow in Revit.

_HOOK_
Case Studies: Successful AutoCAD to Revit Transitions
Exploring real-world examples can provide valuable insights into the successful transition from AutoCAD to Revit. These case studies highlight strategies, challenges, and the impact of effective implementation:
- Case Study 1: High-Rise Residential Project
- An architectural firm transitioned a high-rise residential project from AutoCAD to Revit, streamlining collaboration and coordination. Key to their success was early adoption of BIM standards, comprehensive training for staff, and meticulous data management, resulting in improved design quality and faster turnaround times.
- Case Study 2: Commercial Complex Renovation
- For a complex commercial renovation, the integration of AutoCAD legacy drawings into Revit facilitated accurate historical referencing and efficient new design additions. Utilizing linking for reference drawings and custom family creation for unique elements ensured project accuracy and design consistency.
- Case Study 3: Infrastructure and Landscape Design
- In an extensive infrastructure and landscape project, integrating AutoCAD civil designs into Revit highlighted the power of multidisciplinary collaboration. Leveraging shared coordinates and consistent data exchange protocols, the team achieved a seamless design integration, enhancing decision-making and project visualization.
These case studies exemplify how tailored approaches to AutoCAD-to-Revit transitions can lead to enhanced efficiency, accuracy, and project outcomes.

READ MORE:
Frequently Asked Questions About Importing AutoCAD into Revit
Navigating the process of importing AutoCAD files into Revit can raise questions. Below are answers to some of the most frequently asked questions to help clarify the process:
- Can I edit AutoCAD files once they are imported into Revit?
- While you can\"t directly edit AutoCAD elements in Revit, you can manage layers, visibility, and line styles. For significant changes, it\"s best to edit the source file in AutoCAD and re-import or re-link it in Revit.
- How do I manage file size when importing AutoCAD files into Revit?
- To manage file size, link CAD files instead of importing them, optimize the AutoCAD file by purging unnecessary elements before importing, and use Revit\"s \"Purge Unused\" feature to remove unnecessary elements.
- What is the best practice for maintaining the relationship between AutoCAD and Revit files?
- Establish a clear protocol for updates, use consistent file naming and versioning, and leverage linking to maintain a dynamic relationship between AutoCAD drawings and Revit models.
- How can I ensure that the imported CAD file aligns correctly with my Revit model?
- Use shared coordinates or manual alignment tools in Revit to ensure that the CAD file aligns correctly with your BIM model. Consistently check and adjust the positioning as necessary.
- Can I import 3D AutoCAD models into Revit, and how?
- Yes, you can import 3D AutoCAD models into Revit. Use the \"Import CAD\" tool and select the correct file type and options. Ensure the model\"s units and coordinates align with your Revit project for correct scaling and positioning.
These FAQs aim to address common concerns and help streamline your AutoCAD to Revit import process, enhancing your project\"s efficiency and accuracy.
Embracing the synergy between AutoCAD and Revit unlocks new dimensions in design precision and collaboration, propelling your architectural projects to new heights of innovation and efficiency.