Topic autocad tutorial autodesk: Dive into the world of AutoCAD with our expert tutorials from Autodesk, offering step-by-step guidance to master drafting, design, and 3D modeling for all skill levels.
Table of Content
- How to access AutoCAD documentation and troubleshooting articles from the Autodesk knowledge base?
- Getting Started with AutoCAD
- Understanding the AutoCAD Interface
- Basic Drawing & Editing Commands
- Creating Your First Drawing
- Learning to Use Layers
- YOUTUBE: AutoCAD Basic Tutorial for Beginners - Part 1
- Mastering Precision Tools
- Organizing Objects with Blocks & Groups
- Advanced Drawing Techniques
- Adding Text & Dimensions to Your Drawing
- Using Advanced Tools & 3D Modeling
- Tips for Efficient Workflow & Shortcuts
- Preparing for Professional Certification
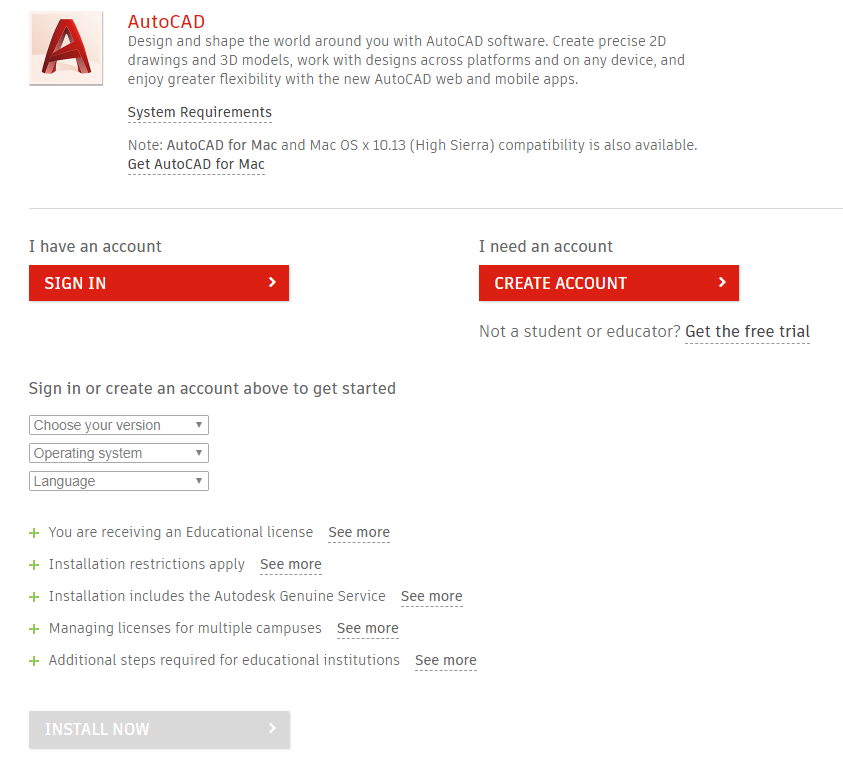
How to access AutoCAD documentation and troubleshooting articles from the Autodesk knowledge base?
To access AutoCAD documentation and troubleshooting articles from the Autodesk knowledge base, follow these steps:
- Open any web browser and go to the Autodesk website.
- In the top menu, hover over the \"Support\" tab and click on \"Product Support\".
- On the Product Support page, locate the search bar.
- Type \"AutoCAD\" into the search bar and press Enter or click on the magnifying glass icon to initiate the search.
- A list of results related to AutoCAD will be displayed.
- Scroll down the page and look for the section titled \"Knowledge Base\".
- Click on the link provided for the Autodesk Knowledge Base.
- You will be redirected to the Autodesk Knowledge Network website.
- On the Knowledge Network website, navigate to the search bar at the top of the page.
- Enter your specific query or topic related to AutoCAD documentation or troubleshooting and press Enter or click on the search icon.
- A list of articles and resources relevant to your search query will be displayed.
- Click on the article title that seems most relevant to your needs.
- The article will open, providing you with detailed documentation or troubleshooting guidance on the selected topic.
READ MORE:
Getting Started with AutoCAD
Beginning your journey with AutoCAD, Autodesk\"s flagship software for drafting and design, requires familiarity with its core functionalities and interface. This section will guide you through the initial steps to become proficient in AutoCAD.
- Explore the AutoCAD Interface: Start by familiarizing yourself with the AutoCAD workspace, including the ribbon, toolbars, command line, and drawing area. Understanding these elements is crucial for efficient navigation and tool access.
- Set Up Your Drawing Environment: Learn how to configure your drawing settings, including units, drawing limits, and layers. These foundational settings are essential for creating precise drawings.
- Basic Drawing Commands: Master the use of basic drawing commands like LINE, CIRCLE, RECTANGLE, and POLYLINE. These commands form the building blocks of your AutoCAD drawings.
- Using Precision Tools: AutoCAD offers various tools to enhance precision, such as Object Snap (OSNAP), Grid, and Ortho Mode. Utilizing these tools will improve the accuracy of your designs.
- Modifying Objects: Learn how to select and modify objects using commands like MOVE, COPY, ROTATE, and SCALE. Editing existing elements is a common task in AutoCAD.
- Practice with Simple Projects: Apply what you\"ve learned by creating simple drawings. Practice using different commands and tools to build your confidence and understanding of AutoCAD.
Starting with AutoCAD can be overwhelming, but focusing on these essential skills will pave the way for advanced learning and mastery of the software. Remember, practice is key to becoming proficient in AutoCAD.

Understanding the AutoCAD Interface
The AutoCAD interface is a gateway to the extensive capabilities of Autodesk\"s drafting software. This section will help you navigate and understand the key components of the interface, ensuring a smooth and efficient design process.
- Ribbon: The Ribbon contains multiple tabs, each hosting a collection of tools and functions grouped by task, such as drawing, modifying, and managing layers. Familiarize yourself with the Ribbon for quick access to AutoCAD\"s features.
- Command Line: Located at the bottom of the screen, the Command Line allows you to execute commands, view prompts, and see the results of your actions. It\"s a powerful tool for experienced users who prefer typing commands.
- Tool Palettes: Tool palettes provide easy access to commonly used tools, blocks, and other drawing content. Customize tool palettes to suit your workflow and increase efficiency.
- Properties Inspector: The Properties Inspector displays information about selected objects and allows you to modify their attributes, such as color, layer, and line type, enhancing control over your designs.
- Workspace Switching: AutoCAD allows you to switch between different workspaces tailored to various tasks, such as drafting, 3D modeling, and layout management. Exploring these workspaces can optimize your work environment.
- Navigation Tools: Tools like Zoom, Pan, and Orbit are essential for moving around your drawings. Mastering these will help you efficiently inspect and navigate your designs.
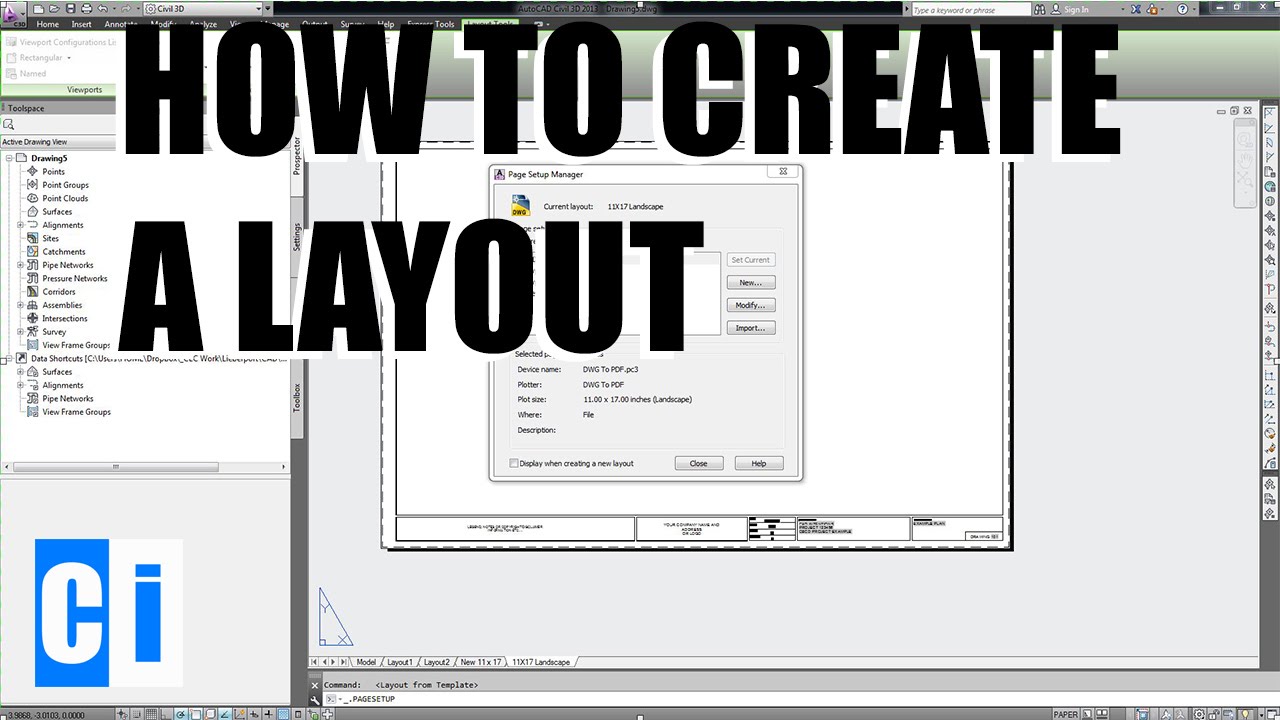
- Model and Layout Tabs: Switch between model space, where you create and edit your designs, and layout tabs, where you prepare your drawings for printing or publication.
Understanding the AutoCAD interface is crucial for harnessing the full potential of the software. Take the time to explore and customize the interface to your preference, setting a solid foundation for your design work.
Basic Drawing & Editing Commands
AutoCAD\"s suite of drawing and editing commands forms the backbone of your design process, enabling the creation and modification of complex drawings with precision and efficiency. This section introduces the fundamental commands every user should know.
- LINE: Creates straight line segments. Click to specify the start point, then the end point, or type coordinates directly.
- CIRCLE: Draws a circle based on a center point and radius. You can also define circles by diameter or by specifying two or three points on its circumference.
- RECTANGLE: Generates a rectangle from two diagonal corner points. Additional options allow for rounded corners.
- POLYLINE: Creates a sequence of connected lines and arcs. This versatile command is essential for drawing complex shapes that can be edited as a single object.
- ARC: Draws arc segments, with various methods for specifying the center, start, end, radius, and angle.
- ERASE: Removes objects from the drawing. Select the objects you wish to delete, or use the \"Select All\" option to remove everything.
- MOVE: Relocates selected objects from one place to another. Specify the base point for the move and then the destination point.
- COPY: Creates copies of the selected objects. After selecting objects to copy, specify the base point and then the point where you want the copy to be placed.
- ROTATE: Turns objects around a base point. Define the rotation angle or use reference objects to set the angle.
- SCALE: Changes the size of selected objects, maintaining their proportion. Specify a base point and then a scale factor or reference length.
- TRIM: Removes parts of objects to meet the edges of other objects. Select cutting edges first, then the parts of objects you want to trim away.
- EXTEND: Lengthens objects to meet the edges of other objects. Like TRIM, select the boundary edges first, then the objects you wish to extend.
Mastering these basic commands will significantly enhance your drawing capabilities in AutoCAD, providing a solid foundation for exploring more advanced features and techniques.

Creating Your First Drawing
Embarking on your first AutoCAD drawing is an exciting step towards becoming proficient in CAD design. This guide will walk you through the process of creating a simple but fundamental drawing, focusing on applying basic commands and setting a strong foundation for future projects.
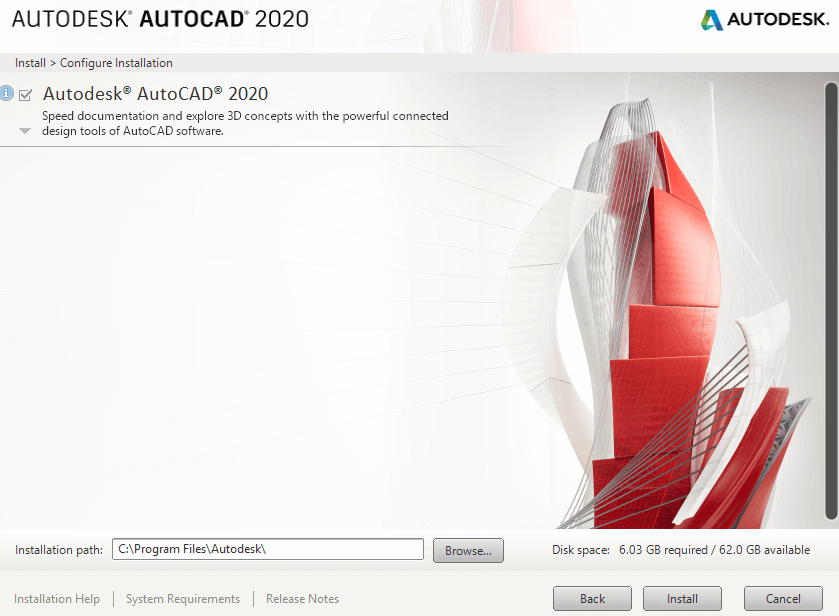
- Open AutoCAD and Start a New Drawing: Launch AutoCAD and select \"New Drawing\" from the start screen. Choose a template that suits your project needs, such as a basic 2D drafting template.
- Set Your Drawing Units: Access the \"Units\" dialog from the command line by typing \"UNITS\" and pressing Enter. Choose the appropriate units (e.g., millimeters or inches) for your drawing.
- Draw a Simple Shape: Begin with a basic shape to get familiar with the drawing commands. Use the \"LINE\" or \"RECTANGLE\" command to create your first geometric figure.
- Apply Dimensions: Use the \"DIMENSION\" command to add dimensions to your shape. This will help you understand the scale and proportions of your drawing.
- Modify Your Drawing: Experiment with editing commands like \"MOVE\", \"COPY\", and \"ROTATE\" to modify your shape. This step is crucial for learning how to adjust and refine your drawings.
- Add Text Labels: With the \"TEXT\" command, insert labels or notes into your drawing. This practice is essential for providing context and instructions within your designs.
- Save Your Work: Regularly save your drawing by clicking the save icon or typing \"SAVEAS\" in the command line. Choose a memorable name and location for your file.
Congratulations on completing your first AutoCAD drawing! This experience serves as the groundwork for your journey in design and drafting. Remember, practice and exploration are key to mastering AutoCAD.

_HOOK_
Learning to Use Layers
Layers are a fundamental aspect of organizing and managing your drawings in AutoCAD. They allow you to separate different elements of your drawing, making it easier to edit, view, and print your work. This section will guide you through the basics of using layers in AutoCAD, including creating layers, assigning objects to layers, and managing layer properties.
Creating and Managing Layers
- Open the Layer Properties Manager: Use the LAYER command or click on the Layer Properties icon in the Layers panel on the Home tab.
- Create a New Layer: Click the New Layer button, represented by a sheet of paper icon. Name your layer according to the element it will represent (e.g., walls, dimensions, text).
- Assign Color, Linetype, and Lineweight: For each layer, you can specify a color, linetype, and lineweight. These properties will apply to all objects on the layer, providing visual cues about the drawing\"s different aspects.
- Set a Layer as Current: Double-click on a layer name or select it and click the green check mark to make it the current layer. New objects will be created on this layer.
- Organize Layers into Groups: For complex drawings, organize layers into groups by right-clicking in the Layer Properties Manager and selecting \"Create Group Filter\". This helps in managing a large number of layers.
Assigning Objects to Layers
Objects can be moved to different layers by selecting them, then either using the Properties palette to change the layer or by selecting the desired layer from the Layer dropdown in the Home tab.
Using Layer States
Layer states allow you to save the visibility, color, linetype, and other properties of layers in a particular configuration. This is useful for viewing different aspects of your project without permanently altering the layer settings.
- To save a layer state, use the LAYERSTATE command and select \"Save\".
- To restore a layer state, open the Layer State Manager and select the desired state.
Tips for Effective Layer Management
- Use meaningful layer names to easily identify the purpose of each layer.
- Consistently apply color, linetype, and lineweight settings across similar elements to maintain uniformity in your drawing.
- Regularly review and purge unused layers to keep your drawing file clean and manageable.
- Utilize layer filters to quickly find layers in complex drawings.
Mastering the use of layers in AutoCAD not only enhances the organization of your drawings but also improves efficiency and collaboration by allowing team members to easily understand the structure and components of your designs.

AutoCAD Basic Tutorial for Beginners - Part 1
Are you new to AutoCAD? Don\'t worry, this video is perfect for beginners like you! Learn the basics, essential tips, and tricks to get you started on your journey to becoming an AutoCAD pro. Don\'t miss out on this opportunity to expand your skills and create incredible designs!
AutoCAD 2021 Tutorial for Beginners - 11 MINUTES!
Exciting news for all AutoCAD enthusiasts! Discover the latest features and improvements in AutoCAD 2021 through this captivating video. Unleash your creativity with enhanced tools, streamlined workflows, and more. Upgrade your design game and explore the endless possibilities that AutoCAD 2021 has to offer. Join us now!
Mastering Precision Tools
Precision is key in creating detailed and accurate drawings in AutoCAD. Autodesk\"s AutoCAD software provides a suite of precision tools designed to help users draw with exactness and efficiency. This section covers essential tools and techniques for enhancing precision in your drawings.
Grid and Snap
Use the grid as a reference system to guide your drawing. The snap feature forces your cursor to align with the nearest grid point, ensuring precise placement of objects.
- To toggle the grid display, press F7.
- To enable snap, press F9. Adjust snap settings to fit the scale of your drawing.
Object Snaps (Osnap)
Object snaps provide a way to specify precise points on objects when you are selecting points. Common snaps include endpoints, midpoints, centers, and intersections.
- Activate Osnap by right-clicking on the Osnap icon in the status bar and selecting the snaps you need.
- Use running object snaps for continuous precision drawing without repeatedly selecting snaps.
Object Snap Tracking
Object Snap Tracking works with Osnap to let you make selections based on a virtual alignment path from key points on existing objects. This is useful for aligning objects or creating objects at specific distances relative to other objects.
Ortho Mode and Polar Tracking
Ortho Mode restricts cursor movement to horizontal and vertical directions, useful for drawing straight lines. Polar Tracking extends this concept by allowing tracking along specified angles.
- To toggle Ortho Mode, press F8.
- To adjust Polar Tracking settings, go to the application status bar and click on the Polar Tracking button.
Dynamic Input
Dynamic Input provides a way to input commands and distances directly at the cursor. It helps keep your focus on the drawing area, improving efficiency and accuracy.
Using Dimensions and Constraints
Dimensions and constraints are powerful tools for maintaining precision. Dimensions display measurements within the drawing, while constraints can fix the size or position of objects relative to each other.
- Apply dimensional constraints to specify the distance or angle between objects.
- Use geometric constraints to define relationships between objects, such as parallelism or perpendicularity.
Mastering these precision tools in AutoCAD is crucial for creating detailed, accurate drawings. Practice using these tools to improve your drawing skills and efficiency. Remember, the key to precision drawing is not just in knowing which tool to use, but in understanding how to apply them effectively in your workflow.

Organizing Objects with Blocks & Groups
In AutoCAD, efficiently organizing your drawing can significantly enhance both the performance and clarity of your work. Blocks and groups are two powerful features for organizing objects, making it easier to manage, modify, and reuse elements within your drawings. This section will explain how to effectively use blocks and groups in AutoCAD.
Creating and Using Blocks
Blocks are collections of objects that combine into a single named object. They are particularly useful for repetitive content that you may need to insert at various points in your drawings.
- Create a Block: Select the objects you wish to include in the block. Use the COMMAND or BLOCK command, then define a name, base point, and select the objects.
- Inserting Blocks: Use the INSERT command to place your block in the drawing. You can specify insertion points, scale, and rotation as needed.
- Editing Blocks: To modify a block, use the BEDIT command. This opens the Block Editor, where you can make changes. Save the block to update it throughout your drawing.
Grouping Objects
Groups allow you to combine multiple objects into a single unit without creating a block. This is useful for temporary arrangements or when you need to keep objects together but separate from other elements.
- To create a group, select the objects you wish to group together and use the GROUP command. Give your group a name if desired.
- To edit the contents of a group, use the GEDIT command. This allows you to add or remove objects from the group.
- Groups can be easily dissolved or ungrouped by using the UNGROUP command, returning the objects to their individual states.
Advantages of Using Blocks and Groups
- Efficiency: Blocks and groups streamline the process of managing repetitive elements, making your workflow faster and more efficient.
- Organization: They help keep your drawing organized, making it easier to navigate and understand the structure of your design.
- Flexibility: Blocks can be edited globally, meaning changes made to a block definition update all instances of that block. Groups offer flexibility in temporary object management without permanently altering the drawing.
Understanding and utilizing blocks and groups in AutoCAD can greatly improve your drawing organization and efficiency. Whether you\"re working on complex projects or simple drawings, these tools are essential for any AutoCAD user aiming to enhance their design process.

Advanced Drawing Techniques
As you become more comfortable with the basics of AutoCAD, exploring advanced drawing techniques can significantly enhance your capabilities and efficiency. These techniques leverage AutoCAD\"s powerful tools to streamline complex tasks, improve accuracy, and expand your creative options. This section delves into several advanced drawing strategies that can elevate your AutoCAD proficiency.
Using Reference Geometry
Reference geometry (XREFs) allows you to include external references in your drawings, such as other DWG files. This technique is useful for collaborating on large projects and maintaining consistency across different drawings.
- Attach an external reference using the XREF command.
- Manage XREF paths and layers to ensure that the external references behave as expected within your drawing.
Parametric Constraints
Parametric constraints enable you to define geometrical and dimensional relationships between objects. This feature allows for dynamic adjustments while maintaining specific design intents.
- Use dimensional constraints to specify distances, angles, and sizes that automatically adjust related objects when changes are made.
- Geometric constraints can control the relationships between objects, such as parallelism, perpendicularity, and tangency.
Dynamic Blocks
Dynamic blocks offer more flexibility than standard blocks by allowing you to embed custom properties and actions. This can include changing the size, shape, or configuration of a block within the drawing without needing multiple block definitions.
- Create a dynamic block using the Block Editor and define parameters and actions that control the block\"s behavior.
3D Modeling Techniques
Moving beyond 2D drawing into 3D modeling opens up a new realm of design possibilities in AutoCAD. Utilize solid, surface, and mesh modeling tools to create detailed 3D models.
- Use solid modeling for volumetric objects with mass and volume.
- Surface modeling is ideal for complex geometries and smooth surfaces.
- Mesh modeling allows for more freedom in creating organic shapes.
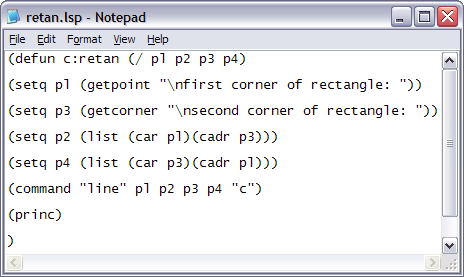
Custom Scripts and Automation
AutoCAD\"s scripting capabilities allow you to automate repetitive tasks, saving time and reducing the potential for errors. Write custom scripts in AutoLISP or use the Action Recorder to create macros.
- Learn basic AutoLISP programming to create custom functions tailored to your needs.
- Use the Action Recorder to capture routine tasks and replay them when needed.
By mastering these advanced drawing techniques, you can take full advantage of AutoCAD\"s extensive capabilities, making your workflow more efficient and your designs more sophisticated. Whether working on detailed technical drawings or innovative design projects, these strategies provide the tools you need to achieve precision and creativity in your work.
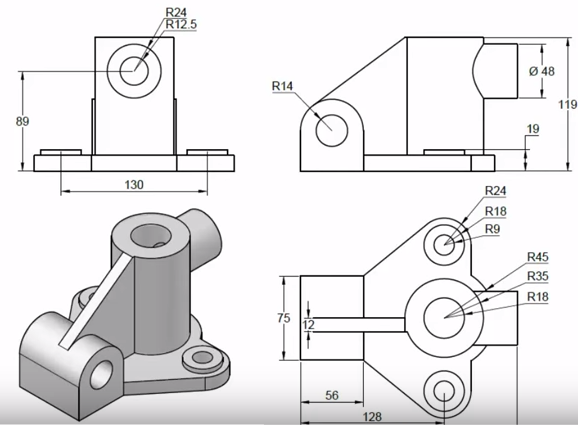
Adding Text & Dimensions to Your Drawing
Text and dimensions are crucial elements in AutoCAD drawings, providing essential information such as measurements, labels, and notes. Properly integrating text and dimensions enhances the clarity and professionalism of your drawings. This section guides you through the process of adding and formatting text and dimensions in AutoCAD.
Adding Text
AutoCAD allows you to add text using the Text command for single-line text or the MText command for multi-line text.
- Single-Line Text (TEXT/DTEXT): Use this for short labels or notes. After selecting the TEXT command, click in the drawing area to specify the insertion point and then enter your text.
- Multi-Line Text (MTEXT): Ideal for longer sections of text. Select the MTEXT command, draw a text box in your drawing, and then enter your text. MText offers advanced formatting options similar to word processing software, such as text styles, alignments, and bullet points.
Formatting Text
Utilize text styles to ensure consistency throughout your drawing. Create or modify text styles by accessing the Style command.
- Define font, size, and other properties for your text styles.
- Apply these styles when creating text objects to maintain a uniform look.
Adding Dimensions
Dimensions provide precise measurements of your drawing\"s elements. AutoCAD offers various dimensioning tools to suit different types of measurements.
- Linear Dimensions: Measure distances between two points. Access this tool with the DIMLINEAR command.
- Aligned Dimensions: Similar to linear dimensions but aligns with the object being measured. Use the DIMALIGNED command.
- Radial & Diameter Dimensions: For measuring circles and arcs. Use the DIMRADIAL and DIMDIAMETER commands respectively.
- Angular Dimensions: Measure angles between two lines. The DIMANGULAR command is used for this purpose.
Dimension Styles
Dimension styles control the appearance of your dimensions, such as text size, line weight, and arrowheads. Managing dimension styles ensures consistency across your drawing.
- Create or modify dimension styles through the DIMSTYLE command.
- Apply these styles before adding dimensions to ensure they meet your drawing\"s standards and conventions.
Effectively adding text and dimensions to your AutoCAD drawings not only communicates important information but also enhances the readability and professionalism of your work. By mastering these tools and techniques, you can ensure that your drawings convey all necessary details clearly and accurately.

_HOOK_
Using Advanced Tools & 3D Modeling
Transitioning from 2D drawings to 3D modeling in AutoCAD unlocks a new dimension of design possibilities. AutoCAD\"s suite of advanced tools and 3D modeling capabilities allows designers to create detailed, accurate models that can be used for analysis, visualization, and fabrication. This section will guide you through the basics of 3D modeling in AutoCAD, including creating and modifying 3D objects, using visualization tools, and understanding some of the software\"s advanced features.
Creating 3D Models
AutoCAD offers several methods for creating 3D models, each suited to different types of projects.
- Primitives: Start with basic 3D shapes such as boxes, spheres, cylinders, cones, and pyramids. Use commands like BOX, SPHERE, CYLINDER, etc., to create these shapes.
- Extrusion: Create 3D objects by extruding 2D shapes. Select a 2D object and use the EXTRUDE command to extend it into the third dimension.
- Revolve: Create complex 3D objects by revolving a 2D shape around an axis. The REVOLVE command is used for this purpose.
Modifying 3D Models
After creating 3D models, you can modify them to achieve your desired shape and complexity.
- Use the PRESSPULL command to adjust faces, edges, and vertices.
- The UNION, SUBTRACT, and INTERSECT commands allow you to combine or separate 3D objects.
- Modify the 3D mesh with tools like MESHSMOOTH and MESHCAP for detailed shaping.
Visualization and Rendering
Visualization tools in AutoCAD help you view your models from different perspectives and apply realistic materials and lighting effects.
- Use the 3DORBIT command to freely rotate and examine your model from any angle.
- Apply materials and textures to your model for more realistic appearances.
- Use the rendering tools to create photorealistic images of your models.
Advanced Tools
Beyond basic modeling, AutoCAD provides advanced tools for more sophisticated design tasks.
- Point Clouds: Import and use point cloud data as a reference for creating models.
- 3D Scanning: Convert scanned data into 3D models within AutoCAD.
- Customization and Automation: Use AutoLISP and other customization tools to automate repetitive tasks and extend AutoCAD\"s capabilities.
Using advanced tools and 3D modeling in AutoCAD can greatly enhance your design capabilities, allowing you to create more complex, accurate, and visually appealing models. Whether you are working on architectural designs, mechanical components, or artistic sculptures, mastering these skills will open up new opportunities for creativity and efficiency in your work.
Tips for Efficient Workflow & Shortcuts
Efficiency in AutoCAD is key to managing complex projects and meeting tight deadlines. By optimizing your workflow and utilizing shortcuts, you can significantly reduce design time and improve productivity. This section provides practical tips and shortcuts to enhance your AutoCAD efficiency.
Customize Your Workspace
AutoCAD allows for extensive customization of your workspace to fit your needs. Tailor your toolbars, command aliases, and palette locations for easy access to frequently used tools and commands.
Use Keyboard Shortcuts
Keyboard shortcuts are a quick way to execute commands without navigating through menus. Familiarize yourself with common shortcuts, and customize your own for a faster workflow.
- C for COPY
- M for MOVE
- L for LINE
- PL for PLINE
- Customize shortcuts through the CUI (Customize User Interface) command.
Use Command Aliases
Command aliases allow you to enter commands quickly by typing short abbreviations in the command line. Customize or create new aliases for commands you use frequently.
Template Files
Save time by creating template files with pre-set layers, styles, and settings. Use these templates to start new projects with consistent standards.
Layer Management
Efficient layer management is crucial for keeping your drawings organized. Use layer properties and filters to manage visibility and editability of various elements in your drawing.
Use Blocks Wisely
Blocks can significantly reduce drawing time for repetitive elements. Create a library of common blocks that you can quickly insert into new drawings.
Take Advantage of Dynamic Blocks
Dynamic blocks contain parameters and actions that allow you to modify the block\"s shape, size, or configuration without creating multiple block definitions.
Automate Repetitive Tasks
Use scripts, macros, or AutoLISP to automate repetitive tasks. This can include anything from drawing setup to complex calculations.
Regularly Save and Backup
Protect your work by saving regularly and setting up automatic backups. This prevents data loss and ensures you have a recent version of your work.
Stay Updated
Keep your AutoCAD software up to date to take advantage of the latest features and improvements. Regularly check for and install updates.
By implementing these tips and shortcuts, you can streamline your AutoCAD workflow, reduce manual tasks, and focus more on the creative aspects of your designs. Efficiency is not just about speed, but also about maximizing the quality and accuracy of your work.
READ MORE:
Preparing for Professional Certification
Obtaining a professional certification in AutoCAD from Autodesk is a valuable step in demonstrating your expertise and commitment to your career in design and drafting. The certification serves as a credible validation of your skills to employers and clients. Preparing for the certification exam requires a focused and comprehensive approach. Here are steps and tips to help you prepare effectively for the Autodesk AutoCAD certification exam.
Understand the Exam Objectives
Start by reviewing the exam objectives and guidelines provided by Autodesk. Understanding the scope of the exam will help you focus your study efforts on the topics that matter most.
Enroll in Autodesk Authorized Training
Consider enrolling in training courses offered by Autodesk Authorized Training Centers. These courses are taught by certified professionals who can provide insights and tips that are directly relevant to the certification exam.
Practice with Real Projects
Hands-on experience is invaluable. Practice using AutoCAD on real or simulated projects that cover a wide range of tools and features. This practical experience will reinforce your knowledge and skills.
Utilize Autodesk\"s Official Study Guides
Autodesk offers official study guides and materials that are specifically designed to prepare you for the certification exam. These resources often include sample questions, practice tests, and study tips.
Join AutoCAD Communities
Joining online forums and communities can provide additional resources, such as study tips, advice from those who have already taken the exam, and opportunities for questions and discussions.
Practice Time Management
The certification exam is timed, so practice managing your time effectively. When taking practice exams, simulate the time constraints of the actual exam to improve your time management skills.
Review and Reflect
After each study session or practice exam, take the time to review and reflect on what you have learned. Identify areas where you need further review or practice and adjust your study plan accordingly.
Stay Updated with AutoCAD
Ensure that you are familiar with the latest version of AutoCAD, as the certification exam may include questions on recent updates or features.
Schedule Your Exam
Once you feel prepared, schedule your certification exam through a Pearson VUE testing center. Be sure to allow yourself enough time before the exam date for any final review or practice.
Preparing for the Autodesk AutoCAD certification exam requires dedication, practice, and a strategic approach to studying. By following these steps, you can increase your confidence and improve your chances of successfully obtaining your professional certification.
Obtaining a professional certification in AutoCAD from Autodesk is a valuable step in demonstrating your expertise and commitment to your career in design and drafting. The certification serves as a credible validation of your skills to employers and clients. Preparing for the certification exam requires a focused and comprehensive approach. Here are steps and tips to help you prepare effectively for the Autodesk AutoCAD certification exam.
Start by reviewing the exam objectives and guidelines provided by Autodesk. Understanding the scope of the exam will help you focus your study efforts on the topics that matter most.
Consider enrolling in training courses offered by Autodesk Authorized Training Centers. These courses are taught by certified professionals who can provide insights and tips that are directly relevant to the certification exam.
Hands-on experience is invaluable. Practice using AutoCAD on real or simulated projects that cover a wide range of tools and features. This practical experience will reinforce your knowledge and skills.
Autodesk offers official study guides and materials that are specifically designed to prepare you for the certification exam. These resources often include sample questions, practice tests, and study tips.
Joining online forums and communities can provide additional resources, such as study tips, advice from those who have already taken the exam, and opportunities for questions and discussions.
The certification exam is timed, so practice managing your time effectively. When taking practice exams, simulate the time constraints of the actual exam to improve your time management skills.
After each study session or practice exam, take the time to review and reflect on what you have learned. Identify areas where you need further review or practice and adjust your study plan accordingly.
Ensure that you are familiar with the latest version of AutoCAD, as the certification exam may include questions on recent updates or features.
Once you feel prepared, schedule your certification exam through a Pearson VUE testing center. Be sure to allow yourself enough time before the exam date for any final review or practice.
Preparing for the Autodesk AutoCAD certification exam requires dedication, practice, and a strategic approach to studying. By following these steps, you can increase your confidence and improve your chances of successfully obtaining your professional certification.