Topic autocad tutorial 2d: Embark on your journey to mastering 2D drafting with our comprehensive AutoCAD Tutorial 2D, designed for beginners to gain proficiency and confidence in design.
Table of Content
- How to learn AutoCAD 2D through step-by-step tutorials?
- Getting Started with AutoCAD
- Understanding the AutoCAD Interface
- Basic Drawing Tools
- YOUTUBE: AutoCAD Basic Tutorial for Beginners - Part 1 of 3
- Modifying Objects in AutoCAD
- Using Layers, Colors, and Linetypes
- Creating Text and Dimensions
- Advanced Drawing Techniques
- Efficient Use of Blocks and Attributes
- Setting Up Layouts and Printing
- Managing External References
- Tips and Tricks for Productivity
How to learn AutoCAD 2D through step-by-step tutorials?
To learn AutoCAD 2D through step-by-step tutorials, you can follow these steps:
- Start by searching for AutoCAD tutorials on reputable websites or platforms.
- Choose a tutorial that is specifically designed for beginners and focuses on 2D drawing.
- Read the tutorial description and ensure it covers the topics and skills you want to learn.
- Watch the video lessons or follow the written instructions provided in the tutorial.
- Take notes or pause the tutorial as needed to understand and practice each step.
- Complete the quizzes or practice exercises included in the tutorial to test your understanding.
- If you encounter any difficulties or have questions, consult the tutorial\'s comments section or seek help from online communities or forums dedicated to AutoCAD.
- Continue practicing and applying what you learn from the tutorial to real-life projects or examples.
- Once you feel comfortable with the basics, consider exploring more advanced AutoCAD tutorials to further enhance your skills.
- Stay updated with the latest versions of AutoCAD and follow tutorials or courses that align with the version you are using.
Remember, learning AutoCAD or any new software takes time and practice, so be patient and persistent in your learning journey.
READ MORE:
Getting Started with AutoCAD
Welcome to the exciting world of AutoCAD! This section will guide you through the initial steps of starting with AutoCAD for 2D drafting. Whether you\"re a complete novice or looking to refresh your skills, these steps will lay the foundation for your journey in mastering AutoCAD.
- Download and Install AutoCAD: Ensure you have the latest version of AutoCAD installed on your computer. Autodesk offers a free trial for new users, and students can access AutoCAD for free.
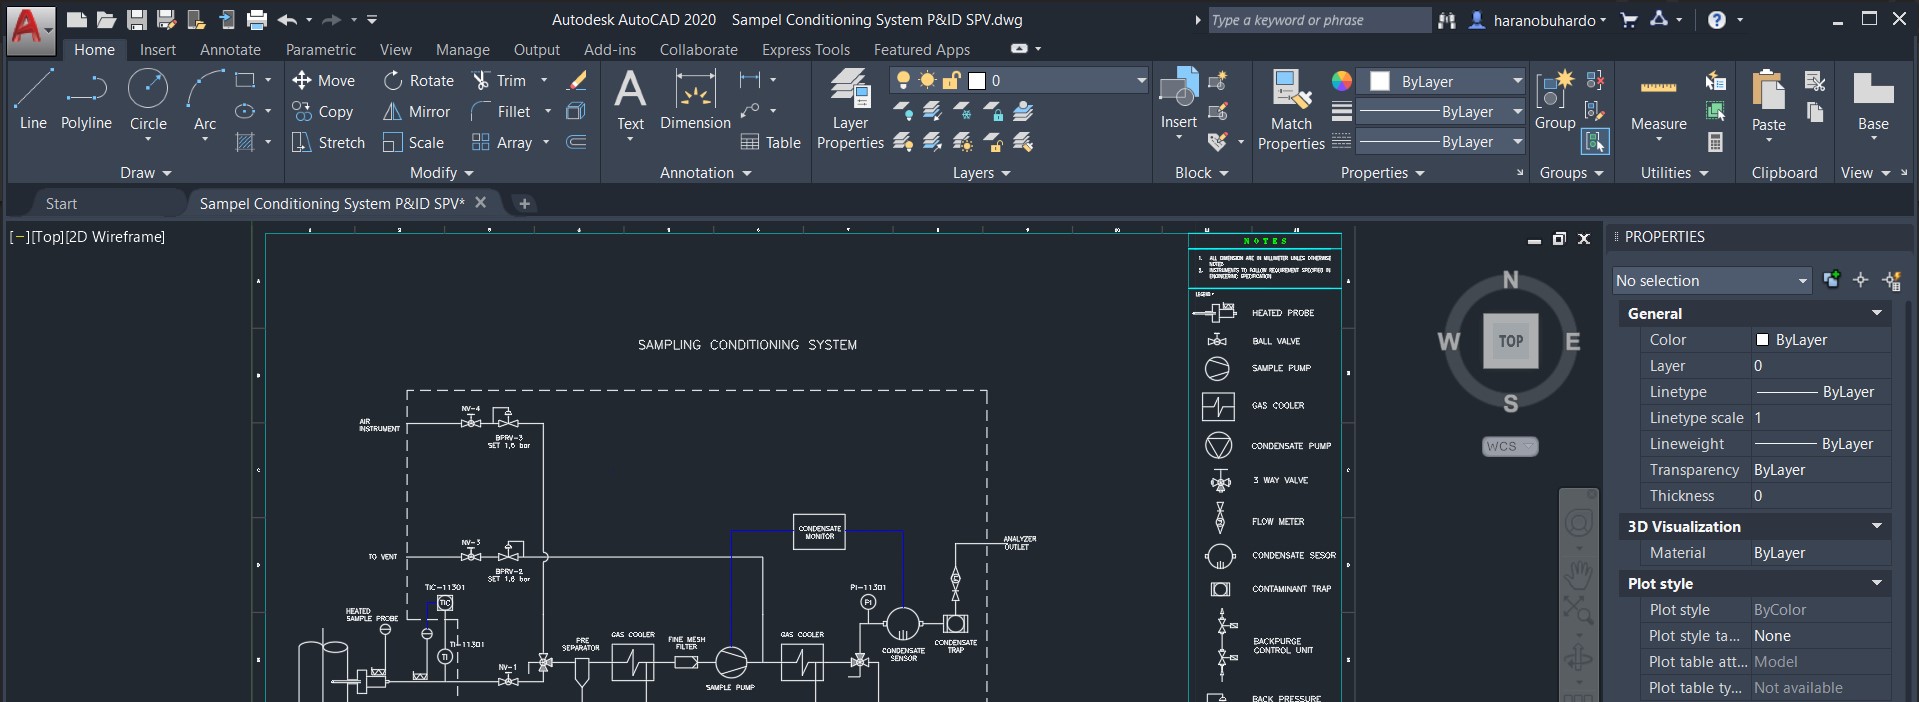
- Explore the AutoCAD Interface: Familiarize yourself with the AutoCAD workspace, the ribbon, toolbars, command line, and drawing area. Understanding the layout of the software will make the learning process smoother.
- Set Up Your Drawing Environment: Before you start drawing, set up your drawing units, limits, and other settings according to the project requirements. This ensures precision in your designs from the start.
- Learn Basic Commands: Start with basic commands like LINE, CIRCLE, RECTANGLE, and POLYGON to create simple shapes. Practice using these commands to understand how to construct basic geometries.
- Practice Drawing: Use the basic drawing tools to create simple 2D shapes and designs. Experiment with modifying tools like ERASE, COPY, MOVE, and ROTATE to edit your drawings.
- Save and Manage Your Work: Learn how to save your drawings and manage your files effectively. Understanding AutoCAD\"s file management system is crucial for efficient work.
By following these steps, you\"ll be well on your way to becoming proficient in 2D drafting with AutoCAD. Remember, practice is key to mastering AutoCAD, so don\"t hesitate to experiment with your designs.
Understanding the AutoCAD Interface
Welcome to the exciting world of AutoCAD! This section will guide you through the initial steps of starting with AutoCAD for 2D drafting. Whether you\"re a complete novice or looking to refresh your skills, these steps will lay the foundation for your journey in mastering AutoCAD.
- Download and Install AutoCAD: Ensure you have the latest version of AutoCAD installed on your computer. Autodesk offers a free trial for new users, and students can access AutoCAD for free.
- Explore the AutoCAD Interface: Familiarize yourself with the AutoCAD workspace, the ribbon, toolbars, command line, and drawing area. Understanding the layout of the software will make the learning process smoother.
- Set Up Your Drawing Environment: Before you start drawing, set up your drawing units, limits, and other settings according to the project requirements. This ensures precision in your designs from the start.
- Learn Basic Commands: Start with basic commands like LINE, CIRCLE, RECTANGLE, and POLYGON to create simple shapes. Practice using these commands to understand how to construct basic geometries.
- Practice Drawing: Use the basic drawing tools to create simple 2D shapes and designs. Experiment with modifying tools like ERASE, COPY, MOVE, and ROTATE to edit your drawings.
- Save and Manage Your Work: Learn how to save your drawings and manage your files effectively. Understanding AutoCAD\"s file management system is crucial for efficient work.
By following these steps, you\"ll be well on your way to becoming proficient in 2D drafting with AutoCAD. Remember, practice is key to mastering AutoCAD, so don\"t hesitate to experiment with your designs.
Basic Drawing Tools
AutoCAD, a cornerstone in the field of design and drafting, offers a suite of powerful drawing tools to transform concepts into precise 2D drawings. Understanding these tools is fundamental for anyone looking to master AutoCAD. This section delves into the essential drawing tools you will use in AutoCAD to create 2D designs.
Line Tool
The Line tool is the most basic yet crucial drawing tool in AutoCAD. It allows you to draw straight lines between two points. To use the Line tool, simply select it from the toolbar, click on your starting point, and then click again on your ending point. Press \"Enter\" to finish.
Circle Tool
The Circle tool enables you to draw circles by specifying the center point and radius. There are several methods to define a circle, including diameter, two-point, and three-point methods, catering to different design needs.
Rectangle Tool
With the Rectangle tool, you can draw rectangles by specifying the diagonal corners. Additional options allow you to create squares, filleted (rounded) corners, and chamfered (angled) corners, enhancing your design capabilities.
Polyline Tool
The Polyline tool is versatile, allowing you to create both straight lines and arcs in a single entity. This tool is perfect for creating complex shapes that can be edited with ease, offering flexibility in design.
Arc Tool
The Arc tool is used to draw arc segments by specifying three points: the start point, end point, and a point on the arc. This tool is essential for creating curved elements in your designs.
Ellipse Tool
The Ellipse tool allows for the creation of ellipses and elliptical arcs. You can specify an ellipse by its axis or by center, providing a range of options for incorporating elliptical shapes into your designs.
Polygon Tool
The Polygon tool lets you draw regular polygons by specifying the center, the number of sides, and either the radius or the side length. This tool is invaluable for creating precise geometric shapes.
Spline Tool
The Spline tool creates smooth curves that pass through or near a series of points. Splines are ideal for designing complex, free-form shapes that require a smooth transition between points.
Hatch Tool
The Hatch tool fills areas in your drawing with patterns or solid fills. It\"s a great way to denote different materials, areas, and to add texture to your drawings.
Text Tool
While not strictly a drawing tool, the Text tool is essential for adding notes, labels, and dimensions to your drawings. AutoCAD offers a variety of text styles and formatting options to communicate design intent clearly.
These basic drawing tools are the foundation of creating 2D designs in AutoCAD. Mastering them will enhance your ability to bring your design ideas to life with precision and efficiency. Practice using these tools to become proficient in 2D drafting and design in AutoCAD.
AutoCAD Basic Tutorial for Beginners - Part 1 of 3
Beginners: If you\'re new to the world of art and looking to unleash your creativity, this video is perfect for you! Watch as we guide you step-by-step through easy and fun art projects, tailored specifically for beginners. Start your artistic journey today and unlock your creative potential.
AutoCAD 2022 2D Sketching Tutorial for Beginners in 13 Minutes
Sketching: Dive into the mesmerizing world of sketching with this captivating video! Whether you\'re a seasoned artist or just starting out, our expert tips and techniques will help you master the art of sketching. From capturing intricate details to creating stunning landscapes, this video is a must-watch for any art lover. Let your imagination run wild with the endless possibilities of sketching.
Modifying Objects in AutoCAD
In AutoCAD, creating your design is only part of the process; modifying objects is equally important to refine your drawings. This section introduces the core tools and commands for modifying objects in AutoCAD, ensuring precision and flexibility in your 2D designs.
Move Tool
The Move tool allows you to reposition objects within your drawing. Select the objects you wish to move, specify a base point, and then the destination point to accurately place your objects.
Copy Tool
With the Copy tool, you can create duplicates of selected objects. After selecting the objects, choose a base point and then the point(s) where you want the copies to be placed.
Rotate Tool
The Rotate tool is used to turn objects around a base point. Select the objects, specify the base point, and then enter the rotation angle or drag in the desired direction.
Scale Tool
The Scale tool changes the size of objects. After selecting the objects and the base point, specify the scale factor or choose a reference length to scale your objects proportionally.
Trim Tool
The Trim tool removes parts of an object that intersect with other objects. Select the cutting edges first, then the parts of the objects you wish to trim away.
Extend Tool
Use the Extend tool to lengthen objects to meet the edges of other objects. After selecting the boundary edges, select the objects you want to extend.
Offset Tool
The Offset tool creates parallel copies of objects at a specified distance. This is particularly useful for creating concentric shapes or parallel lines.
Fillet Tool
The Fillet tool creates a rounded corner between two objects. Specify the radius of the fillet, then select the two objects to apply it.
Chamfer Tool
The Chamfer tool is used to create a beveled edge between two objects. After setting the chamfer distance, select the two objects to apply it.
Mirror Tool
The Mirror tool creates a reversed copy of selected objects. Choose the objects, then define a mirror line. The objects will be mirrored across this line.
Array Tool
Arrays create multiple copies of objects in a pattern. There are three types: Rectangular (in rows and columns), Polar (in a circular pattern), and Path (along a path). Each type allows you to specify the number and arrangement of the copies.
Stretch Tool
The Stretch tool is used to modify objects by stretching them from a selected point. Select the objects partially within the crossing selection, then drag to stretch.
Mastering these modifying tools in AutoCAD enhances your ability to edit and refine your designs efficiently. Each tool offers unique capabilities that, when used in combination, can address virtually any design modification requirement.

_HOOK_
Using Layers, Colors, and Linetypes
Organizing a complex AutoCAD drawing is essential for both clarity and efficiency. Layers, colors, and linetypes are foundational elements of this organization, allowing users to separate different types of information for better visualization and editing. This section covers the basics of how to effectively use these features in your 2D AutoCAD projects.
Understanding Layers
Layers are like transparent sheets stacked on top of each other, each containing a different part of the drawing. They help organize different elements of your design, such as electrical layouts, plumbing, and structural details, allowing you to hide or show these elements as needed. To use layers effectively:
- Open the Layer Properties Manager to create, rename, or delete layers.
- Assign specific colors, linetypes, and lineweights to each layer to differentiate them visually.
- Control the visibility of layers to simplify your workspace or focus on specific aspects of the design.
Choosing Colors
Colors are not just for aesthetics; they serve to distinguish between different types of information. For instance, you might use one color for structural elements and another for electrical components. When selecting colors:
- Be consistent with color usage across similar elements to maintain clarity.
- Consider color printing or plotting; some colors might not translate well to physical copies.
- Use the Index Color, True Color, or Color Books options in AutoCAD to select colors.
Selecting Linetypes
Linetypes convey the nature of objects, such as dashed lines for boundaries or hidden elements. AutoCAD offers a variety of predefined linetypes, and you can also create custom linetypes. To manage linetypes:
- Load linetypes into your drawing using the Linetype Manager.
- Assign linetypes to layers or directly to objects.
- Adjust the scale of your linetypes to ensure they are visible and appropriate for the drawing scale.
Practical Tips for Using Layers, Colors, and Linetypes
- Always create a new layer before starting a different aspect of your drawing to avoid confusion.
- Use meaningful names for layers to easily identify their contents.
- Regularly purge unused layers, colors, and linetypes to keep your file clean and manageable.
- Experiment with layer states to quickly switch between different views of your drawing.
- Remember to set the correct layer as active before drawing to ensure new objects are created on the intended layer.
Effectively using layers, colors, and linetypes in AutoCAD not only improves the readability of your drawings but also enhances your workflow, making it easier to edit and share your designs. By mastering these tools, you can take full advantage of AutoCAD\"s capabilities to produce detailed, organized, and professional 2D drawings.
Creating Text and Dimensions
Text and dimensions are crucial elements in AutoCAD drawings, providing necessary annotations, labels, and measurements that communicate specific details about the design. This section explores how to effectively create and manage text and dimensions in your 2D drawings.
Adding Text
To add text to your drawings, AutoCAD offers the \"TEXT\" and \"MTEXT\" (multiline text) commands. Here\"s how to use them:
- TEXT: Ideal for single-line entries. Simply select the \"TEXT\" command, click in the drawing area to set the insertion point, and then type your text.
- MTEXT: Best for paragraphs or multiline text. After selecting the \"MTEXT\" command, drag to create a text box and then enter your text. MTEXT offers formatting options similar to word processing software, such as text alignment, bullet points, and font choices.
Formatting Text
AutoCAD allows you to customize the appearance of text using text styles. To create or modify a text style:
- Open the Text Style dialog box from the Annotate tab.
- Create a new style or modify an existing one, setting font type, size, orientation, and other properties.
- Apply the style to your text objects to ensure consistency across your drawing.
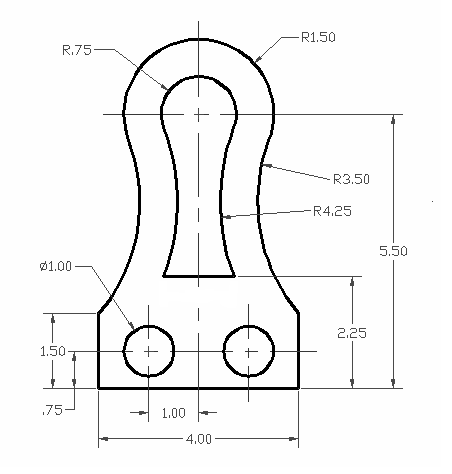
Creating Dimensions
Dimensions in AutoCAD provide precise measurements of distances, angles, radii, and diameters. To add dimensions:
- Select the type of dimension you need (linear, aligned, angular, radius, diameter) from the Annotate tab.
- Click on the object or specify points in your drawing to place the dimension.
- AutoCAD automatically calculates and displays the measurement.
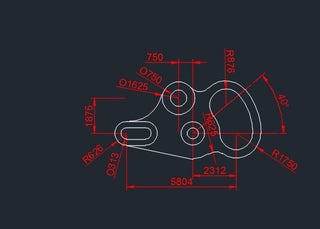
Customizing Dimensions
Dimension styles control the appearance of dimensions, including text size, arrowheads, line weight, and color. To customize dimensions:
- Access the Dimension Style Manager from the Annotate tab.
- Create a new style or modify an existing one to suit your drawing\"s standards.
- Assign the style to your dimensions for a uniform look throughout your project.
Tips for Effective Annotation
- Use layers to separate text and dimensions from other drawing elements, making them easier to manage and modify.
- Keep text and dimension styles consistent across your drawings to maintain clarity and professionalism.
- Regularly update dimensions as your design changes to ensure accuracy in your drawings.
- Employ the \"Match Properties\" tool to quickly apply properties from one text or dimension object to another.
By incorporating text and dimensions effectively, your AutoCAD drawings will communicate more clearly, making it easier for others to understand and work with your designs. Mastering these tools is essential for creating detailed and informative 2D drawings.

Advanced Drawing Techniques
Once you\"ve mastered the basics of AutoCAD, it\"s time to explore advanced drawing techniques that can significantly enhance your productivity and the quality of your designs. This section covers some powerful tools and methods for taking your 2D drawings to the next level.
Using Reference Geometry
Reference geometry, such as construction lines (xlines) and rays, can help you create accurate drawings. These tools extend infinitely and are great for aligning objects and creating complex geometries:
- Use xlines to establish baselines or reference points.
- Employ rays to project from a single point outward, useful for angle constructions.
Parametric Constraints
Parametric constraints allow you to control the dimensions and relationships between objects. By applying these constraints, you can ensure your design adheres to specific requirements and automatically adjust related elements when changes are made:
- Apply dimensional constraints to set distances, lengths, angles, and radii.
- Use geometric constraints to maintain alignments, parallelisms, and perpendicularity.
Dynamic Blocks
Dynamic blocks contain flexibility and intelligence, allowing you to modify the shape, size, and configuration of blocks with simple grips. They can significantly reduce the number of block definitions in your library:
- Create a dynamic block by defining parameters and actions that determine how the block can change.
Layer States and Layer Filters
Managing layers efficiently is crucial in complex drawings. Layer states and filters can help you organize and access the right layers at the right time:
- Layer States allow you to save and restore different layer configurations, making it easy to switch between different views of your drawing.
- Layer Filters help you sort and display only the layers you need, based on criteria such as layer name or property.
Using External References (Xrefs)
Xrefs let you include other DWG files in your drawing without actually inserting the files, keeping your drawing lightweight. This is particularly useful for collaborating on large projects:
- Attach an Xref using the \"External References\" palette.
- Xrefs can be updated automatically if the referenced file changes, ensuring consistency across related drawings.
Advanced Printing and Plotting
Understanding the printing and plotting process in AutoCAD is essential for producing high-quality prints. Explore advanced features such as plot styles, batch plotting, and layout management to create professional-grade documents:
- Configure plot styles to control the appearance of your drawings on paper, including lineweight and color.
- Use batch plotting to print multiple drawings or layouts at once.
By incorporating these advanced drawing techniques into your workflow, you can increase the precision, efficiency, and overall quality of your AutoCAD projects. Practice and experimentation are key to mastering these skills and applying them effectively in your work.

Efficient Use of Blocks and Attributes
Blocks and attributes are powerful features in AutoCAD that streamline the drafting process, promote consistency, and reduce file size by eliminating the need to draw repeated elements. This section explores how to use blocks and attributes effectively in your 2D AutoCAD drawings.
Creating and Inserting Blocks
Blocks are groups of objects that combine into a single named object. Here\"s how to create and use them:
- Select the objects you want to include in your block.
- Use the BLOCK command to open the Block Definition dialog box.
- Specify a name, base point, and select the objects for the block. Optionally, add a description.
- Insert blocks into your drawing using the INSERT command or by dragging from the Tool Palettes.
Editing Blocks
If you need to modify a block, you can do so without exploding it:
- Use the REFEDIT command to edit the block in place, allowing you to make changes while seeing the context of the rest of your drawing.
- Save your changes to update the block throughout your drawing automatically.
Using Attributes with Blocks
Attributes add data to blocks, such as part numbers or specifications. When creating a block with attributes:
- Use the ATTDEF command to define attributes, setting options like tag name, prompt, and default value.
- Add these attributes to your block definition. When the block is inserted, you\"ll be prompted to enter specific information for each attribute.
Extracting Data from Attributes
Attributes can store valuable data within your drawing. Use the DATAEXTRACTION command to extract this information into a table within AutoCAD or export it to an external file, such as an Excel spreadsheet.
Dynamic Blocks
Dynamic blocks add flexibility to your block libraries by allowing parametric behavior, such as stretch, scale, rotate, and more, all within a single block definition:
- Create dynamic blocks by adding parameters and actions to your block definitions.
- This enables a single block to serve multiple purposes, reducing the number of blocks you need to manage.
Tips for Efficient Block Management
- Organize your blocks into tool palettes for easy access and efficient workflow.
- Use the DESIGNCENTER to browse and insert blocks from other drawings.
- Regularly purge unused blocks from your drawing to keep your file size manageable and your block library organized.
Effectively using blocks and attributes in AutoCAD not only saves time but also ensures consistency across your drawings, enhances productivity, and maintains data accuracy. With these strategies, you can create, manage, and utilize blocks and attributes to their full potential in your AutoCAD projects.

Setting Up Layouts and Printing
Properly setting up layouts and preparing for printing are critical steps in the AutoCAD workflow, ensuring your designs translate accurately from screen to paper. This section provides a comprehensive guide to configuring layouts and executing prints with precision.
Understanding Paper Space and Model Space
AutoCAD drawings comprise two primary environments: Model Space and Paper Space. Model Space is where you create your design, and Paper Space (Layouts) is where you set up sheets for printing:
- Begin by designing in Model Space, focusing on the accuracy and detail of your drawing.
- Switch to Paper Space to arrange views of your model on a sheet, simulating how it will appear on printed paper.
Creating and Customizing Layouts
Layouts represent virtual sheets of paper. To create a professional print layout:
- Access the Layout tab that AutoCAD creates by default or create a new one by right-clicking the Layout tab area and choosing \"New Layout\".
- Double-click inside the viewport to activate it and adjust the view to show the necessary parts of your Model Space drawing.
- Customize the layout by setting the paper size, scale, and orientation through the Page Setup Manager.
Configuring Viewports
Viewports are windows into your Model Space drawing from Paper Space. They can be scaled independently to properly display the design on the sheet:
- Create multiple viewports to show different parts or aspects of your design on the same sheet.
- Each viewport can have a different scale, allowing detailed views alongside overall plans.
Setting the Scale for Drawings
Correctly scaling your drawing ensures that it prints at the desired size and proportion:
- In the Layout tab, select a viewport and lock its scale to maintain the correct proportion between the drawing and the paper size.
- Use common architectural, engineering, or metric scales to ensure your drawing adheres to industry standards.
Adding Titles and Labels
Titles, labels, and other annotations are added in Paper Space to provide context and information about your drawing:
- Use the MTEXT tool to add text that doesn’t need to scale with the Model Space drawing.
- Place a title block around the border of your layout to include information like the project title, date, and scale.
Printing and Plotting
Finalizing your drawing for print involves several considerations:
- Open the Plot dialog box from the File menu or use the PLOT command.
- Select a printer/plotter, paper size, and scale. Ensure the plot scale matches the scale set in your viewport.
- Choose plot style tables to control the appearance of your drawing elements when printed, such as lineweights and colors.
- Preview your plot to check for errors or adjustments before printing.
By carefully setting up layouts and understanding the printing process, you can ensure that your AutoCAD drawings are presented professionally and accurately, whether for internal review or client presentations. The ability to effectively transition from digital to printed formats is a crucial skill for any AutoCAD user.
_HOOK_
Managing External References
External References (Xrefs) in AutoCAD are crucial for collaborating on large projects and managing large drawings efficiently. Xrefs allow you to reference other DWG files within your drawing without importing them directly, keeping your file sizes manageable and ensuring that all team members have access to the most current files. This section outlines how to effectively manage external references.
Attaching External References
To attach an external reference to your drawing:
- Go to the \"Insert\" tab and select \"External Reference\".
- In the External References palette, click \"Attach\" and choose the type of file you wish to reference (DWG, DWF, PDF, etc.).
- Browse to select the file and specify the insertion point, scale, and rotation as needed.
Controlling Visibility and Display
Manage the visibility and display properties of Xrefs to streamline your workspace:
- Use layer controls to manage the visibility of different elements within the Xref, just as you would with objects directly in your drawing.
- Adjust the fade control to differentiate between Xref content and your current drawing for easier editing.
Clipping External References
You can clip external references to display only a specified portion of the reference in your drawing:
- Select the Xref in your drawing.
- Use the \"XREF\" command and choose the \"Clip\" option.
- Define the clipping boundary by specifying points in your drawing. You can create rectangular or polygonal clips.
Updating and Reloading External References
Keep your drawing current with updates to Xrefs:
- The External References palette shows the status of all attached Xrefs and indicates if an update is available.
- To update an Xref, right-click on its name in the palette and select \"Reload\". This updates the Xref to reflect the latest version of the external file.
Detaching and Unloading External References
If an external reference is no longer needed, you can detach or unload it from your drawing:
- Unload an Xref to remove it from the current session without removing the reference from the drawing. This is useful for reducing visual clutter or improving performance.
- Detach an Xref to completely remove the reference from your drawing. Use this option if the Xref will no longer be used in the drawing.
Path Management
Managing the file paths of external references is essential, especially when moving files between computers or networks:
- Use the \"Reference Manager\" tool for a comprehensive view of all external references and their paths.
- Adjust paths as needed to ensure that AutoCAD can locate the external files, using absolute or relative paths depending on your project needs.
Effectively managing external references in AutoCAD not only enhances collaboration among team members but also ensures that your drawings are always up to date with the latest information. By mastering these techniques, you can improve the efficiency and accuracy of your design process.

READ MORE:
Tips and Tricks for Productivity
Maximizing productivity in AutoCAD is crucial for efficiently turning your design concepts into precise 2D drawings. This section is packed with tips and tricks to enhance your workflow, reduce repetitive tasks, and improve overall drafting speed.
Customize Your Workspace
AutoCAD allows for extensive customization to suit your specific workflow. Tailor your workspace by:
- Customizing the ribbon and toolbars to keep your most-used tools accessible.
- Using workspaces to switch between different tool sets based on the task at hand.
- Adjusting the command alias file (PGP) to create shortcuts for frequently used commands.
Use Keyboard Shortcuts
Keyboard shortcuts can significantly speed up your drawing process. Familiarize yourself with AutoCAD’s default shortcuts and consider customizing your own for complex commands or sequences you use regularly.
Master Quick Commands
Commands like COPY, MOVE, and TRIM are staples in the drawing process. Mastering their quick use without toolbar clicks can enhance your efficiency:
- Use the command line effectively for faster input and access to options.
- Leverage command repetition by pressing Enter or Space to repeat the last command.
Leverage Layer Management
Efficient layer management is key to a streamlined workflow. Use layer properties and filters to organize and access your layers effectively:
- Assign colors, linetypes, and other properties to layers for easy identification.
- Use layer states to save and restore layer configurations for different views or stages of your project.
Utilize Block Libraries
Blocks save time by allowing you to reuse drawing components. Build a library of common elements to drag and drop into your drawings:
- Organize blocks into categories for easy access.
- Use dynamic blocks for elements that require variation without needing to create multiple versions.
Implement Data Extraction
Extracting data from your drawings can automate documentation tasks like creating schedules or material lists:
- Use the DATAEXTRACTION command to pull information from objects, blocks, and attributes into a table or external file.
Automate Repetitive Tasks
Scripts, AutoLISP routines, and macros can automate repetitive tasks, saving you hours of manual work:
- Record actions as macros for simple tasks you perform frequently.
- Explore AutoLISP for more complex automation, especially if you perform specific calculations or adjustments often.
Keep Your Files Clean
Maintaining clean and organized files is essential for performance and ease of navigation:
- Regularly purge unused objects and layers to reduce file size and clutter.
- Use the AUDIT and RECOVER commands to fix errors and recover corrupted files.
By integrating these tips and tricks into your daily use of AutoCAD, you can enhance your productivity, reduce stress, and free up time to focus on the creative aspects of your designs. Remember, efficiency is not just about speed but also about working smarter to achieve high-quality results.
Embark on your journey to mastering AutoCAD 2D with our comprehensive tutorials, designed to equip you with the skills needed to bring precision and creativity to your designs. Unlock your potential and transform your ideas into professional-grade drawings today.