Topic autocad lisp tutorial: Embark on mastering AutoCAD with our comprehensive LISP tutorial, designed to elevate your drafting skills through powerful customization and efficient automation.
Table of Content
- How can I work with AutoLISP expressions at the AutoCAD command prompt for a tutorial?
- Understanding AutoLISP: Basics and Syntax
- Creating Your First AutoLISP Script: Simple Examples
- Navigating AutoLISP Functions: Setq, Princ, and More
- Advanced AutoLISP: Loops, Conditions, and Error Handling
- YOUTUBE: \"50 Powerful AutoCAD Productive Lisp Programs: Best CAD Tutorials\"
- Integrating AutoCAD Commands within AutoLISP
- Optimizing AutoCAD Workflows: Automation and Custom Commands
- Managing Data and User Interaction in AutoLISP
- Extending Functionality: Working with External Files and Layers
- Debugging and Error Handling in AutoLISP Scripts
- Transitioning to Advanced Topics: From Basic to Complex Scripts
How can I work with AutoLISP expressions at the AutoCAD command prompt for a tutorial?
If you want to work with AutoLISP expressions at the AutoCAD command prompt, here is a step-by-step tutorial:
- Open AutoCAD and access the command line.
- Enter the command \"!dRadius\" to prompt AutoLISP.
- AutoLISP will then return the value stored in the dRadius user variable.
This tutorial will help you understand how to work with AutoLISP expressions and retrieve values using the dRadius variable at the AutoCAD command prompt.
READ MORE:
Understanding AutoLISP: Basics and Syntax
AutoLISP is a dialect of the Lisp programming language, tailored specifically for use with the full version of AutoCAD. It is used for automating repetitive tasks, customizing commands, and creating new functions in AutoCAD.
The foundation of AutoLISP is its simplicity and power. With basic syntax and structure, it enables intricate CAD operations and workflow automation. Let\"s delve into the essentials of AutoLISP\"s syntax and basic concepts:
- Data Types: AutoLISP supports various data types such as integers, reals, strings, and lists, each serving a specific purpose in your scripts.
- Variables: Variables in AutoLISP can store data values and are defined using the setq function, allowing for dynamic and flexible script behavior.
- Functions: Functions are the building blocks of AutoLISP. They perform operations on data and can be either predefined or custom-defined using the defun keyword.
- Symbols and Lists: Symbols are names for variables, functions, or constants. Lists, denoted by parentheses, are a series of items, which can be data, symbols, or even other lists.
- Control Structures: AutoLISP provides control structures such as conditional statements (if, cond) and loops (while, repeat), essential for script flow control.
Understanding these basics is crucial for developing robust AutoLISP scripts and harnessing the full potential of AutoCAD automation. As you progress, these concepts will be the tools you use to craft precise and efficient CAD operations.
Creating Your First AutoLISP Script: Simple Examples
Starting your journey with AutoLISP scripting in AutoCAD can unlock a new realm of efficiency and customization. Begin by grasping the basics of scripting, focusing on simple yet foundational aspects that form the core of AutoLISP programming.
- Understanding the Structure:
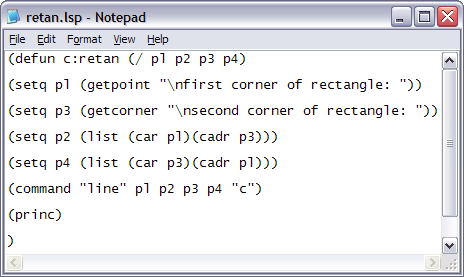
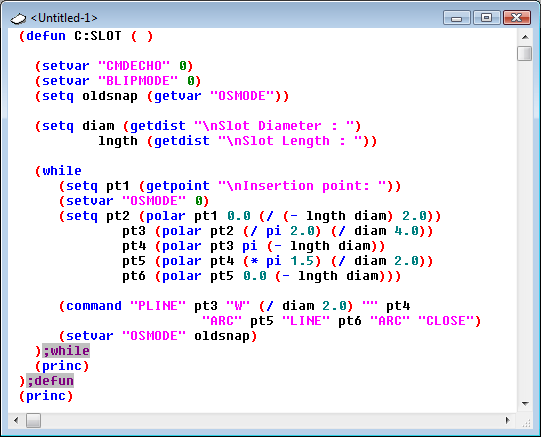
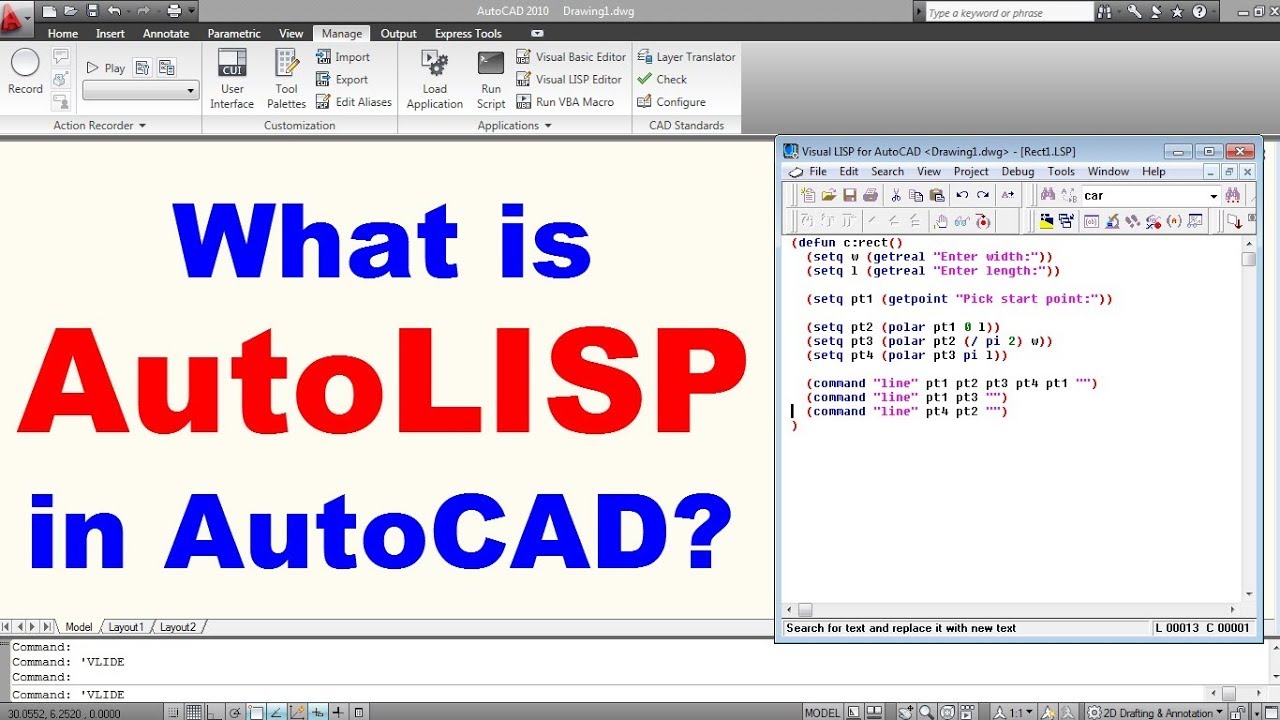
- Every AutoLISP script is structured around lists, a fundamental concept derived from its LISP origins. A typical list might look like (function_name [argument1 argument2 ...]), where the first element is a function, followed by its arguments. For instance, (setq dRadius 1.25) sets the value 1.25 to the variable dRadius.
- Basic Commands:
- Setq: Assigns values to variables. For example, (setq a b) assigns the value of b to a.
- Prin1, Princ, and Print: These commands are used for printing texts or values. Prin1 prints the expression on the screen and returns the expression, Princ is similar but does not print control characters, and Print adds a newline before and a space after the expression.
- Setvar: Sets an AutoCAD system variable to a given value. For example, (setvar \"blipmode\" 0) turns the blipmode off.
- Creating Basic Geometries:
- AutoLISP interacts seamlessly with AutoCAD commands, allowing you to create or modify geometric entities. For example, (command \"circle\" \"0,0\" dRadius) draws a circle with radius dRadius at coordinates (0,0).
- Handling User Input:
- AutoLISP provides various functions to capture user input. Getint, for instance, prompts users for an integer, and getpoint captures coordinate points from the user.
- Loop and Conditional Statements:
- Control the flow of your script with loops like while, repeat, and foreach, and conditional statements like if and cond to make decisions based on certain conditions.
- Working with Files:
- AutoLISP allows you to read from and write to external files, enhancing the scope of your automation tasks. This capability can be used to manage standard layers from a text file or to automate repetitive tasks.
These elements form the building blocks of AutoLISP scripting. As you become more familiar with these concepts, you\"ll be able to create more complex and powerful scripts to automate tasks in AutoCAD, enhancing productivity and streamlining your workflow.
Navigating AutoLISP Functions: Setq, Princ, and More
AutoLISP functions are the backbone of scripting in AutoCAD, offering a wide array of capabilities from setting variables to controlling output. Key functions like setq, princ, and others, are fundamental in creating efficient and powerful scripts.
- Setq:
- The setq function is crucial for assigning values to variables. It stands for \"set quote\" and is used to define or change the value of a variable, enhancing the dynamic nature of your script. For example, (setq x 10) assigns the value 10 to the variable x.
- Princ and Prin1:
- Both princ and prin1 are used for outputting text in AutoLISP. Princ prints text without quotes, making it ideal for user-friendly messages, while prin1 prints the text with quotes and is more suited for debugging and logging purposes.
- Understanding Lists:
- In AutoLISP, lists are fundamental. They are enclosed in parentheses and can contain numbers, strings, variables, or even other lists. Manipulating lists is essential for handling complex data structures in your scripts.
- Function Creation (defun):
- The defun keyword is used to define new functions, allowing you to create custom commands and routines. This powerful feature helps in encapsulating code for reuse and better organization.
- Arithmetic Functions:
- AutoLISP provides a set of arithmetic functions like +, -, *, and / that work similarly to those in traditional mathematics, enabling calculations and numerical operations within your scripts.
Mastering these functions is a step towards writing effective AutoLISP scripts. They provide the tools to control and manipulate data, automate tasks, and customize your AutoCAD environment, unlocking a new level of efficiency in your CAD operations.

Advanced AutoLISP: Loops, Conditions, and Error Handling
In advanced AutoLISP, proficient control over loops, conditions, and error handling is crucial to create robust and efficient scripts. Understanding and effectively implementing these concepts can significantly optimize your AutoCAD workflows and automation processes.
Loops
Loops are fundamental for repeating a set of instructions until a specific condition is met. AutoLISP provides two primary looping constructs:
- Repeat Loop: Executes a sequence of commands a specified number of times. It is useful when the number of iterations is known beforehand.
- While Loop: Continues to execute as long as the given condition evaluates to true. It\"s ideal for scenarios where the number of iterations isn\"t predetermined.
Conditions
Conditional statements are vital in controlling the flow of the AutoLISP program. They allow the execution of certain code segments based on specific conditions, making your scripts dynamic and adaptable to various scenarios.
- If-else statements: Execute a block of code if a specified condition is true and optionally another block if the condition is false.
- Cond statements: Provide a more streamlined way to handle multiple conditions, acting like a switch or case statement in other programming languages.
Error Handling
Error handling in AutoLISP is essential to manage and respond to exceptions gracefully, ensuring the stability and reliability of your scripts. Key concepts and functions include:
- *error* Function: A central function for error handling that allows custom error management and ensures that AutoCAD returns to a known state after an error occurs.
- vl-catch-all-apply: Helps in trapping exceptions, allowing a safe execution of functions and commands.
- Error Traps: Preserve user settings and the drawing environment, ensuring that any alterations made during the script execution are reverted in case of an error.
Mastering these advanced concepts in AutoLISP will empower you to develop complex, yet stable and efficient automation scripts, significantly enhancing your productivity in AutoCAD.
_HOOK_
\"50 Powerful AutoCAD Productive Lisp Programs: Best CAD Tutorials\"
Discover the power of AutoCAD Lisp with this comprehensive tutorial! Whether you\'re a beginner or an experienced user, this video will guide you through the basics and advanced techniques, allowing you to unlock the full potential of AutoCAD.
\"Introducing AutoLISP for AutoCAD LT 2024\"
Dive into the world of AutoLISP with this in-depth video! Learn how to automate repetitive tasks, customize your AutoCAD workspace, and streamline your workflow. With step-by-step instructions and practical examples, you\'ll become a proficient AutoLISP programmer in no time.
Integrating AutoCAD Commands within AutoLISP
Integrating AutoCAD commands into AutoLISP scripts enhances the automation capabilities, allowing you to tap into the full power of AutoCAD\"s built-in functionality. The command function is your gateway to bringing AutoCAD commands into the realm of AutoLISP, enabling a seamless fusion of AutoCAD\"s graphical prowess with AutoLISP\"s scripting agility.
Using the Command Function
The command function is a pivotal feature in AutoLISP, granting you the ability to invoke any AutoCAD command within your scripts. Its syntax is straightforward, yet powerful, permitting the execution of commands with various inputs and user interactions:
- Command names and options are input as strings, closely mirroring their usage in the AutoCAD command line interface.
- To mimic user input, such as pressing Enter or Spacebar in AutoCAD, you can use an empty string (\"\") within your command function calls.
- The PAUSE symbol can be employed when you wish to halt the command execution, awaiting user input.
- Remember, the command function always returns nil, marking the end of the command\"s execution.
Advanced Command Function Usage
For more complex scenarios, where you need to ensure that a command completes before your script proceeds, consider using the command-s function. This variant is designed for efficiency and precision, making sure that every step of the command is accounted for before moving on:
- The command-s function requires all arguments for the AutoCAD command prompts to be provided, ensuring the command is fully resolved within the same statement.
- Unlike the regular command function, command-s does not support the PAUSE token, necessitating a complete set of inputs upfront.
Practical Examples and Tips
Let\"s explore a few practical scenarios to illustrate how AutoCAD commands can be seamlessly integrated within your AutoLISP scripts:
- Drawing a line or a circle is as simple as calling the command function with appropriate points and parameters.
- For interactive commands, such as specifying the radius of a circle at runtime, the PAUSE token comes in handy, allowing user participation during script execution.
- When dealing with system variables or requiring precise control over command execution, the command-s function offers a more rigorous approach.
Embracing the command function in AutoLISP opens up a universe of possibilities, bridging the gap between AutoCAD\"s robust command set and the flexibility of AutoLISP scripting. Dive into this synergy, and watch as your automation and customization tasks are executed with unmatched precision and efficiency.
Optimizing AutoCAD Workflows: Automation and Custom Commands
Optimizing your AutoCAD workflows through AutoLISP provides a dynamic and powerful means to customize your working environment, streamline repetitive tasks, and significantly enhance productivity. This section delves into the essentials of creating custom routines, implementing system variables, and establishing startup LISP routines to automate tasks efficiently.
Understanding AutoLISP
AutoLISP, based on the LISP (LISt Processing) programming language, offers a structured way to automate and extend AutoCAD functionalities. It allows for the creation of custom routines by defining functions, managing values, and manipulating lists. The language\"s syntax might seem daunting initially, but with practice, it becomes an intuitive tool for developing complex commands and automating tasks.
Creating Custom Commands and Automating Tasks
AutoLISP empowers you to craft custom commands, automate routine operations, and modify the AutoCAD environment to suit your workflow. By employing functions like setq, command, and getvar, you can define custom commands, automate repetitive actions, and control system settings. These capabilities enable you to streamline your design process, from drawing basic shapes to managing complex datasets.
Implementing System Variables
System variables play a crucial role in optimizing your AutoCAD environment. Variables like PEDITACCEPT, PROXYGRAPHICS, and FILEDIA can be manipulated to enhance your workflow efficiency. For instance, setting PEDITACCEPT to 1 automates polyline conversion, eliminating unnecessary prompts and streamlining the drawing process. Similarly, controlling variables like MSLTSCALE and FILEDIA through AutoLISP scripts ensures a consistent and tailored working environment.
Setting Up Startup LISP Routines
To further automate your workflow, you can create startup LISP routines that execute predefined commands every time AutoCAD is launched. This feature allows you to automatically set system variables, eliminating the need to manually adjust settings for each session. By using the command function within a startup LISP file, you can ensure that essential variables and settings are consistently applied, paving the way for a more streamlined and efficient design process.
Optimizing your AutoCAD workflows through AutoLISP not only boosts productivity but also transforms your design process into a more intuitive and tailored experience. By mastering these techniques, you can harness the full potential of AutoCAD customization and automation.
Managing Data and User Interaction in AutoLISP
Managing data and user interaction in AutoLISP is crucial for developing dynamic and responsive AutoCAD applications. AutoLISP provides robust tools for data manipulation and user interaction, enabling you to create customized and efficient CAD solutions.
Data Management in AutoLISP
AutoLISP offers a variety of functions for managing and manipulating data effectively. Functions like subst to replace list elements, apply to call functions with a list of arguments, and mapcar to apply a function to each list element, provide powerful data management capabilities. Understanding and using these functions allow you to handle complex data structures and perform intricate operations on your CAD drawings.
User Interaction in AutoLISP
Interacting with users is a fundamental aspect of AutoLISP programming. By utilizing the Visual LISP Editor, you can write and format LISP routines that are user-friendly and efficient. AutoLISP provides functions to get and store data input by users, such as getstring, getreal, and getpoint. These functions allow you to gather user input during the execution of your scripts, making your applications interactive and adaptable to user needs.
Integrating Data and User Input
Once you have managed your data and captured user input, integrating both aspects is essential for creating holistic AutoLISP applications. You can pass the stored data to AutoCAD\"s drawing commands via AutoLISP, allowing you to automate drawing processes based on user-defined parameters and data-driven logic. This integration empowers you to develop applications that are not only automated but also tailored to the specific requirements and inputs of your users, leading to increased productivity and enhanced user experiences.
By mastering data management and user interaction in AutoLISP, you unlock the potential to create powerful, customized, and user-centric AutoCAD applications that can significantly streamline your CAD workflows.
Extending Functionality: Working with External Files and Layers
Extending the functionality of AutoLISP to interact with external files and manage layers significantly enhances the automation capabilities in AutoCAD. By efficiently managing these elements, you can streamline your CAD workflows, maintain drawing standards, and foster a more organized working environment.
Working with External Files
AutoLISP provides the functionality to interact with external files, allowing for data storage and retrieval outside of the AutoCAD drawing environment. This capability is crucial for tasks such as reading data from files or writing drawing information to files for later use. Techniques involve opening files with designated symbol names and specifying the mode (read, write, or append). Operations like reading lines from a file and writing data to a file become straightforward with AutoLISP functions.
Managing Layers
Layers are essential in organizing and managing the different components of your drawings. AutoLISP facilitates layer management by allowing you to change the current layer, check for the existence of layers, and even automate layer creation if it doesn\"t exist. The process involves retrieving the current layer or style, performing your operations, and then restoring the original layer or style to maintain drawing integrity. Utilizing functions like tblsearch, you can verify the existence of a layer or style before making changes, preventing potential errors in your scripts. Moreover, AutoLISP enables you to create layers or styles if they don\"t exist, ensuring that your drawing adheres to set standards.
By leveraging these powerful features of AutoLISP, you can significantly enhance your drawing management process, making it more efficient, standardized, and adaptable to changes. This way, your focus can remain on the design, with confidence that the organizational aspects are handled seamlessly in the background.

Debugging and Error Handling in AutoLISP Scripts
Effective debugging and error handling are crucial for developing reliable and robust AutoLISP scripts in AutoCAD. Proper error handling ensures that your program can gracefully exit, provide informative feedback to users, and restore the AutoCAD environment to a known state in case of unexpected issues.
Understanding Error Handling Functions
AutoLISP offers several functions specifically designed for error handling. The most central of these is the *error* function, a user-definable error-handling routine that AutoCAD executes whenever an error condition occurs. This function allows you to intercept errors, provide feedback, and ensure that your program exits cleanly. Other useful functions include *pop-error-mode*, *push-error-using-command*, and vl-catch-all-apply for advanced error handling and exception trapping.
Implementing an Error Trap
Integrating an error trap into your AutoLISP routine is a best practice. You should always save any existing error trap as a variable at the start of your program and restore it at the end. This ensures that the user\"s settings, including the existing error trap, are preserved. An effective error trap performs necessary cleanups and restores the drawing to its original settings when an error occurs. This can include actions like undoing changes and resetting system variables.
Suppressing Non-Critical Errors
To emulate the behavior of standard AutoCAD commands and enhance user experience, it\"s essential to suppress non-critical error messages, such as those caused by a user pressing the Esc key to exit a program. However, critical error messages, especially those outside the user\"s control, should still be displayed. This balance ensures that users are not overwhelmed by unnecessary error messages while still being informed about significant issues.
Restoring System Settings
AutoLISP scripts often modify system variables during execution. It\"s crucial to ensure that any changes to the system variables are reset if the user interrupts the script. A well-designed error handler should restore the original settings of system variables if the script exits prematurely due to an error.
By mastering debugging and error handling techniques in AutoLISP, you can develop more reliable, user-friendly scripts that contribute to a smoother and more productive AutoCAD experience.

_HOOK_
READ MORE:
Transitioning to Advanced Topics: From Basic to Complex Scripts
Transitioning from basic to complex scripts in AutoLISP represents a significant step in mastering AutoCAD\"s automation and customization capabilities. As you delve into advanced topics, you\"ll be able to create more sophisticated and powerful scripts that can transform your productivity and workflow.
Understanding the Foundations
AutoLISP, rooted in the LISP programming language, is built around the manipulation of lists and allows for intricate data management and command sequences. It follows a straightforward syntax where functions and their arguments are enclosed in parentheses. This functional approach provides a solid foundation for transitioning to complex scripting, allowing for the nesting of expressions and the precise control of your script\"s logic and flow.
Enhancing AutoLISP Proficiency
To make the leap from basic to advanced scripting, it\"s crucial to deepen your understanding of AutoLISP\"s capabilities. This includes mastering the use of AutoCAD objects, system variables, and custom commands within your scripts. As you progress, you\"ll find yourself creating not just scripts but entire programs that can automate tasks, manipulate drawing objects, and customize the AutoCAD environment to suit your specific needs.
Exploring Advanced Concepts
Advanced scripting involves leveraging the full range of functions and constructs available in AutoLISP. You\"ll explore complex data types, employ conditional statements to make logical decisions, and iterate over data using loops. Advanced scripts might also interact with the operating system, handle errors gracefully, and even extend AutoLISP\"s functionality with external libraries or modules.
By dedicating time to learn and experiment with AutoLISP, utilizing resources like Autodesk Knowledge Network, CADTutor, and Udemy, you will be able to unlock new levels of automation and efficiency in your CAD projects, ultimately becoming proficient in writing advanced AutoLISP scripts.
Embark on a journey through our comprehensive AutoCAD LISP tutorials to transform your drafting into an art of precision and efficiency, making complex tasks surprisingly simple and your AutoCAD experience exceptionally productive.