Topic autocad tutorial layout: Discover the secrets of AutoCAD layout mastery in this comprehensive tutorial, designed to elevate your design presentations and streamline your workflow with practical, easy-to-follow steps.
Table of Content
- How to create viewports in AutoCAD layouts?
- Understanding Layouts in AutoCAD
- Practical Steps to Create a Layout
- Advanced Layout Tips
- Practical Steps to Create a Layout
- Advanced Layout Tips
- YOUTUBE: Page Setup in a Layout in AutoCAD
- Advanced Layout Tips
- Introduction to AutoCAD Layouts
- Starting with Basic Layout Configurations
- Creating and Managing Viewports
- Customizing Layouts with Title Blocks and Borders
- Advanced Techniques for Layout Management
- Scaling Drawings and Working with Annotations
- Printing and Plotting Layouts
- Tips and Tricks for Efficient Layout Design
- Common Mistakes to Avoid in Layout Creation
- Resources for Further Learning
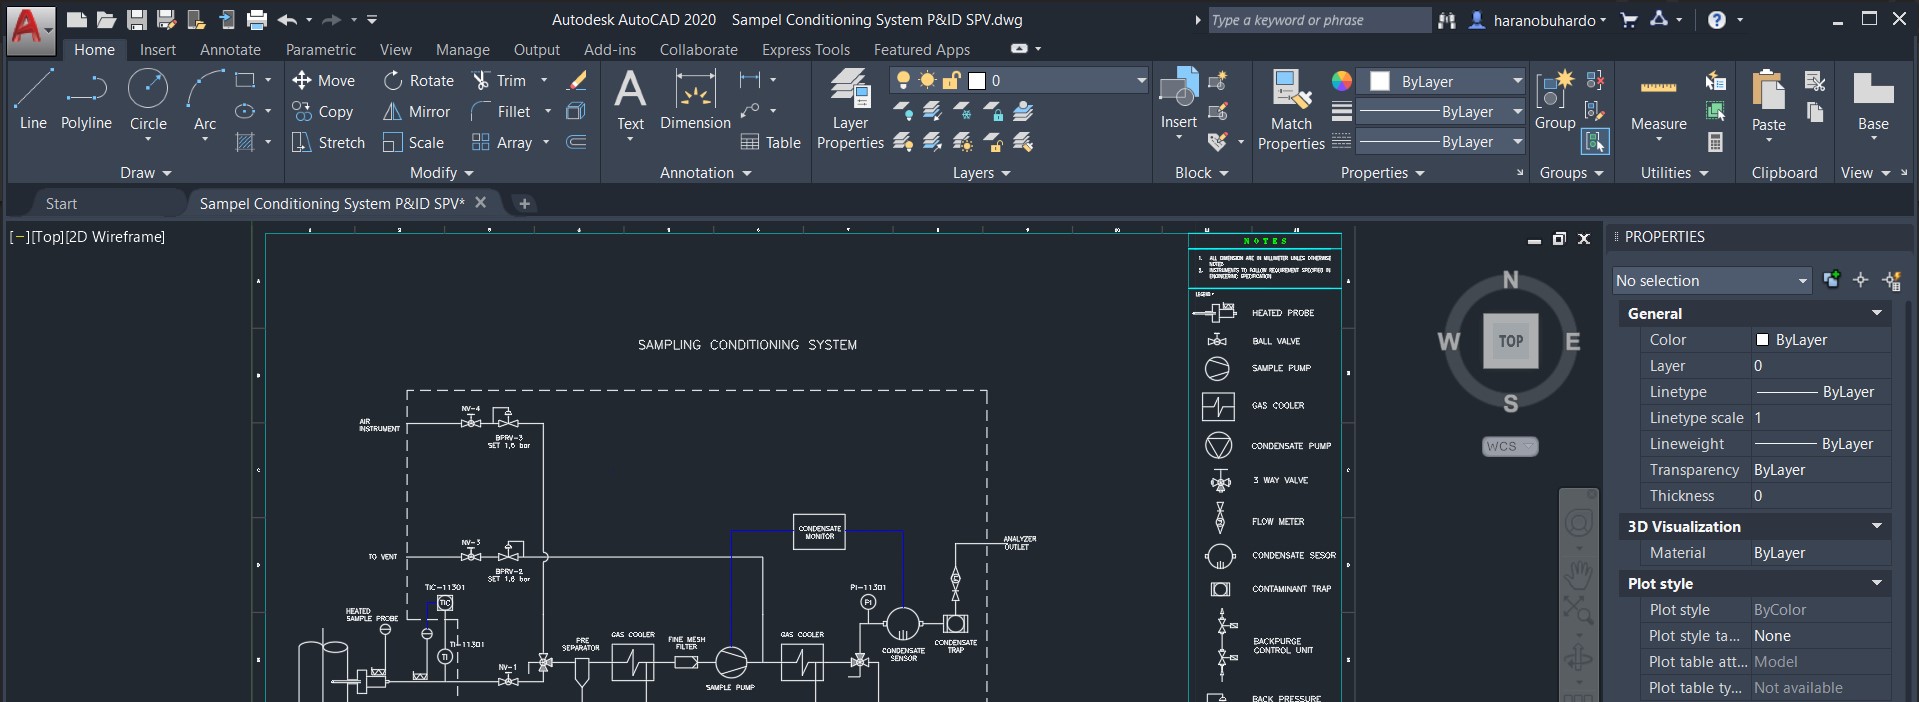
How to create viewports in AutoCAD layouts?
To create viewports in AutoCAD layouts, follow these steps:
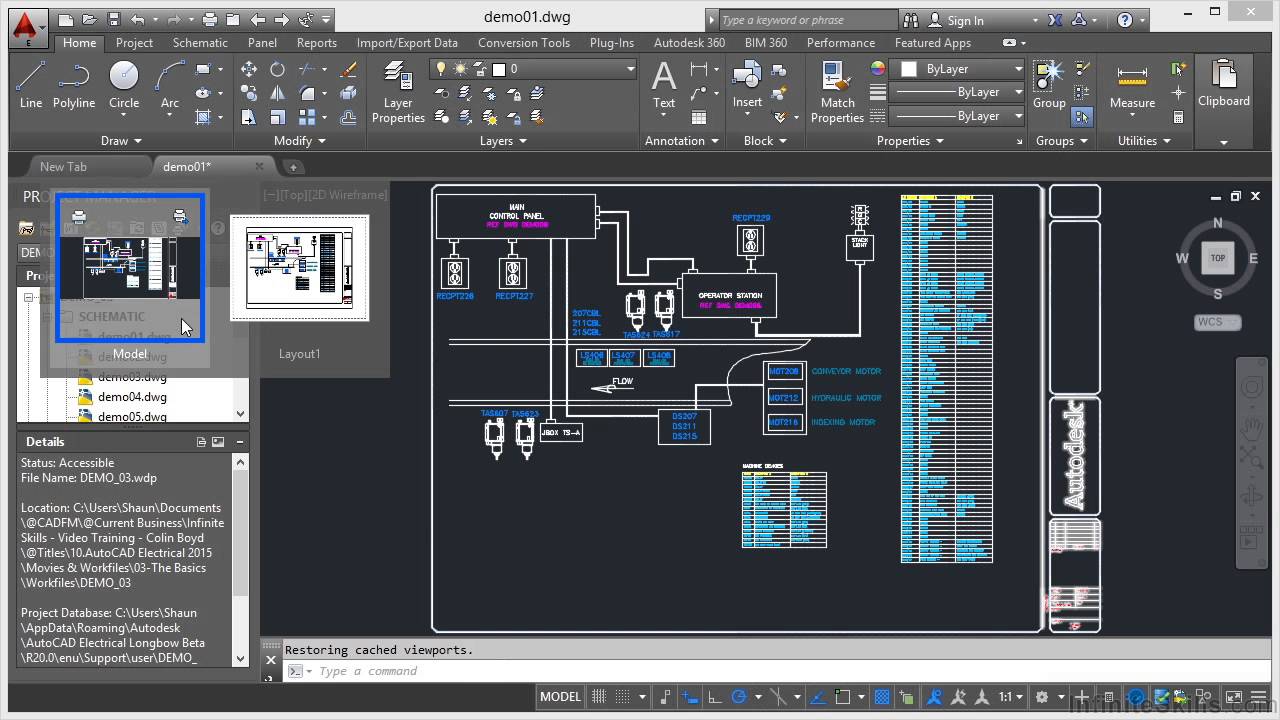
- Open your AutoCAD software and open the drawing you want to work on.
- Select the \"Layout\" tab at the bottom of the drawing area to switch to the layout view.
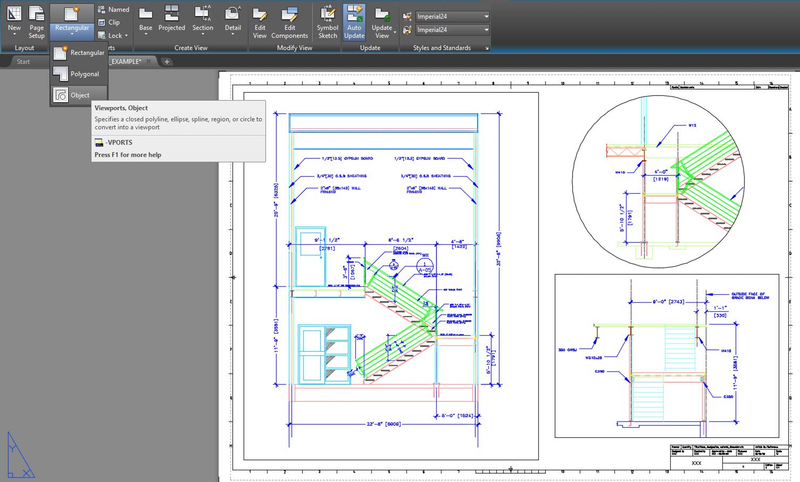
- In the \"Layout\" tab, click on the \"Layout Viewports\" panel to display the available viewport tools.
- Select the \"Rectangular\" or \"Polygonal\" viewport tool depending on the shape you want for your viewport.
- Click and drag on the layout to specify the size and position of your viewport.
- Release the mouse button to create the viewport.
- You can resize, move, or adjust the properties of the viewport using the grips and properties palette.
- To display a specific view in the viewport, double-click inside the viewport to enter the model viewport.
- Use the \"Zoom\" and \"Pan\" tools to navigate and adjust the view as desired.
- Exit the model viewport by double-clicking outside the viewport boundaries.
- Repeat the above steps to create additional viewports with different views if needed.
- Save your drawing when you\'re done.
Note: The above steps are general guidelines and may slightly vary based on the version of AutoCAD you are using. It\'s always recommended to refer to the official AutoCAD documentation or relevant tutorials for specific instructions.
READ MORE:
Understanding Layouts in AutoCAD
Layouts in AutoCAD are used to arrange your model drawings on a virtual paper for printing. It allows you to display your model at different scales and from different perspectives within the same drawing.
Starting with Layouts
- Launch AutoCAD and open your project.
- Find the layout tabs at the bottom of the workspace. Click on a layout tab to begin.
- If you need a new layout, right-click a tab and select \"New Layout\".
Customizing Layouts
- Viewport Creation: Use the MVIEW command to create viewports that display different parts of your model.
- Scaling Your Viewports: Right-click within a viewport to set its scale, ensuring accurate representation of your model.
- Inserting Title Blocks: Title blocks can be inserted and scaled within your layout to provide essential project information.
Practical Steps to Create a Layout
Follow these steps to create a functional layout for your design:
- Open your drawing and select a layout tab.
- Use the MVIEW command to create a new viewport.
- Adjust the viewport\"s scale to suit your design\"s requirements.
- Insert and scale a title block as needed.
- Arrange additional viewports or elements as necessary.
- Save your layout and switch back to model space.
Advanced Layout Tips
Enhance your layout by exploring advanced features such as:
- Custom viewport configurations for detailed presentations.
- Layer management within layouts to control element visibility.
- Use of annotation scales to maintain text and dimension consistency across different scales.
Conclusion
Mastering layouts in AutoCAD streamlines the process of preparing your designs for presentation and printing. By following this guide, you can enhance the quality and efficiency of your design workflows.
Practical Steps to Create a Layout
Follow these steps to create a functional layout for your design:
- Open your drawing and select a layout tab.
- Use the MVIEW command to create a new viewport.
- Adjust the viewport\"s scale to suit your design\"s requirements.
- Insert and scale a title block as needed.
- Arrange additional viewports or elements as necessary.
- Save your layout and switch back to model space.
_HOOK_
Advanced Layout Tips
Enhance your layout by exploring advanced features such as:
- Custom viewport configurations for detailed presentations.
- Layer management within layouts to control element visibility.
- Use of annotation scales to maintain text and dimension consistency across different scales.
Conclusion
Mastering layouts in AutoCAD streamlines the process of preparing your designs for presentation and printing. By following this guide, you can enhance the quality and efficiency of your design workflows.

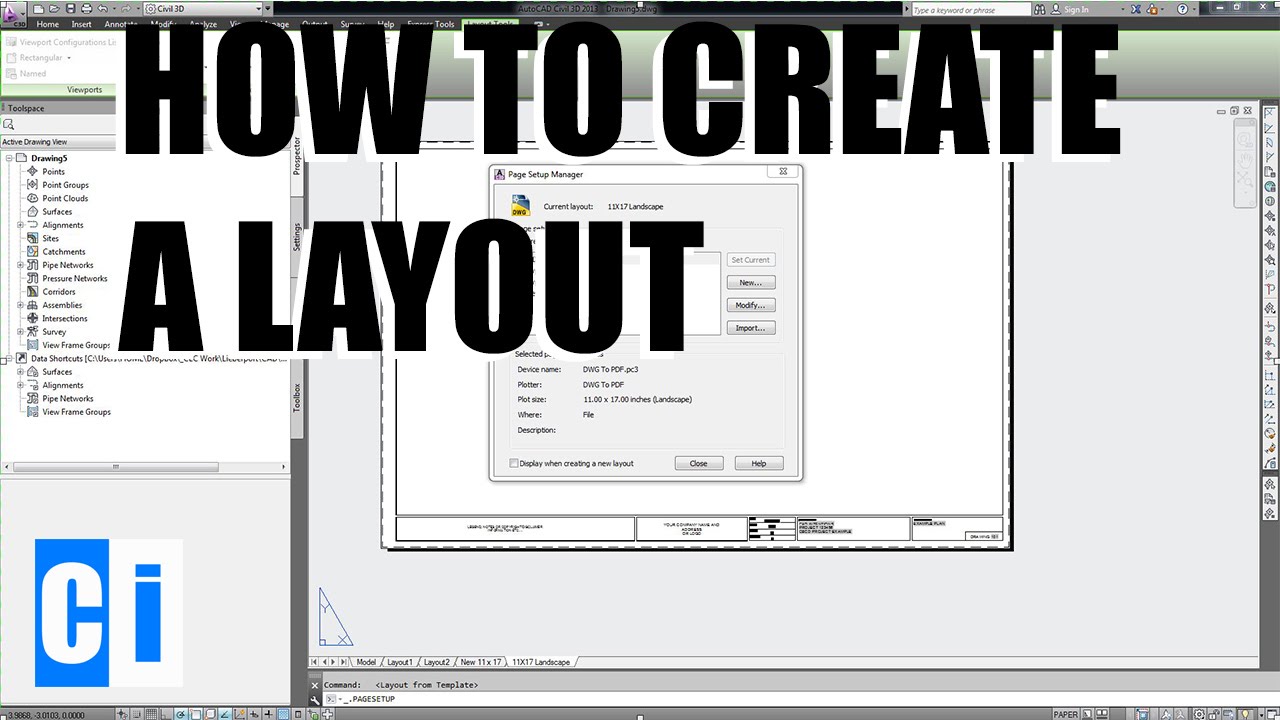
Page Setup in a Layout in AutoCAD
\"Discover the secrets of efficient page setup with our comprehensive video tutorial! Learn how to optimize your document layout, adjust margins, and customize headers and footers for a professional look. Watch now and unlock the full potential of page setup!\"
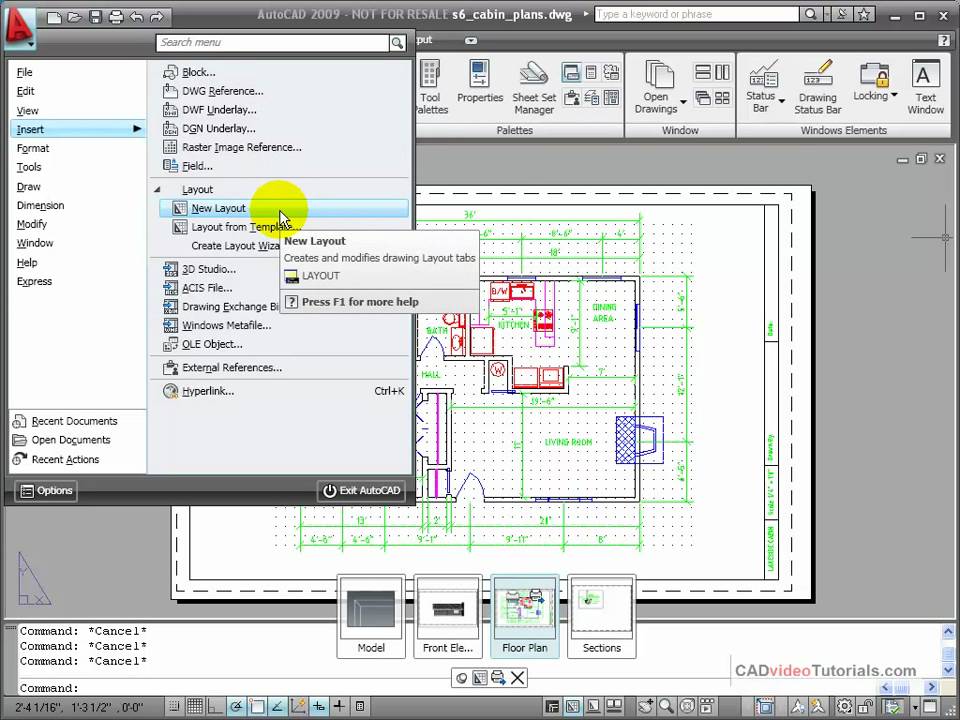
Create Layouts in AutoCAD - New Layout Tutorial
\"Unleash your creativity with our step-by-step guide on creating captivating layouts! From designing eye-catching templates to arranging elements for maximum impact, our video will teach you the art of crafting stunning layouts. Start watching and take your design skills to the next level!\"
Advanced Layout Tips
Enhance your layout by exploring advanced features such as:
- Custom viewport configurations for detailed presentations.
- Layer management within layouts to control element visibility.
- Use of annotation scales to maintain text and dimension consistency across different scales.
Conclusion
Mastering layouts in AutoCAD streamlines the process of preparing your designs for presentation and printing. By following this guide, you can enhance the quality and efficiency of your design workflows.
Introduction to AutoCAD Layouts
AutoCAD layouts are a crucial feature for drafters and designers, providing a powerful means to organize and present your drawings for printing or presentation. Understanding how to effectively use layouts can significantly enhance the quality and efficiency of your work.
Layouts in AutoCAD serve as a bridge between your model space, where the design is created, and the paper space, where the design is laid out for printing. This section helps you understand the fundamentals of layout creation, customization, and utilization for various project needs.
- Overview of Layouts: Understand what layouts are and why they are beneficial for your drafting projects.
- Layout Tabs: Learn about the layout tabs at the bottom of the AutoCAD interface, which allow you to switch between model space and layout views easily.
- Creating a New Layout: Steps to create a new layout, including selecting a layout tab and using the right-click menu options.
- Viewport Management: How to create and manage viewports within a layout to display different views of your model at varying scales.
- Scaling and Annotation: Techniques for scaling your drawings within a layout and adding annotations that remain legible across different viewport scales.
By mastering AutoCAD layouts, you can produce professional-quality drawings ready for presentation or printing, accommodating a wide range of project requirements. This section will guide you through the basics to get started with confidence.

Starting with Basic Layout Configurations
Initiating your journey with AutoCAD layouts begins with understanding basic configurations. This essential step sets the foundation for effectively showcasing your designs. Here, we detail how to start with layout configurations that cater to your project needs.
- Selecting a Layout: Start by choosing an existing layout tab or create a new one to tailor your workspace for specific project requirements.
- Setting Up Your Paper: Configure your paper size and orientation to match the output you anticipate for your design presentations or prints.
- Creating Viewports: Viewports are windows into your model space. Learn to create and position them within your layout to best display your design.
- Adjusting Viewport Scales: Scaling your viewports correctly is crucial for accurate representation of your design on paper.
- Applying Layout Elements: Incorporate essential layout elements such as title blocks and borders to professionalize your presentation.
Mastering these basic layout configurations will empower you to create compelling and professionally formatted drawings. Each step is designed to enhance your ability to communicate your designs effectively, ensuring your layouts are both functional and aesthetically pleasing.
- Tips for Effective Viewport Management: Efficiently organize multiple viewports to display different aspects of your design.
- Importance of Consistent Scale: Ensure that all elements within your layout adhere to a consistent scale for clarity and professionalism.
- Customizing Your Layout Space: Personalize your layout space with background colors, layer management, and more to suit your preferences and project needs.
By following these guidelines, you\"ll set a strong foundation for creating detailed and polished AutoCAD layouts, ready for any design challenge.
Creating and Managing Viewports
Viewports are essential in AutoCAD layouts for displaying different perspectives or scales of your design within a single layout. This section covers the creation and management of viewports, enabling you to showcase your work effectively.
- Creating a New Viewport: Begin by activating the layout tab where you want to add viewports. Use the \"MVIEW\" command to create new viewports within your layout space. You can specify the number and arrangement of viewports.
- Configuring Viewport Properties: Once a viewport is created, you can customize its properties, such as scale, layer visibility, and locking the viewport to prevent accidental changes.
- Scaling Your Viewports: Accurately scale viewports to represent the true dimensions of your design. Use the properties palette or the scale list in the viewport\"s right-click menu to select an appropriate scale.
- Managing Layers within Viewports: Control which layers are visible in each viewport for focused presentation of your design elements. This can be done through the Layer Properties Manager.
- Locking Viewports: Once you have configured your viewport, lock it to prevent changes to its scale or view. This ensures that your layout remains consistent.
Effective viewport management enhances the readability and professionalism of your AutoCAD layouts. By mastering these steps, you can create dynamic presentations of your designs, showcasing different details and perspectives within a single layout.
- Best Practices for Viewport Arrangement: Strategically arrange viewports to maximize the use of space and the presentation of your design.
- Using Annotation Scaling in Viewports: Ensure annotations appear at the correct scale and are legible across all viewports.
- Customizing Viewport Borders: Adjust the appearance and properties of viewport borders to fit the overall design of your layout.
Adopting these techniques will allow you to create more effective and engaging layouts, turning your AutoCAD projects into compelling narratives of your design prowess.
_HOOK_
Customizing Layouts with Title Blocks and Borders
Customizing your AutoCAD layouts with title blocks and borders not only enhances the professional appearance of your drawings but also conveys essential information about the project. This section will guide you through the process of adding and customizing these elements for your layouts.
- Inserting Title Blocks: Start by choosing or designing a title block that suits your project\"s requirements. You can insert a title block into your layout as a block reference from your library or create one directly in the layout.
- Customizing Title Blocks: Modify the title block to include project-specific information such as the project name, date, designer\"s name, and revision history. Use attributes within the block for dynamic data that changes from one project to another.
- Adding Borders: Borders frame your layout and give it a finished look. Create a border using the RECTANGLE command, making sure it aligns with the margins you intend to use for printing.
- Scaling Title Blocks and Borders: Ensure that your title blocks and borders are scaled appropriately for the paper size you will be using. This might involve adjusting the scale factor of the block when inserting it into your layout.
By carefully designing and implementing title blocks and borders, you make your AutoCAD layouts more informative and visually appealing. This not only aids in the organization of your drawings but also communicates important details to viewers and collaborators.
- Tips for Effective Title Block Design: Keep your title block design simple yet informative, allowing for easy updates and consistency across different projects.
- Using Layers for Title Blocks and Borders: Assign title blocks and borders to specific layers for better control over their visibility and printing options.
- Automating Title Block Data: Explore ways to automate the filling of attribute data in title blocks to save time and reduce errors in repetitive information entry.
Incorporating well-designed title blocks and borders into your layouts not only establishes a professional standard for your drawings but also streamlines the process of managing and updating project information.

Advanced Techniques for Layout Management
Expanding beyond the basics, advanced layout management in AutoCAD involves techniques that can significantly improve the efficiency of your design process and the quality of your final presentations. This section delves into sophisticated strategies for optimizing your layout configurations.
- Layer Management in Layouts: Utilize layer properties to control the visibility and appearance of different elements within each viewport. This allows for more complex and detailed presentations without cluttering your model space.
- Using Annotative Objects: Annotative objects automatically adjust their size and scale to match the viewport scale, ensuring that text, dimensions, and other annotations are always legible, regardless of how the viewport is scaled.
- Linking Data Tables to Layouts: Incorporate external data sources into your layouts by linking Excel tables or other databases. This ensures that your layout contains up-to-date information and reduces manual data entry.
- Creating Dynamic Blocks for Layouts: Design dynamic blocks for commonly used layout elements such as title blocks, legends, and notes. This allows for flexible adjustments to block size, shape, and information directly within the layout.
- Automating Layout Creation: Explore scripting and macros to automate repetitive layout creation tasks. This can include setting up viewports, inserting title blocks, and applying standard settings across multiple layouts.
By mastering these advanced techniques, you can leverage AutoCAD\"s full potential to create highly customized and detailed layouts that effectively communicate your design intent. These strategies not only save time but also enhance the clarity and professionalism of your project documentation.
- Efficient Use of Viewports: Develop strategies for organizing multiple viewports to maximize the presentation of different design aspects within a single layout.
- Customizing Plot Styles: Tailor plot styles for different elements in your layout to achieve consistent and visually appealing printouts.
- Optimizing Layouts for Digital Presentation: Consider digital presentation formats by setting up interactive PDFs or web-based layouts that allow viewers to navigate through different aspects of your design.
Implementing these advanced layout management techniques can significantly enhance your workflow, making your designs more adaptable, informative, and engaging for all stakeholders involved.
Scaling Drawings and Working with Annotations
Proper scaling and annotation of drawings within AutoCAD layouts are pivotal for the clarity and accuracy of your design documentation. This section guides you through the process of effectively scaling your drawings and managing annotations to ensure they are informative and legible.
- Understanding Scale in Layouts: Grasp the concept of scale as it applies to layout spaces, ensuring your designs are presented at the correct size relative to the real world.
- Setting Up Scales for Viewports: Learn how to set and adjust the scale of viewports to accurately display the design at a specified scale, using the properties palette or the scale list in the viewport\"s context menu.
- Creating Annotative Objects: Utilize annotative text, dimensions, and other annotations that automatically adjust their size based on the scale of the viewport they are displayed in, ensuring legibility across different views.
- Managing Annotation Scales: Manage the scales at which your annotative objects are displayed, adding or removing scales as necessary to maintain clarity in different viewport scales.
- Using Layers for Annotations: Organize annotations on separate layers to control their visibility and appearance, making it easier to manage different sets of annotations for various purposes.
Effectively scaling drawings and annotations within your AutoCAD layouts not only enhances the professionalism of your documents but also improves communication with clients and team members by ensuring that your designs are accurately represented and easy to understand.
- Tips for Consistent Scaling: Strategies for maintaining consistent scale across multiple viewports and layouts to avoid confusion.
- Best Practices for Annotative Objects: Guidelines for creating and managing annotative text, dimensions, and other annotations to ensure they are effective and efficient.
- Customizing Annotation Styles: Customize text styles, dimension styles, and other annotation styles to match your project\"s standards and enhance readability.
By mastering the art of scaling drawings and working with annotations in AutoCAD, you can create detailed, accurate, and professional layouts that clearly communicate your design intent.
Printing and Plotting Layouts
Finalizing your AutoCAD projects often involves printing or plotting your layouts to share with clients or for record-keeping. This section provides a step-by-step guide to ensure your layouts are printed or plotted accurately and professionally.
- Preparing Your Layout for Printing: Confirm that your layout is complete, with all elements correctly scaled and annotated. Ensure viewports are locked to prevent unintended changes.
- Selecting the Right Printer or Plotter: Choose a printer or plotter that is capable of handling your document size and quality requirements. Set it as your output device in the Page Setup Manager.
- Configuring Page Setup: In the Page Setup Manager, configure the paper size, orientation, plot scale, and other settings specific to your layout. Save these settings for future use.
- Adjusting Plot Styles: Plot styles control the appearance of your drawing when printed, including line weights, colors, and fills. Adjust these settings as needed to ensure your layout prints as intended.
- Previewing Before Plotting: Always preview your layout before printing. This step helps identify and correct any issues with scale, alignment, or plot styles before the final print.
- Plotting Your Layout: With everything set and previewed, proceed to plot your layout. Consider using the \"Plot to PDF\" option for digital sharing or archiving.
Printing and plotting in AutoCAD can seem complex, but by following these steps, you can achieve high-quality, accurate reproductions of your work. Whether you\"re sharing designs with clients or creating documentation for your portfolio, these practices will ensure your layouts look their best.
- Common Plotting Issues and Solutions: Tips for troubleshooting common issues such as incorrect scales, missing elements, or poor line quality.
- Optimizing Layouts for Plotting: Strategies for reducing file size and enhancing plot quality, including raster versus vector plots and the use of plotter configuration files.
- Sustainable Plotting Practices: Considerations for minimizing waste and optimizing resource use when printing large format drawings.
Mastering the printing and plotting process in AutoCAD ensures your designs are communicated clearly and professionally, leaving a lasting impression on your audience.
Tips and Tricks for Efficient Layout Design
Creating efficient AutoCAD layouts is both an art and a science, requiring a blend of technical skills, creativity, and practical strategies. Here are some tips and tricks to enhance your layout design process, making it more efficient and effective.
- Utilize Templates: Save time by creating layout templates with predefined title blocks, borders, and viewports. This allows you to start new projects more quickly and ensures consistency across your documents.
- Master Keyboard Shortcuts: Learn and use AutoCAD\"s keyboard shortcuts for common commands. This can significantly speed up your workflow and reduce repetitive strain.
- Implement Layer Standards: Establish and adhere to layer naming and color standards. This makes it easier to manage visibility and appearance across different layouts and drawings.
- Use Data Extraction: Automate the creation of tables and lists (such as bill of materials or room schedules) by extracting data directly from your drawings. This ensures accuracy and saves time.
- Explore Dynamic Blocks: Dynamic blocks with parameters and actions can simplify the inclusion of common symbols or elements, allowing for quick adjustments without needing to redraw components.
- Regularly Update Block Libraries: Keep your block libraries up to date and organized. This ensures you always have the right elements at hand and can maintain consistency across projects.
- Practice Effective Viewport Management: Organize and manage viewports efficiently to showcase different aspects of your design within a single layout, making it easier for viewers to understand the project.
Adopting these strategies can streamline your layout design process, reduce errors, and improve the overall quality of your AutoCAD presentations. With practice, these tips and tricks will become second nature, enhancing your productivity and design capabilities.
_HOOK_
Common Mistakes to Avoid in Layout Creation
Creating effective layouts in AutoCAD requires attention to detail and an understanding of common pitfalls. Recognizing and avoiding these mistakes can lead to more accurate, professional, and effective layouts. Here\"s a list of common errors to watch out for.
- Ignoring Scale Settings: One of the most frequent mistakes is not setting or checking the scale of viewports properly, leading to inaccurately represented designs.
- Overlooking Layer Management: Failing to properly manage layers can result in cluttered, confusing layouts where important details are lost or obscured.
- Neglecting Viewport Locks: Not locking viewports after setting them up can lead to unintentional alterations in scale or view, affecting the layout\"s accuracy.
- Using Inconsistent Annotation Styles: Inconsistency in text, dimension styles, and other annotations can make layouts look unprofessional and can confuse the reader.
- Forgetting to Update Title Blocks: Outdated or incorrect information in title blocks can mislead and detract from the credibility of your drawings.
- Overcomplicating Layouts: Adding too many elements to a layout can overwhelm the viewer. It\"s important to keep layouts clear and focused.
- Disregarding Print Preview: Skipping the print preview step can lead to unexpected results in the final printout, such as incorrect alignment, scaling, or missing elements.
Avoiding these common mistakes will improve the quality and effectiveness of your AutoCAD layouts. By applying careful planning, consistent standards, and regular reviews, you can ensure your layouts accurately communicate your design intentions.
READ MORE:
Resources for Further Learning
To enhance your skills and deepen your knowledge in creating and managing AutoCAD layouts, a variety of resources are available. Expanding your learning through these resources can help you stay updated with the latest techniques and trends in AutoCAD design.
- AutoCAD Official Training Guides: Autodesk offers comprehensive training guides and tutorials that cover all aspects of AutoCAD, including layout creation.
- Online Courses and Webinars: Platforms such as LinkedIn Learning, Udemy, and Coursera provide in-depth courses on AutoCAD, including specific modules on layout design and management.
- YouTube Tutorials: A wealth of free tutorials is available on YouTube, offering step-by-step instructions on various AutoCAD tasks, including layout customization.
- AutoCAD Forums and Communities: Joining AutoCAD forums and communities can provide insights, tips, and support from experienced users and professionals in the field.
- Books and eBooks: Numerous books and eBooks are available that focus on AutoCAD, with some dedicated solely to layout techniques and best practices.
- Workshops and Training Sessions: Participating in workshops and training sessions offered by Autodesk or authorized training centers can provide hands-on experience under the guidance of experts.
By leveraging these resources, you can continuously improve your AutoCAD layout skills, keeping pace with industry standards and enhancing your ability to execute complex design projects efficiently.
Embrace the power of AutoCAD layouts to transform your designs into compelling narratives. With practice, patience, and continuous learning, mastering layout creation will elevate your projects to new heights of professionalism and efficiency.