Topic mep autocad tutorial: Embark on a journey to excellence in MEP design with our comprehensive AutoCAD tutorial. Unlock the secrets to creating sophisticated mechanical, electrical, and plumbing systems, enhancing your engineering projects with precision and efficiency.
Table of Content
- What are the basic topics covered in AutoCAD MEP tutorial for beginners?
- Getting Started with AutoCAD MEP
- Understanding MEP Toolsets and Workspace
- Creating and Editing HVAC Systems
- Designing Piping Systems
- Plumbing Design Essentials
- Electrical System Design
- YOUTUBE: AutoCAD MEP Tutorial for Beginners
- Working with Schematics and Representations
- Advanced Techniques: Ducting and Fittings
- Project Management and Collaboration Tools
- Customizing AutoCAD MEP for Efficiency
- Preparing for Certification: Courses and Resources
What are the basic topics covered in AutoCAD MEP tutorial for beginners?
The basic topics covered in AutoCAD MEP tutorial for beginners are:
- Introduction to AutoCAD MEP
- Understanding the User Interface
- Creating and Managing Projects
- Working with Drawing Files
- Using Layers and Object Properties
- Working with Drawing Tools
- Creating and Editing Walls, Doors, and Windows
- Placing and Modifying Plumbing Fixtures
- Adding Electrical Components
- Setting Up HVAC Systems
- Creating and Editing Ductwork and Piping
- Using Annotation and Dimensioning Tools
- Generating Schedules and Bill of Materials
- Performing System Analysis and Calculations
- Collaboration and Data Exchange
- Customization and Automation
READ MORE:
Getting Started with AutoCAD MEP
AutoCAD MEP is the go-to software for designing mechanical, electrical, and plumbing (MEP) systems in a building. This introductory guide will help you get familiar with the basics of AutoCAD MEP, from setting up your first project to mastering the essential tools and features.
- Understanding the AutoCAD MEP Interface: Familiarize yourself with the user interface, including toolsets, ribbons, and workspace customization options.
- Setting Up Your First Project: Learn how to create a new project, set up drawing templates, and manage project files effectively.
- Basic Drawing and Editing Commands: Start drawing MEP components using basic commands. Learn how to modify and manipulate objects with move, copy, rotate, and scale.
- Working with MEP Objects: Dive into the specifics of MEP design by exploring how to insert, edit, and manage HVAC, piping, and plumbing components.
- Annotation and Documentation: Understand how to annotate your drawings effectively with tags, schedules, and legends to convey important information.
- Collaboration and Sharing: Get tips on sharing your MEP designs with team members and integrating your work into larger building models.
By following these steps, you\"ll be well on your way to mastering AutoCAD MEP and enhancing your MEP design skills. Remember, practice is key to becoming proficient with this powerful software tool.
Understanding MEP Toolsets and Workspace
The MEP toolset in AutoCAD is designed to enhance productivity for mechanical, electrical, and plumbing designs. This section will guide you through understanding the specialized toolsets and how to navigate the MEP workspace for efficient design processes.
- MEP Workspace Overview: Begin by exploring the MEP-specific workspace, which includes tailored ribbons and toolbars for MEP design, making it easier to access commonly used tools and commands.
- Toolsets for Each Discipline: Learn about the different toolsets available for HVAC (Heating, Ventilation, and Air Conditioning), electrical design, and plumbing. Each toolset includes specialized tools and features for designing complex MEP systems.
- Using the Content Browser: Discover how to utilize the Content Browser to drag and drop pre-designed MEP components into your drawings, saving time and ensuring accuracy.
- Customizing Your Workspace: Customize the MEP workspace according to your preferences. This includes arranging toolbars, palettes, and command settings to optimize your design workflow.
- Palette Management: Effective management of tool palettes is crucial for MEP design. Learn to organize, share, and customize palettes to streamline your design process.
- Project Navigator for Managing Drawings: Understand how to use the Project Navigator to manage your MEP drawings efficiently, including setting up projects, managing views, and coordinating drawings across different MEP disciplines.
By familiarizing yourself with the MEP toolsets and workspace, you can significantly improve your efficiency and precision in MEP designs. Practice using these tools and customizations to become proficient in navigating and utilizing AutoCAD MEP to its fullest potential.
Creating and Editing HVAC Systems
Designing HVAC systems in AutoCAD MEP involves a series of steps to ensure accuracy and efficiency in your models. This guide will walk you through the process of creating and editing HVAC systems, using AutoCAD MEP\"s powerful toolsets.
- Starting Your HVAC Design: Initiate by setting up your project and drawing space. Use the MEP workspace tailored for HVAC design to access relevant tools easily.
- Using HVAC Toolsets: Explore the HVAC toolset, which includes commands and tools for designing ductwork, placing HVAC components, and creating HVAC systems.
- Drawing Ductwork: Learn how to draw ducts using the Duct tool, adjust sizes, and specify materials. Utilize automatic routing solutions to efficiently connect HVAC components.
- Adding Components: Insert HVAC components such as fans, vents, and air terminals into your design. Use the Content Browser to find and place standardized parts.
- Editing and Modifying Systems: Discover methods for editing ductwork and components, including changing sizes, adjusting routes, and modifying properties to meet design requirements.
- Creating HVAC Schedules: Generate schedules automatically for ducts and equipment, facilitating documentation and providing clear, concise information for project stakeholders.
- Collaboration and Coordination: Learn about tools and practices for collaborating with team members, ensuring that HVAC systems integrate seamlessly with other MEP systems in the project.
By mastering these steps, you\"ll be able to create detailed and efficient HVAC systems within AutoCAD MEP, contributing to the overall success of your MEP projects.

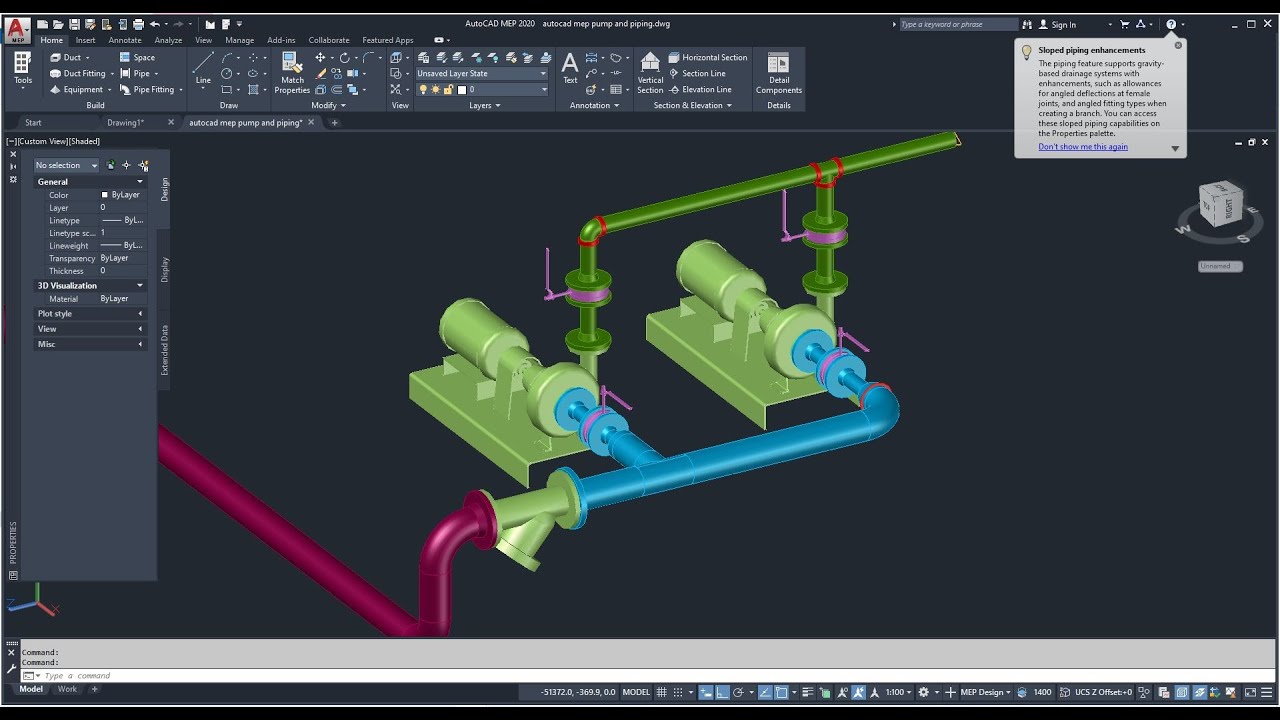
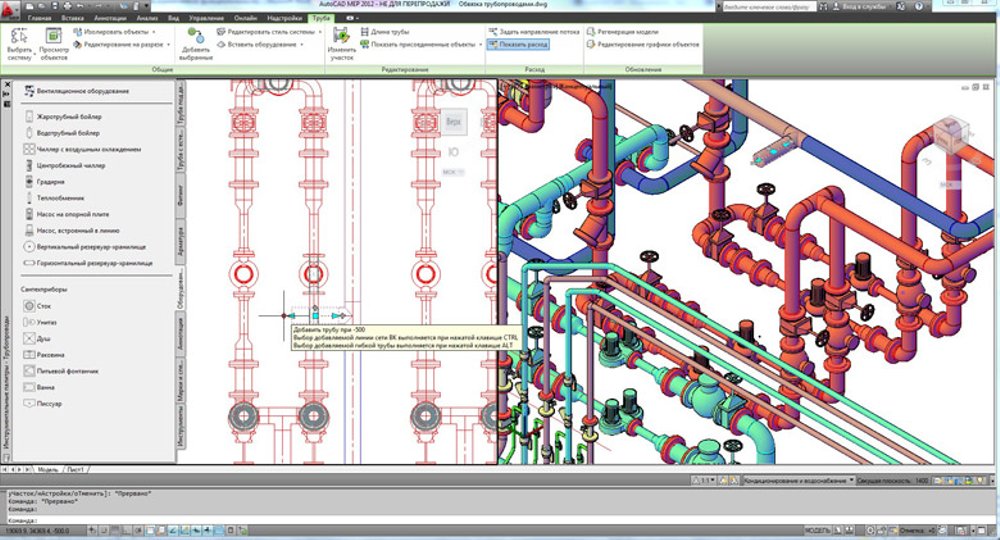
Designing Piping Systems
Designing efficient piping systems is crucial for any MEP project. AutoCAD MEP provides a comprehensive set of tools to help you design, edit, and document your piping systems. Follow these steps to create accurate and functional piping designs.
- Initiating the Piping Design: Start by setting the project standards for pipe types, sizes, and materials. Define the layer standards to keep your project organized.
- Selecting Pipe Types: Choose the appropriate pipe types for your design, considering the fluid type, pressure requirements, and temperature conditions.
- Drawing Pipes: Utilize the AutoCAD MEP tools to draw pipes, automatically connecting pipe segments and fittings. Adjust routing preferences to optimize the layout.
- Inserting Fittings and Valves: Add fittings, valves, and other components from the tool palette or Content Browser. AutoCAD MEP allows for easy placement and adjustment to fit your design needs.
- Creating Piping Systems: Group your pipes and fittings into systems to simplify editing and documentation. Assign properties such as flow direction and system type.
- Editing and Modifying: Learn how to edit existing piping systems, including changing sizes, rerouting pipes, and replacing components.
- Generating Isometric and Orthogonal Views: Produce detailed views of your piping systems for documentation and construction, leveraging AutoCAD MEP\"s powerful drawing tools.
- Documenting and Annotating: Annotate your piping designs with tags and schedules to provide clear, detailed information for installation and maintenance.
With these steps, you\"re on your way to designing comprehensive piping systems using AutoCAD MEP, enhancing the functionality and efficiency of your MEP projects.
_HOOK_
Plumbing Design Essentials
Plumbing design is a critical component of the MEP sector, focusing on the water supply and drainage systems in a building. AutoCAD MEP facilitates the design, drafting, and documentation of plumbing systems with specialized tools and features. This section provides a foundational guide to plumbing design essentials.
- Understanding Plumbing Systems: Begin with an overview of plumbing systems, including potable water supply, waste, and vent systems. Recognize the importance of compliance with local codes and standards.
- Setting Up Your Project: Configure your AutoCAD MEP project for plumbing design. Define layer standards, line types, and drawing scales specific to plumbing.
- Designing Water Supply Systems: Learn to design the water supply system, from the water source to fixtures, including pipes, valves, and fittings. Emphasize on ensuring adequate water pressure and flow rates.
- Designing Drainage Systems: Focus on the layout of waste and vent piping. Understand the principles of gravity flow, trap design, and venting to ensure effective drainage and odor control.
- Adding Plumbing Fixtures: Insert and connect plumbing fixtures such as sinks, toilets, and showers. Utilize the Content Browser for accessing manufacturer-specific models.
- Calculating Loads and Sizing: Perform load calculations to determine water demand and pipe sizing to ensure the system meets usage requirements efficiently.
- Creating Schedules and Documentation: Generate detailed schedules for fixtures, fittings, and equipment. Annotate drawings with tags and notes for comprehensive documentation.
- Collaborating with Other Disciplines: Coordinate plumbing designs with mechanical, electrical, and structural systems to avoid conflicts and ensure integrated building services design.
Mastering these essentials will enable you to design robust and efficient plumbing systems using AutoCAD MEP, ensuring that your projects meet both functionality and regulatory requirements.

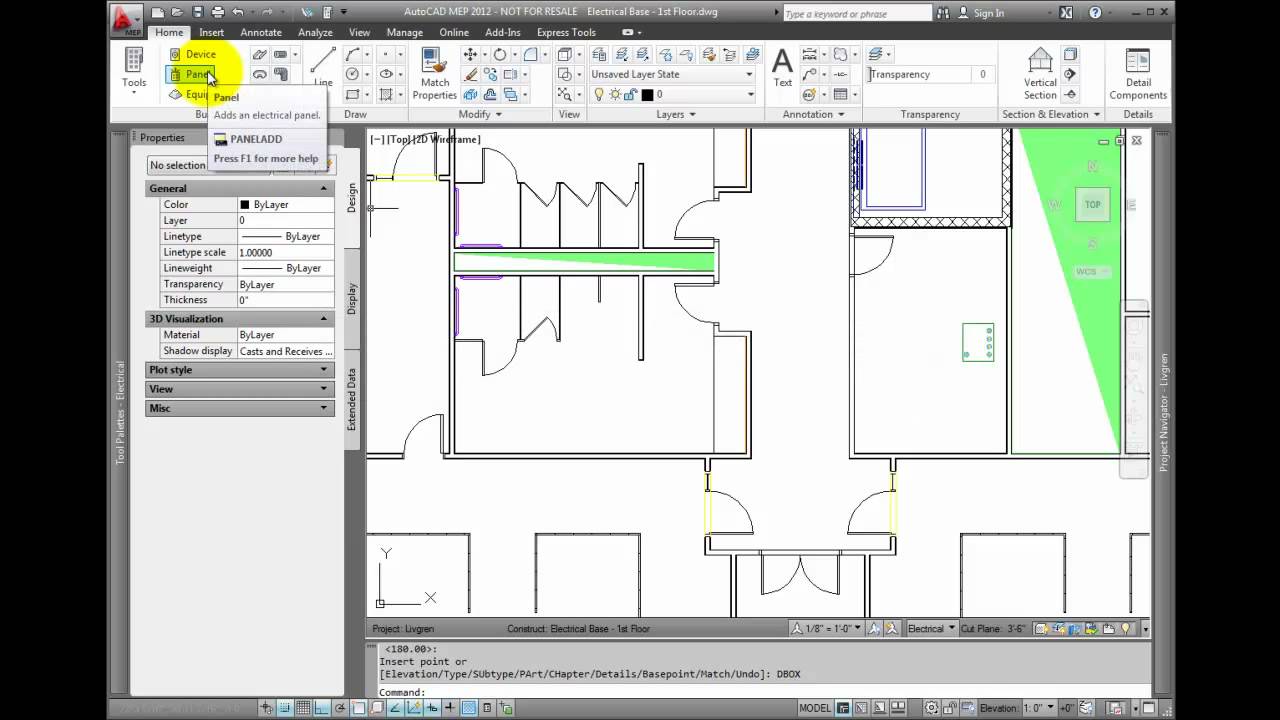
Electrical System Design
Electrical system design within MEP projects is crucial for ensuring power distribution, lighting, and system controls are effectively integrated into building designs. Using AutoCAD MEP, engineers and designers can create detailed, accurate electrical systems. This guide outlines the steps for electrical system design using AutoCAD MEP.
- Understanding Electrical Systems: Start with a fundamental understanding of electrical systems, including power distribution, lighting, and emergency systems.
- Setting Up Electrical Drawings: Prepare your AutoCAD MEP environment by setting up drawing files, layer standards, and electrical components libraries.
- Creating Power Distribution Networks: Design the layout for power distribution, including placing panels, transformers, and receptacles. Ensure adherence to codes and standards for safety and efficiency.
- Designing Lighting Systems: Plan and design lighting systems, taking into consideration lighting levels, energy efficiency, and occupant comfort. Utilize AutoCAD MEP’s tools to place light fixtures and control systems.
- Adding Electrical Components: Insert electrical components such as switches, outlets, and fixtures from the extensive library available in AutoCAD MEP.
- Wiring and Connectivity: Draw wiring connections between components, using AutoCAD MEP’s intelligent wiring tools to automatically connect devices and track electrical loads.
- Generating Schedules and Reports: Automatically generate schedules for panels, circuits, and fixtures. Use these tools to create detailed reports that aid in installation and maintenance.
- Collaboration and Coordination: Collaborate with other MEP disciplines to ensure electrical systems are integrated seamlessly with mechanical and plumbing systems, avoiding conflicts and ensuring a holistic building design.
By following these steps, electrical engineers and designers can leverage AutoCAD MEP to create comprehensive, compliant, and efficient electrical systems for any building project.

AutoCAD MEP Tutorial for Beginners
\"Calling all beginners! This video is the perfect introduction to help you take your first steps into the world of [keyword]. Get ready to learn the basics, gain confidence, and unlock your potential in no time!\"
AutoCAD MEP Overview Video
\"Curious about [keyword]? Look no further! In this comprehensive overview video, you\'ll get a complete picture of what [keyword] is all about. From its history to its key components, you\'ll leave with a solid understanding and ready to dive deeper.\"
Working with Schematics and Representations
Creating and interpreting schematics and representations is a fundamental aspect of MEP design in AutoCAD MEP. This section delves into the techniques and best practices for working with electrical, plumbing, and HVAC schematics, ensuring accurate representation of systems within a building project.
- Understanding MEP Schematics: Gain a solid foundation in reading and creating schematic diagrams for MEP systems, focusing on symbols, notation, and system flows.
- Creating Electrical Schematics: Learn the process of drafting electrical diagrams, including power, lighting, and control circuits. Utilize specialized tools in AutoCAD MEP for creating detailed and accurate electrical schematics.
- Developing Plumbing and Piping Diagrams: Explore techniques for designing plumbing layouts and piping schemes, including water supply, drainage, and vent systems. Employ AutoCAD MEP’s libraries for symbols and components.
- Designing HVAC Schematics: Master the creation of HVAC control diagrams and ductwork schematics, ensuring clear representation of airflow, system zoning, and equipment.
- Utilizing Layers and Styles: Effectively use layers, line styles, and color coding to differentiate between various MEP systems, enhancing clarity and readability of schematics.
- Annotation and Dimensioning: Annotate schematics with critical information such as component specifications, dimensions, and notes. Learn the best practices for dimensioning and labeling to convey clear and precise information.
- Generating Reports from Schematics: Convert schematic data into reports and schedules. Use AutoCAD MEP to extract component lists, materials, and other data directly from your diagrams for project documentation and analysis.
- Collaboration and Sharing: Share your schematic designs with project stakeholders and collaborate with other design disciplines. Understand the tools and formats suitable for efficient sharing and integration of MEP schematics into larger project models.
By mastering these elements, you will enhance your ability to create, interpret, and share MEP schematics, contributing significantly to the design and execution of complex building systems.
Advanced Techniques: Ducting and Fittings
Mastering advanced techniques in ducting and fittings design is crucial for creating efficient HVAC systems in AutoCAD MEP. This section explores sophisticated strategies for optimizing your ductwork designs, ensuring compatibility, efficiency, and compliance with standards.
- Optimizing Duct Layouts: Learn how to design duct layouts that maximize airflow efficiency and minimize energy consumption. Techniques include strategic placement of branches, minimizing bends, and selecting the optimal duct sizes.
- Custom Fittings and Transitions: Dive into creating custom fittings for complex ductwork configurations. Understand how to use AutoCAD MEP\"s tools to design transitions, tees, and elbows that fit specific installation requirements.
- Automated Duct Routing: Utilize AutoCAD MEP\"s automated routing features to streamline the ductwork design process. Learn how to set preferences for routing optimization, including elevation, connection types, and material specifications.
- Pressure Loss Calculation: Implement advanced techniques for calculating pressure loss in duct systems. Use these calculations to adjust duct sizing, layout, and component selection for optimal system performance.
- Integrating with Building Models: Explore methods for integrating ductwork designs seamlessly with other building systems. Focus on collision detection, space allocation, and coordination with structural elements.
- Advanced Annotation and Documentation: Master the art of annotating ductwork plans with detailed information, including airflow direction, system classification, and performance data. Learn to generate comprehensive documentation that aids in installation and maintenance.
- Energy Efficiency and Sustainability: Apply advanced techniques to design duct systems that contribute to the building\"s overall energy efficiency. Considerations include material selection, insulation, and integration with renewable energy sources.
By applying these advanced ducting and fittings techniques in AutoCAD MEP, you will enhance your ability to design high-performing, efficient HVAC systems tailored to the specific needs of your projects.
Project Management and Collaboration Tools
Effective project management and collaboration are key to the success of MEP projects. AutoCAD MEP includes tools and features that facilitate communication, coordination, and project tracking among team members. This section outlines how to leverage these tools for efficient project management and collaboration.
- Using the Project Navigator: Discover how to manage drawings and models efficiently with the Project Navigator, organizing files by discipline and ensuring easy access for all team members.
- Collaboration with External References (Xrefs): Learn to use Xrefs to link drawings from different disciplines without merging files, enabling seamless collaboration while keeping the project files organized and up-to-date.
- Data Sharing and Coordination: Explore tools for sharing and coordinating project data, including the use of sheet sets for compiling drawings and sharing them with project stakeholders.
- Version Control: Understand how to implement version control practices to manage revisions and changes, ensuring that team members are always working with the latest project information.
- Communication Tools: Utilize AutoCAD MEP\"s communication features to exchange notes, comments, and feedback directly within the project files, facilitating clear and timely communication among the design team.
- Integrating with BIM Models: Learn the process of integrating MEP designs with BIM models for a comprehensive view of the project, enhancing coordination with architects and other engineers.
- Cloud-Based Collaboration: Explore options for cloud-based collaboration, allowing team members to access, review, and update project files from any location, fostering flexibility and remote work capabilities.
By mastering these project management and collaboration tools, MEP professionals can improve project outcomes, enhance team productivity, and ensure the delivery of high-quality designs within schedule and budget constraints.

_HOOK_
Customizing AutoCAD MEP for Efficiency
Customizing AutoCAD MEP is essential for enhancing productivity and streamlining workflows. By tailoring the software to fit your specific project needs and preferences, you can significantly reduce design time and improve project outcomes. This section offers steps to customize AutoCAD MEP for maximum efficiency.
- Custom Tool Palettes: Create custom tool palettes that include your most frequently used tools, commands, and blocks. This allows for quick access and reduces the time spent searching for specific tools.
- User Interface Modification: Adjust the AutoCAD MEP interface to suit your workflow. Rearrange ribbons, toolbars, and palettes to optimize the workspace for your specific needs.
- Template Creation: Develop custom templates with predefined settings such as drawing scales, layer names, and styles. Templates can significantly speed up the creation of new projects by providing a consistent starting point.
- Automation with Scripts and Macros: Utilize AutoCAD\"s scripting capabilities to automate repetitive tasks. Scripts and macros can perform a series of commands with a single click, saving time and reducing manual effort.
- Custom Blocks and Families: Design custom blocks and families for common MEP components. These can be easily inserted into new drawings, ensuring consistency and accuracy across projects.
- Layer Management: Implement a custom layering system that aligns with your company\"s standards. A well-organized layer system makes it easier to manage and edit drawings.
- Shortcut Keys: Configure shortcut keys for common actions and commands. Keyboard shortcuts can dramatically speed up the design process by minimizing reliance on the mouse.
By customizing AutoCAD MEP to fit your unique workflow and project requirements, you can achieve greater efficiency and productivity, ultimately leading to higher quality designs and more successful projects.
READ MORE:
Preparing for Certification: Courses and Resources
Achieving certification in AutoCAD MEP is a significant step toward validating your skills and advancing your career. This section outlines essential courses and resources to help you prepare for AutoCAD MEP certification, ensuring you have the knowledge and skills to succeed.
- Official AutoCAD MEP Training: Start with Autodesk\"s official training courses. These are designed to cover all aspects of AutoCAD MEP, from basics to advanced functionalities.
- Online Tutorials and Webinars: Utilize free and paid online tutorials and webinars. These can provide in-depth knowledge on specific topics, offering flexible learning opportunities.
- Study Guides and eBooks: Invest in official study guides and eBooks that cover the AutoCAD MEP certification exam topics. These resources are great for learning at your own pace and can be referred back to as needed.
- Practice Exams: Take practice exams to familiarize yourself with the format and types of questions you\"ll encounter. This can help reduce exam anxiety and identify areas where you need further study.
- User Groups and Forums: Join AutoCAD MEP user groups and forums. These communities are invaluable for getting answers to specific questions, sharing knowledge, and learning from experienced professionals.
- Hands-on Projects: Gain practical experience by working on real-world projects. This hands-on practice is crucial for applying what you\"ve learned and building confidence in your skills.
By following these steps and utilizing these resources, you\"ll be well-prepared to take and pass the AutoCAD MEP certification exam, setting a solid foundation for your future in MEP design and drafting.
Embarking on your AutoCAD MEP learning journey opens up a world of opportunities in the MEP design field. With dedication, practice, and the right resources, you can master the skills needed to bring innovative solutions to life.