Topic autocad mep tutorial: Unlock the full potential of MEP design with our comprehensive AutoCAD MEP tutorial, designed to elevate your skills and productivity in engineering projects.
Table of Content
- How to use AutoCAD MEP for beginners?
- Getting Started with AutoCAD MEP
- Understanding the AutoCAD MEP Interface
- Basic Drawing and Editing Commands
- Working with MEP Toolsets
- Creating Mechanical Designs
- Electrical Design Fundamentals
- YOUTUBE: AutoCAD MEP Tutorial for Beginners
- Plumbing Design Essentials
- Advanced Techniques in AutoCAD MEP
- Collaborating and Sharing MEP Designs
- Customizing Your Workspace and Tools
- Tips, Tricks, and Troubleshooting
How to use AutoCAD MEP for beginners?
To use AutoCAD MEP for beginners, follow these steps:
- Start by opening AutoCAD MEP on your computer.
- Once the software is launched, you will be presented with the AutoCAD MEP user interface.
- Familiarize yourself with the various tools and menus available in AutoCAD MEP. These tools will be used to create, edit, and manipulate mechanical, electrical, and plumbing drawings.
- Begin by creating a new drawing or opening an existing drawing file.
- Use the drawing tools to draw the desired MEP elements such as walls, pipes, ducts, electrical fixtures, etc.
- Refer to the AutoCAD MEP documentation and tutorials for detailed instructions on how to use specific tools and commands.
- Utilize the modify tools to edit and refine your MEP drawings as needed.
- Take advantage of the annotation and dimensioning tools to add labels, dimensions, and other annotations to your drawings.
- Save your work regularly to avoid losing any progress.
- Once you are satisfied with your MEP drawing, you can plot or print it for further use or sharing.
Remember to practice and explore the features of AutoCAD MEP to gain proficiency in using the software.
READ MORE:
Getting Started with AutoCAD MEP
Embarking on your AutoCAD MEP journey starts with understanding the basics. This section aims to guide beginners through initial setup, familiarization with the interface, and the first steps in creating MEP designs.
- Installation: Ensure you have AutoCAD MEP installed on your computer. Follow the installation guide carefully for a smooth setup.
- Exploring the Interface: Familiarize yourself with the AutoCAD MEP workspace. Learn about the toolbars, command line, and how to customize your workspace to your liking.
- Setting Up a New Project: Learn how to set up a new project, including setting drawing units, limits, and working with templates.
- Drawing Basics: Start with simple drawing commands to create your first MEP designs. Practice using lines, arcs, and circles.
- Layer Management: Understand how to use layers to organize your drawings effectively. Learn about creating, modifying, and assigning objects to layers.
- MEP Components: Begin adding MEP components to your designs. Explore the toolsets for mechanical, electrical, and plumbing components.
- Basic Editing Commands: Get to grips with basic editing commands like move, copy, rotate, and scale to refine your designs.
- Saving and Sharing: Learn how to save your work and share your designs with others, ensuring you maintain the integrity of your files.
By following these steps, you\"ll lay a solid foundation for your AutoCAD MEP skills, enabling you to move on to more complex designs and functions with confidence.

Understanding the AutoCAD MEP Interface
The AutoCAD MEP interface is designed to enhance your drafting, design, and documentation workflow for mechanical, electrical, and plumbing (MEP) systems. This section will help you become familiar with the key components and functionalities of the interface.
- Ribbon: The ribbon at the top contains tabs and panels with access to tools and commands for drafting and editing. Each tab is organized by task, such as Insert, Annotate, and Manage.
- Tool Palettes: Tool palettes provide efficient access to tools and content libraries. You can easily drag and drop frequently used elements into your drawings.
- Command Line: Located at the bottom, the command line allows you to input commands directly, offering suggestions and auto-complete features as you type.
- Properties Palette: This palette shows the properties of selected objects and allows for easy modification of object attributes.
- Project Navigator: Essential for managing MEP projects, the Project Navigator lets you organize, view, and navigate through your project\"s drawings and models.
- Workspace Switching: AutoCAD MEP allows you to switch between different workspaces tailored to specific tasks, enhancing productivity by customizing the interface according to your needs.
- Content Browser: Access and manage your content libraries of MEP components, making it easier to find and insert parts into your designs.
Understanding these interface components will streamline your workflow, making it easier to design and document MEP systems efficiently. Take the time to explore each area to fully leverage the capabilities of AutoCAD MEP.
Basic Drawing and Editing Commands
Mastering the basic drawing and editing commands in AutoCAD MEP is crucial for efficiently creating and modifying your MEP designs. This section covers essential commands to kickstart your project.
- Line: Use the \"LINE\" command to draw straight lines. Click to define the start point, then click again to define the end point.
- Polyline: The \"PLINE\" command allows for drawing a series of connected lines and arcs. This is useful for outlining complex shapes.
- Circle: With the \"CIRCLE\" command, you can draw circles by specifying the center point and radius.
- Rectangle: The \"RECTANGLE\" command creates rectangular shapes quickly. Specify the corner points to define the rectangle.
- Trim: Use \"TRIM\" to remove parts of an object that cross a selected cutting edge.
- Extend: The \"EXTEND\" command lengthens objects to meet the edges of another object.
- Move: \"MOVE\" allows you to select and reposition objects within your drawing.
- Copy: With \"COPY\", you can duplicate objects to a specified location.
- Rotate: \"ROTATE\" enables you to turn objects around a base point.
- Scale: Use \"SCALE\" to resize objects, maintaining their proportion.
These basic commands form the foundation of your drafting work in AutoCAD MEP, allowing for the creation and modification of detailed, accurate MEP designs.
Working with MEP Toolsets
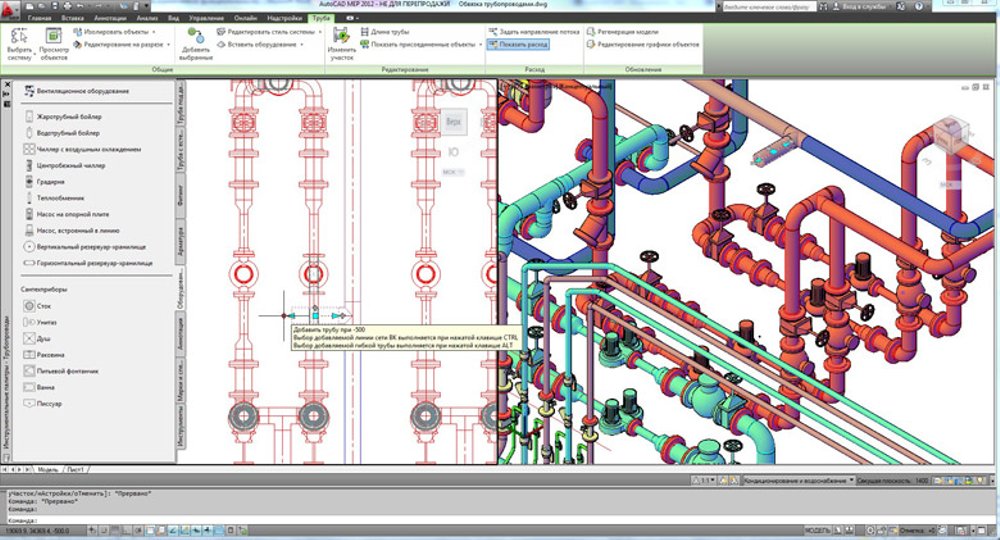
AutoCAD MEP\"s specialized toolsets are designed to enhance productivity in mechanical, electrical, and plumbing design. Understanding how to effectively use these toolsets can significantly improve the efficiency and accuracy of your projects.
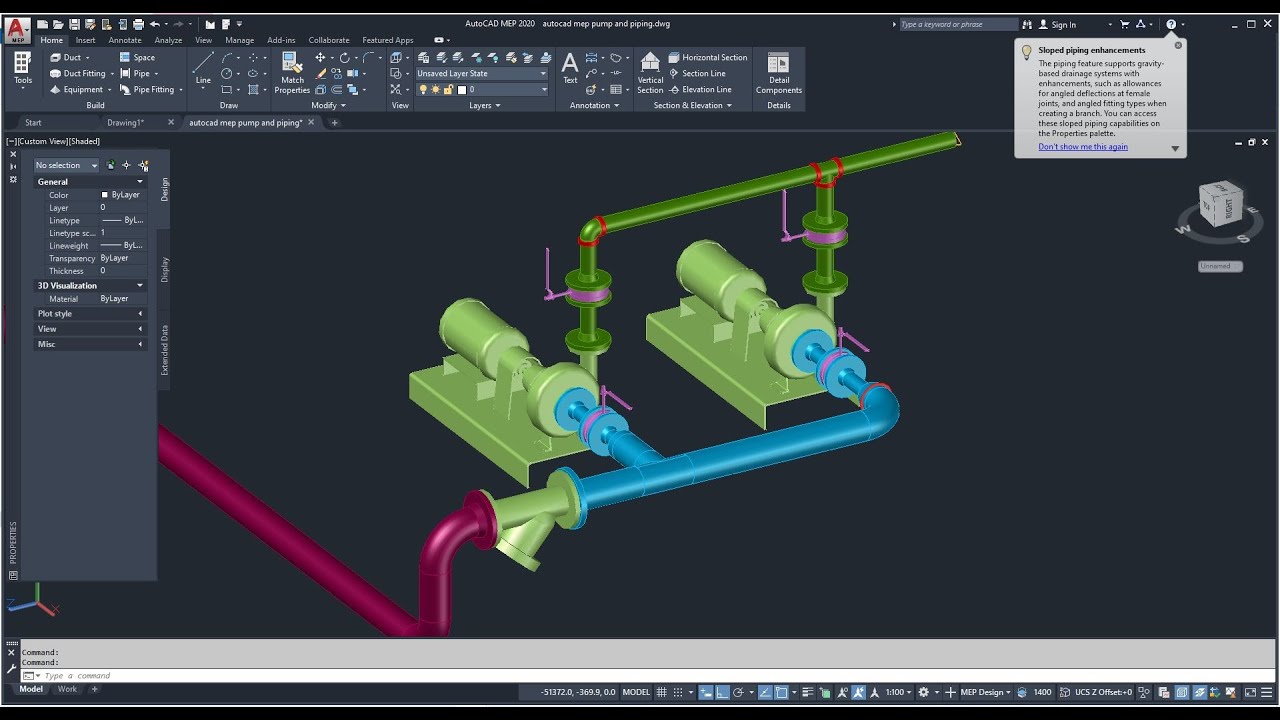
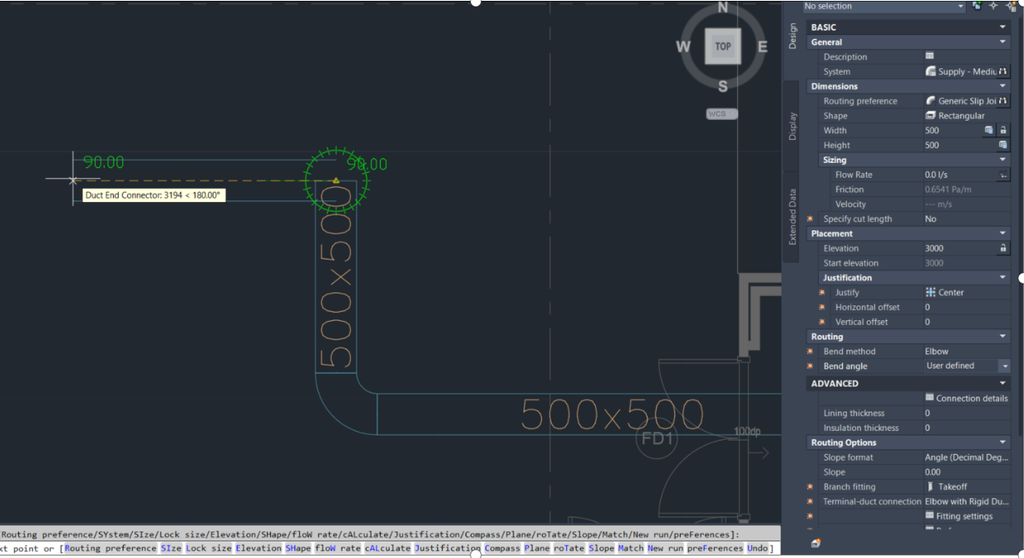
- Mechanical Toolset: This includes tools for designing HVAC systems, creating ductwork layouts, and detailing piping designs. Use the mechanical toolset to insert and connect HVAC components, apply sizing and calculations, and generate detailed schematics.
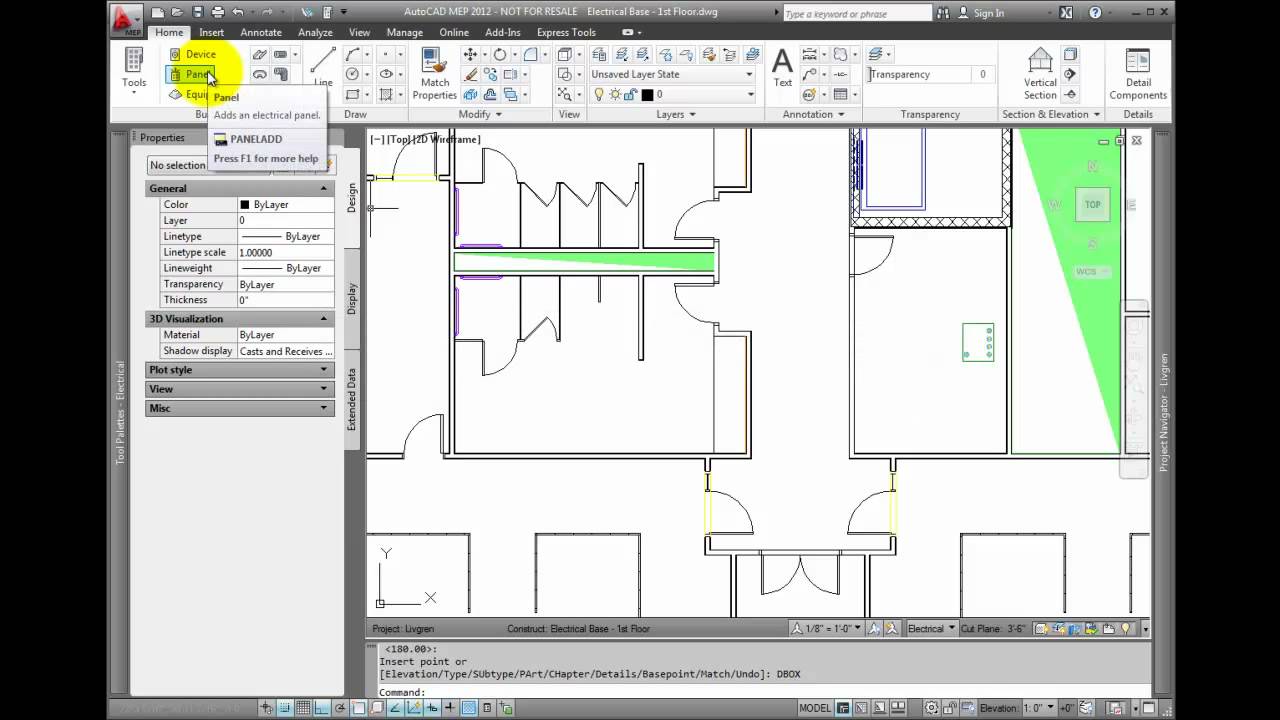
- Electrical Toolset: Offers a comprehensive suite of tools for designing electrical circuits, lighting systems, and power distribution networks. It allows for easy placement of electrical components, automatic wire routing, and the creation of circuit diagrams.
- Plumbing Toolset: Designed for plumbing and piping design, this toolset helps in laying out domestic water systems, drainage, and fire protection systems. Utilize it for inserting plumbing fixtures, designing pipe networks, and generating parts lists.
- Content Libraries: AutoCAD MEP provides extensive libraries of MEP components and symbols, enabling quick insertion and modification of parts in your designs. These libraries are regularly updated to reflect industry standards.
- Automatic Calculations: Leverage the toolsets for automatic calculations related to flow rates, sizing, and load requirements. This ensures that your designs comply with relevant codes and standards.
- Interoperability: These toolsets are designed to work seamlessly with other AutoCAD products and BIM (Building Information Modeling) software, facilitating collaboration and the integration of MEP systems into larger project workflows.
By mastering these toolsets, you can streamline your design process, reduce errors, and ensure that your MEP projects are both efficient and compliant with industry practices.
_HOOK_
Creating Mechanical Designs
Creating mechanical designs in AutoCAD MEP involves a series of steps that help engineers and designers to develop detailed, accurate, and efficient HVAC, piping, and ductwork systems. This section guides you through the process of creating mechanical designs from conceptualization to final detailing.
- Define Project Requirements: Start by understanding the mechanical system requirements, including heating, ventilation, air conditioning, and piping needs for the project.
- Select Components: Utilize AutoCAD MEP\"s extensive library to select the appropriate components for your design, such as ducts, pipes, fittings, and HVAC units.
- Layout Design: Begin laying out your mechanical system using the drawing tools. Consider the spatial arrangement and how different systems interact with each other and the building structure.
- Connect Components: Use the connection tools to connect individual components, ensuring proper alignment and adherence to design standards.
- Size Components: Apply sizing calculations to your components based on load requirements and industry standards to ensure efficiency and compliance.
- Detailing: Add details to your design, including dimensions, annotations, and labeling, to enhance clarity and communicate specific requirements.
- Review and Revise: Review your design for any potential issues or improvements. Utilize AutoCAD MEP\"s analysis tools to simulate and validate your design\"s performance.
- Finalize Design: Once satisfied with the design and its performance, finalize your drawings, preparing them for sharing with stakeholders and integration into the larger project documentation.
By following these steps, you can efficiently create mechanical designs in AutoCAD MEP that meet project requirements and adhere to professional standards, ensuring optimal performance of mechanical systems.

Electrical Design Fundamentals
Electrical design in AutoCAD MEP encompasses the creation of detailed and accurate electrical diagrams, plans, and schematics that outline the electrical system\"s layout, components, and connections. This section introduces the fundamentals of electrical design, providing a foundation for developing comprehensive electrical systems.
- Understanding Electrical Systems: Begin with a solid understanding of electrical principles, including voltage, current, and resistance, and how they apply to building electrical systems.
- Plan the Layout: Plan the layout of electrical components, including outlets, switches, light fixtures, and major appliances, ensuring compliance with codes and standards.
- Selection of Components: Use AutoCAD MEP\"s library to select and insert electrical components into your design, considering their specifications and requirements.
- Wiring Diagrams: Create detailed wiring diagrams to show the connections between different components, including power sources, switches, and fixtures.
- Circuit Design: Design circuits carefully to meet load requirements and avoid overloading. Consider circuit breakers, wire sizes, and the number of devices on each circuit.
- Use of Layers: Organize your electrical design using layers to separate different types of electrical systems and components, enhancing clarity and ease of editing.
- Labeling and Documentation: Label all components and provide detailed documentation, including specifications and installation instructions, to ensure accurate implementation.
- Review and Compliance: Review your electrical design for compliance with local codes and standards, and make necessary adjustments to ensure safety and functionality.
Mastering these fundamentals will enable you to create efficient, safe, and compliant electrical designs using AutoCAD MEP, facilitating the successful execution of electrical projects.

AutoCAD MEP Tutorial for Beginners
\"Take your MEP (Mechanical, Electrical, and Plumbing) skills to the next level with this informative and engaging video. Learn how to optimize building systems and enhance efficiency with the powerful tools and techniques offered by AutoCAD MEP.\"
Plumbing Design Essentials
Plumbing design in AutoCAD MEP involves the strategic planning and detailing of water supply, waste, and vent systems within a building. This section covers the essential steps and considerations for creating effective plumbing designs that ensure functionality, efficiency, and compliance with standards.
- Understanding Plumbing Systems: Gain a solid foundation in the principles of plumbing systems, including water supply, drainage, and venting.
- Layout Planning: Plan the layout of pipes, fixtures, and appliances, ensuring optimal function and adherence to building codes.
- Component Selection: Select appropriate plumbing fixtures and fittings from AutoCAD MEP\"s comprehensive library, considering material, size, and specifications.
- Piping Diagrams: Create detailed piping diagrams to visualize the routing and connections of water supply and waste lines.
- System Calculation: Perform calculations for water supply needs and drainage requirements to ensure the system\"s capacity meets the building\"s demands.
- Layer Management: Utilize layers to organize different aspects of the plumbing design, such as separate layers for hot and cold water, drainage, and venting systems.
- Annotation and Labeling: Clearly annotate and label all elements of the plumbing design, providing detailed information on sizes, lengths, and materials.
- Compliance Check: Review your design for compliance with local and international plumbing codes to ensure safety and functionality.
Mastering these essentials will enable you to design comprehensive plumbing systems using AutoCAD MEP, ensuring that they are efficient, compliant, and meet the needs of the occupants.

Advanced Techniques in AutoCAD MEP
Advancing your skills in AutoCAD MEP enables you to tackle complex projects with efficiency and innovation. This section delves into advanced techniques that can significantly enhance your design and documentation process.
- Dynamic Blocks and Parametric Drawing: Learn to create dynamic blocks with adjustable parameters and constraints to streamline the design of customizable components.
- 3D Modeling and Visualization: Utilize AutoCAD MEP’s 3D modeling tools to create detailed models of MEP systems. Learn to apply visualization techniques for better understanding and presentation of designs.
- Automated Routing and Connection Tools: Master the use of automated routing tools for efficient placement and connection of HVAC, piping, and electrical systems, minimizing manual adjustments.
- Data Extraction and Reporting: Extract data from your models to create detailed reports and schedules. Learn to customize data extraction templates to suit project needs.
- Collaboration with BIM: Integrate AutoCAD MEP designs with BIM software for enhanced collaboration across disciplines. Understand the process of exporting and importing models for interdisciplinary coordination.
- Customization with AutoLISP: Explore how to use AutoLISP to automate repetitive tasks and customize commands and functionalities specific to MEP tasks.
- Advanced Layer Management: Develop strategies for complex layer management to ensure clean, organized, and manageable drawing files, especially for large scale projects.
- Workflow Optimization: Implement workflow optimization techniques, including the use of templates, tool palettes, and command macros to speed up the design process.
By mastering these advanced techniques, you can leverage the full power of AutoCAD MEP, leading to more innovative solutions, improved productivity, and better project outcomes.
Collaborating and Sharing MEP Designs
Effective collaboration and sharing of MEP designs are key to successful project execution. This section outlines strategies and tools in AutoCAD MEP that facilitate seamless collaboration among team members and with stakeholders.
- Utilize AutoCAD MEP\"s Collaboration Tools: Leverage built-in tools for sharing and collaborating on projects, such as the use of Xrefs (external references) to integrate and update drawings from other team members without altering the original files.
- Cloud Storage and Access: Use cloud storage solutions compatible with AutoCAD MEP to store, access, and share project files from anywhere, enabling team members to work collaboratively in real-time.
- Data Linking for Live Updates: Link project data from external databases or Excel sheets that can be updated in real-time, ensuring that all team members have access to the most current information.
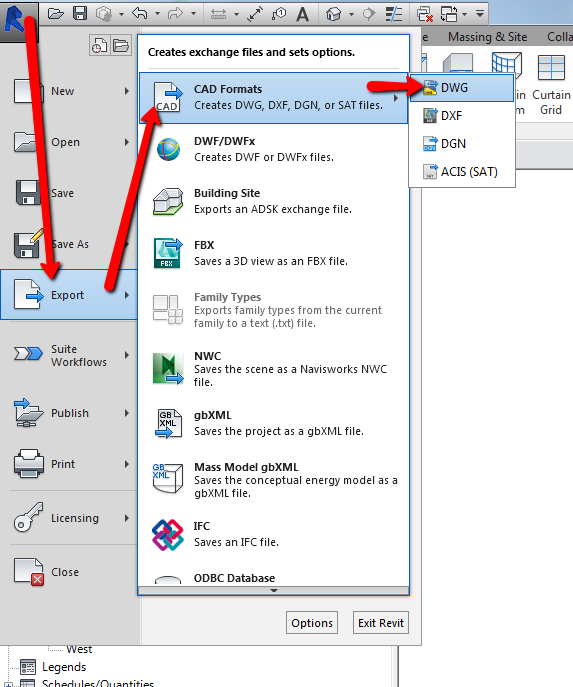
- PDF and DWF Sharing: Export drawings to PDF or DWF formats for easy sharing with stakeholders who may not have AutoCAD MEP, allowing for review, markup, and feedback.
- Use of Sheet Sets: Organize your drawings into sheet sets to streamline the publishing, transmitting, and archiving of project documents, making collaboration more efficient.
- Communication Tools: Incorporate communication tools directly within your design workflow, such as comments and markups, to facilitate clear and effective feedback loops.
- Version Control: Implement version control practices to manage changes and revisions, ensuring that the team is always working on the latest version of the design.
- BIM Integration: For projects involving BIM, use AutoCAD MEP’s BIM interoperability features to share and collaborate on designs with other BIM tools, enhancing coordination across disciplines.
By adopting these collaboration and sharing practices, teams can work more efficiently, reduce errors, and ensure that MEP designs are accurately integrated into the broader project context.
_HOOK_
Customizing Your Workspace and Tools
Customizing your AutoCAD MEP workspace and tools can significantly enhance productivity and comfort, allowing you to tailor the software to fit your specific needs and workflow. This section provides a guide to personalizing your AutoCAD MEP environment.
- Adjusting the User Interface: Start by customizing the user interface through the CUI (Customize User Interface) dialog. Rearrange toolbars, ribbon panels, and command aliases to match your workflow preferences.
- Tool Palettes Customization: Customize tool palettes to include frequently used commands, blocks, and tools. This allows for quick access and streamlines the design process.
- Creating Command Aliases: Create shortcuts for common commands to reduce typing and speed up drawing. Utilize the command alias editor to assign new aliases.
- Customizing Drawing Templates: Set up drawing templates with predefined settings such as drawing units, layer names, and styles. This ensures consistency across projects and saves time on setup.
- Layer Management Strategies: Develop a layer management strategy that suits your projects. Customize layer properties and colors to make identification and selection easier.
- Profile Setup: Save your workspace settings, toolbars, and menus as profiles to easily switch between different workspace configurations or share with others.
- Keyboard Shortcuts: Customize keyboard shortcuts for rapid access to frequently used functions, improving efficiency and reducing reliance on the mouse.
- Macro Recording: Use macro recording for repetitive tasks. Record actions into a script that can be played back to automate tasks, saving time and reducing errors.
By customizing your workspace and tools, you can create a more efficient and comfortable working environment that caters to your unique design approach and project needs.
READ MORE:
Tips, Tricks, and Troubleshooting
Enhancing your efficiency in AutoCAD MEP and overcoming common challenges can be achieved through a set of proven tips, tricks, and troubleshooting strategies. This section aims to equip you with practical advice to streamline your workflow and solve typical issues.
- Layer Management: Utilize layer filters and layer states to manage complex drawings. This helps in quickly isolating or displaying specific systems or components.
- Efficient Use of Commands: Master the use of command shortcuts and the command line for faster drawing and editing. Familiarize yourself with command aliases for increased productivity.
- Block and Tool Palette Organization: Organize blocks and tools in custom palettes for easy access. This reduces search time and increases drawing speed.
- Custom Scripts for Repetitive Tasks: Develop custom scripts for tasks you find yourself repeating. This can save significant amounts of time over the course of a project.
- Regularly Save and Backup: Implement a rigorous save and backup routine to avoid data loss. Consider using cloud storage for real-time backups.
- Error Checking and Validation: Use AutoCAD MEP’s built-in error checking tools to validate designs. This can help catch mistakes early in the design process.
- Use of Reference Drawings: Make use of external references (Xrefs) to keep large projects manageable and reduce file sizes.
- Networking with Community Forums: Engage with AutoCAD MEP forums and user groups for advice and solutions to complex problems. Sharing experiences can provide new insights and shortcuts.
- Staying Updated: Keep your software up to date to benefit from the latest features and bug fixes. Regular updates can significantly impact performance and functionality.
By adopting these tips and tricks, and knowing how to troubleshoot common issues, you can enhance your AutoCAD MEP experience, leading to more efficient and successful project outcomes.
Embark on a journey to mastery with our AutoCAD MEP tutorials, designed to elevate your skills and transform your design approach, ensuring you\"re equipped to tackle any project with confidence and precision.