Topic basic tutorial autocad: Embark on a journey to master AutoCAD with our basic tutorial, designed to empower beginners with the skills to create stunning designs and elevate their drafting expertise effortlessly.
Table of Content
- What are the basic architectural 2D drafting techniques in Autodesk AutoCAD?
- Getting Started with AutoCAD
- User Interface Overview
- Creating Basic 2D Objects
- Modifying 2D Objects
- Introduction to Layers and Object Properties
- Creating Text and Dimensions
- YOUTUBE: AutoCAD Basic Tutorial for Beginners Part 1 of 3
- Advanced Drawing Techniques
- Introduction to 3D Modeling
- Customizing AutoCAD Settings
- Tips for Efficient Workflow
What are the basic architectural 2D drafting techniques in Autodesk AutoCAD?
The basic architectural 2D drafting techniques in Autodesk AutoCAD include:
- Creating a new drawing file in AutoCAD.
- Setting up the drawing units and scale.
- Using the line command to draw basic lines and shapes.
- Using the circle command to draw circles and arcs.
- Using the polyline command to draw complex shapes.
- Using the hatch command to add patterns or textures to an area.
- Using the offset command to create parallel lines and shapes.
- Using the trim and extend commands to modify lines and shapes.
- Using the fillet and chamfer commands to round or bevel corners.
- Using the dimensioning tools to add annotations and measurements.
- Creating and editing blocks to reuse design elements.
- Using layers to organize and control the visibility of objects.
- Creating and managing layouts and viewports for printing or presentation.
- Using external references (Xrefs) to incorporate other drawings into your design.
READ MORE:
Getting Started with AutoCAD
Welcome to the beginning of your journey with AutoCAD, the leading drafting and design software. This section will guide you through the initial steps to get you up and running, ensuring a solid foundation for your AutoCAD skills.
- Install AutoCAD: Ensure you have the latest version installed on your computer. Autodesk often offers a free trial or educational versions for students.
- Understand the AutoCAD Interface: Familiarize yourself with the ribbon, toolbars, command line, and drawing area to navigate efficiently.
- Set Up Your Drawing: Learn how to set drawing units, limits, and use the drawing settings to create a workspace tailored to your project\"s needs.
- Basic Commands: Start with basic commands such as LINE, CIRCLE, RECTANGLE, and POLYLINE to begin drawing.
- Layers: Discover how to create and manage layers, which are crucial for organizing your drawing elements.
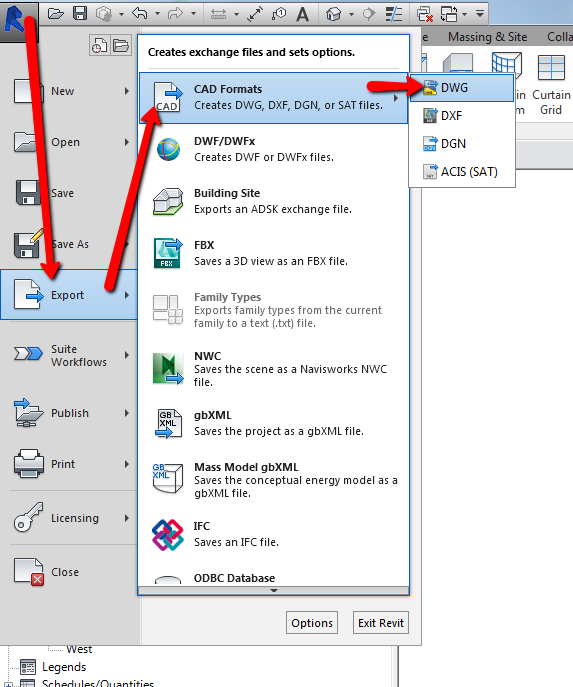
- Saving Your Work: Understand the different file formats and how to save your work effectively.
By following these steps, you\"ll begin to appreciate the power and flexibility of AutoCAD. Remember, practice is key to becoming proficient, so start experimenting with simple designs to build your confidence and skills.

User Interface Overview
The AutoCAD user interface is designed to optimize the drafting and design experience. This overview introduces the key components, helping users navigate and utilize the software efficiently.
- Ribbon: Contains tabs and panels with access to tools and commands organized by task.
- Command Line: Displays prompts, options, and messages. You can enter commands directly.
- Toolbars: Provides quick access to frequently used commands. Can be customized and positioned anywhere within the interface.
- Drawing Area: The main workspace where you create and modify drawings.
- Navigation Bar: Includes tools for panning, zooming, and changing the view of your drawing.
- Model and Layout Tabs: Switch between model space and various layout views.
- Status Bar: Shows the current drawing status, including the active tools and modes.
Understanding the AutoCAD interface is crucial for efficient drawing and editing. Take time to familiarize yourself with each component for a smoother workflow.
Creating Basic 2D Objects
Mastering the creation of basic 2D objects is fundamental to using AutoCAD efficiently. This section walks you through the steps to draw the most common shapes and forms.
- Lines: Use the LINE command to draw straight segments. Click in the drawing area to set the start point, then another click for the end point.
- Circles: With the CIRCLE command, you can specify the center and radius or diameter to create perfect circles.
- Rectangles: RECTANGLE command allows you to draw rectangles by specifying two diagonal corners.
- Polylines: POLYLINE command creates connected sequences of line or arc segments, useful for drawing complex linear shapes.
- Arcs: Use the ARC command by specifying the start point, endpoint, and a point on the arc path to create curved segments.
- Ellipses: ELLIPSE command requires the center, endpoint of one axis, and endpoint of the other axis to draw ellipses.
Each of these basic objects serves as the building blocks for more complex designs. Experiment with these tools to get comfortable with object creation in AutoCAD.

Modifying 2D Objects
After creating basic 2D objects in AutoCAD, the next crucial skill is modifying these objects to refine your designs. This section demonstrates how to use key modification commands effectively.
- Move: Use the MOVE command to change the position of selected objects within your drawing.
- Copy: The COPY command allows you to duplicate selected objects to a new location without altering the original.
- Rotate: ROTATE command lets you pivot selected objects around a base point to a specified angle.
- Scale: With SCALE, you can resize selected objects proportionally from a base point.
- Trim: TRIM command removes specific parts of objects that intersect with other objects.
- Extend: EXTEND lengthens objects to meet the edges of other objects.
- Offset: OFFSET creates parallel copies of objects at a specified distance.
- Mirror: MIRROR command creates a reversed copy of selected objects across a specified axis.
Mastering these modification commands will significantly enhance your drafting efficiency and allow for greater creative exploration in your designs.
_HOOK_
Introduction to Layers and Object Properties
Layers and object properties are fundamental concepts in AutoCAD, allowing for efficient organization and control over your drawings. This section explains how to use layers and adjust object properties to streamline your design process.
- Understanding Layers: Layers organize your drawing by separating different elements, such as electrical layouts, plumbing, and structural details. Each layer can be independently turned on or off, locked, or frozen.
- Creating and Managing Layers: Learn to create new layers and assign colors, linetypes, and lineweights. Managing layers effectively can drastically improve the readability and editability of your drawing.
- Object Properties: Each object in AutoCAD has properties such as color, linetype, lineweight, and transparency. These properties can be set by layer or individually for each object.
- Modifying Object Properties: Use the Properties palette or the Layer Properties Manager to change the attributes of selected objects or layers to meet specific design criteria.
- Utilizing Layer States: Save and restore layer configurations to quickly switch between different views of your drawing, facilitating easier presentation and editing.
By mastering layers and object properties, you can enhance your workflow, making your drawings more organized and adaptable to changes.

Creating Text and Dimensions
Adding text and dimensions to your AutoCAD drawings is crucial for communicating design intent and specifications. This section guides you through the process of incorporating these elements effectively.
- Adding Text: Use the TEXT command to create single-line text or MTEXT for multiline text. Specify the insertion point, font, size, and alignment.
- Formatting Text: The Text Style dialog box allows you to define text styles, including font type, height, and width factor, to ensure consistency throughout your drawing.
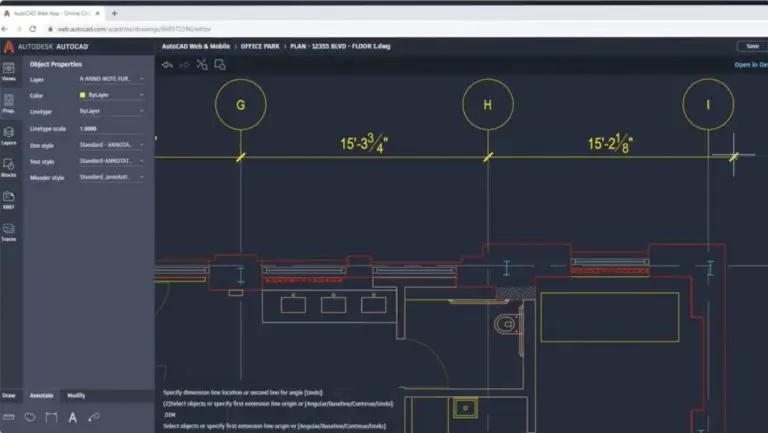
- Creating Dimensions: The DIM command suite offers a variety of dimensioning tools, including linear, radial, angular, and ordinate dimensions. Each tool automatically calculates and displays measurements based on your drawing geometry.
- Dimension Styles: Use the Dimension Style Manager to create and manage dimension styles, ensuring uniformity in how measurements are displayed.
- Editing Text and Dimensions: Easily modify text and dimensions using grips for quick adjustments or the Properties palette for more detailed changes.
Effectively using text and dimensions not only enhances the readability of your drawings but also facilitates accurate communication between all stakeholders involved in a project.

AutoCAD Basic Tutorial for Beginners Part 1 of 3
\"Discover the incredible world of AutoCAD with our comprehensive tutorial! From basic commands to advanced techniques, this video will empower you to create stunning designs with ease. Explore the endless possibilities and unleash your inner creative genius – watch now!\"
AutoCAD Complete Tutorial for Beginners Full tutorial 1h40m
\"Ready to become an AutoCAD pro? Our step-by-step tutorial is here to guide you every step of the way. Whether you\'re a beginner or looking to sharpen your skills, this video has got you covered. Join us on this educational journey and unlock the full potential of AutoCAD today!\"
Advanced Drawing Techniques
As you grow more comfortable with AutoCAD\"s basic functionality, exploring advanced drawing techniques can unlock new possibilities for your designs. This section delves into sophisticated methods that can enhance your projects.
- Using Blocks and Attributes: Learn to create, insert, and manage blocks to streamline your workflow and attribute data to add dynamic information to block instances.
- Advanced Text Options: Explore fields, tables, and annotative text to automate and scale text for different drawing scales.
- Dynamic Blocks: Create blocks with adjustable parameters and actions to reduce the number of block definitions needed for similar objects.
- Layer Management and Filters: Utilize advanced layer management techniques, including layer filters and layer states, to efficiently control the visibility and appearance of your drawings.
- Custom Linetypes and Hatch Patterns: Customize linetypes and hatch patterns to convey specific types of information or to adhere to company standards.
- Parametric Constraints: Apply geometric and dimensional constraints to maintain relationships between drawing geometry as edits are made.
- External References (Xrefs): Attach other drawings as Xrefs to reference their content without adding it directly to your working drawing, facilitating collaboration and reducing file sizes.
Mastering these advanced techniques can significantly improve your efficiency and the quality of your drawings, making AutoCAD an even more powerful tool in your design arsenal.

Introduction to 3D Modeling
Transitioning from 2D drafting to 3D modeling in AutoCAD opens up a new dimension of design possibilities. This section introduces the basics of 3D modeling, helping you to start creating complex three-dimensional objects and environments.
- Understanding 3D Space: Familiarize yourself with navigating the 3D workspace, including using the ViewCube and steering wheels for orbiting, panning, and zooming.
- Simple 3D Objects: Begin with creating basic 3D shapes such as boxes, spheres, cylinders, cones, and pyramids using the solid primitives commands.
- Modifying 3D Objects: Learn to modify 3D objects with commands like EXTRUDE, REVOLVE, SWEEP, and LOFT to create more complex forms.
- 3D Navigation: Master the 3D navigation tools to efficiently move around your models and view them from different angles.
- Working with Meshes: Explore the creation and editing of mesh models, which offer more flexibility in shaping and sculpting objects.
- Applying Materials: Add materials to your 3D models to give them realistic textures and colors.
- Rendering: Introduction to rendering techniques to create photorealistic images of your models, enhancing the presentation and visualization of your designs.
By understanding these foundational elements of 3D modeling in AutoCAD, you can start to bring your architectural, engineering, and design visions to life in exciting new ways.
Customizing AutoCAD Settings
Personalizing AutoCAD settings can significantly enhance your productivity and create a more efficient drafting environment. This section covers key customization options to tailor AutoCAD to your preferences and workflow.
- Workspace Configuration: Customize your workspace by adjusting the ribbon, toolbars, and palettes to access your most-used tools quickly.
- Command Aliases: Edit command aliases through the Edit Aliases (PGP) file to create keyboard shortcuts for frequently used commands, streamlining your workflow.
- Mouse Buttons: Configure mouse buttons to perform specific commands or access certain tools, reducing the need to switch between the keyboard and mouse.
- Snapping and Grid Settings: Adjust snapping and grid settings to match the precision required for your projects, facilitating easier alignment and placement of objects.
- Template Files: Create and modify template files with pre-set layers, styles, and settings to start new projects efficiently, ensuring consistency across your drawings.
- Plotting and Publishing Settings: Customize plotting and publishing settings for high-quality outputs, including paper sizes, plot styles, and file formats.
- System Variables: Tweak system variables to alter the behavior of AutoCAD\"s drawing environment, affecting how drawings are displayed and managed.
By customizing AutoCAD settings, you can streamline your design process, making it more responsive to your individual needs and preferences.

_HOOK_
READ MORE:
Tips for Efficient Workflow
Adopting efficient workflow strategies in AutoCAD can significantly reduce design time and increase productivity. Here are some expert tips to enhance your drafting process.
- Use Keyboard Shortcuts: Memorize and utilize keyboard shortcuts for common commands to speed up your work without constantly navigating the toolbars.
- Organize with Layers: Keep your drawings organized by using layers effectively. Assign specific colors, linetypes, and lineweights to different layers to differentiate elements of your design easily.
- Master the Command Line: The command line is a powerful tool in AutoCAD. Become familiar with command aliases and options to streamline your drawing process.
- Customize Tool Palettes: Create custom tool palettes for the commands and blocks you use most frequently to access them quickly.
- Save and Use Templates: Develop template files with predefined settings such as drawing units, layers, and styles to start new projects efficiently.
- Regularly Save Your Work: Set up AutoCAD to automatically save your work at regular intervals to prevent data loss.
- Utilize External References: Use external references (Xrefs) to insert other CAD files into your current drawing. This method keeps file sizes manageable and ensures that all references are up to date.
- Practice Clean Drawing Habits: Regularly purge unused objects and layers to keep your file size down and performance up.
Implementing these tips can lead to a more streamlined and efficient workflow, allowing you to focus more on design and less on the mechanics of AutoCAD.
Embarking on the AutoCAD learning journey opens a world of creative possibilities. Whether you\"re drafting detailed designs or modeling complex 3D structures, this guide aims to equip you with the foundational skills needed for success.