Topic drawing recovery autocad: Discover how to effortlessly recover your AutoCAD drawings with our guide, ensuring your designs remain safe and intact. Learn the essential steps for quick and efficient drawing recovery.
Table of Content
- How to recover a drawing in AutoCAD after a program or system failure?
- Overview of Drawing Recovery Manager
- Steps to Use the Drawing Recovery Manager
- Using the RECOVER Command to Repair Corrupt Files
- How to Restore a Drawing from a Backup File (BAK)
- Dealing with AutoSave Files for Recovery
- Understanding and Managing DWL and DWL2 Files
- YOUTUBE: AutoCAD Drawing Recovery Manager Tutorial
- Optimizing Drawing Files: PURGE and AUDIT Commands
- Troubleshooting Common Recovery Issues
- Preventive Measures to Avoid Drawing Corruption
- External References (XREF) and Drawing Recovery
How to recover a drawing in AutoCAD after a program or system failure?
To recover a drawing in AutoCAD after a program or system failure, you can follow these steps:
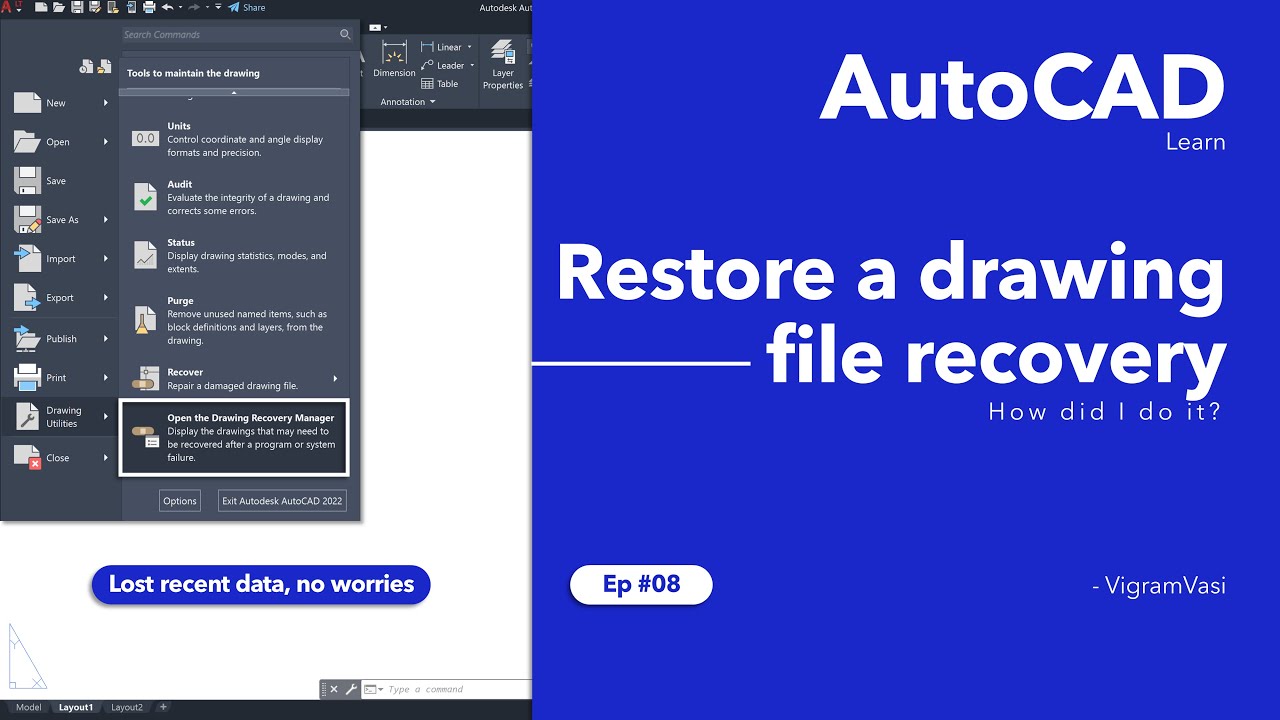
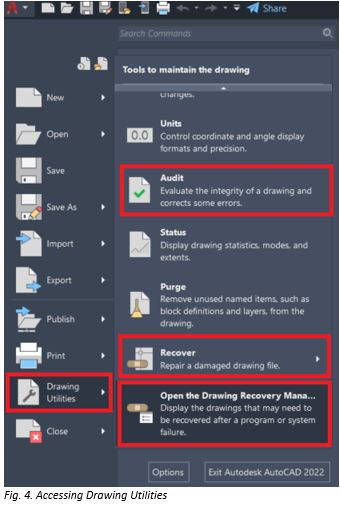
- Open AutoCAD and go to the \"File\" menu.
- Select the \"Drawing Utilities\" option.
- From the drop-down menu, choose \"Recover\" to open the drawing recovery manager.
- In the drawing recovery manager, you will see a list of any recoverable drawings. These are the drawings that were open at the time of the failure.
- Select the drawing you want to recover.
- Click the \"Open\" button to open the selected drawing.
- AutoCAD will attempt to recover the drawing. Once the recovery process is complete, the drawing will open in AutoCAD.
- Save the recovered drawing with a new filename to ensure you have a usable version.
By following these steps, you should be able to recover a drawing in AutoCAD after a program or system failure.
READ MORE:
Overview of Drawing Recovery Manager
The Drawing Recovery Manager in AutoCAD is an essential feature designed to assist users in recovering their work after a program crash or unexpected shutdown. This powerful tool automatically saves backup copies of open drawings, ensuring that you can quickly restore your work with minimal loss. Here\"s how it functions and how you can leverage it for effective drawing recovery:
- Accessing the Drawing Recovery Manager: You can open the Drawing Recovery Manager by searching for it in the application menu or using the command line.
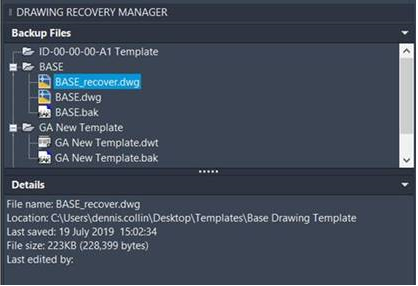
- Understanding the Interface: The manager lists all recovered drawings, organized by the date and time of recovery. Each entry provides details about the drawing, including its name and the last time it was saved.
- Recovering Files: To recover a drawing, simply select it from the list and open it. AutoCAD will load the most recent autosave or backup file available.
- Reviewing and Saving: After opening a recovered file, review it carefully to ensure that all necessary data is intact. Then, save the drawing under a new file name to preserve the recovered data.
By familiarizing yourself with the Drawing Recovery Manager, you can significantly reduce the risk of losing important work due to software crashes or other unforeseen events. Remember to regularly save your work and take advantage of AutoCAD\"s autosave feature for added security.

Steps to Use the Drawing Recovery Manager
Utilizing the Drawing Recovery Manager in AutoCAD streamlines the process of retrieving unsaved or corrupted drawings, ensuring that your design efforts are not lost. Follow these detailed steps to navigate and use the Drawing Recovery Manager effectively:
- Open AutoCAD: Start by launching AutoCAD. If the program closed unexpectedly, the Drawing Recovery Manager should automatically appear.
- Manually Access: If the Recovery Manager doesn\"t start automatically, type \"DRAWINGRECOVERY\" in the command line to open it manually.
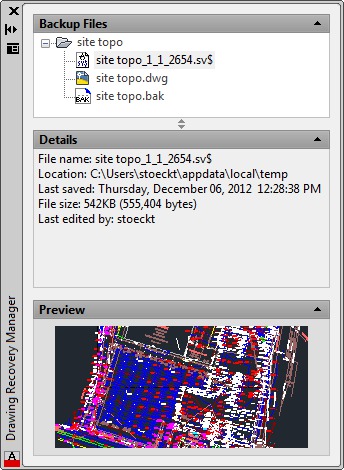
- Review Available Files: The manager will display a list of drawings that have been autosaved. Each file will be associated with its autosave timestamp, allowing you to choose the most recent or appropriate version.
- Select a Drawing: Click on the drawing you wish to recover. You\"ll see options to open, save, or delete the backup and autosave files associated with that drawing.
- Open and Inspect: Open the selected drawing to review its content. Ensure that all elements are as expected and that no data is missing or corrupted.
- Save the Drawing: After ensuring the drawing is correct, save it to a new file to prevent overwriting any existing files. This step is crucial for preserving the recovered data.
- Backup and Autosave Settings: Consider adjusting your AutoCAD settings to optimize the frequency and location of autosave files, enhancing your future recovery options.
Following these steps, the Drawing Recovery Manager becomes a valuable tool in safeguarding your AutoCAD projects against unexpected data loss, enabling a more secure and efficient design workflow.
Using the RECOVER Command to Repair Corrupt Files
The RECOVER command in AutoCAD is a powerful tool designed to fix corrupt drawing files, ensuring that your work is not lost due to file corruption. Here\"s how to use the RECOVER command to attempt repairs on damaged files:
- Launch AutoCAD: Open your AutoCAD application to begin the recovery process.
- Initiate the RECOVER Command: Type \"RECOVER\" in the command line or access it through the File menu.
- Select the Corrupt File: A dialog box will appear prompting you to select the corrupt drawing file you wish to repair. Navigate to the file\"s location, select it, and click \"Open\".
- AutoCAD Repairs the File: AutoCAD will then analyze and attempt to fix any errors found within the file. This process may take some time depending on the file\"s size and the extent of corruption.
- Review the Repaired File: Once the process is complete, the repaired drawing will open automatically. Thoroughly check the drawing to ensure that all elements and data are intact and correctly restored.
- Save the Drawing: If the recovery is successful and the drawing appears to be correct, save it immediately to a new file to avoid overwriting any existing data. This step is critical to preserving your recovered work.
Using the RECOVER command can be a straightforward solution for addressing file corruption. While it may not resolve all issues, it serves as a vital first step in salvaging valuable AutoCAD drawings.
How to Restore a Drawing from a Backup File (BAK)
AutoCAD automatically creates BAK files as backups for your drawings, offering a safety net in case of accidental data loss. Restoring a drawing from a BAK file is a straightforward process. Here\"s how to do it:
- Locate the BAK File: Find the BAK file associated with your drawing. It\"s usually located in the same folder as your DWG file and has the same name with a .bak extension.
- Rename the BAK File: Change the file extension from .bak to .dwg. This can be done by right-clicking on the file, selecting \"Rename,\" and then changing the extension.
- Open the Renamed File in AutoCAD: Double-click the newly renamed DWG file or open AutoCAD and navigate to the file through the \"Open\" dialog.
- Review the Drawing: Once the file is open in AutoCAD, review it thoroughly to ensure that all necessary elements and data are intact.
- Save the Restored Drawing: If the drawing looks correct, save it. Consider saving it under a new name or location to prevent any accidental overwrites or data loss.
This method can be a lifesaver, especially when dealing with unexpected data loss or corruption. Regularly checking and managing your backup files can significantly reduce the risk of losing valuable work.

_HOOK_
Dealing with AutoSave Files for Recovery
AutoCAD automatically creates BAK files as backups for your drawings, offering a safety net in case of accidental data loss. Restoring a drawing from a BAK file is a straightforward process. Here\"s how to do it:
- Locate the BAK File: Find the BAK file associated with your drawing. It\"s usually located in the same folder as your DWG file and has the same name with a .bak extension.
- Rename the BAK File: Change the file extension from .bak to .dwg. This can be done by right-clicking on the file, selecting \"Rename,\" and then changing the extension.
- Open the Renamed File in AutoCAD: Double-click the newly renamed DWG file or open AutoCAD and navigate to the file through the \"Open\" dialog.
- Review the Drawing: Once the file is open in AutoCAD, review it thoroughly to ensure that all necessary elements and data are intact.
- Save the Restored Drawing: If the drawing looks correct, save it. Consider saving it under a new name or location to prevent any accidental overwrites or data loss.
This method can be a lifesaver, especially when dealing with unexpected data loss or corruption. Regularly checking and managing your backup files can significantly reduce the risk of losing valuable work.

Understanding and Managing DWL and DWL2 Files
DWL and DWL2 files are temporary lock files created by AutoCAD to manage and secure access to drawing files (DWG) while they are being edited. When a drawing is opened in AutoCAD, DWL and DWL2 files are automatically generated to prevent simultaneous editing by multiple users, ensuring that no data loss or corruption occurs. Here\"s how to effectively manage these files:
- Recognizing DWL and DWL2 Files: DWL files serve as a lock marker for the current session, indicating that the file is in use. DWL2 files, on the other hand, contain additional information such as the username of the person editing the file and the machine name being used.
- What Happens When AutoCAD Crashes: Under normal circumstances, when you close a drawing file properly, AutoCAD automatically deletes the associated DWL and DWL2 files. However, if AutoCAD crashes or closes unexpectedly, these files remain in the folder, indicating that the file may still be open or in use.
- Deleting DWL and DWL2 Files: If you find DWL and DWL2 files without the corresponding AutoCAD application running, it is safe to manually delete these files. This action is necessary to unlock the drawing, allowing it to be opened for editing again. Always ensure that AutoCAD is not running and the DWG file is not open in another instance before deleting these files.
- Recovering After a Crash: In the event of an AutoCAD crash, after deleting the DWL and DWL2 files, you can attempt to reopen your DWG file. If issues persist, consider using the RECOVER command to repair any corrupt files.
- Preventive Measures: To avoid frequent crashes and the resultant hassle of dealing with DWL and DWL2 files, practice regular file saves, use the AUTOSAVE feature, and maintain a clean working environment within AutoCAD. Regularly purging unused blocks, layers, and other elements can also help in minimizing file corruption and performance issues.
Understanding the function and management of DWL and DWL2 files is crucial for maintaining the integrity of your AutoCAD projects. By following the best practices outlined above, you can ensure a smoother workflow and reduce the risk of drawing file corruption.
AutoCAD Drawing Recovery Manager Tutorial
Looking to learn something new? This tutorial video is packed with easy-to-follow instructions and helpful tips that will quickly turn you into an expert in no time. Don\'t miss out!
Easy and Fast AutoCAD File Recovery: DWG, SV$, BAK, Autosave, Backup File
Lost important files? Don\'t panic! This file recovery video will guide you step-by-step on how to retrieve your precious data. With clear explanations and proven methods, you\'ll be able to recover your files like a pro. Watch now to save the day!
Optimizing Drawing Files: PURGE and AUDIT Commands
AutoCAD\"s PURGE and AUDIT commands are essential tools for optimizing drawing files, ensuring efficient performance, and reducing file sizes by cleaning up unnecessary data. Here\"s how to effectively use these commands:
- Using the PURGE Command:
- The PURGE command helps remove unused objects like blocks, layers, linetypes, and text styles from your drawing. This action declutters the drawing and can significantly reduce file size, leading to improved performance. To use the PURGE command:
- Type PURGE in the command line and press Enter.
- A dialog box will appear, listing all removable items. You can select individual items to purge or choose \"Select All\" to remove all unused objects.
- Click \"Purge Checked Items\" to clean up the drawing.
- You may need to repeat the purge process to remove nested items that become unused after the initial purge.
- Using the AUDIT Command:
- The AUDIT command checks the drawing for errors and inconsistencies, offering an option to fix them automatically. This command is crucial for maintaining the integrity of your drawing files. To use the AUDIT command:
- Type AUDIT in the command line and press Enter.
- When prompted, type Y to fix any detected errors, then press Enter. AutoCAD will then audit the file and repair errors.
- Regular Maintenance:
- Regularly using the PURGE and AUDIT commands can help maintain the health of your AutoCAD drawings. It is a good practice to use these commands before saving and closing your files to ensure they are optimized and error-free.
By incorporating the PURGE and AUDIT commands into your regular workflow, you can enhance the performance of AutoCAD, reduce file sizes for easier sharing and storage, and ensure the integrity and reliability of your drawing files.
Troubleshooting Common Recovery Issues
AutoCAD users may encounter common issues when attempting to recover drawing files. These problems can range from simple file access issues to more complex data corruption scenarios. Here\"s a guide to troubleshooting and resolving some of the most frequent recovery challenges:
- Unable to Open Drawing Files:
- If you\"re unable to open a drawing file, first check if a DWL or DWL2 file exists in the same directory, indicating the file is locked. Deleting these lock files can resolve access issues. If the problem persists, use the RECOVER command to attempt file repair.
- Missing Changes After a Crash:
- AutoCAD\"s AutoSave feature periodically saves a copy of your work. If you lose changes after a crash, check the automatic save folder for SV$ files that can be renamed to DWG and recovered.
- Corrupt Drawing Files:
- For corrupt drawing files, the RECOVER command is the first line of defense. It scans the file for errors and attempts to fix them. If RECOVER does not work, try inserting the file into a new drawing using the INSERT command, which can sometimes bypass corruption.
- Errors When Opening Files:
- Errors during file opening can often be fixed by running the AUDIT command after using RECOVER. AUDIT checks for and fixes logical errors in the drawing database.
- File Performance Issues:
- Large or complex files may experience performance issues. Use the PURGE command to remove unused objects from the drawing, and consider using the -PURGE command to clean up regapps (registered applications) that can bloat file size and slow performance.
- Recovering Data from Temporary Files:
- In cases of unexpected shutdowns, AutoCAD may have temporary files (.ac$ or .sv$) that can be recovered. Locate these files in the temp folder and rename the extension to .dwg to see if your unsaved work can be recovered.
- Dealing with External References (Xrefs) Issues:
- Recovery issues involving external references (Xrefs) may require detaching and reattaching the Xrefs, or using the RECOVERALL command, which recovers the main drawing and all attached Xrefs.
When dealing with recovery issues, patience and a systematic approach to troubleshooting can help restore your work and get you back on track. Always maintain regular backups and consider using cloud storage or AutoCAD\"s automatic save features to minimize data loss.

Preventive Measures to Avoid Drawing Corruption
To ensure the integrity and longevity of your AutoCAD drawings, adopting preventive measures against drawing corruption is essential. Drawing corruption can lead to data loss, wasted time, and significant frustration. Here are strategies to minimize the risk:
- Regularly Save and Backup Your Work:
- Make frequent saves and maintain regular backups of your drawings. Utilize AutoCAD\"s automatic save feature to create temporary save files (.sv$) that can be recovered in case of a crash.
- Maintain a Clean Drawing Environment:
- Use the PURGE command to remove unused objects and the AUDIT command to check for and repair errors. This not only reduces file size but also minimizes the risk of corruption.
- Avoid Unnecessary Complexities:
- Keep your drawings as simple as possible. Excessive layering, overly complex block definitions, and unnecessary annotation can increase file size and the risk of corruption.
- Use Trusted Sources:
- Be cautious about importing content from untrusted sources. Blocks, drawings, and other content from external sources can sometimes introduce errors or corrupt elements into your files.
- Keep Software and Hardware Updated:
- Ensure your AutoCAD software and your computer\"s operating system are up to date. Using outdated software or hardware can lead to compatibility issues and increase the risk of drawing corruption.
- Split Large Drawings:
- For very large or complex drawings, consider splitting them into smaller, more manageable files. This can improve performance and reduce the chances of file corruption.
- Optimize External References (Xrefs):
- Ensure that external references are correctly attached and optimized. Regularly audit and purge unnecessary data from Xrefs to maintain drawing health.
- Monitor System Health:
- Regular maintenance of your computer\"s hard drive, such as disk checks and defragmentation, can prevent system errors that might lead to drawing corruption.
By implementing these preventative measures, you can significantly reduce the risk of drawing corruption in AutoCAD, ensuring your data remains safe and your workflow uninterrupted.

_HOOK_
READ MORE:
External References (XREF) and Drawing Recovery
External References (XREFs) in AutoCAD are crucial for managing large projects by linking separate drawing files without embedding them directly into the working file. This method keeps the main drawing lightweight and facilitates easier updates. However, XREFs can complicate drawing recovery processes due to their dependencies. Here\"s how to handle XREF-related recovery issues effectively:
- Identifying Missing XREFs:
- If an XREF is missing, AutoCAD will display a warning upon opening the drawing. Check the External References palette to identify which files are missing and either re-path or reattach them as needed.
- Recovering Corrupted XREFs:
- Use the RECOVER command on individual XREF files to fix corruption. If an XREF cannot be recovered, you may need to restore it from a backup or recreate the file.
- Detaching and Reattaching XREFs:
- If a drawing with XREFs behaves unexpectedly, detaching and reattaching the XREFs can sometimes resolve the issue. This refreshes the links and can clear up any path-related problems.
- Using the XREF Bind Feature:
- In situations where an XREF needs to become a permanent part of the drawing, the BIND command converts the XREF into a block within the drawing. This can be useful for archiving or sharing a self-contained file.
- Managing XREF Paths:
- Path issues are common with XREFs, especially when files are moved. Using relative paths for XREFs can help avoid broken links when sharing files between systems or users. The Reference Manager tool can assist in updating multiple XREF paths simultaneously.
- Backup and AutoSave Features:
- Ensure AutoCAD\"s automatic save feature is enabled to create backup (.bak) and autosave (.sv$) files. These can be lifesavers for recovering not just the main drawing but also any associated XREFs in the event of a crash.
Effectively managing XREFs requires diligence in maintaining clean file paths, regular backups, and understanding how to utilize AutoCAD\"s recovery and binding tools. By following these practices, you can minimize disruptions and ensure the integrity of your projects.
Mastering drawing recovery in AutoCAD ensures your projects remain resilient against data loss. Embrace these strategies to safeguard your work, streamline your workflow, and maintain project integrity, setting the foundation for successful and stress-free design endeavors.