Topic drawing on autocad: Embark on a journey to master AutoCAD, the premier drafting software, and unlock your potential to create stunning, precise drawings with ease and confidence.
Table of Content
- How can I learn to draw on AutoCAD with step-by-step lessons and practice exercises?
- Getting Started with AutoCAD
- Basic Drawing and Editing Commands
- Creating Precise 2D & 3D Drawings
- Understanding the AutoCAD Interface
- Using Layers, Blocks, and Xrefs in Drawings
- Advanced Drawing Techniques
- YOUTUBE: Wrench in AutoCAD Practice Drawing
- Dimensioning and Annotation for Clarity
- Plotting and Printing Your Drawings
- AutoCAD Shortcuts and Efficiency Tips
- Collaborating and Sharing Drawings
- Navigating the AutoCAD Web and Mobile App
How can I learn to draw on AutoCAD with step-by-step lessons and practice exercises?
Learning to draw on AutoCAD can be done through step-by-step lessons and practice exercises. Here are some steps you can follow:
- Start by accessing the AutoCAD web app, which is included when you subscribe to AutoCAD and AutoCAD LT.
- Once you have access to AutoCAD, you can begin learning through video lessons and quizzes.
- Look for resources that offer free step-by-step lessons. There are websites and online courses that provide this type of instruction.
- Utilize practice exercises to reinforce what you have learned. These exercises often come with fully dimensioned drawings that you can download.
By following these steps and consistently practicing, you can improve your drawing skills on AutoCAD.
READ MORE:
Getting Started with AutoCAD
AutoCAD is a powerful drafting and design software that engineers, architects, and professionals worldwide use to create precise 2D and 3D drawings. Starting with AutoCAD can seem overwhelming, but with the right approach, it becomes an invaluable tool for your design projects.
- Install AutoCAD: Begin by downloading and installing AutoCAD from the official Autodesk website, ensuring you meet the system requirements.
- Explore the Interface: Familiarize yourself with the AutoCAD workspace and user interface. Learn about the ribbon, toolbars, command line, and drawing area.
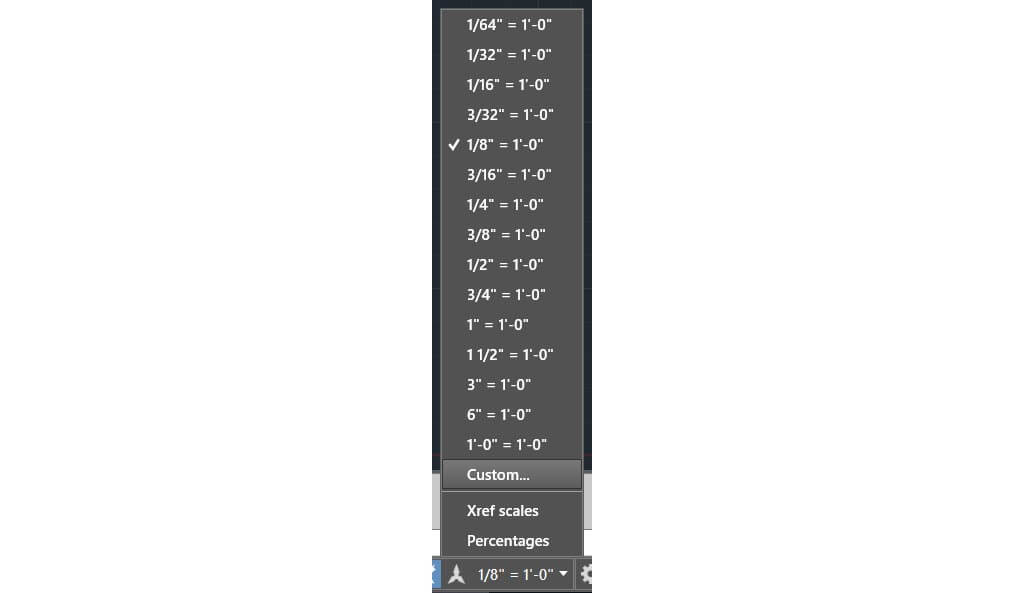
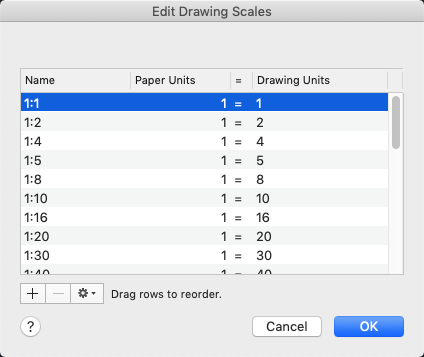
- Set Up Your Drawing Environment: Configure your drawing settings, including units, drawing limits, and scales, to match the requirements of your project.
- Learn Basic Commands: Practice basic commands like LINE, CIRCLE, RECTANGLE, and ARC. Understand how to use the command line effectively.
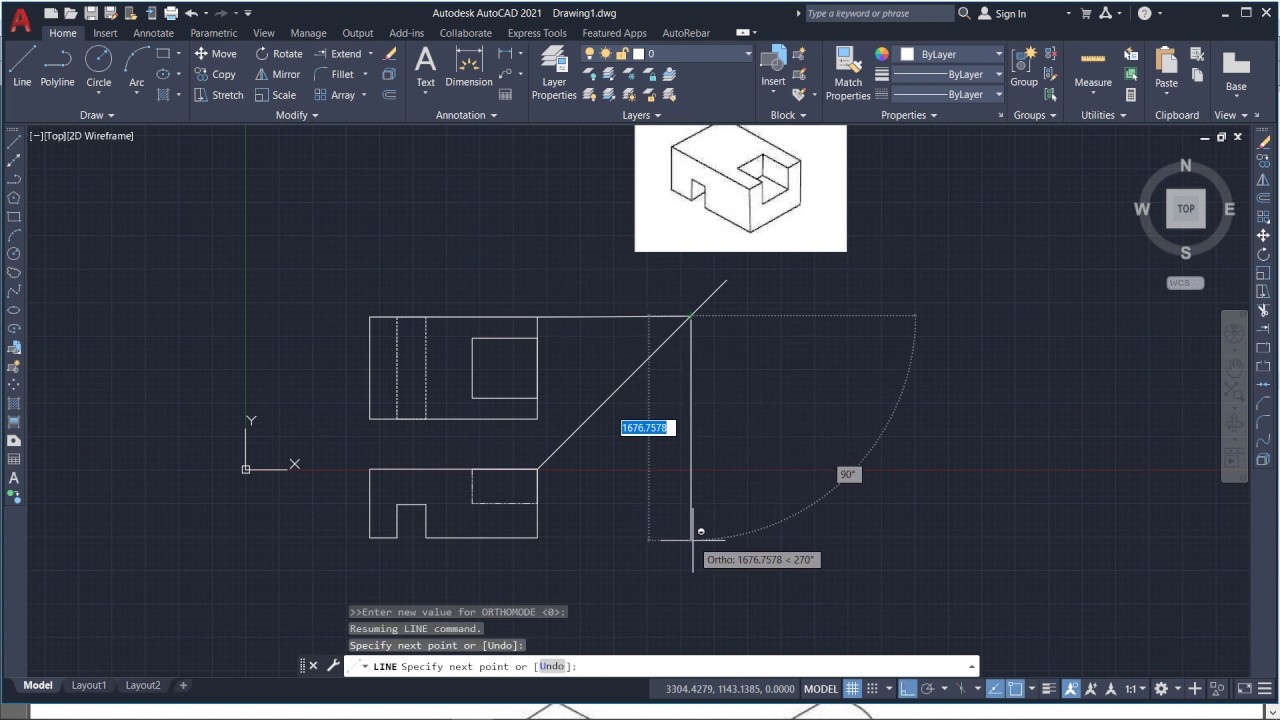
- Practice Precision Drawing: Use object snaps, grid, and ortho mode to draw precisely. Mastering these tools is crucial for creating accurate designs.
- Create Your First Drawing: Apply what you\"ve learned by creating a simple drawing. Use layers to organize different elements of your drawing.
- Save and Manage Your Drawings: Learn how to save, open, and manage your AutoCAD files. Familiarize yourself with different file formats like DWG and DXF.
As you become more comfortable with AutoCAD, explore more advanced features and techniques to enhance your productivity. Remember, practice and patience are key to becoming proficient in AutoCAD.

Basic Drawing and Editing Commands
Mastering the basic drawing and editing commands in AutoCAD is essential for creating detailed and accurate designs. This section introduces the fundamental commands and techniques to get you started.
- LINE: Draws straight lines. Command: LINE or L. Click two points to define the line segment.
- CIRCLE: Creates circles. Command: CIRCLE or C. Specify the center and then the radius.
- RECTANGLE: Draws rectangles. Command: RECTANGLE or REC. Click two points to define opposite corners.
- POLYLINE: Draws connected lines and arcs. Command: POLYLINE or PL. Click to define start point, then subsequent points.
- ARC: Creates arcs. Command: ARC. Specify start, center, and end points.
- ERASE: Removes objects. Command: ERASE or E. Select the objects to erase.
- TRIM: Trims objects to meet the edges of other objects. Command: TRIM or TR. Select cutting edges, then the objects to trim.
- EXTEND: Extends objects to meet the edges of other objects. Command: EXTEND or EX. Select boundary edges, then the objects to extend.
- COPY: Duplicates objects. Command: COPY or CO. Select objects to copy and specify the base point and second point.
- MIRROR: Creates a mirrored copy of objects. Command: MIRROR or MI. Select objects, then define two points for the mirror line.
- MOVE: Moves objects. Command: MOVE or M. Select objects and then specify the base point and second point.
- ROTATE: Rotates objects. Command: ROTATE or RO. Select objects, specify the base point, then the angle of rotation.
These commands are the building blocks for creating and modifying drawings in AutoCAD. Practice using these commands to become proficient in drafting and design.
Creating Precise 2D & 3D Drawings
Creating precise 2D and 3D drawings in AutoCAD requires understanding the tools and functions available for detailed design work. This section will guide you through the essential steps to achieve accuracy and efficiency in your drawings.
- Starting with a Plan: Before drawing, have a clear plan or sketch. Understand the dimensions and requirements of your project.
- Setting Up Your Workspace: Customize the AutoCAD interface to suit your needs. Set up drawing units, grid settings, and snap functionality for precision.
- Using Drawing Tools: Familiarize yourself with AutoCAD\"s drawing tools. Use the LINE, POLYLINE, CIRCLE, and ARC for 2D; and BOX, CYLINDER, SPHERE, and EXTRUDE for 3D models.
- Applying Object Snaps: Utilize object snaps (Osnap) for accuracy. Snaps allow you to draw or align objects with exact locations on existing geometry.
- Layer Management: Organize your drawing by layers. Assign different elements of your drawing to layers with specific colors, line types, and line weights.
- Dimensioning and Text: Add dimensions and text to your 2D drawings for clarity. Use AutoCAD\"s dimension and text styles to maintain consistency.
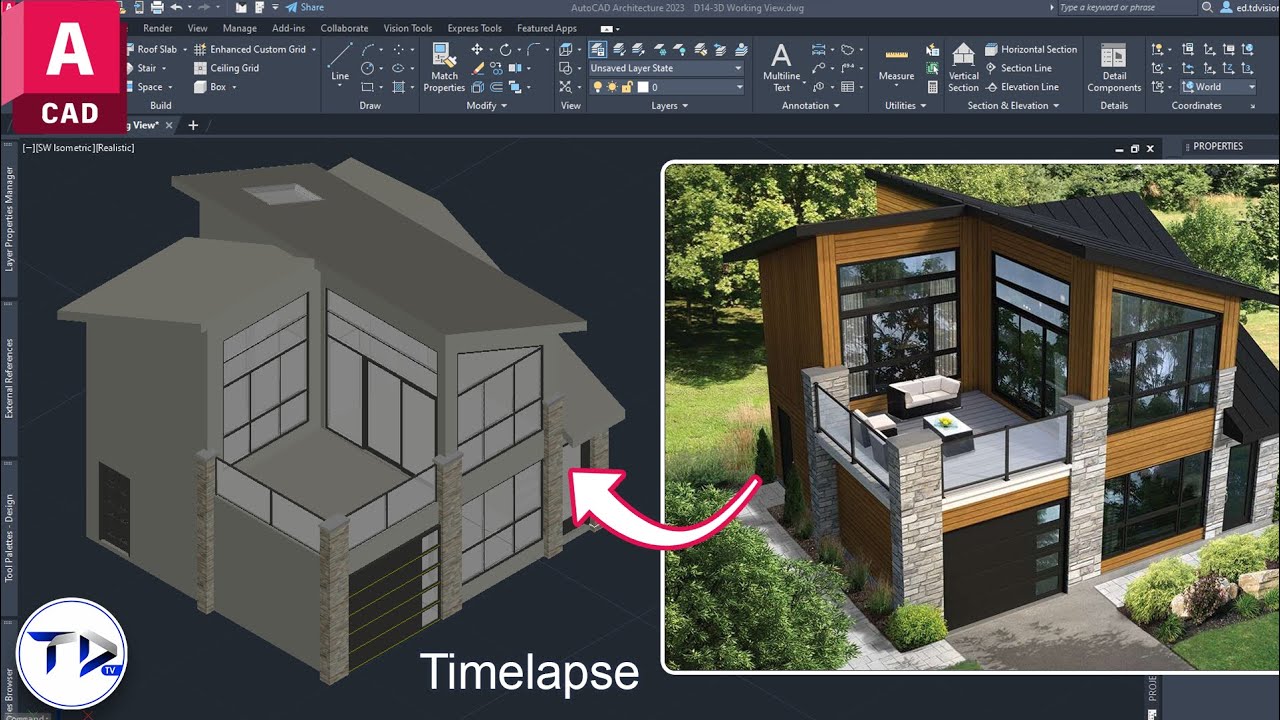
- Creating 3D Models: Start with basic shapes and use commands like PUSH/PULL, ROTATE3D, and FILLET to add complexity to your 3D models.
- Viewing and Navigating 3D Models: Use the orbit, pan, and zoom tools to view your 3D model from different angles. Understanding the VIEWCUBE and STEERINGWHEELS can enhance your navigation through the model.
- Rendering: Apply materials and lighting to your 3D models for a realistic appearance. Use AutoCAD\"s rendering tools to create high-quality visualizations.
Mastering these techniques in AutoCAD will enable you to create detailed and precise 2D plans and 3D models that meet professional standards.

Understanding the AutoCAD Interface
AutoCAD\"s interface is designed to help users efficiently navigate and utilize the software\"s extensive features for creating and editing 2D and 3D drawings. Understanding this interface is crucial for both new and experienced users to maximize productivity.
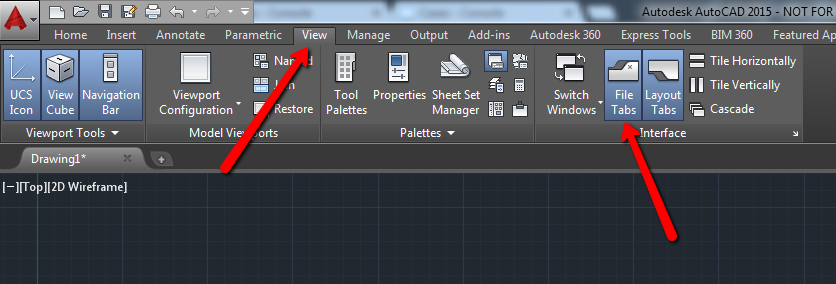
- Ribbon: The ribbon contains multiple tabs, each with its own set of tools organized by task, such as drawing, modifying, and managing views.
- Command Line: Located at the bottom of the screen, the command line allows users to input commands, view prompts, and see action results. It is a powerful tool for experienced users.
- Tool Palettes: These provide easy access to commonly used tools, blocks, and commands. Users can customize palettes for their specific workflow.
- Workspace Switcher: This allows users to switch between different workspace environments tailored for various tasks, such as drafting, 3D modeling, or custom workspaces.
- Navigation Bar: Located on the right side of the screen, the navigation bar includes tools to pan, zoom, and orbit around drawings, essential for reviewing details or working in 3D.
- Model and Layout Tabs: These tabs allow users to switch between model space, where drawings are created and edited, and layout spaces, where drawings are prepared for printing or publishing.
- Status Bar: At the bottom, the status bar displays various toggles like grid, snap, polar tracking, and object snap settings. These tools assist in creating precise drawings.
By familiarizing yourself with these elements, you can navigate the AutoCAD interface more effectively and make the most of its capabilities for your projects.
_HOOK_
Using Layers, Blocks, and Xrefs in Drawings
Efficiently organizing and managing complex drawings in AutoCAD is achievable through the use of layers, blocks, and external references (Xrefs). These features streamline the drawing process, improve drawing clarity, and enhance collaboration among team members.
- Layers: Layers organize different elements of your drawings into manageable sections. By assigning elements to layers, you can control the visibility, color, line type, and line weight of groups of objects independently.
- Creating and Managing Layers: Use the Layer Properties Manager to create new layers, modify existing ones, and set a current layer. Organize layers logically by function, such as electrical, plumbing, or architectural details.
- Blocks: Blocks allow you to create reusable symbols or objects that you can insert into your drawings. Blocks reduce file size and save time by eliminating the need to redraw commonly used elements.
- Creating and Inserting Blocks: After creating a block, you can insert it into any drawing. Use the Block Editor to modify blocks as needed. Blocks can contain attributes that prompt for specific information when inserted, such as part numbers or specifications.
- Xrefs: External references (Xrefs) link other drawings into your current drawing without actually importing the file. Xrefs are particularly useful for large projects where multiple team members work on different aspects of the project.
- Using Xrefs: Attach an Xref to your drawing to reference another team member\"s work. As the external drawing is updated, your drawing will automatically display the updates, ensuring consistency across the project.
Mastering the use of layers, blocks, and Xrefs in AutoCAD enhances your efficiency, ensures consistency across drawings, and significantly improves project collaboration.
Advanced Drawing Techniques
To elevate your AutoCAD drawings to the next level, mastering advanced drawing techniques is crucial. These methods enhance your ability to create complex and efficient designs.
- 3D Modeling: Delve into 3D modeling to bring your designs to life. Utilize commands like EXTRUDE, REVOLVE, and SWEEP to create three-dimensional shapes from 2D sketches.
- Custom Blocks and Dynamic Blocks: Learn to create custom blocks for repetitive elements and dynamic blocks with adjustable parameters, saving time on large projects.
- Advanced Layer Management: Use layers strategically to manage visibility and organize complex drawings. Implement layer filters and layer states to streamline your workflow.
- Parametric Constraints: Apply parametric constraints to control the dimensions and relationships between objects. This ensures design intent is maintained even as the drawing evolves.
- Using External Databases: Connect your drawings to external databases to automate data entry and update drawing elements dynamically based on the database information.
- Customization and Automation: Customize the AutoCAD interface and automate repetitive tasks with AutoLISP or Visual Basic for Applications (VBA) scripts to increase efficiency.
- Rendering and Visualization: Use AutoCAD\"s rendering tools to create photorealistic images of your models. Adjust lighting, materials, and environment settings to enhance realism.
By integrating these advanced techniques into your workflow, you can significantly improve the quality and efficiency of your AutoCAD projects.
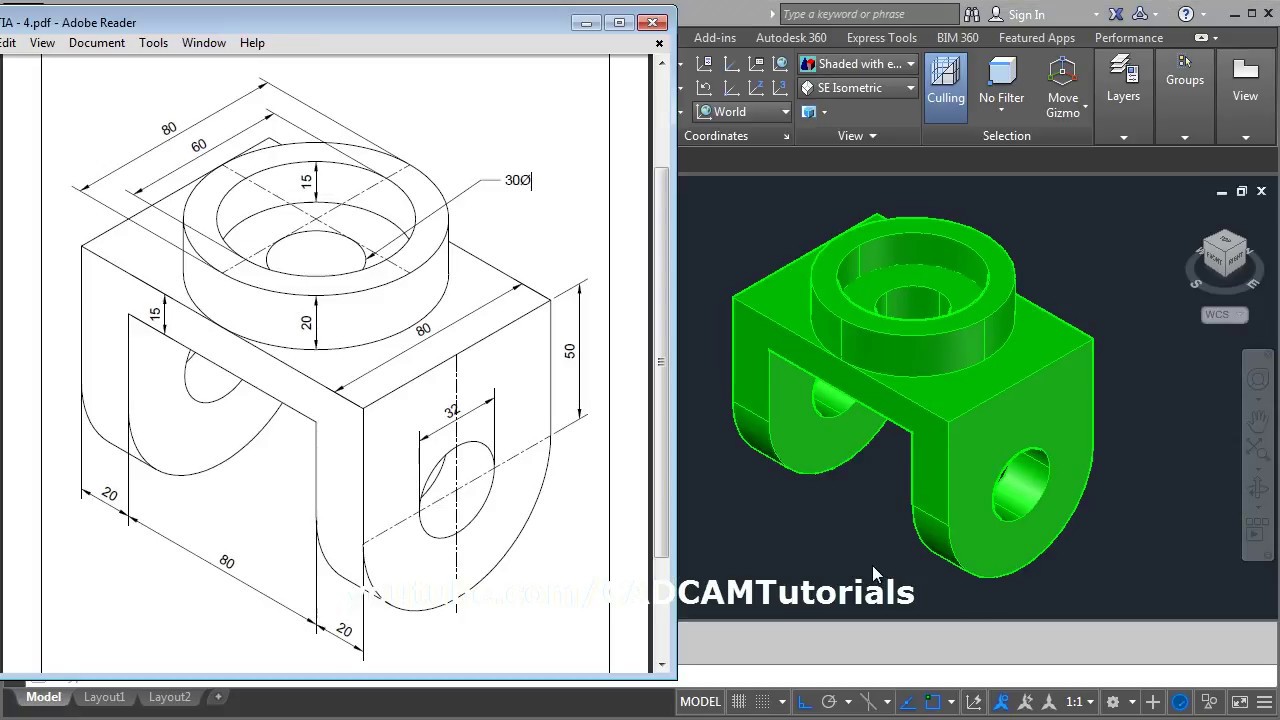
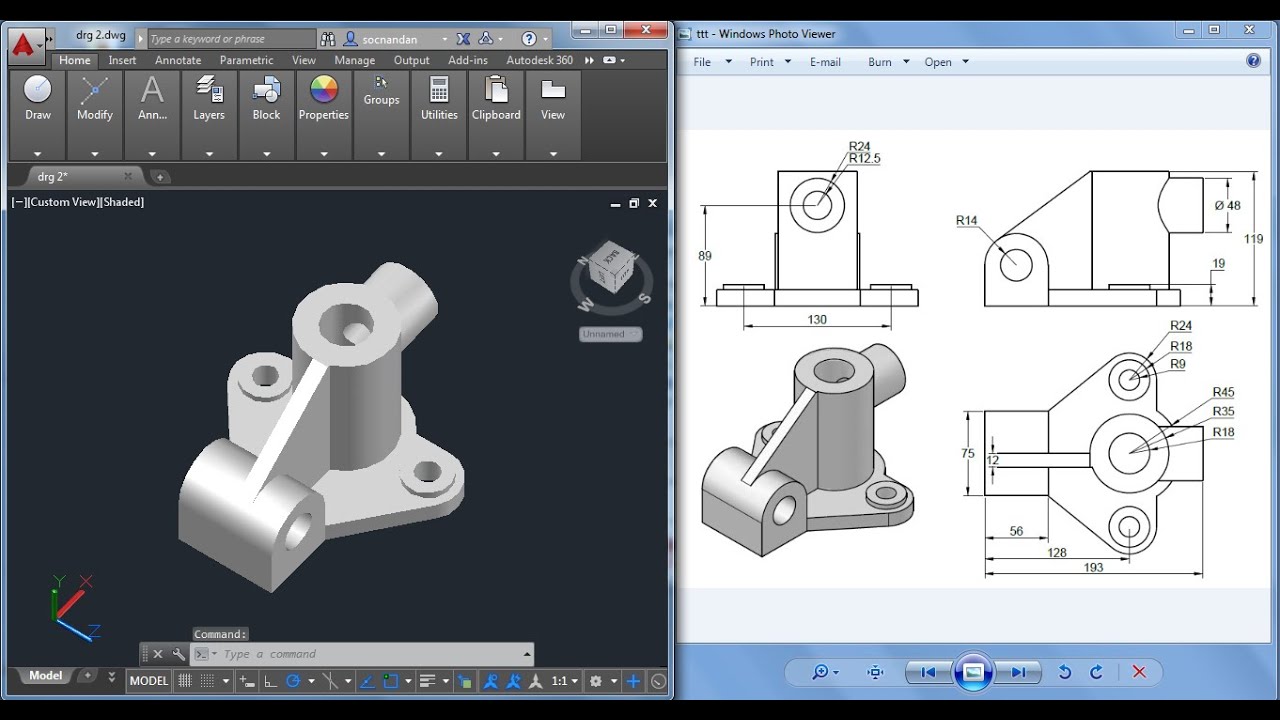
Wrench in AutoCAD Practice Drawing
\"Discover the endless possibilities of AutoCAD as we walk you through the exciting world of 3D modeling, precise measurements, and intricate designs. Get ready to witness the power of AutoCAD in this captivating video!\"
Making a simple floor plan in AutoCAD: Part 1
\"Step into the world of dream homes with our incredibly detailed floor plan video. Explore the artistry and functionality of beautifully crafted floor plans that bring your imagination to life. Don\'t miss out on this inspiring journey!\"
Dimensioning and Annotation for Clarity
Dimensioning and annotating your AutoCAD drawings are crucial steps to communicate the specifics of your design accurately. These features help to convey measurements, design intent, and other essential details clearly to engineers, architects, and builders.
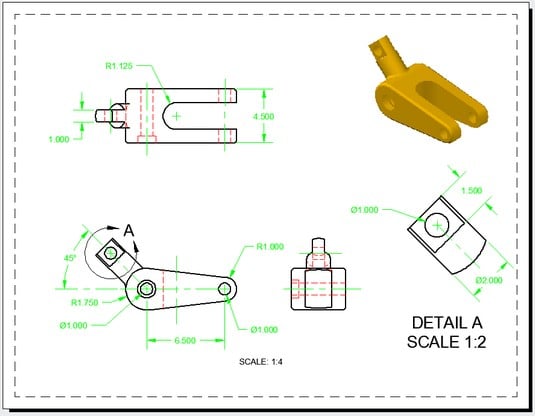
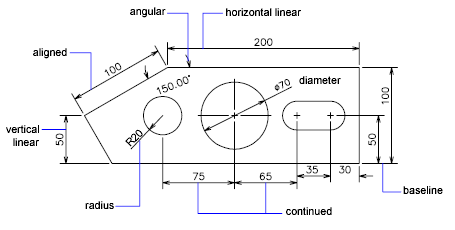
- Understanding Dimensioning: Dimensioning involves adding measurements to your drawing. Use the DIM command to access various dimensioning tools, including linear, radial, angular, and ordinate dimensions.
- Setting Dimension Styles: Create and customize dimension styles through the Dimension Style Manager. This allows you to control text size, arrow style, line weight, and other properties to ensure consistency across your drawings.
- Adding Text Annotations: Use the TEXT or MTEXT command to add notes and labels to your drawings. These annotations can provide additional context or specify materials, processes, or tolerances.
- Using Leaders: Leaders point to specific parts of your drawing, providing information without cluttering the design. The QLEADER or LEADER command allows you to draw a line that connects an annotation to a feature.
- Applying Tolerances: When precision is critical, add tolerances to your dimensions. Tolerance information can specify acceptable measurement variation, critical for manufacturing and construction.
- Layer Management for Dimensions and Annotations: Place your dimensions and annotations on separate layers. This practice makes it easier to manage visibility and edit your drawing without altering the design.
Proper dimensioning and annotation are key to creating detailed and functional AutoCAD drawings. They ensure your designs are understood and executed correctly by all team members and stakeholders.
Plotting and Printing Your Drawings
Plotting and printing in AutoCAD are crucial steps to bring your digital designs into the physical world. This process allows for the sharing, reviewing, and use of your drawings in real-life applications. Here are steps and tips to ensure high-quality outputs.
- Prepare Your Drawing: Ensure your drawing is clean and all elements are correctly layered. This preparation includes removing unnecessary objects and ensuring all objects are on the correct layer with the right color and line type.
- Choose the Right Paper Size: Select a paper size that matches your drawing\"s scale and the detail level you wish to convey. AutoCAD supports various paper sizes, from standard A4 to custom sizes.
- Configure Plot Settings: Access the Plot dialog box to configure settings such as the printer/plotter, paper size, plot area, plot scale, and drawing orientation. Ensure that the plot scale correctly corresponds to the scale used in your drawing.
- Preview Before Plotting: Use the preview feature to check the layout and appearance of your drawing before printing. This step can help identify and correct any issues with scale, layout, or visibility of elements.
- Manage Plot Styles: Plot styles control the appearance of your drawing when printed, including line weights, colors, and line types. Assign or create a plot style table (CTB or STB file) to ensure your drawing prints as expected.
- Save and Reuse Plot Settings: After configuring your plot settings for a drawing, save them as a page setup. This setup can be applied to other drawings to maintain consistency and save time on future plots.
- Plot or Print: With everything set up, send your drawing to the plotter or printer. Consider using high-quality print settings for final prints, especially for presentations or official submissions.
By following these steps, you can achieve professional-quality prints of your AutoCAD drawings, ready for presentation, submission, or on-site use.

AutoCAD Shortcuts and Efficiency Tips
Boosting productivity in AutoCAD is essential for meeting project deadlines and improving the quality of your designs. This section covers shortcuts and efficiency tips to streamline your workflow.
- Keyboard Shortcuts: Familiarize yourself with keyboard shortcuts for common commands like COPY (CO), MOVE (M), and ROTATE (RO) to speed up your work.
- Custom Aliases: Create custom command aliases in the PGP file for commands you use frequently. This personalization allows for faster command execution.
- Use Quick Access Toolbar: Customize the Quick Access Toolbar with tools you use most often. This adjustment minimizes the need to switch between tabs.
- Command Line Tricks: Use the command line effectively by learning command options and using the up and down arrow keys to cycle through previous commands.
- Palette Management: Organize your tool palettes for easy access to blocks, hatches, and frequently used commands. Docking palettes can save screen space.
- Templates: Create drawing templates with preset layers, styles, and settings to ensure consistency across projects and save setup time.
- Layer Filters: Use layer filters to manage layers in complex drawings, making it easier to work with only the layers you need visible.
- Block Libraries: Maintain a library of commonly used blocks to drag and drop into drawings, saving time on creating repetitive elements.
- Dynamic Blocks: Use dynamic blocks for components that have multiple configurations or sizes to reduce the number of blocks you need to manage.
- Layouts and Viewports: Pre-configure layouts with title blocks and viewports to streamline the plotting process and ensure consistency in presentation.
Implementing these shortcuts and tips can significantly enhance your efficiency in AutoCAD, allowing you to focus more on design and less on repetitive tasks.

_HOOK_
Collaborating and Sharing Drawings
Collaboration and sharing are integral aspects of modern CAD projects. AutoCAD includes features that facilitate easy sharing and collaboration among team members, regardless of their location. This section explores how to effectively collaborate and share your AutoCAD drawings.
- Using AutoCAD Web and Mobile: AutoCAD\"s web and mobile applications allow users to access, view, and edit drawings anywhere, anytime. This flexibility is crucial for collaboration on the go.
- Sharing Drawings with Xrefs: Utilize external references (Xrefs) to share drawing components without merging them into a single file. This method keeps the main drawing file size manageable and allows multiple users to work on different components simultaneously.
- Data Linking: Link your drawings to external data sources, such as spreadsheets, to ensure that updates to the data source are reflected in your drawing. This feature is particularly useful for collaborative projects that require consistent data updates.
- eTransmit: Use the eTransmit command to package your drawings and all related files, including Xrefs and font files, into a single package for easy sharing with stakeholders.
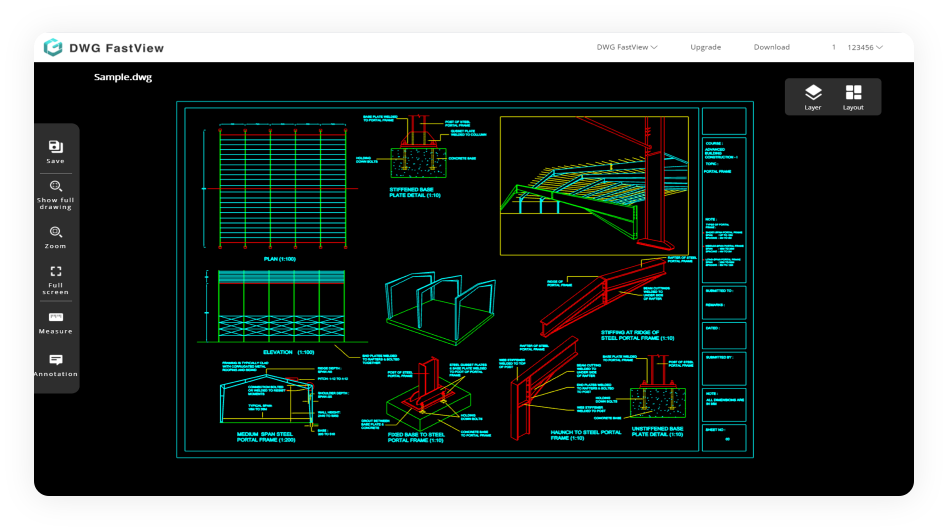
- PDF Export: Export your drawings to PDF for easy sharing with clients or team members who may not have AutoCAD. PDFs can include layers and hyperlinks, making them a versatile option for sharing detailed designs.
- DWG Compare: When working with multiple versions of a drawing, use the DWG Compare feature to highlight differences between versions. This tool is invaluable for collaborative reviews and ensuring all changes are accounted for.
- Collaboration for Civil 3D: For projects involving Civil 3D, leverage the Collaboration for Civil 3D feature, which allows team members to work on Civil 3D projects in a shared cloud environment.
By leveraging these collaboration and sharing tools, teams can work more efficiently, ensuring that everyone has access to the latest drawings and data, thus enhancing the overall productivity and quality of projects.
READ MORE:
Navigating the AutoCAD Web and Mobile App
The AutoCAD Web and Mobile app provides flexibility and convenience, allowing users to access, edit, and share their AutoCAD drawings from anywhere, on any device. This guide will help you navigate the features and functionalities of the app to maximize your productivity.
- Accessing Drawings: Log in to your Autodesk account to access your drawings. The app syncs with AutoCAD on your desktop, providing access to your files in the cloud.
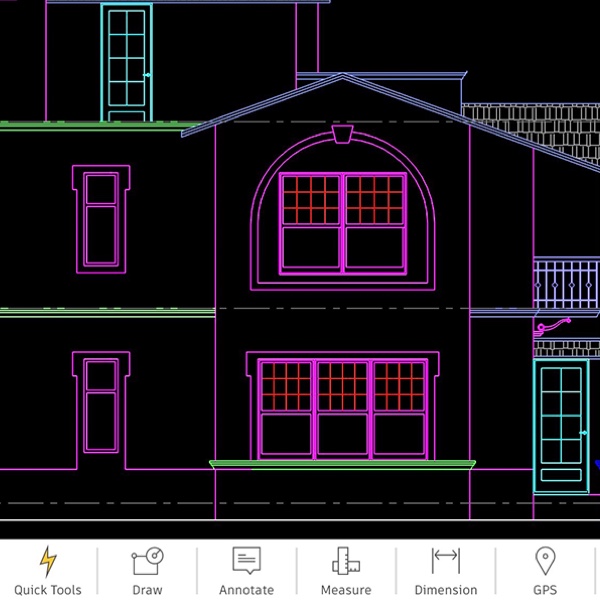
- Using the Interface: The user interface is optimized for touch interaction on mobile devices and intuitive navigation on web browsers. Familiarize yourself with the toolsets available, which are similar to those on the desktop version of AutoCAD.
- Drawing and Editing: Use familiar AutoCAD drafting tools to create new drawings or edit existing ones. Tools like Line, Circle, Arc, and more are available for precision drawing and editing.
- Viewing Options: Easily pan, zoom, and orbit your drawings for detailed viewing. Use the view cube for navigating 3D models and switch between layout views for optimal presentation.
- Layer Management: Manage layers directly from the app. Turn layers on and off to control the visibility of different parts of your drawing.
- Measuring and Annotation: Utilize measuring tools to check dimensions and add text annotations for clarity or notes directly within your drawing.
- Sharing and Collaboration: Share your drawings with others directly from the app. You can also collaborate in real-time, allowing team members to view and edit drawings simultaneously.
- Saving and Exporting: Save your changes back to the cloud to ensure they are updated across all your devices. Export drawings to various formats for use outside of the AutoCAD ecosystem.
By leveraging the AutoCAD Web and Mobile app, you can ensure continuous productivity and collaboration, whether in the office, on-site, or on the go.
Embarking on your AutoCAD journey unlocks endless possibilities for precision, creativity, and collaboration in design. Master AutoCAD to transform your ideas into reality and lead the way in drafting and design innovation.