Topic blender minecraft animation tutorial: Dive into the creative world of 3D animation with our Blender Minecraft Animation Tutorial, designed to guide beginners through crafting their very own Minecraft animations from scratch, ensuring a fun and rewarding learning experience.
Table of Content
- How to create Minecraft animations using Blender?
- Getting Started with Blender and Minecraft
- Importing Your Minecraft World
- Character Creation and Skin Selection
- Basics of Animation in Blender
- Advanced Animation Techniques
- Lighting and Rendering Your Minecraft Scene
- YOUTUBE: Minecraft Animation Tutorial Part 1 - Blender Basics
- Adding Sound and Exporting Your Animation
- Utilizing MCprep for Enhanced Animations
- Troubleshooting Common Issues
- Resources for Further Learning
How to create Minecraft animations using Blender?
To create Minecraft animations using Blender, you can follow the steps below:
- Download and install Blender, the free and open-source 3D animation software.
- Search for Minecraft character models or rigs that are compatible with Blender. You can find various resources online, such as websites, forums, or YouTube channels that provide free or paid Minecraft character models.
- Import the Minecraft character model into Blender by going to \"File\" > \"Import\" and selecting the appropriate file format for the model.
- Position and animate the character model by using Blender\'s animation tools. You can create keyframes to define the character\'s movement and actions at different points in time.
- Add materials and textures to the character model to make it resemble the Minecraft style. You can use Blender\'s node-based material editor to create blocky textures and apply them to the model.
- Create or import Minecraft-style environments or props for your animation. You can use pre-made Minecraft world models or create your own using basic geometric shapes.
- Arrange the character model and environment elements in the Blender scene to create the desired animation setup.
- Set up the rendering settings in Blender, such as resolution, frame rate, and output format.
- Start animating by moving the character model, adjusting the camera, and editing keyframes to achieve the desired motion and flow.
- Preview your animation within Blender to see how it looks. Make any necessary adjustments to the animation, materials, and lighting to improve the overall result.
- Once satisfied with the animation, render the final frames using Blender\'s rendering engine. This process may take some time depending on the complexity of the animation and your computer\'s hardware.
- Combine the rendered frames into a video file using a video editing software of your choice. You can add music, sound effects, or additional effects to enhance the final result.
- Export the completed Minecraft animation as a video file and share it with others or upload it to platforms like YouTube.
Remember, creating high-quality Minecraft animations requires practice and experimentation with Blender\'s features. Don\'t be afraid to explore different techniques and styles to make your animations unique and visually appealing.
READ MORE:
Getting Started with Blender and Minecraft
Embarking on your Blender Minecraft animation journey begins with setting up the necessary tools and understanding the basics of both Blender and Minecraft. This guide will walk you through the initial steps to bring your Minecraft worlds and characters to life in Blender.
- Download and Install Blender: Ensure you have the latest version of Blender installed. Blender is free and open-source software available for all major operating systems.
- Download Minecraft Assets: Gather Minecraft models, textures, and any other assets you plan to use in your animation. Tools like Mineways or MCprep can help you export your Minecraft world and import it into Blender.
- Install Blender Add-ons: Add-ons like MCprep add Minecraft-specific functionality to Blender, simplifying tasks like importing characters, worlds, and applying textures.
- Familiarize Yourself with Blender\"s Interface: Spend some time getting to know Blender’s interface. Focus on key areas like the 3D viewport, timeline for animation, and the properties panel.
- Importing Your Minecraft World: Use MCprep or a similar tool to import your Minecraft world into Blender. This will be the foundation of your animation.
- Basic Animation Principles: Before diving into complex animation, understand Blender\"s basic animation tools and principles. Learn about keyframes, the dope sheet, and the graph editor to control your animations.
Following these steps will prepare you for the more advanced aspects of Minecraft animation in Blender, such as character animation, lighting, and rendering. The goal is to build a solid foundation that will make the rest of your animation journey smoother and more enjoyable.

Importing Your Minecraft World
Importing your Minecraft world into Blender is a critical step for creating Minecraft animations. This process allows you to bring your custom-built worlds or any Minecraft world you wish to animate into Blender. Follow these steps to import your Minecraft world successfully:
- Choose a World Export Tool: Begin by selecting a tool to export your Minecraft world. One of the most popular tools for this purpose is Mineways, which is compatible with both Windows and Mac. Another option is jmc2obj, which works well for detailed exports.
- Export Your Minecraft World: Open your chosen tool and navigate to the world you want to export. With Mineways, you can select the specific area of your world to export, which helps in managing file sizes. Make sure to export the world in a format that Blender can import, such as .obj.
- Prepare Blender: Before importing the world, ensure that Blender is set up correctly. If not already done, install the Blender Minecraft addon, such as MCprep, to simplify the import process and improve the final render\"s appearance.
- Import the World into Blender: In Blender, go to File > Import and select the appropriate file format (.obj for most cases). Navigate to the location of your exported Minecraft world and select the file to import.
- Adjust the Imported World: Once imported, you might need to adjust the scale, rotation, and position of the world to fit your animation needs. Utilize Blender\"s tools to make these adjustments as necessary.
- Texture and Material Setup: If your world\"s textures did not automatically apply or if you\"re seeking a higher level of detail, you might need to manually apply textures or use the MCprep addon to auto-assign Minecraft-specific materials and textures for a more authentic look.
Following these steps will have your Minecraft world ready in Blender for animation. The process might vary slightly depending on the tools used and the specific requirements of your project. Experimenting with different settings and tools can help achieve the best results for your animation.
Character Creation and Skin Selection
Character creation and skin selection are essential steps in personalizing your Minecraft animation in Blender. These steps allow you to bring your unique characters to life within your animated world. Follow this guide to create and customize characters effectively:
- Find or Create a Minecraft Skin: Begin by choosing a skin for your character. You can select an existing skin from various online Minecraft skin libraries or create your own using skin editing software. Ensure your skin is saved as a standard Minecraft skin format (.png).
- Importing the Skin into Blender: With your skin ready, the next step is to import it into Blender. This is often done through a character rig specifically designed for Minecraft animations. Blender plugins like MCprep come with pre-made rigs that you can use.
- Apply the Skin to a Rig: Once you have a rig, you can apply your skin. In the rig, locate the material or texture section where you can replace the default skin with your custom skin file (.png). Ensure the skin aligns correctly with the rig\"s mesh.
- Adjusting the Rig: After applying the skin, you might need to adjust the rig to match your character\"s proportions or animations. Use Blender\"s tools to modify bones or mesh as necessary, ensuring your character moves naturally.
- Customizing Your Character: Beyond the basic skin, you can further customize your character by adding accessories, clothing, or custom textures. This can be done by creating new materials in Blender or modifying the existing skin file to include these details.
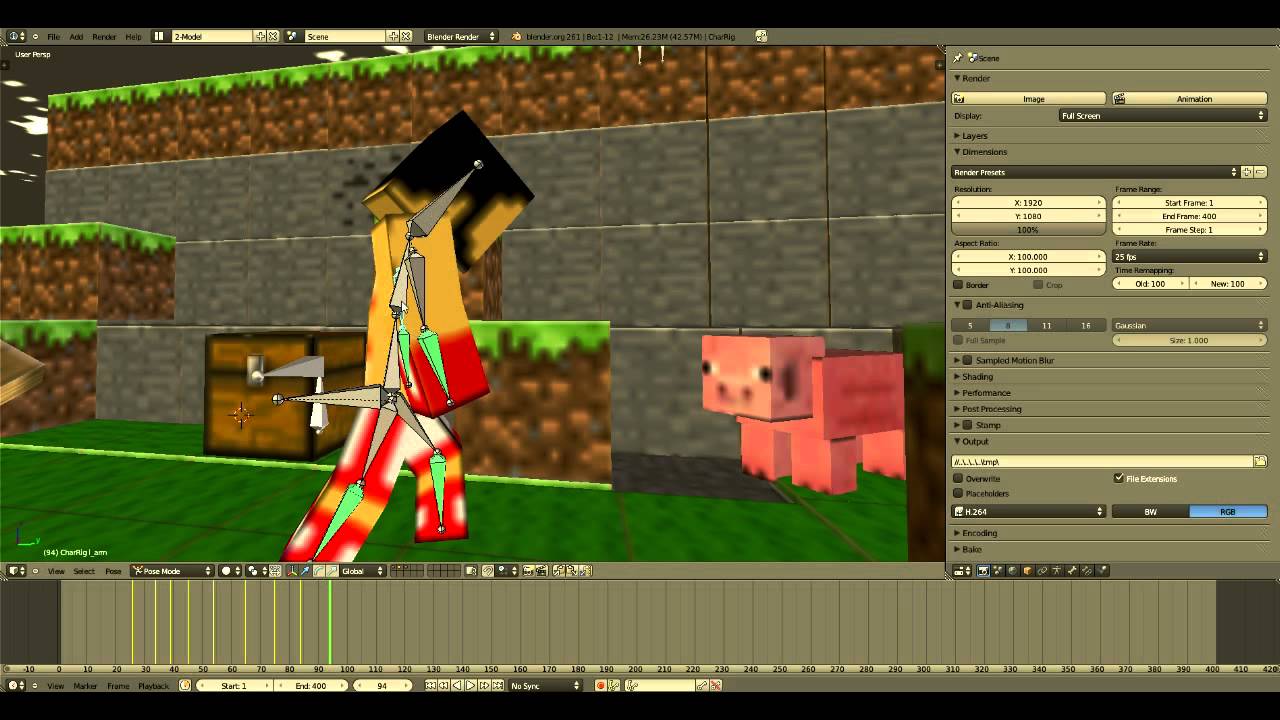
- Animating Your Character: With your character fully customized, you\"re now ready to animate. Use Blender\"s animation tools to bring your character to life. Keyframe animation, inverse kinematics, and shape keys are powerful techniques for Minecraft character animation.
By following these steps, you\"ll be able to create a unique and personalized character for your Minecraft animation project. Remember, the key to a great animation is not just in the creation but also in bringing your character to life with expressive and dynamic animations.

Basics of Animation in Blender
Learning the basics of animation in Blender sets the foundation for creating dynamic and engaging Minecraft animations. This section will guide you through the fundamental steps and concepts necessary to start animating in Blender:
- Understanding the Blender Interface: Familiarize yourself with Blender\"s interface, focusing on the timeline, dope sheet, and graph editor. These areas are crucial for animation as they allow you to manage keyframes and control the timing and pacing of your animation.
- Creating Your First Keyframe: Animation in Blender is done by setting keyframes. To create a keyframe, select the object you wish to animate, move to the desired frame in the timeline, and press I to insert a keyframe. Choose the type of keyframe, such as location, rotation, or scale, based on the animation you want to achieve.
- Animating Movement: To animate an object moving, set a keyframe at the starting position, move to another frame, move your object to the new position, and insert another keyframe. Blender will automatically interpolate the movement between these keyframes, creating a smooth animation.
- Using the Dope Sheet and Graph Editor: The dope sheet provides an overview of all keyframes and their timing, making it easier to adjust the overall animation. The graph editor offers detailed control over the interpolation and timing of keyframes, allowing for more precise adjustments to the animation curves.
- Practicing with Simple Animations: Start with simple animations to get a feel for timing, spacing, and the flow of movement. Practice by animating basic objects like cubes or spheres moving, rotating, and scaling.
- Animating Minecraft Characters: Apply these basic principles to animate Minecraft characters. Use character rigs to simplify the process, and focus on key poses to define your character\"s actions and movements. Remember to animate facial expressions and limbs to convey emotions and actions effectively.
- Looping Animations: For animations like walking or running, you\"ll want to create looping sequences. Make sure the starting and ending keyframes are identical (excluding the final position for walk cycles) to ensure a seamless loop.
Mastering these basics will provide you with a strong foundation to explore more complex and creative animations in Blender. Remember, animation is an art that requires practice, patience, and experimentation to perfect.

_HOOK_
Advanced Animation Techniques
Once you\"ve mastered the basics of animation in Blender, you can elevate your Minecraft animations by incorporating advanced techniques. These methods will add complexity, realism, and professional polish to your projects. Dive into the world of advanced animation with the following steps:
- Inverse Kinematics (IK): IK simplifies the animation of complex movements, particularly in character limbs. By setting up an IK rig, you control the end effector (like a hand or foot), and Blender calculates the appropriate angles for the joints. This is ideal for animating walking, running, or interacting with objects.
- Morph Targets / Shape Keys: Shape keys are used for facial animations and subtle body movements. They allow you to morph a mesh from one state to another, enabling detailed expressions and dialogue synchronization.
- Physics Simulations: Incorporate Blender\"s physics engine for realistic environmental interactions. Use cloth simulation for dynamic clothing and hair, particle systems for rain, smoke, or fire, and rigid body dynamics for destruction sequences or object interactions.
- Camera Movement and Angles: Enhance the cinematic quality of your animation by using dynamic camera movements. Employ techniques such as tracking shots, pans, zooms, and depth of field adjustments to add visual interest and direct the viewer\"s attention.
- Lighting and Shadows: Advanced lighting techniques can dramatically affect the mood and realism of your scenes. Experiment with three-point lighting setups, ambient occlusion, and soft shadows to create depth and atmosphere.
- Compositing and Post-Processing: Blender\"s compositor allows you to add final touches to your animation, such as color grading, adding glow effects, or integrating live-action footage with your animated scenes.
- Performance and Lip Sync: For characters that speak, matching lip movements to dialogue significantly enhances believability. Use sound waveforms in Blender to match shape keys or mouth rigs to the audio for accurate lip-syncing.
By integrating these advanced techniques into your Blender animations, you\"ll be able to create more sophisticated and engaging Minecraft animations. Each project offers an opportunity to experiment with different methods and discover new ways to bring your creative visions to life.

Lighting and Rendering Your Minecraft Scene
Lighting and rendering are crucial stages in the Blender animation process, transforming your Minecraft scenes from basic models into immersive, visually appealing animations. Proper lighting sets the mood and atmosphere, while rendering brings out the final details and quality. Follow these steps to effectively light and render your Minecraft scenes in Blender:
- Understanding Blender\"s Lighting: Begin by exploring Blender\"s lighting options. Key light sources include Point, Sun, Spot, and Area lights. Experiment with these to understand their effects, considering Minecraft\"s blocky aesthetic and how it interacts with light and shadow.
- Setting Up Your Scene Lighting: For Minecraft scenes, a combination of Sun for general daylight and Point or Spot lights for specific areas or objects works well. Use Area lights for soft, diffused lighting in interiors. Pay attention to the direction and color of the lights to match the time of day or desired atmosphere.
- Using Ambient Occlusion: Ambient Occlusion adds depth and realism by simulating the soft shadowing objects receive from ambient light. Enable it in Blender\"s World settings to enhance the nooks and crannies in your Minecraft scene.
- Applying Emission Materials: In Minecraft, certain blocks emit light (e.g., torches, lava). In Blender, use Emission shaders on these objects to mimic this effect, adjusting the strength to match the in-game light levels.
- Experimenting with Volumetric Lighting: For dramatic effects like sunbeams or foggy environments, use volumetric lighting. This can be achieved by adding a volume scatter shader to the world\"s volume material properties.
- Choosing a Render Engine: Blender offers several render engines, including Eevee and Cycles. Eevee is faster and well-suited for real-time previews, while Cycles produces more realistic results at the cost of longer render times. Choose based on your project\"s needs and deadline.
- Setting Up Rendering Settings: Adjust your render settings for the best balance between quality and render time. This includes resolution, sample rates for Cycles, and any specific passes you might need for compositing.
- Rendering Your Scene: With everything set up, render your scene. You can render a single image to check the lighting or render the entire animation. Keep an eye on the render times and make adjustments as necessary to optimize the process.
By carefully setting up lighting and rendering settings, you can create stunning, lifelike animations that bring your Minecraft world to life. Remember, practice and experimentation are key to mastering lighting and rendering in Blender.

Minecraft Animation Tutorial Part 1 - Blender Basics
Blender: Unleash your inner artist with Blender! This revolutionary software has taken the world by storm, empowering individuals to create stunning 3D models and animations like never before. Dive into this video to discover the endless possibilities of Blender, whether you\'re a seasoned professional or just starting your journey into the world of 3D art. Prepare to be amazed by the power and versatility of this extraordinary tool!
Adding Sound and Exporting Your Animation
Adding sound to your Blender animation can significantly enhance its impact, bringing your Minecraft scenes to life with music, effects, and dialogue. Once complete, exporting your animation allows you to share your creation with the world. Here’s how to add sound and export your animation in Blender:
- Importing Sound Files: To add sound to your animation, first import your audio files into Blender. Go to the Video Sequencer editor, and use the Add > Sound to import your audio files. You can add multiple tracks for music, sound effects, and dialogue.
- Synchronizing Audio with Animation: Once your audio files are imported, align them with the appropriate frames in your animation. Use the timeline in the Video Sequencer to match sound effects with actions, dialogue with character movements, and ensure music fits the overall mood of the scene.
- Adjusting Sound Levels: It’s crucial to balance the audio levels to ensure clarity and a pleasant viewing experience. Use the strip properties in the Video Sequencer to adjust the volume of each sound track, making sure no sound overpowers the others.
- Adding Sound Effects and Music: For a more immersive experience, consider adding environmental sound effects and music. Sound effects can include footsteps, ambient noises, or action-specific sounds, while music can set the tone and atmosphere of the scene.
- Exporting Your Animation: With your sound properly aligned and adjusted, it’s time to export your animation. Go to the Output Properties panel, choose your desired file format (e.g., AVI, MPEG, MOV) and specify your output location. Ensure your render settings are configured for the best quality and file size for your needs.
- Rendering with Sound: To include the sound in your final animation, ensure the Audio Codec is set correctly in the encoding settings. Then, render your animation by clicking Render > Render Animation or pressing Ctrl + F12. Blender will render the video and audio together into a single file.
Adding sound and exporting your animation are the final steps in the Blender animation process. These elements transform your project from a visual experience into a fully realized animation that can engage audiences on multiple levels. Experiment with different sounds and export settings to find what works best for your Minecraft animation.
Utilizing MCprep for Enhanced Animations
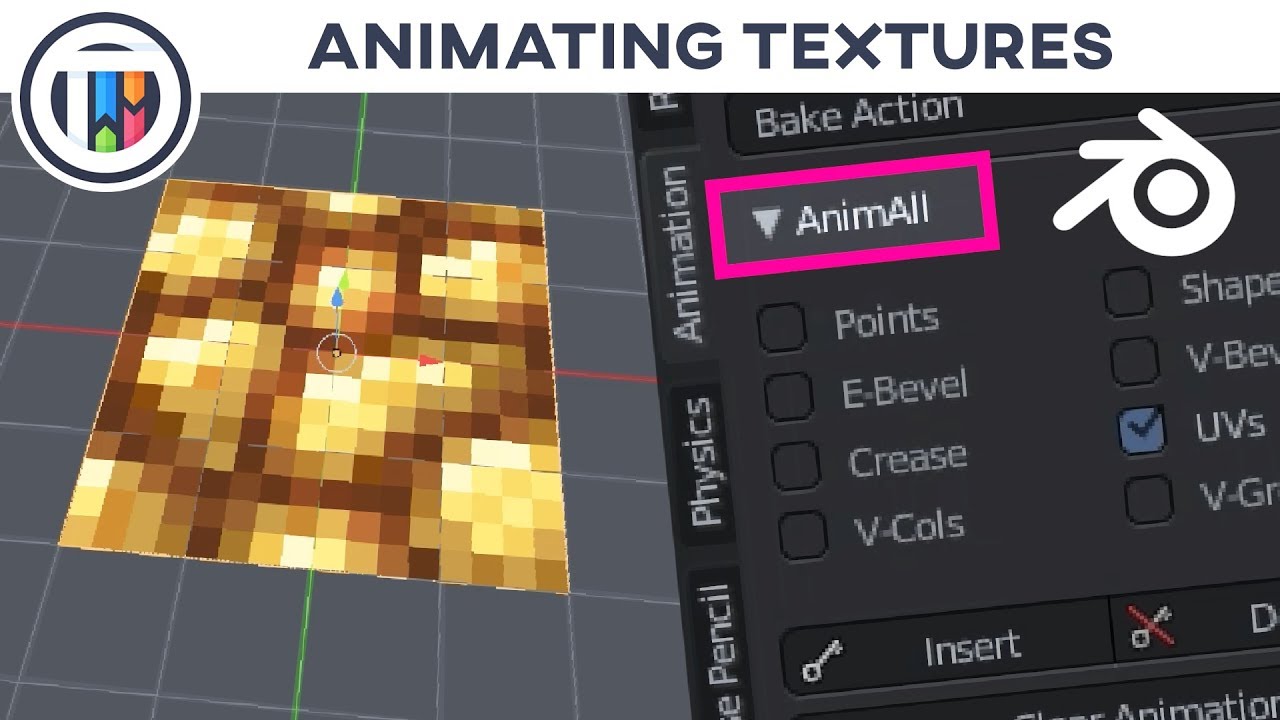
MCprep is a Blender addon specifically designed to improve Minecraft animation workflows. It offers tools for automating mundane tasks, enhancing textures, and simplifying character and world imports. Here’s how you can utilize MCprep to enhance your Minecraft animations in Blender:
- Installing MCprep: First, download MCprep from its official website or GitHub page. In Blender, go to Edit > Preferences > Add-ons, click \"Install,\" and select the downloaded .zip file. Enable the addon by checking the box next to it in the Add-ons menu.
- Preparing Your Scene: MCprep comes with several utilities to prepare your scene for Minecraft animation. Use the \"Prep Materials\" feature to automatically convert Minecraft textures to be render-ready in Blender, fixing common issues like transparency and shading.
- Importing Minecraft Worlds: With MCprep, importing Minecraft worlds into Blender is streamlined. Use the \"Import Minecraft World\" feature to bring in worlds directly from your Minecraft saves. MCprep will handle the conversion, including the placement of blocks and textures.
- Character Skinning and Rigging: MCprep includes pre-built rigs that are compatible with Minecraft skins. This makes it easy to import and apply skins to these rigs, ensuring that your characters are ready for animation with minimal setup.
- Asset Management: The addon provides a library of Minecraft-specific assets, including blocks, items, and mobs. These can be easily added to your scene, ensuring you have a comprehensive set of elements to work with for your animation.
- Animating with MCprep: Utilize MCprep’s features to simplify the animation process. The addon can automatically adjust armatures for better animation workflows and provide tools for creating complex scenes more efficiently.
- Enhancing Textures and Materials: MCprep can automatically enhance Minecraft textures for a more realistic appearance in Blender. This includes adjustments for lighting, reflections, and more sophisticated material effects.
By incorporating MCprep into your Blender workflow, you can significantly enhance the quality and efficiency of your Minecraft animations. This powerful addon automates technical tasks, allowing you to focus on the creative aspects of animation production.
Troubleshooting Common Issues
When working on Minecraft animations in Blender, you may encounter several common issues. Here’s how to troubleshoot and resolve these problems to keep your animation project on track:
- Textures Not Displaying Correctly: If Minecraft textures appear black, missing, or incorrect, ensure that the textures are properly linked in the material properties. Using MCprep can automate this process, fixing common texture issues.
- Character Rig Problems: Issues with character rigs, such as incorrect deformations or movement, often result from improperly applied armatures or weight painting. Revisit your rig setup, ensuring that bones are correctly assigned to mesh vertices.
- Animation Playback Lag: If Blender lags during animation playback, try reducing the viewport shading quality or simplifying your scene. Using Blender\"s Simplify option in the Render properties can also help improve playback performance.
- Lighting Looks Flat: Minecraft worlds can sometimes appear flat in Blender due to inadequate lighting. Experiment with different light sources, such as adding a Sun lamp for dynamic shadows, or use three-point lighting for character-focused scenes.
- Render Times Are Too Long: Long render times can be mitigated by optimizing your scene. Lower the resolution, reduce samples in Cycles, or switch to Eevee for faster renders. Additionally, consider using Blender\"s denoising feature to maintain quality with fewer samples.
- Objects Disappearing or Clipping: If objects disappear or clip through the camera view, check the camera\"s clipping settings. Adjust the Start and End clipping values in the Camera properties to ensure your entire scene is within view.
- Audio Sync Issues: For animations where audio is out of sync, ensure that the frame rate of your Blender project matches the frame rate intended for the final video. Adjust the audio strips in the Video Sequencer to align with the correct frames.
By addressing these common issues, you can ensure a smoother animation process in Blender. Remember, problem-solving is a natural part of learning and mastering animation techniques. Don’t hesitate to seek help from Blender forums and communities for more specific issues.

_HOOK_
READ MORE:
Resources for Further Learning
Expanding your skills in Blender and Minecraft animation requires access to a variety of learning resources. Here are some valuable resources to further your knowledge and expertise in creating engaging Minecraft animations:
- Blender Official Documentation: The Blender Manual is an invaluable resource for understanding all of Blender\"s features, tools, and workflows. It\"s regularly updated to reflect the latest versions.
- Online Courses and Tutorials: Platforms like Udemy, Coursera, and YouTube offer a range of tutorials and courses tailored to Blender animation. Look for courses specifically focused on Minecraft animation to learn techniques relevant to your projects.
- Blender Communities: Joining Blender communities on platforms like Blender Artists, Reddit, or Discord can provide support, feedback, and inspiration from fellow animators. Participate in challenges and projects to practice your skills.
- MCprep Resources: The official MCprep website and forums are great places to find specific advice, tutorials, and support for using MCprep effectively in your Minecraft animations.
- Books on Blender: There are several comprehensive books available that cover Blender animation techniques, from beginner to advanced levels. These can serve as detailed guides for self-study.
- Animation Principles: Understanding the principles of animation is crucial for creating lifelike and engaging animations. Resources like \"The Animator\"s Survival Kit\" by Richard Williams offer deep insights into animation techniques.
- Blender Addons and Plugins: Exploring additional Blender addons and plugins can enhance your animation workflow. Look for tools that automate repetitive tasks or add new functionalities to Blender.
By utilizing these resources, you can continuously improve your Blender and Minecraft animation skills, keeping up with new techniques and technologies in the field. Remember, the key to mastery is consistent practice and learning.
Embark on an exciting journey to bring your Minecraft worlds to life with Blender! Our comprehensive guide covers everything from basic animations to advanced techniques, ensuring you have the skills to create stunning animations that captivate and inspire.