Topic animation with blender tutorial: Embark on a journey to master animation with Blender tutorials, where creativity meets technology, empowering you to bring your unique visions to life.
Table of Content
- How to learn animation in Blender using a tutorial?
- Getting Started with Blender for Animation
- Understanding Blender\"s Interface and Basic Tools
- Keyframe Animation: The Foundation of Blender Animation
- Animating Characters: Rigging and Weight Painting
- Advanced Animation Techniques: Inverse Kinematics and Shape Keys
- Creating Realistic Animations with Physics and Particles
- YOUTUBE: Blender Tutorial: Animation for Beginners
- Animation Principles and Tips for Lifelike Results
- Rendering Your Animation: Best Practices and Optimization
- Resources and Communities for Blender Animators
How to learn animation in Blender using a tutorial?
Learning animation in Blender using a tutorial is a great way to start creating your own animations. Here is a step-by-step guide to help you get started:
- First, find a tutorial that suits your skill level and learning style. You can search for \"animation with Blender tutorial\" on YouTube, Blender\'s official website, or other online learning platforms.
- Once you have chosen a tutorial, make sure you have Blender installed on your computer. Blender is a free and open-source 3D animation software that you can download from the official Blender website.
- Start by watching the tutorial from the beginning and follow along with the instructor. The tutorial should cover the basics of animation in Blender, including keyframing, timeline navigation, and basic animation tools.
- As you watch the tutorial, take notes and try to understand the concepts being explained. Pay attention to the instructor\'s workflow and the techniques they use to create animations.
- After each step or technique explained in the tutorial, pause the video and try to replicate it in Blender. This will help you reinforce what you have learned and gain hands-on experience.
- Don\'t rush through the tutorial. Take your time to practice and experiment with the techniques shown. Animation is a skill that requires practice and patience, so be prepared to invest time in honing your skills.
- If you encounter any difficulties or have questions while following the tutorial, don\'t hesitate to ask for help. Join online communities, Blender forums, or reach out to the tutorial creator for assistance.
- Once you have completed the tutorial, don\'t stop there! Continue to explore more advanced tutorials, experiment with different animation styles, and challenge yourself to create your own projects.
Remember, learning animation is an ongoing process, and with practice and dedication, you can develop your skills and create amazing animations using Blender.
READ MORE:
Getting Started with Blender for Animation
Welcome to the exciting world of animation with Blender! Whether you\"re a beginner or looking to sharpen your skills, this guide will set the foundation for your animation journey. Follow these steps to get started:
- Download and Install Blender: Visit the official Blender website to download the latest version. Blender is free and open-source, suitable for all major operating systems.
- Familiarize Yourself with the Interface: Open Blender and spend some time getting to know the layout. The default screen is divided into sections including the 3D viewport, timeline, and outliner.
- Basic Navigation: Learn how to navigate the 3D viewport. Practice zooming, panning, and rotating the view using your mouse and keyboard shortcuts.
- Adding Objects: Learn how to add objects to your scene. Use the \"Add\" menu or the shortcut \"Shift + A\" to create meshes, lights, cameras, and more.
- Basic Modeling Techniques: Start with simple modeling practices. Learn to modify objects using edit mode, extrude faces, and use modifiers to shape your models.
- Introduction to Keyframe Animation: Understand the basics of keyframe animation. Learn how to insert keyframes for object properties like location, rotation, and scale to create simple animations.
- Rendering Your First Animation: Explore the rendering process. Learn how to set up camera angles, adjust lighting, and render your animation into a video format.
These foundational steps will prepare you for more advanced Blender animation techniques. Remember, practice is key to mastering animation in Blender. Happy animating!

Understanding Blender\"s Interface and Basic Tools
Blender\"s interface might seem daunting at first, but it\"s designed to streamline your animation workflow. Let\"s break down the key components and tools you need to get familiar with:
- 3D Viewport: The heart of Blender, where you\"ll spend most of your time. This is where you view, edit, and animate your models. You can switch between different shading modes to get a better view of your work.
- Timeline: Located at the bottom of the default layout, the timeline allows you to control the animation playback, set keyframes, and change the start and end frames of your animation.
- Outliner: A hierarchical list of all objects in your scene, located to the top right. It\"s useful for selecting, hiding, or locking objects.
- Properties Panel: This panel contains various settings for your scene, objects, materials, modifiers, and more. It\"s crucial for fine-tuning the details of your project.
- Tool Shelf and Modes: The tool shelf, on the left side of the 3D viewport, contains tools for transforming, editing, and sculpting your objects. Blender includes different modes like Object Mode, Edit Mode, Sculpt Mode, etc., each tailored for specific tasks.
Understanding these basic tools and components is essential for navigating Blender efficiently. Start by experimenting with each area to get a feel for the workflow. Remember, practice makes perfect, and familiarity with Blender\"s interface is the first step towards mastering animation.
Keyframe Animation: The Foundation of Blender Animation
Keyframe animation is a cornerstone technique in Blender that allows animators to create smooth, dynamic movements by defining start and end points for an object\"s properties over time. This section will guide you through the fundamentals of keyframe animation in Blender, covering everything from inserting your first keyframes to understanding interpolation and easing for more nuanced animations.
- Understanding Keyframes: A keyframe is a snapshot of an object\"s properties at a specific frame in your animation timeline. By setting keyframes at different points, Blender interpolates the values in between, creating motion.
- Inserting Keyframes: To create a keyframe, first select the object you wish to animate. Move to the frame where you want the keyframe, adjust the property (such as location, rotation, or scale), then press I and choose the property to keyframe.
- Interpolation and Easing: Blender automatically calculates the frames between your keyframes. The default interpolation mode is Bezier, creating smooth transitions. You can adjust the interpolation type and easing in the Graph Editor for more control over the animation\"s flow.
- Animating Multiple Properties: You can animate more than one property at a time. For example, animating both the rotation and position of an object can create more complex movements.
- Editing Keyframes: Keyframes can be edited directly in the Timeline, Dope Sheet, or Graph Editor. Move, duplicate, or delete keyframes to refine your animation.
- Using Auto Keying: Blender\"s Auto Keying feature can automatically insert keyframes for any property you change, making it easier to animate complex scenes. Enable it with the auto keyframe button next to the timeline.
Mastering keyframe animation in Blender opens up a world of possibilities for your projects. Whether you\"re creating simple movements or intricate sequences, understanding keyframes is the first step towards bringing your animations to life.

Animating Characters: Rigging and Weight Painting
Animating characters in Blender involves two crucial steps: rigging and weight painting. Rigging is the process of creating a skeleton (armature) that defines how your character moves. Weight painting is used to control which parts of the mesh move with which bones. This guide will walk you through the basics of both, setting the foundation for animating your characters.
- Creating an Armature: Start by building an armature within your character model. This armature represents the skeleton and should mimic the structure of the bones in the body. Use Shift + A in Object Mode to add bones, positioning them to match the joints of your character.
- Parenting Mesh to Armature: Once your armature is complete, you need to connect (parent) your mesh to it. Select your mesh, then Shift-select your armature, and use Ctrl + P to parent them. Choose \"With Automatic Weights\" for Blender to attempt initial weight painting based on the proximity of the bones to the mesh.
- Adjusting Weight Paint: Switch to Weight Paint mode to fine-tune how bones influence different parts of the mesh. Select a bone and paint on the mesh to adjust the influence. Red indicates strong influence, while blue represents no influence. This step is crucial for realistic movement.
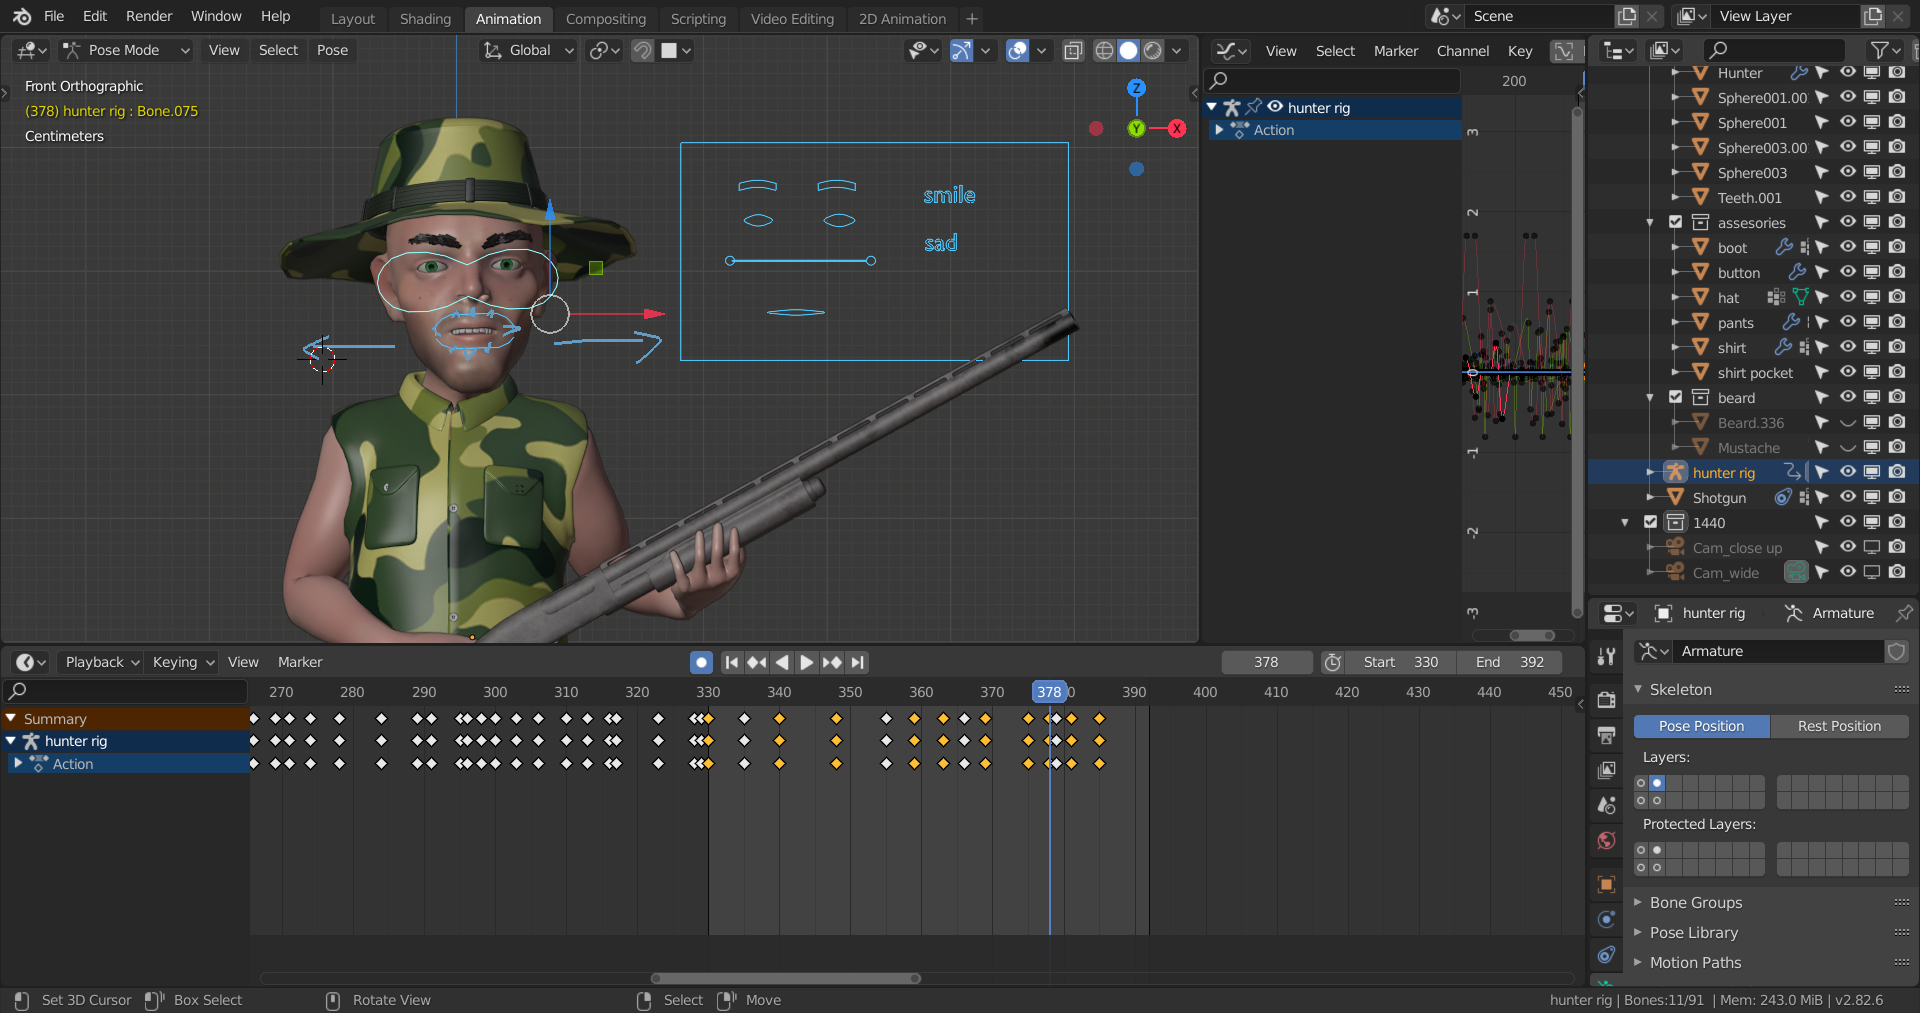
- Testing Rig Movement: Test the rig by selecting the armature and switching to Pose Mode. Rotate, move, and scale the bones to see how the mesh deforms. Adjust the weight painting as needed to correct any unnatural movements.
- Adding Inverse Kinematics (IK): For more advanced control, add Inverse Kinematics to your rig. IK allows you to control chain movements with a single controller, which is especially useful for limbs. Add an IK constraint to a bone and define the chain length to set this up.
- Customizing Bone Shapes: For easier selection and a cleaner workspace, customize the visual shape of control bones. Create a new shape with mesh objects or curves, then assign it to a control bone under the bone\"s custom shape property in the Bone tab.
With a properly rigged and weight-painted character, animating becomes a more intuitive and effective process. These steps form the backbone of character animation in Blender, enabling you to bring your characters to life with natural and compelling movements.

_HOOK_
Advanced Animation Techniques: Inverse Kinematics and Shape Keys
Delving into advanced animation techniques in Blender, Inverse Kinematics (IK) and Shape Keys stand out as powerful tools for creating more complex and lifelike animations. This section explores how to effectively use these techniques to enhance your animation projects.
- Implementing Inverse Kinematics (IK):
- Setting Up IK: IK simplifies the animation of articulated structures like limbs by allowing you to move the end effector (hand or foot) and have the rest of the limb follow in a natural manner. To set up IK, add an IK constraint to the bone at the end of the chain you wish to control.
- Adjusting IK Properties: Configure the IK constraint properties, such as chain length, to specify how many bones up the chain the IK effect should influence. Experiment with settings like stiffness and pole targets to refine how the limb bends and rotates.
- Using Shape Keys for Facial Expressions and Morphing:
- Creating Shape Keys: Shape keys allow for deformations of the mesh that can be animated over time, perfect for facial expressions or morphing objects. In Object Mode, select your mesh, go to the Object Data Properties tab, and add a new Shape Key.
- Editing Shape Keys: With the Basis key active, add another key and edit your mesh to the desired deformation. This new keyframe represents the target shape. You can now animate between the basis shape and this new shape.
- Combining IK and Shape Keys: For advanced character animations, combine IK for body movements with Shape Keys for facial expressions. This combination allows for the animation of complex scenes with characters that move and express emotions realistically.
Understanding and applying these advanced techniques will significantly elevate the quality of your animations. By mastering IK for smooth, natural movements and utilizing Shape Keys for detailed expressions and morphs, you can bring a higher level of realism and complexity to your Blender projects.
Creating Realistic Animations with Physics and Particles
Blender\"s physics and particle systems offer a powerful suite of tools for adding realism to your animations. From simulating natural forces like gravity and wind to creating complex particle effects such as rain, smoke, or fire, these features enable you to add dynamic, lifelike elements to your scenes. This section will guide you through the basics of using physics and particles to enhance your animations.
- Understanding the Physics Engine:
- Blender\"s physics engine simulates real-world physical forces and interactions. Key components include rigid body dynamics for simulating hard objects, cloth simulation for fabrics, and fluid dynamics for liquids. Each offers unique settings to mimic real-world behavior.
- Simulating Rigid Bodies:
- To create animations with colliding or falling objects, use the Rigid Body physics type. This simulates the motion and interaction of hard objects. You can adjust properties like mass, friction, and bounciness to achieve the desired effect.
- Creating Cloth Simulations:
- For animations involving flags, curtains, or clothing, the Cloth physics type allows you to simulate flexible materials. Parameters such as stiffness, damping, and air resistance let you control how the cloth behaves under various conditions.
- Using Fluid Dynamics:
- Fluid simulation is perfect for creating realistic water, smoke, or fire effects. By defining a domain object to contain the simulation and fluid objects as sources, Blender calculates the fluid\"s motion over time, offering control over viscosity, flow rate, and interaction with other objects.
- Working with Particle Systems:
- Particle systems are versatile tools for creating a wide range of effects, from rain and snow to hair and fur. By emitting particles from objects, you can simulate complex phenomena. Customization options include particle lifespan, size, and behavior upon collision.
- Integrating Physics with Animation:
- To combine physics simulations with keyframe animation, you may need to keyframe physics properties or use force fields to influence the motion of particles and rigid bodies. This allows for a seamless blend of controlled animation and physics-based realism.
By mastering these tools, you can create animations that not only look spectacular but also behave in ways that mimic the complexity of the real world. Whether it\"s the flow of water, the fluttering of cloth, or the random movement of particles, Blender\"s physics and particle systems open up endless possibilities for adding depth and realism to your projects.
Blender Tutorial: Animation for Beginners
Looking to learn something new? Check out this amazing tutorial video that will guide you step-by-step on how to master a new skill or solve a problem. Get ready to level up your knowledge and become an expert!
Blender Tutorial: Character Animation for Impatient People
Dive into a world of captivating characters in this video! Whether you\'re a fan of superheroes, animated movies, or intriguing book characters, this video will take you on an exciting journey, unraveling their stories and secrets. Get ready to be mesmerized by the magic of these amazing characters!
Animation Principles and Tips for Lifelike Results
Creating lifelike animations requires more than just technical skills in software like Blender; it involves understanding and applying core animation principles. These principles, established by early Disney animators, are timeless guidelines that can help you create more dynamic and believable animations. Here are key principles and tips to achieve lifelike results in your animations.
- Squash and Stretch: This principle gives the illusion of weight and volume to characters and objects as they move. Apply squash and stretch to make your animations feel more elastic and alive. In Blender, you can use shape keys or armature to deform objects and characters for this effect.
- Anticipation: Before any significant action, there should be a smaller, opposite action to build anticipation. This makes the action more realistic and gives the audience time to understand what’s about to happen. Use keyframes to set up an anticipatory motion before the main action.
- Staging: Use the camera angles, lighting, and composition within Blender to direct the viewer\"s attention to the most important parts of your scene. Proper staging ensures that key actions are clear and understandable.
- Straight Ahead Action and Pose to Pose: These are two approaches to animation. Straight ahead action involves creating each frame one after another to create fluid, dynamic motions. Pose to pose is more structured, starting with key poses and then filling in the intervals. Blender allows you to blend these techniques, using pose-to-pose for structured movements and straight ahead for fluid actions.
- Follow Through and Overlapping Action: In real life, different parts of an object move at different rates. In Blender, simulate this by delaying the animation of parts of your character or object to make the movement more natural. Use the Graph Editor to offset keyframes for overlapping action.
- Slow In and Slow Out: Acceleration and deceleration make animation more natural. Objects don’t start or stop moving abruptly. In Blender, you can adjust the easing of keyframes in the Graph Editor to smooth out the beginning and end of motions.
- Secondary Action: Adding secondary actions adds richness to the primary action, enhancing realism. For instance, a character blinking or adjusting posture while walking. Layer these actions subtly without overshadowing the main action.
- Timing: The number of frames between actions determines the speed and can affect the perception of weight and size. Experiment with timing in Blender to make your animations feel more grounded in reality.
- Exaggeration: While realism is important, a degree of exaggeration can add more drama and appeal to your animations. Use exaggerated movements or expressions to convey emotions and actions more clearly.
- Appeal: Characters and objects should have a pleasing design that attracts the viewer\"s attention. Use Blender’s modeling and texturing tools to create appealing and engaging designs.
By integrating these principles into your Blender animations, you can create works that resonate more deeply with viewers, combining technical proficiency with the art of storytelling and visual communication.

Rendering Your Animation: Best Practices and Optimization
Rendering is a critical final step in the animation process, where your Blender projects come to life. However, it can be time-consuming and resource-intensive. To ensure a smooth rendering process and high-quality results, follow these best practices and optimization tips.
- Choose the Right Render Engine: Blender offers several render engines, including Eevee and Cycles. Eevee is faster and suitable for real-time rendering, while Cycles produces more realistic results but takes longer. Select the one that best fits your project\"s needs.
- Optimize Your Scenes: Before rendering, simplify your scenes. Remove any unnecessary geometry, textures, or effects. Use modifiers like Decimate to reduce polygon count without significantly affecting visual quality.
- Manage Light and Shadow Settings: Excessive or complex lighting can increase rendering times. Use light probes and baked lighting in Eevee for faster results, or optimize shadow samples and light paths in Cycles to balance quality and speed.
- Use Render Layers and Compositing: Splitting your scene into render layers allows you to render complex scenes in manageable parts and later composite them together. This can significantly reduce render times and improve flexibility in post-processing.
- Adjust Render Settings: In the render settings, fine-tune parameters such as resolution, sample rates, and anti-aliasing to find a balance between render quality and time. Lowering the resolution for test renders can speed up the process.
- Apply Denoising: Noise can be a significant issue in renders, especially in low-light conditions. Use Blender’s built-in denoising tools to clean up your renders without increasing render times significantly.
- Utilize Hardware Efficiently: Ensure that Blender is configured to use your hardware optimally. For instance, Cycles can render using GPU or CPU, or a combination of both. GPU rendering is generally faster if you have a powerful graphics card.
- Batch Rendering: For lengthy animations, consider batch rendering, which breaks the render process into smaller chunks. This approach can help manage resources better and prevent data loss from crashes.
- Test Renders: Perform test renders at a lower resolution or with a reduced frame range to check for potential issues before committing to the final render. This can save a lot of time and resources.
- Save Regularly and Use Autosave: Ensure your project is saved before rendering. Blender’s autosave feature can also help recover your work in case of a crash during rendering.
By following these practices, you can streamline the rendering process, reduce wait times, and achieve high-quality animations with Blender. Remember, rendering is both an art and a science—experimenting with settings and finding what works best for your specific project is key.
READ MORE:
Resources and Communities for Blender Animators
Blender is not just a powerful tool for animation; it\"s supported by a vibrant community of artists, developers, and enthusiasts who share a passion for 3D creation. Whether you\"re a beginner or an experienced animator, numerous resources and communities can help you learn, share, and collaborate. Here are some valuable places to start:
- Blender Official Website: The official Blender website (blender.org) is the go-to place for downloads, updates, and official tutorials. It also hosts a comprehensive manual and user forums.
- Blender Artists Community: Blender Artists (blenderartists.org) is one of the largest forums for Blender users. It\"s a great place to ask questions, share your work, and receive feedback from fellow artists.
- BlenderNation: BlenderNation (blendernation.com) offers daily news, articles, tutorials, and showcases of Blender artworks. It\"s an excellent source for inspiration and staying updated on the latest Blender developments.
- CG Cookie: CG Cookie (cgcookie.com) provides in-depth tutorials and courses on Blender, covering everything from the basics to advanced techniques. While some resources are free, a subscription offers full access.
- Blender Guru: Blender Guru (blenderguru.com) is a well-known tutorial website created by Andrew Price. It offers tutorials for all skill levels, focusing on everything from basic modeling to complex scenes.
- YouTube: YouTube hosts a vast number of Blender tutorials and channels. Some popular ones include Blender Guru, CG Geek, and Ducky 3D. These channels offer free tutorials on a wide range of topics.
- Blender Conference: The annual Blender Conference is an event where Blender enthusiasts from around the world gather to share knowledge, showcase work, and meet the developers. It\"s also streamed online for those who cannot attend in person.
- Blender Cloud: Blender Cloud (cloud.blender.org) is a subscription service offering access to training, assets, and production files. It\"s also a way to support the ongoing development of Blender.
- Blender Stack Exchange: For specific questions or troubleshooting, Blender Stack Exchange (blender.stackexchange.com) is a Q&A site where you can find answers to technical questions about Blender.
- Social Media Groups: There are numerous Blender-related groups and communities on social media platforms like Facebook, Reddit, and Discord, offering places to share work, tips, and connect with other animators.
Engaging with these resources and communities can greatly enhance your Blender animation skills, offering support, inspiration, and opportunities to connect with like-minded creators around the globe.
Embark on your Blender animation journey with confidence, leveraging these comprehensive guides and community resources. Unlock your creative potential and transform your visions into captivating animations that inspire and awe.

_HOOK_