Topic 2d autocad tutorial: Embark on a journey to master 2D AutoCAD with our comprehensive tutorial, designed to enhance your drafting skills and bring your architectural visions to life. Start transforming ideas into reality today!
Table of Content
- How to learn AutoCAD with free step-by-step video lessons and practice exercises?
- Getting Started with AutoCAD
- Understanding the AutoCAD Interface
- Basic Drawing Tools: Lines, Circles, and Rectangles
- Manipulating Objects: Select, Move, Copy, and Rotate
- Mastering Precision Drawing: Using Grids, Snap, and Ortho Mode
- Advanced Drawing Techniques: Polyline, Arcs, and Splines
- YOUTUBE: AutoCAD Basic Tutorial for Beginners - Part 1 of 3
- Layer Management for Organized Drawings
- Dimensioning and Annotation for Clarity
- Creating Blocks for Reuse
- Plotting and Printing Your Drawings
- Efficient Use of Commands and Shortcuts
- Tips for Effective 2D Drafting
How to learn AutoCAD with free step-by-step video lessons and practice exercises?
To learn AutoCAD with free step-by-step video lessons and practice exercises, you can follow the below steps:
- Visit the website that offers free AutoCAD tutorials.
- Look for the section or page specifically dedicated to AutoCAD tutorials.
- Find the video lessons that cover the basics of AutoCAD and start with the first lesson.
- Watch the video carefully, taking note of the instructions and commands used.
- Pause the video when necessary and try to replicate the steps in your own AutoCAD software.
- After completing each lesson, take the quizzes provided to test your understanding.
- Make sure to practice the exercises provided to reinforce your learning.
- Continue watching the following video lessons in sequential order to progressively build your AutoCAD skills.
- Take your time and don\'t rush through the lessons. Practice regularly to improve your proficiency.
- If you encounter any difficulties or have questions, refer to the provided resources or seek help from online forums or communities.
READ MORE:
Getting Started with AutoCAD
Welcome to the world of AutoCAD, a powerful tool for 2D drafting and design. Starting with AutoCAD might seem daunting, but with these steps, you\"ll become comfortable with the interface and basic functions quickly.
- Install AutoCAD: Ensure you have the latest version installed on your computer for the best experience.
- Open a New Drawing: Launch AutoCAD and select \"New Drawing\" to begin. This will open a blank workspace where you can start your design.
- Familiarize Yourself with the Interface: Spend some time exploring the AutoCAD interface. Locate the menu bar, toolbars, command line, and drawing area.
- Set Up Your Drawing: Before you start, configure your drawing\"s units and precision. Access the \"Drawing Settings\" under the \"Settings\" menu to set your preferences.
- Learn Basic Commands: Learn basic commands like LINE, CIRCLE, RECTANGLE to start drawing. You can enter commands via the command line or use the toolbars.
- Practice Zoom and Pan: Use the ZOOM and PAN commands to navigate around your drawing. This is crucial for working efficiently in your drawing space.
- Save Your Work: Get into the habit of frequently saving your work by using the SAVE or QSAVE commands.
Remember, practice is key to becoming proficient in AutoCAD. Start with simple projects to familiarize yourself with the drawing tools and gradually move to more complex designs.
Understanding the AutoCAD Interface
The AutoCAD interface is a gateway to the vast capabilities of this powerful design and drafting software. A well-organized workspace helps you to improve efficiency and ease the design process. Here\"s a breakdown of key components to help you navigate and utilize AutoCAD effectively.
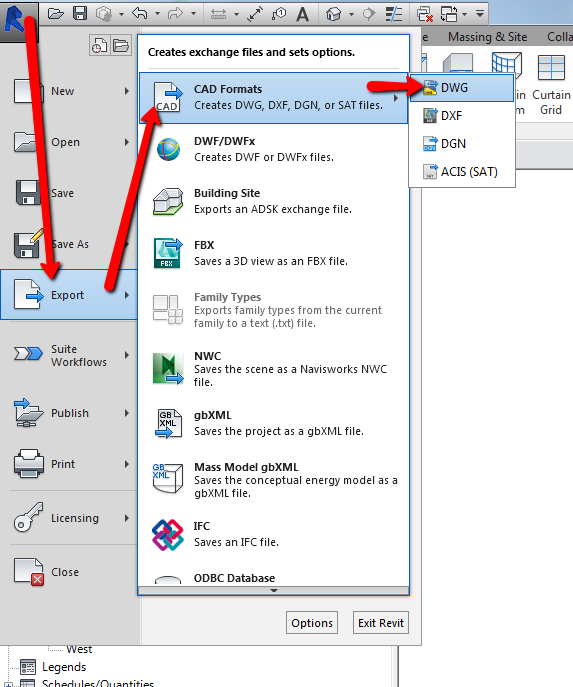
- Application Menu: Located at the top-left corner, it provides access to file operations, including new, open, save, and print.
- Ribbon: This area contains multiple tabs, each with its own set of tools and commands organized in panels for drawing, modifying, and managing your projects.
- Command Line: Positioned at the bottom of the screen, it displays prompts, options, and messages. You can also enter commands directly here.
- Toolbars: These are customizable bars that can be docked or floated, containing shortcuts to frequently used commands and tools.
- Drawing Area: The central part of the screen where you create and modify your drawings.
- Navigation Bar: Offers tools to pan, zoom, and change the view of your drawing efficiently.
- Status Bar: Located at the bottom, it provides quick access to drawing modes, coordinates, and other settings.
- Properties Palette: Displays the properties of selected objects and allows for easy modification.
- Layers Panel: Essential for managing the visibility, color, and other properties of different elements in your drawing.
Understanding these components and how they work together will help you navigate the AutoCAD interface with confidence, making your drawing and design tasks more intuitive and productive.

Basic Drawing Tools: Lines, Circles, and Rectangles
Mastering AutoCAD\"s basic drawing tools is the first step towards becoming proficient in creating professional 2D drawings. Lines, circles, and rectangles form the foundation of most designs. Here\"s how to use these essential tools effectively.
- Lines:
- Select the Line tool from the Ribbon or type \"LINE\" in the command line.
- Click to specify the starting point, then move your cursor to the end point and click again.
- Press \"Enter\" to complete the line or continue drawing multiple connected lines.
- Circles:
- Activate the Circle tool from the Ribbon or by typing \"CIRCLE\".
- Click to set the center point of the circle.
- Specify the radius by moving the cursor away from the center point and clicking, or by typing the radius value and pressing \"Enter\".
- Rectangles:
- Select the Rectangle tool from the Ribbon or type \"RECTANG\" in the command line.
- Click in the drawing area to set one corner point of the rectangle.
- Move your cursor to define the opposite corner and click again to complete the rectangle.
- For precise dimensions, after the first click, enter the length, press \"Tab\", enter the width, and then press \"Enter\".
With practice, these tools will become second nature, allowing you to create detailed 2D drawings with efficiency and precision.
Manipulating Objects: Select, Move, Copy, and Rotate
After creating basic shapes in AutoCAD, the next step is learning how to manipulate these objects to achieve the desired design. This section covers the essential skills of selecting, moving, copying, and rotating objects in your drawings.
- Selecting Objects:
- Use the \"SELECT\" tool or simply click on an object to select it.
- For multiple selections, hold down the \"Shift\" key while clicking on additional objects, or use a window selection by clicking and dragging across the objects.
- Moving Objects:
- Select the object(s) you wish to move.
- Type \"MOVE\" in the command line or choose the move tool from the Ribbon.
- Specify the base point for the move, then the destination point, or enter a distance and direction.
- Copying Objects:
- After selecting the object(s), initiate the \"COPY\" command.
- Pick a base point, then specify the copy point(s) or enter a distance.
- You can make multiple copies by continuing to click points until you press \"Enter\".
- Rotating Objects:
- Select the object(s) to be rotated.
- Activate the \"ROTATE\" command.
- Choose the base point around which the object will rotate.
- Specify the rotation angle by typing it in or by rotating the object interactively with your mouse.
Mastering these commands allows you to effectively modify and refine your designs, turning basic drawings into detailed plans.
_HOOK_
Mastering Precision Drawing: Using Grids, Snap, and Ortho Mode
Precision is crucial in any AutoCAD drawing, enabling the creation of detailed and accurate designs. AutoCAD\"s Grid, Snap, and Ortho modes are essential tools for achieving such precision. Here\"s how to utilize these features effectively.
- Using the Grid:
- The grid is a visual reference of dots or lines on your drawing area, representing a predefined spacing.
- To toggle the grid display, press \"F7\" or click the \"Grid\" button on the status bar. Adjust grid settings via \"Drafting Settings\" dialog box.
- The grid helps you align objects and visualize the scale of your design.
- Enabling Snap Mode:
- Snap mode forces your cursor to jump to exact points on the grid, aiding in precise placement of drawing elements.
- Activate Snap mode by pressing \"F9\" or clicking the \"Snap\" button on the status bar. Customize its settings through \"Drafting Settings\".
- Utilizing Ortho Mode:
- Ortho mode restricts cursor movement to horizontal and vertical directions, perfect for drawing straight lines.
- Turn Ortho mode on or off by pressing \"F8\" or using the \"Ortho\" button on the status bar.
Combining these tools not only enhances the accuracy of your drawings but also streamlines the design process, allowing for the creation of complex layouts with ease and precision.
Advanced Drawing Techniques: Polyline, Arcs, and Splines
AutoCAD\"s advanced drawing tools like polylines, arcs, and splines allow for the creation of complex and smooth designs. These tools offer flexibility and precision for detailed projects. Here\"s how to master these advanced techniques.
- Polylines:
- Select the \"Polyline\" tool from the Ribbon or type \"PLINE\" in the command line.
- Click in the drawing area to start the polyline, then click additional points to continue. Each segment can be straight or curved, depending on the options selected during creation.
- Close the polyline by connecting the last point to the first or by typing \"C\" when prompted.
- Arcs:
- Activate the \"Arc\" tool from the Ribbon or enter \"ARC\" in the command line.
- Specify the start point, then the second point, and finally the end point of the arc. There are several methods to define an arc, including center, start, end, and direction.
- Splines:
- Choose the \"Spline\" tool from the Ribbon or type \"SPLINE\".
- Click to place control points in the drawing area. The spline curve will pass through or near these points, creating a smooth, flowing line.
- Press \"Enter\" to complete the spline. You can adjust the curvature by moving the control points.
Understanding these advanced drawing techniques enhances your ability to tackle more sophisticated design tasks, giving you the tools to bring even the most intricate ideas to life.

AutoCAD Basic Tutorial for Beginners - Part 1 of 3
Discover the amazing world of AutoCAD, the leading software for 3D designing and drafting. Unleash your creativity, enhance your skills, and bring your designs to life with this comprehensive video tutorial.
AutoCAD 2022 2D Sketching Tutorial For Beginner in 13 Minutes
Unleash your inner artist with this incredible sketching tutorial. Whether you\'re a beginner or an expert, this video will guide you through different techniques to create stunning sketches that will leave everyone in awe. Don\'t miss out on this opportunity to elevate your sketching skills!
Layer Management for Organized Drawings
Effective layer management in AutoCAD is key to creating organized and manageable drawings. Layers allow you to separate different elements of your drawing, making editing, viewing, and printing processes more efficient. Here’s a step-by-step guide to mastering layer management.
- Creating Layers:
- Open the Layer Properties Manager by clicking on the \"Layer Properties\" icon on the ribbon or typing \"LAYER\" in the command line.
- Click the \"New Layer\" button to create a new layer. Assign it a name, color, and other properties to differentiate it from other layers.
- Assigning Objects to Layers:
- Select the object you wish to assign to a layer.
- Open the \"Layer Dropdown\" menu in the ribbon and select the desired layer.
- Managing Layer Visibility:
- Use the Layer Properties Manager to toggle the visibility of layers by clicking on the light bulb icon next to each layer name.
- This allows you to focus on specific aspects of your drawing without the clutter of other elements.
- Locking Layers:
- To prevent accidental modifications, layers can be locked by clicking the \"Lock\" icon next to the layer\"s name in the Layer Properties Manager.
- Using Layer States:
- Layer states can save and restore different layer configurations. This is useful for working on complex projects with multiple viewing and editing needs.
- Save a layer state by clicking the \"Layer States Manager\" in the Layer Properties Manager, then \"New\".
Adopting a disciplined approach to layer management can significantly enhance your productivity and the quality of your AutoCAD projects.

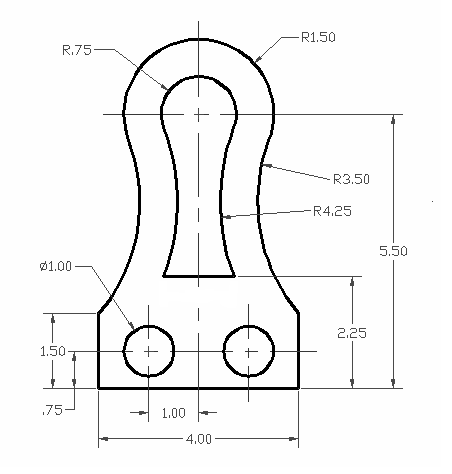
Dimensioning and Annotation for Clarity
Dimensioning and annotation are crucial for the clarity and comprehensibility of your AutoCAD drawings. Proper use of these tools ensures that your designs are accurately communicated to whoever reads them. Follow these steps to effectively apply dimensioning and annotations to your drawings.
- Adding Dimensions:
- Access the \"Annotate\" tab on the Ribbon to find dimensioning tools such as Linear, Aligned, Radius, Diameter, and Angular.
- Select the appropriate dimension tool for your needs. For instance, use \"Linear\" for distances between two points, \"Radius\" for circles, and \"Angular\" for angles.
- Click on the object(s) you wish to dimension, then place the dimension line in the desired location.
- AutoCAD automatically calculates and displays the measurement. You can customize the appearance of dimensions in the \"Dimension Style Manager\".
- Creating Annotations:
- Use the \"Multiline Text\" tool (MTEXT) for larger blocks of text or \"Single Line Text\" (TEXT) for shorter notes.
- Select the area where you want to insert the text and type your annotations. Format the text using the options in the Text Editor tab.
- Annotations can include notes, specifications, and other important information that cannot be conveyed through drawing alone.
- Managing Text Styles:
- Create and manage text styles through the \"Style Manager\" to ensure consistency in your annotations across multiple drawings.
- Customize font, size, alignment, and other properties to match your project standards or personal preferences.
By mastering dimensioning and annotation, you enhance the functionality and professionalism of your AutoCAD drawings, ensuring that they clearly communicate the intended design and details.

Creating Blocks for Reuse
Blocks in AutoCAD are a powerful feature that allows you to create reusable drawing components. They help streamline your drawing process by enabling you to reuse previously drawn or designed objects instead of recreating them from scratch. Here’s how to create and use blocks effectively.
- Defining a Block:
- Choose the objects you want to include in your block.
- Type \"BLOCK\" in the command line or access the \"Create Block\" dialogue from the \"Insert\" tab on the Ribbon.
- Enter a name for your block, specify a base point, and select the objects to be included. Optionally, you can add a description for the block.
- Click \"OK\" to create the block. Your selected objects are now combined into a single block that can be inserted into any drawing.
- Inserting Blocks:
- To insert a block, type \"INSERT\" or go to the \"Insert\" tab and select \"Block\" from the Ribbon.
- Choose the block you want to insert from the list of available blocks. You can specify insertion points, scale, and rotation before placing the block.
- Editing Blocks:
- If you need to modify a block, use the \"BLOCK EDITOR\" command to make changes directly to the block\"s definition.
- Once your edits are complete, save the changes, and every instance of the block within the drawing will be updated.
- Sharing Blocks:
- Blocks can be saved as separate files and shared with others. This is useful for creating a library of common components that can be used across multiple projects.
- To save a block as a separate file, use the \"WBLOCK\" command.
By leveraging blocks, you can significantly increase your productivity, ensure consistency across your drawings, and simplify the management of drawing components.

_HOOK_
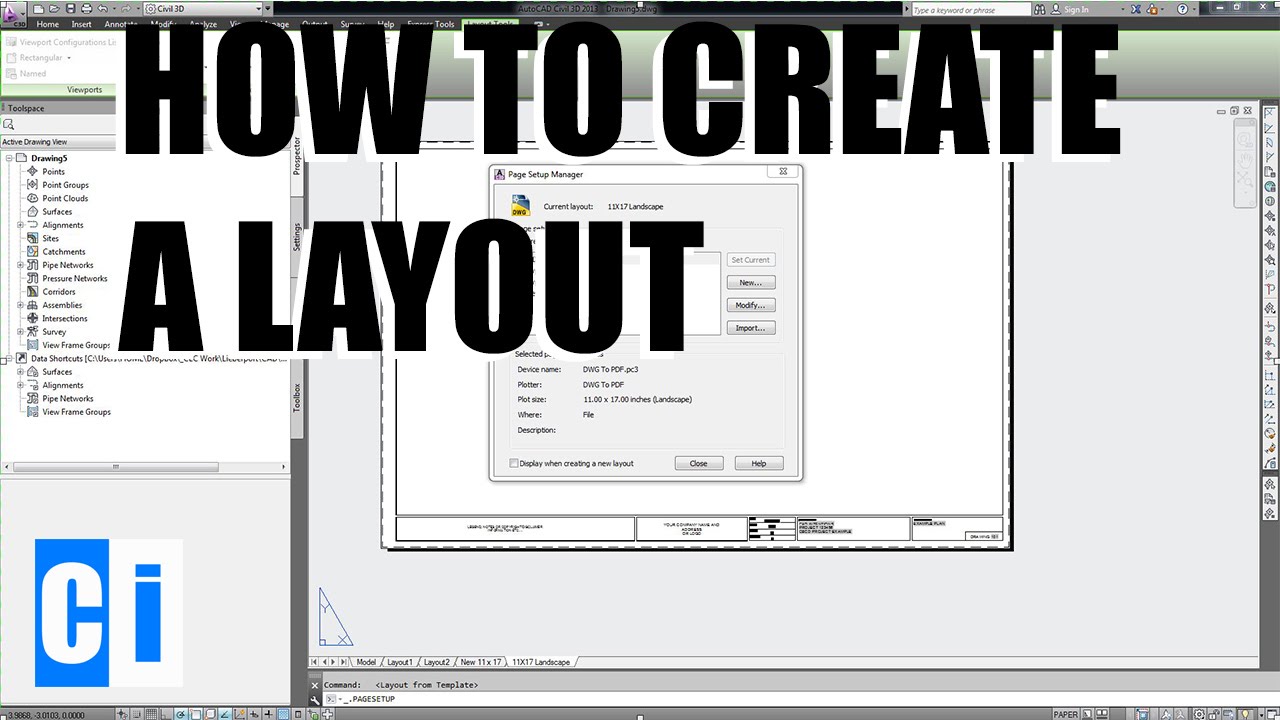
Plotting and Printing Your Drawings
Finalizing your AutoCAD projects involves plotting or printing your drawings for presentation or documentation purposes. This process can seem complex due to the variety of options available, but these steps will guide you through the basics of plotting and printing effectively.
- Setting Up Your Layout:
- Before plotting, ensure your drawing is properly scaled in a layout (paper space). Set up page size, orientation, and plot scale in the Page Setup Manager.
- Adjust the viewport to frame your drawing as desired on the sheet.
- Choosing a Printer/Plotter:
- Go to the \"Plot\" dialog box, where you can select from available printers and plotters. Consider the final output size and the media type when choosing.
- Configuring Plot Settings:
- In the \"Plot\" dialog box, specify details such as the paper size, plot area, plot scale, and drawing orientation.
- Select the \"Plot Style Table\" to control the appearance of your drawing\"s lines, colors, and fill patterns on the final print.
- Previewing Before Plotting:
- Always preview your plot to check for errors or adjustments needed before final printing. This can save time and resources.
- Plotting the Drawing:
- After confirming the settings and preview, click \"OK\" in the \"Plot\" dialog box to start plotting.
- For digital submissions, you can also choose to plot to a PDF or DWF file.
By following these steps, you can ensure that your drawings are plotted or printed accurately, reflecting the quality and precision of your work.
Efficient Use of Commands and Shortcuts
Mastering commands and shortcuts in AutoCAD significantly enhances productivity and workflow efficiency. Familiarizing yourself with these tools allows for rapid drawing, editing, and navigating within the software. Here are essential commands and shortcuts to incorporate into your daily use.
- Commonly Used Commands:
- LINE - Draws straight lines.
- CIRCLE - Creates circles based on radius or diameter.
- RECTANG - Generates rectangles.
- TRIM - Trims objects to meet the edges of other objects.
- EXTEND - Extends objects to meet the edges of other objects.
- Essential Shortcuts:
- F1 - Opens the Help window.
- F2 - Toggles the Text window.
- F3 - Toggles Object Snap.
- F8 - Toggles Ortho mode, constraining movement to horizontal or vertical.
- F9 - Toggles Snap mode, ensuring precise cursor placement.
- Navigation Shortcuts:
- PAN - Click and drag to move the view within the drawing area.
- ZOOM - Allows zooming in and out. Use ZOOM EXTENTS to view the entire drawing.
- Layer Management:
- LA or LAYER - Opens the Layer Properties Manager.
- Quickly switch between layers by typing the layer name after the LAYER command.
- Block and Group Commands:
- BLOCK - Creates a block from selected objects.
- GROUP - Groups multiple objects into a single unit for easier manipulation.
Integrating these commands and shortcuts into your AutoCAD routine can significantly cut down on design time, making your workflow more efficient and productive.
READ MORE:
Tips for Effective 2D Drafting
Effective 2D drafting in AutoCAD is not just about using the right tools but also about implementing best practices that streamline your workflow and enhance the quality of your drawings. Here are some valuable tips to improve your 2D drafting efficiency.
- Use Layers Wisely: Organize your drawing by assigning elements to layers. This makes it easier to edit, hide, or lock parts of your drawing as needed.
- Master Keyboard Shortcuts: Familiarize yourself with AutoCAD\"s keyboard shortcuts for common commands to speed up your drafting process.
- Utilize Snap and Grid: Use snap and grid features to ensure precision in your drawings. They help in aligning objects and maintaining consistent dimensions.
- Employ Block Libraries: Create and use blocks for repetitive elements. This saves time and ensures consistency across your drawings.
- Keep Your Drawing Simple: Avoid overcomplicating your drawing with unnecessary details. Simplify your work by using the least amount of lines and shapes possible to convey your design.
- Regularly Update Your Templates: Use templates for consistent project setups. Regularly update these templates to reflect changes in standards or practices.
- Use External References: For large projects, use external references (Xrefs) to link different drawings. This keeps the file size down and simplifies collaboration.
- Practice Dimensioning and Annotation: Apply dimensions and annotations clearly and correctly to convey the necessary information about your design.
- Review and Revise: Always take the time to review your drawings for errors or improvements, preferably after taking a break to look at it with fresh eyes.
By integrating these tips into your 2D drafting workflow, you\"ll enhance both the efficiency and the accuracy of your AutoCAD projects, leading to higher quality outcomes and more satisfied clients or stakeholders.
Embarking on your 2D AutoCAD journey unlocks endless possibilities in design and drafting. With practice and dedication, these tutorials will empower you to bring your creative visions to life with precision and confidence.