Topic paint bucket adobe illustrator: Unlock the secrets of Adobe Illustrator"s Paint Bucket tool and transform your design projects with unparalleled color precision and creativity.
Table of Content
- How do I use the paint bucket tool in Adobe Illustrator?
- Understanding the Paint Bucket Tool in Illustrator
- How to Access and Use the Paint Bucket Tool
- Tips for Effective Color Filling with the Paint Bucket
- Common Issues and Solutions with the Paint Bucket Tool
- Advanced Techniques and Creative Uses of the Paint Bucket Tool
- Comparing the Paint Bucket Tool with Other Illustrator Tools
- YOUTUBE: Adobe Illustrator: How to Fill Color with the Paint Bucket Tool
- Integrating the Paint Bucket Tool into Workflow
- Best Practices for Organizing and Managing Colors
- Case Studies: Real-world Examples of Paint Bucket Tool Usage
- Additional Resources and Tutorials for Learning More
How do I use the paint bucket tool in Adobe Illustrator?
To use the paint bucket tool in Adobe Illustrator, you can follow these steps:
- Select the object or group of objects you want to apply the paint bucket to.
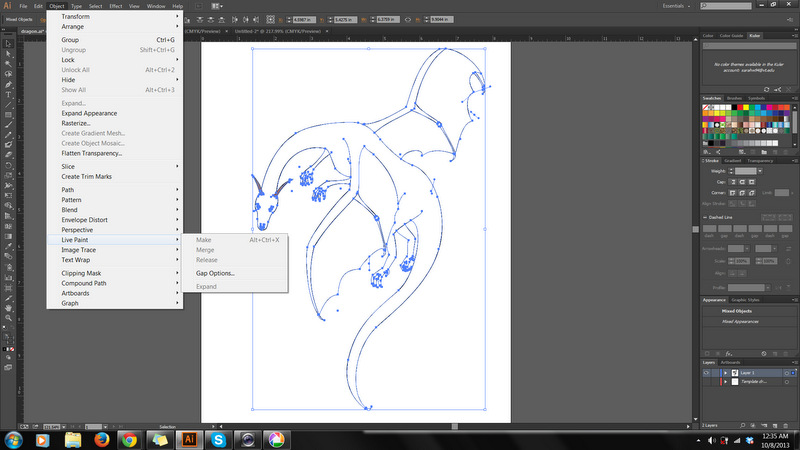
- Go to the Object menu and choose Live Paint.
- Click on the Make option to convert the selected objects into a Live Paint group.
- You will notice that the objects within the group are now divided into different regions according to their shapes and boundaries.
- Select the Live Paint Bucket tool from the toolbar on the left side of the screen. It is represented by an icon resembling a paint bucket.
- Choose the desired fill color from the Color panel or Swatches panel.
- Click on any region within the Live Paint group to apply the selected color to that region.
- You can continue clicking on different regions to fill them with the chosen color.
- If you want to change the applied color, simply select a new color from the Color or Swatches panel and click on the desired region to update its fill.
- When you are finished coloring, you can choose the Expand option from the Object menu to convert the Live Paint group back into individual shapes, if desired.
READ MORE:
Understanding the Paint Bucket Tool in Illustrator
The Paint Bucket Tool in Adobe Illustrator, also known as the \"Live Paint Bucket\", is a versatile feature designed for filling areas with color. This tool is especially useful in vector graphics, allowing designers to fill shapes and sections effortlessly.
- Functionality: It detects and fills the area within a defined boundary, such as a shape or a closed path.
- Live Paint Groups: The tool works best with Live Paint Groups, which can be created by selecting objects and choosing \"Live Paint\" > \"Make\".
- Interactive Coloring: Once a Live Paint Group is formed, clicking an area with the Paint Bucket applies the selected fill color to that section.
- Gap Detection: A notable feature is its gap detection capability, allowing it to fill areas even if they are not completely enclosed.
- Stroke and Fill Options: The tool also allows changing the color of strokes and fills separately, offering great flexibility.
Mastering the Paint Bucket Tool enhances efficiency in coloring complex vector illustrations and contributes significantly to a designer\"s workflow in Adobe Illustrator.
How to Access and Use the Paint Bucket Tool
The Paint Bucket Tool in Adobe Illustrator, known for its simplicity and effectiveness, can be accessed and used through a few straightforward steps.
- Opening Illustrator: Start by launching Adobe Illustrator.
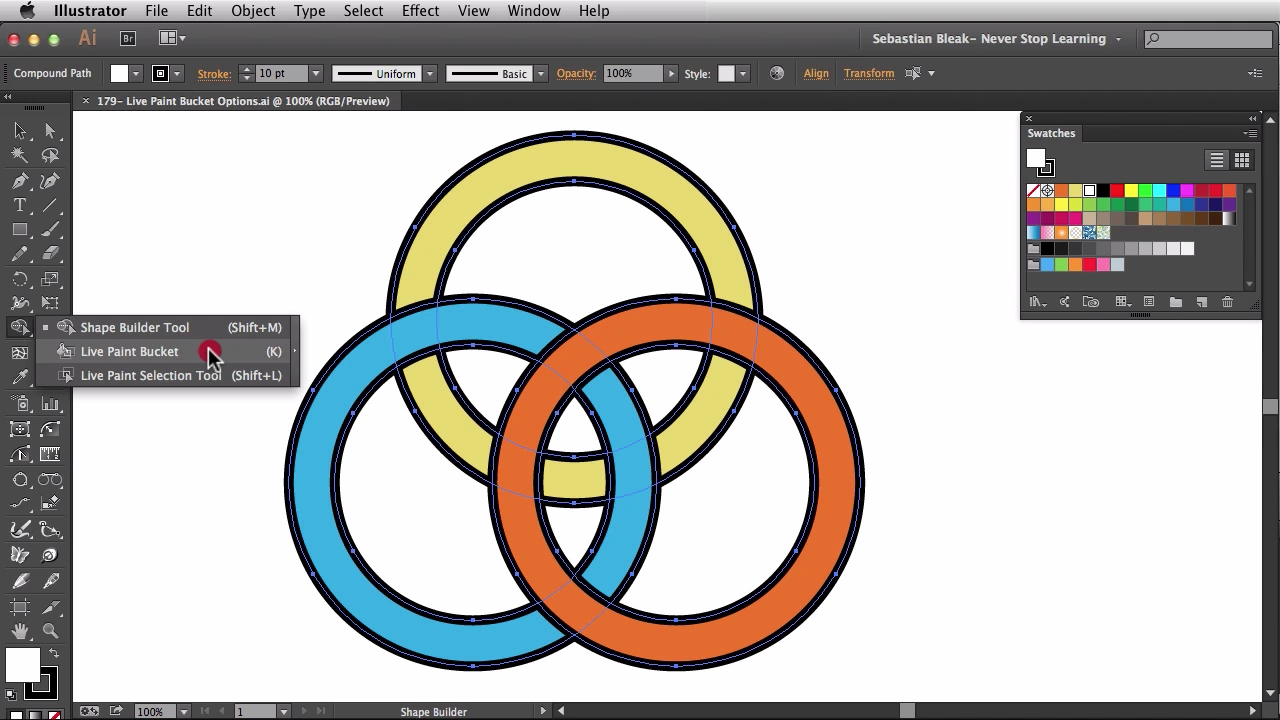
- Finding the Tool: The Paint Bucket Tool, also known as the \"Live Paint Bucket\", is located in the Tools panel. If it\"s not visible, use the shortcut key \"K\" to activate it.
- Creating or Selecting Artwork: Before using the tool, create new artwork or select existing vector objects.
- Converting to Live Paint Group: To use the tool effectively, convert your selection into a Live Paint Group by choosing \"Object\" > \"Live Paint\" > \"Make\".
- Applying Color: With the tool active, click on the area you wish to color. The tool will fill the enclosed area with the current fill color.
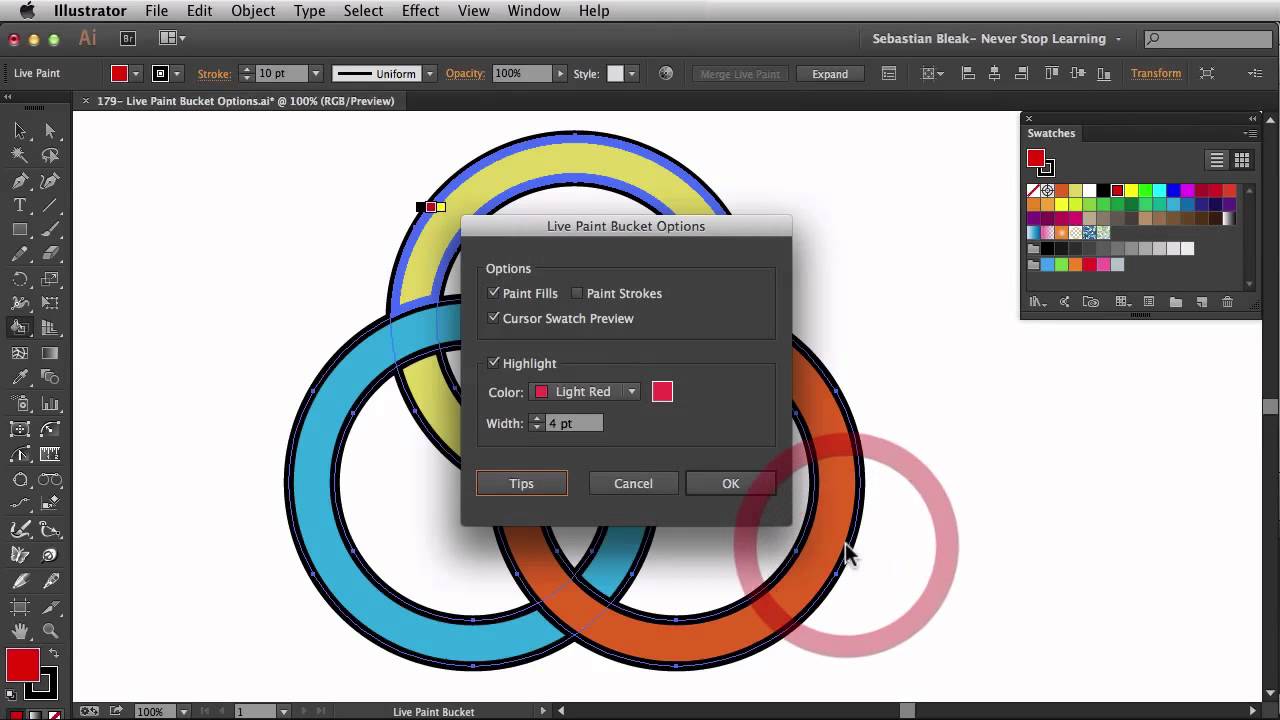
- Adjusting Colors: Change the fill color as needed in the Swatches panel to apply different colors to other areas.
- Exploring Options: Experiment with the tool\"s options like gap detection and tolerance for more precise coloring.
- Finalizing the Design: Once coloring is complete, you can finalize your design by expanding the Live Paint Group, which converts it into standard vector paths.
Mastering the Paint Bucket Tool\"s accessibility and usage in Illustrator empowers designers to efficiently add vibrant colors to their vector artworks.

Tips for Effective Color Filling with the Paint Bucket
Maximizing the potential of the Paint Bucket tool in Adobe Illustrator involves understanding its nuances and applying effective techniques for color filling. Here are some key tips to enhance your coloring workflow:
- Preparation of Artwork: Ensure your artwork is well-organized with clearly defined areas for coloring. This makes the tool more effective in detecting boundaries.
- Utilizing Live Paint Groups: Convert your artwork into a Live Paint Group for more seamless coloring. This allows for easy application and adjustment of colors within bounded areas.
- Gap Detection Setting: Adjust the gap detection settings to suit your artwork’s needs. This feature helps fill color in areas that might not be fully enclosed.
- Experimenting with Colors: Don’t hesitate to experiment with different colors from the Swatches panel. This can lead to unique and vibrant designs.
- Layer Management: Organize your artwork in layers for easier color application and adjustments later.
- Shortcut Usage: Familiarize yourself with shortcuts like \"K\" for the Paint Bucket tool to speed up your workflow.
- Revisiting and Adjusting: After applying colors, revisit your work to make adjustments. Illustrator allows easy color changes even after application.
- Expanding Live Paint: Once satisfied, consider expanding your Live Paint Groups to turn them into standard paths for further editing or finalization.
By applying these tips, you can harness the full capabilities of the Paint Bucket tool, leading to more efficient and creative design work in Illustrator.
Common Issues and Solutions with the Paint Bucket Tool
While the Paint Bucket Tool in Adobe Illustrator is a powerful asset, users may encounter some common issues. Here are solutions to effectively address these challenges:
- Issue: Incomplete Filling: Sometimes, the tool may not fill an area completely. Solution: Check for any small gaps in the outline of the shape and use the \"Gap Detection\" feature to adjust sensitivity.
- Issue: Wrong Area Being Filled: Occasionally, the tool might fill an unintended area. Solution: Ensure that your paths are properly closed, and consider creating separate Live Paint groups for distinct areas.
- Issue: Color Not Applying: If the tool isn\"t applying color, Solution: verify that you\"re working in a Live Paint group and the selected area is part of it.
- Issue: Slow Performance: Large designs or complex groups can slow down the tool. Solution: Simplify your artwork by reducing the number of paths or anchor points.
- Issue: Lack of Precision: Difficulty in targeting small areas. Solution: Zoom in on your artwork for better accuracy and control.
- Issue: Unexpected Color Changes: If colors change unexpectedly after applying, Solution: check your color settings and ensure you\"re using the correct color profile.
Understanding these common issues and their solutions enhances your proficiency with the Paint Bucket Tool, leading to a smoother experience in Adobe Illustrator.
_HOOK_
Advanced Techniques and Creative Uses of the Paint Bucket Tool
The Paint Bucket Tool in Adobe Illustrator is not just for basic color filling; it can be utilized for advanced techniques and creative applications. Here are some innovative ways to use this tool:
- Gradient Filling: Combine the Paint Bucket with gradient fills to create smooth color transitions within shapes.
- Pattern Creation: Use the tool to fill areas with patterns or custom designs, enhancing the visual appeal of your illustrations.
- Layering Colors: Experiment with layering multiple colors in a Live Paint Group for complex color schemes and effects.
- Interactive Coloring: Engage in interactive coloring by rapidly changing colors in a design to compare different palettes.
- Stylized Strokes: Apply the Paint Bucket to strokes for unique effects, turning simple lines into intricate designs.
- Gap Detection for Complex Shapes: Leverage the gap detection feature for complex shapes to ensure thorough and consistent color application.
- Creating Artistic Effects: Use the tool for abstract art and creative effects by playing with random color placements and unexpected color combinations.
Exploring these advanced techniques with the Paint Bucket Tool opens up new realms of creativity and innovation in your Illustrator projects.

Comparing the Paint Bucket Tool with Other Illustrator Tools
Understanding how the Paint Bucket Tool in Adobe Illustrator compares to other tools is essential for designers. This comparison highlights the unique functionalities and use cases of the Paint Bucket Tool versus other Illustrator tools:
- Paint Bucket vs. Shape Builder Tool: The Paint Bucket is ideal for filling color in defined areas, while the Shape Builder Tool is used for creating complex shapes by merging and editing overlapping shapes.
- Paint Bucket vs. Gradient Tool: While the Paint Bucket applies flat colors, the Gradient Tool is used to create color gradients and smooth transitions between multiple colors.
- Paint Bucket vs. Eyedropper Tool: The Eyedropper is used for sampling and applying color and style from one object to another, unlike the Paint Bucket which fills areas with the current color.
- Paint Bucket vs. Pen Tool: The Pen Tool is for drawing and editing paths and shapes with precision, whereas the Paint Bucket is for coloring within these paths.
- Paint Bucket vs. Brush Tool: The Brush Tool is used for freeform drawing and painting, offering a range of artistic brush strokes, unlike the more structured coloring approach of the Paint Bucket.
This comparison shows that the Paint Bucket Tool, with its specific functionality, complements other Illustrator tools, enriching the overall design process.

Adobe Illustrator: How to Fill Color with the Paint Bucket Tool
\"Discover the magical world of fill colors in our latest tutorial video! Learn how to add vibrant and eye-catching hues to any design, elevating it to a whole new level of visual appeal. Watch now and unlock the endless possibilities of fill color!\"
Adobe Illustrator: Live Paint Bucket Tool Tutorial
\"Experience the ultimate creativity with live paint in our captivating video tutorial! Explore the art of seamlessly blending colors and bring your illustrations to life like never before. Join us on this exciting journey and unleash your inner artist with live paint techniques!\"
Integrating the Paint Bucket Tool into Workflow
Incorporating the Paint Bucket Tool effectively into your Adobe Illustrator workflow can significantly enhance your design efficiency. Here are steps and tips for integrating this tool seamlessly:
- Initial Design Phase: Use the Paint Bucket Tool early in the design process for quick color experiments and decisions.
- Creating Color Palettes: Leverage the tool to try out different color palettes on your designs, seeing real-time how various colors interact within your artwork.
- Streamlining Color Application: For complex vector illustrations, the tool allows for rapid color application, saving time compared to manual coloring methods.
- Gap Detection Feature: Utilize the gap detection functionality to ensure complete and accurate color filling, especially in detailed areas.
- Combining with Other Tools: Integrate the Paint Bucket Tool with other Illustrator tools like the Pen Tool or Shape Builder for a comprehensive design approach.
- Refining Artwork: Post color application, use the tool for making quick adjustments or experimenting with alternative color schemes.
- Final Touches: In the final stages, review and adjust the colors applied with the Paint Bucket Tool for a polished, professional look.
By integrating the Paint Bucket Tool into your Illustrator workflow, you can streamline your coloring process, experiment more freely, and achieve more cohesive and dynamic designs.

Best Practices for Organizing and Managing Colors
Effective color management is crucial in Adobe Illustrator to enhance the visual impact and coherence of your designs. Here are some best practices for organizing and managing colors:
- Utilize Swatches: Create and use swatches for consistent color application. Swatches can be saved and reused, ensuring color consistency across different projects.
- Color Libraries: Take advantage of Illustrator’s color libraries for a wide range of pre-defined color palettes suited for various design needs.
- Harmonious Color Schemes: Use tools like the Color Guide to create harmonious color schemes. This can help maintain a balanced and appealing color palette.
- Color Groups: Organize similar colors into groups in the Swatches panel for easy access and reference.
- Global Colors: Implement global colors for elements that require consistent coloring, as changes to a global color will update all instances where it is used.
- Layer Management: Organize colored elements on separate layers to simplify edits and adjustments.
- Testing on Different Backgrounds: Check your colors against various backgrounds to ensure they stand out appropriately in different contexts.
- Accessible Colors: Consider accessibility and color contrast, especially if your design will be used in web or app interfaces.
By following these practices, you can maintain a well-organized color system, making your design process more efficient and your final artwork more cohesive and impactful.
Case Studies: Real-world Examples of Paint Bucket Tool Usage
Exploring real-world examples is a great way to understand the practical applications of the Paint Bucket Tool in Adobe Illustrator. Here are some illustrative case studies:
- Graphic Design: A graphic designer used the Paint Bucket Tool to quickly apply brand colors to various elements in a promotional flyer, ensuring consistency and saving time.
- Web Design: In a web design project, the tool was utilized to apply and test different color schemes efficiently, helping the designer to make quick adjustments based on client feedback.
- Fashion Design: A fashion illustrator employed the Paint Bucket Tool to experiment with different color combinations on clothing sketches, streamlining the process of finalizing patterns and palettes.
- Game Art: In the development of game graphics, the tool was used to color characters and backgrounds swiftly, enabling artists to focus more on the creative aspects of character and environment design.
- Logo Design: A logo designer used the Paint Bucket Tool to apply various color options to logo prototypes, helping in visualizing the final design in multiple contexts.
These case studies demonstrate the versatility and effectiveness of the Paint Bucket Tool in diverse design disciplines, highlighting its role in enhancing creativity and efficiency.
_HOOK_
READ MORE:
Additional Resources and Tutorials for Learning More
To further enhance your skills with the Paint Bucket Tool in Adobe Illustrator, a variety of resources and tutorials are available. Here are some recommendations to deepen your understanding:
- Adobe\"s Official Tutorials: Adobe offers comprehensive guides and tutorials on their website, perfect for beginners and advanced users alike.
- Online Learning Platforms: Websites like Udemy, Skillshare, and Lynda provide detailed courses on Illustrator, including specific lessons on the Paint Bucket Tool.
- YouTube Tutorials: YouTube is a treasure trove of free tutorials, where experienced designers share their tips and tricks on using the Paint Bucket Tool effectively.
- Design Blogs and Forums: Many design blogs and forums have dedicated sections for Illustrator tips, including user experiences and advanced techniques with the Paint Bucket Tool.
- Illustrator User Groups: Joining Illustrator user groups or online communities can provide insights, support, and feedback from fellow designers.
- E-books and Digital Guides: Numerous e-books and digital guides are available online, offering step-by-step instructions and creative ideas for using Illustrator’s tools.
Utilizing these resources can greatly enhance your proficiency with the Paint Bucket Tool, allowing for more creative and efficient design work in Illustrator.
Embracing the Paint Bucket Tool in Adobe Illustrator opens a world of creative possibilities, enhancing your designs with efficiency and precision. Dive in and let your creativity flourish with this indispensable tool!