Topic add font to adobe illustrator: Discover how to add fonts to Adobe Illustrator, transforming your design projects with endless creative typography possibilities. This guide offers essential steps and tips for seamlessly integrating new fonts into your workflow.
Table of Content
- How to add fonts to Adobe Illustrator?
- Understanding Adobe Illustrator Font Types
- Steps to Add Adobe Fonts via Creative Cloud
- Downloading and Installing Custom Fonts
- Installing Fonts on Windows for Adobe Illustrator
- Installing Fonts on MacOS for Adobe Illustrator
- YOUTUBE: How to Add Fonts to Illustrator | Quick and Simple Method | Zeedign Tutorials
- Using Fonts in Adobe Illustrator Projects
- Managing and Organizing Fonts in Adobe Illustrator
- Troubleshooting Common Font Issues in Illustrator
- Best Practices for Using Fonts in Design Projects
- Exploring Font Licensing and Legal Considerations
How to add fonts to Adobe Illustrator?
To add fonts to Adobe Illustrator, follow these steps:
- Begin by finding the preferred fonts from the internet. There are numerous websites that offer free or paid fonts for download.
- Download the fonts to your computer. Generally, fonts are downloaded as ZIP files, so make sure to extract the contents of the ZIP file.
- Once the fonts are downloaded and extracted, locate the font files on your computer.
- Right-click on the font file and select \"Install\" from the context menu.
- Now, open Adobe Illustrator.
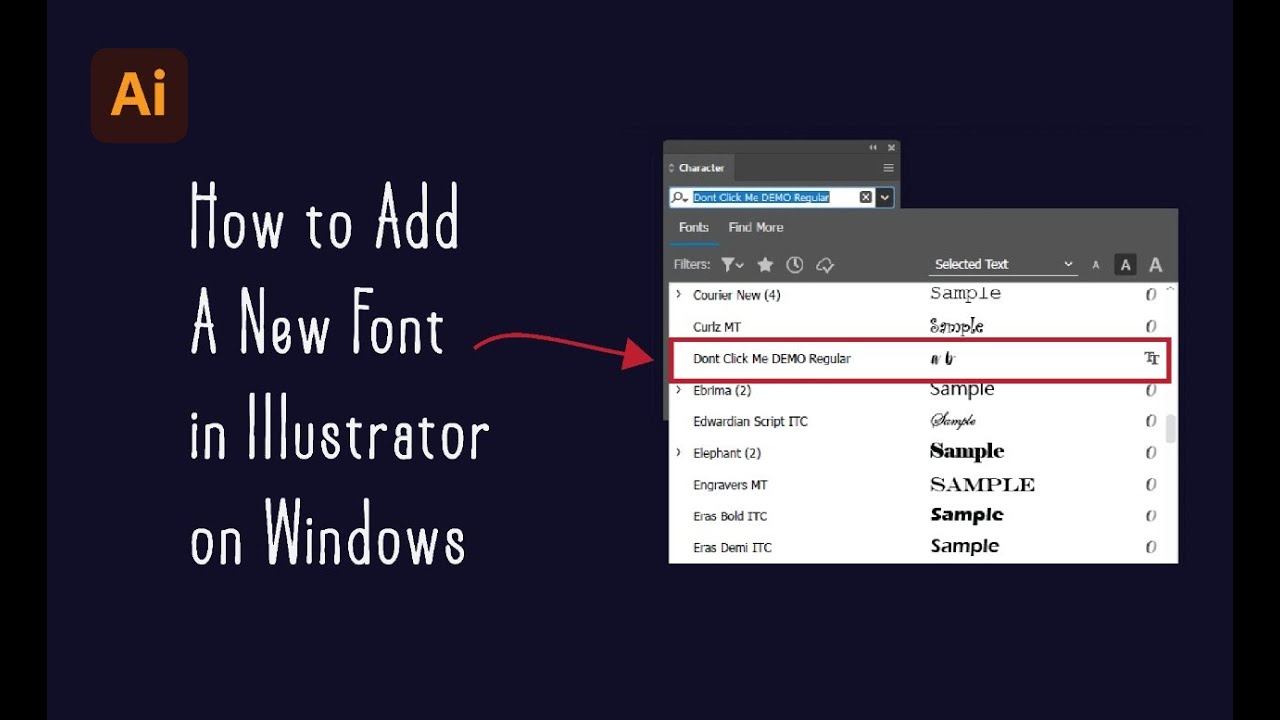
- In Illustrator, go to the \"Type\" menu at the top and select \"Font.\" You can also use the shortcut \"Ctrl + Shift + F\" (Windows) or \"Command + Shift + F\" (Mac) to open the font menu.
- In the font menu, you will be able to see all the available fonts on your computer.
- If the newly installed font is not showing up in the font menu, try restarting Adobe Illustrator or your computer to refresh the font cache.
- Once the font appears in the font menu, you can select it and start using it in your Illustrator projects.

READ MORE:
Understanding Adobe Illustrator Font Types
Adobe Illustrator supports various font types, each offering unique characteristics and uses in your design projects. Understanding these font types helps in selecting the right typography for your artwork.
- TrueType (TTF): A versatile font type developed by Apple and Microsoft, known for its wide compatibility and quality at any size.
- OpenType (OTF): Created by Adobe and Microsoft, OpenType fonts offer comprehensive language support and advanced typographic features, such as ligatures and alternate characters.
- PostScript (Type 1): An older format used primarily in professional publishing and graphic design, recognized for its high quality in print.
- Web Fonts (EOT, WOFF, SVG, etc.): Specifically designed for use on the web, allowing designers to use custom fonts that are not installed on the user\"s system.
Adobe Illustrator seamlessly integrates with these font types, enabling designers to bring their creative vision to life with precision and flexibility. By exploring and understanding the nuances of each font type, you can enhance the readability, aesthetic appeal, and overall impact of your designs.
Additionally, Illustrator\"s support for Adobe Fonts (previously known as Typekit) allows users to access a vast library of fonts directly within the application, streamlining the design process and encouraging experimentation with typography.
Steps to Add Adobe Fonts via Creative Cloud
Adding Adobe Fonts to your Adobe Illustrator projects via Creative Cloud enhances your design with a vast array of typographic styles. Follow these steps to integrate Adobe Fonts seamlessly:
- Sign in to Creative Cloud: Ensure you\"re logged into your Adobe Creative Cloud account to access Adobe Fonts.
- Access Adobe Fonts: Navigate to the Adobe Fonts website or use the Creative Cloud desktop app. Here, you can browse through thousands of font families.
- Explore and Choose Fonts: Use filters for style, language, or font properties to find the perfect font for your project. You can also preview fonts directly in your design.
- Activate Fonts: When you find a font you like, activate it with a single click. This makes the font available in Illustrator and other Adobe applications.
- Use Fonts in Illustrator: Open Adobe Illustrator and find your activated fonts readily available in the font menu. You can now use them in your projects.
Adobe Fonts integrated via Creative Cloud are synced across your devices, ensuring you have access to your favorite fonts in any Adobe application, anytime, anywhere. This seamless integration promotes a more efficient and creative workflow.

Downloading and Installing Custom Fonts
To enhance your Adobe Illustrator projects with unique typography, downloading and installing custom fonts is a straightforward process. Begin by exploring various font websites to find a font that suits your design needs. Once you\"ve chosen a font, download it to your computer, typically in a .zip format.
- After downloading, locate the .zip file in your Downloads folder and unzip it to access the font files, which are usually in .ttf or .otf formats.
- To install the font on Windows, right-click on the font file and select \"Install.\" On macOS, double-click the font file and click \"Install Font\" in the dialog box that appears.
- With the font installed, it becomes available in Adobe Illustrator and other applications on your computer. Simply launch Illustrator, use the Type tool to create text, and find your new font in the font menu.
Remember, if Illustrator was open during the font installation, you might need to restart the application for the new font to appear in the font list. Always check the font\"s license for usage rights, especially for commercial projects.
Installing Fonts on Windows for Adobe Illustrator
Installing custom fonts on Windows for use in Adobe Illustrator is an easy process that can significantly enhance your design projects. Follow these step-by-step instructions to add new typography options to your creative toolkit.
- Download the Font: Choose your desired font from a reputable font website and download it to your computer. Fonts typically come in .zip files containing .ttf (TrueType Font) or .otf (OpenType Font) files.
- Extract the Font Files: Navigate to the downloaded .zip file, usually located in your Downloads folder. Right-click on the file and select \"Extract All\" to unzip the font file. A folder containing the font files (.ttf or .otf) will appear.
- Install the Font: Open the folder containing the extracted font files. Right-click on the font file you wish to install (either .ttf or .otf) and select \"Install.\" This will add the font to your system fonts, making it available to Adobe Illustrator and other applications.
- Confirm Installation: To ensure the font has been successfully installed, you can go to the Control Panel > Appearance and Personalization > Fonts. You should see your newly installed font listed among the other fonts on your computer.
- Use the Font in Adobe Illustrator: Open Adobe Illustrator and create a new project or open an existing one. Select the Type Tool (T) from the toolbar, click anywhere on your canvas to create a text box, and type your text. With the text selected, open the Character panel to find and select your newly installed font from the dropdown menu.
If Adobe Illustrator was open during the font installation, you might need to restart the application for the new font to appear in the font list. Enjoy exploring the creative possibilities with your new font in Adobe Illustrator!

_HOOK_
Installing Fonts on MacOS for Adobe Illustrator
Adding new fonts to Adobe Illustrator on a MacOS system is a simple process that can dramatically expand your creative possibilities. Follow these steps to install new fonts:
- Download the Font: First, select and download the font you wish to add to Illustrator. Fonts usually come in .zip files from reputable online font libraries.
- Unzip the Font File: Locate the downloaded .zip file in your Downloads folder. Double-click the file to unzip it, revealing the font files, typically in .ttf or .otf format.
- Install the Font: Double-click the font file (.ttf or .otf) to open it in the Font Book application. Click on the \"Install Font\" button at the bottom of the preview window to install the font to your system.
- Verify the Installation: Open Font Book directly from your Applications folder to ensure that the font is installed. You can find the new font listed in the Font Book, confirming its availability for use in applications, including Adobe Illustrator.
- Use the Font in Illustrator: Open Adobe Illustrator and start a new project or open an existing one. Select the Text Tool, click on the artboard to create a text object, and then select your newly installed font from the font menu in the Character panel.
Note: If Adobe Illustrator was open during the font installation, you may need to restart Illustrator to see the newly installed font in the font menu.

How to Add Fonts to Illustrator | Quick and Simple Method | Zeedign Tutorials
Get ready to learn and become an expert with these comprehensive tutorials! Whether you\'re a beginner or advanced, these step-by-step videos will guide you through various topics and help you master new skills. Watch now and unlock your potential!
Using Fonts in Adobe Illustrator Projects
Once you have installed new fonts on your computer, using them in Adobe Illustrator projects is straightforward. Here\"s how to effectively incorporate these fonts into your designs:
- Select the Type Tool: Open your Adobe Illustrator project and select the Type Tool (T) from the toolbar. This tool allows you to create text elements in your design.
- Create a Text Object: Click on the artboard where you want to add text, and begin typing. As you type, Illustrator uses the current font selection to display the text.
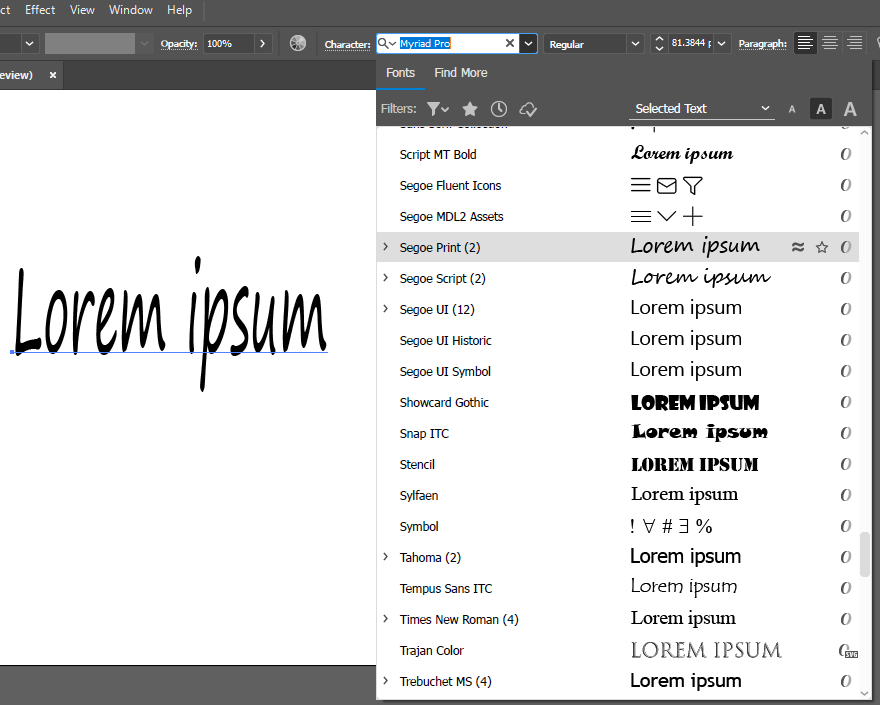
- Choose Your Font: With the text selected, open the Character panel by going to Window > Type > Character or using the shortcut Ctrl+T (Windows) or Cmd+T (macOS). Here, you can select the newly installed font from the dropdown menu. You can also adjust font size, letter spacing (tracking), line spacing (leading), and other typographic details.
- Apply Text Effects: Illustrator offers various effects and styles that you can apply to your text. Access these options through the Effect menu. You can warp text, create outlines, or apply shadow effects to make your text stand out.
- Convert Text to Outlines: For certain projects, you may want to convert your text to outlines to manipulate each letter as a shape. To do this, select your text and go to Type > Create Outlines. This converts the text into vector paths, allowing for more complex adjustments and ensuring the text appears consistently across different systems and devices.
Remember, the use of typography in your Illustrator projects can significantly impact the overall design. Choosing the right font, adjusting the typographic settings, and applying effects thoughtfully can elevate your design and communicate your message more effectively. Experiment with different fonts and settings to discover what works best for your specific project needs.
How to Install New Font in Adobe CC (InDesign, Illustrator, Photoshop)
Want to get started with a new software or application? Don\'t worry, we\'ve got you covered! Our easy-to-follow install video will walk you through the process, ensuring a seamless setup. Say goodbye to installation headaches and hello to hassle-free use! Click play and get started today!
Managing and Organizing Fonts in Adobe Illustrator
Efficient management and organization of fonts in Adobe Illustrator can streamline your design process and enhance productivity. Here are steps and tips to effectively manage and organize your fonts:
- Using Adobe Fonts: Adobe Illustrator integrates seamlessly with Adobe Fonts, offering a vast library of fonts. You can activate fonts from Adobe Fonts directly within Illustrator, ensuring they are always updated and synced across your devices.
- Font Organization Tips: Organize your fonts by creating font collections in Adobe Illustrator or your system’s font management tool. This can help you quickly access fonts based on project type, client, or style, such as serif, sans-serif, script, etc.
- Utilizing the Character Panel: The Character panel in Illustrator allows you to view, filter, and search your fonts. Use the search functionality to find fonts by name or style, making it easier to select the right font for your project.
- Font Book on MacOS: If you’re using a Mac, Font Book is a useful tool for managing your fonts. You can create collections, enable and disable fonts, and organize your fonts in a way that makes them easily accessible for Illustrator projects.
- Cleaning Up Fonts: Periodically review and clean up your font library to remove fonts you no longer use. This can help Illustrator run more smoothly and makes font management more manageable.
- Third-Party Font Management Tools: Consider using third-party font management software for more advanced features like font auto-activation, extensive font libraries, and better organization tools. Examples include Suitcase Fusion, FontExplorer X Pro, and RightFont.
Remember, efficient font management not only saves time but also enhances creativity by making it easier to experiment with typography. Regularly organizing your fonts and taking advantage of Adobe Illustrator\"s integration with Adobe Fonts and other font management tools can significantly improve your design workflow.

Troubleshooting Common Font Issues in Illustrator
Encountering font issues in Adobe Illustrator can interrupt your workflow and affect project outcomes. Here are steps to troubleshoot some of the most common font problems in Illustrator:
- Fonts Not Displaying Correctly: If a font doesn\"t display correctly, ensure it\"s properly installed on your computer. Restart Illustrator to refresh its font list. If the issue persists, check for font file corruption by reinstalling the font.
- Missing Fonts: When opening documents that contain fonts you don\"t have, Illustrator will indicate missing fonts. Use the Type > Find Font feature to replace missing fonts with those available on your system or sync missing fonts from Adobe Fonts if available.
- Font Appears as Boxes or Question Marks: This usually indicates a missing font or a font that Illustrator cannot recognize. Ensure the font is installed, and try opening the file on a system where the font is available. Alternatively, ask the document sender for the original font files.
- Text Outlines Instead of Editable Text: If you receive a file with text converted to outlines, you won\"t be able to edit the text directly. To avoid this, always ask for the Illustrator files with editable text or the specific fonts used in the document.
- Performance Issues with Fonts: Large font libraries can slow down Illustrator. Consider using a font management tool to activate only the fonts you need for a specific project. This keeps your font list manageable and improves Illustrator\"s performance.
- Font Activation Issues: If fonts from Adobe Fonts are not activating, check your internet connection and ensure you\"re logged into your Adobe Creative Cloud account. Sometimes, signing out and back into Creative Cloud can resolve activation issues.
Regularly updating Adobe Illustrator and your fonts can prevent many issues. If problems persist, consult Adobe’s support resources or forums where you may find solutions specific to your issue.
Best Practices for Using Fonts in Design Projects
Choosing and using fonts effectively is crucial in design projects to ensure readability, convey the correct mood, and support the overall design strategy. Here are some best practices for using fonts in your Adobe Illustrator projects:
- Limit Font Usage: Use a limited number of fonts within a single project. A good rule of thumb is to use two to three fonts to maintain design coherence and readability.
- Contrast is Key: Ensure there is enough contrast between your font choices, especially when pairing fonts. Contrast can be in weight (light vs. bold), style (serif vs. sans-serif), or size. This helps to create hierarchy and focus within your design.
- Consider Readability: Choose fonts that are easy to read, especially for body text. Sans-serif fonts are often preferred for digital designs due to their readability on screens.
- Match the Mood: The font should match the tone and mood of your design. For instance, a playful font might be suitable for a children\"s book cover, while a sleek, modern font might be better for a tech startup\"s branding.
- Respect Font Licensing: Always ensure that you have the appropriate license for the fonts you use, especially for commercial projects. This avoids legal issues and supports font designers.
- Use Web-Safe Fonts for Digital Projects: If you are designing for the web, consider using web-safe fonts or web fonts to ensure your text appears consistently across different browsers and devices.
- Experiment with Typography: Don\"t be afraid to experiment with different typographic techniques such as letter-spacing, line-height, and text alignment to enhance your design’s visual appeal and readability.
- Optimize for Performance: For web projects, ensure that the font files you use are optimized for web performance. This includes using font formats like WOFF2 and ensuring font files are not excessively large.
By following these best practices, you can enhance the effectiveness of your design projects, ensuring that your use of typography complements and elevates your overall design vision.

_HOOK_
READ MORE:
Exploring Font Licensing and Legal Considerations
Understanding font licensing and legal considerations is essential for designers to ensure the compliant use of typography in projects. Here are key points to consider:
- Know the Types of Font Licenses: Fonts can come with various types of licenses, such as desktop, webfont, commercial, or open-source licenses. Each type dictates how a font can be used, shared, or modified.
- Desktop vs. Webfont Licenses: Desktop licenses typically allow fonts to be installed on a computer and used in applications like Adobe Illustrator for creating graphics and documents. Webfont licenses, on the other hand, are required for embedding fonts into websites.
- Commercial Use: If you plan to use fonts in projects that will be sold or used for business purposes, ensure the font\"s license allows for commercial use. Some free fonts are only licensed for personal use unless a commercial license is purchased.
- Read the License Agreement: Always read the font\"s license agreement carefully. It will specify restrictions and rights, such as the number of computers on which the font can be installed or if the font can be used in a logo.
- Avoid Piracy: Only download fonts from reputable sources. Using pirated fonts is illegal and can result in legal action as well as harm to your professional reputation.
- Consider Open Source Fonts: Open-source fonts are a great option for projects on a budget. They are usually free to use, modify, and distribute, but it\"s still important to check their licensing for any specific restrictions or attribution requirements.
- Keep Records: Maintain records of where you obtained your fonts and their license agreements. This can be crucial if you need to prove your right to use a font in your projects.
Navigating the complexities of font licensing is crucial for the legal and ethical use of fonts in design projects. When in doubt, consult with a legal professional to ensure compliance with all licensing requirements.
Unlock the full potential of your Adobe Illustrator projects by mastering the art of adding and managing fonts. From choosing the perfect typeface to navigating licensing and legalities, our comprehensive guide ensures your designs stand out while staying compliant. Dive in to elevate your creative work!