Topic how to animate camera in blender: Unlock the secrets of camera animation in Blender with our comprehensive guide, designed to elevate your visuals to the next level effortlessly.
Table of Content
- How can I precisely animate cameras in Blender to achieve the desired behavior?
- Understanding Keyframes for Camera Animation
- Setting Up Your Camera
- Animating Camera Movement
- Creating Smooth Camera Movements
- Using Camera Rigs for Advanced Animation
- Animating Camera Switching in Blender
- YOUTUBE: Tutorial: Quick Smooth Camera Movements in Blender
- Adding Realism with Depth of Field
- Utilizing Blender\"s Graph Editor for Fine-tuning
- Exporting Your Animated Camera Sequence
- Tips for Cinematic Camera Animation
How can I precisely animate cameras in Blender to achieve the desired behavior?
To precisely animate cameras in Blender and achieve the desired behavior, you can follow these steps:
- Open Blender and create a new project or open an existing one.
- Select the camera object by right-clicking on it in the viewport or selecting it from the Outliner.
- Navigate to the Object Data Properties tab (represented by a camera icon) in the Properties panel.
- Expand the Camera section and locate the Camera Lock to View checkbox. Make sure it is unchecked. This ensures that the camera will not be controlled by the viewport view.
- In the viewport, choose the desired initial frame for your camera animation.
- Press Ctrl + Alt + Numpad 0 to set the camera view to the current viewport view.
- With the camera still selected, go to the Object Properties tab in the Properties panel (represented by a cube icon).
- Expand the Transform section and locate the Location and Rotation properties. These properties control the position and orientation of the camera at the current frame.
- Hover your cursor over the Location property and press I to insert a keyframe. Choose Loc from the menu that appears. Repeat this for the Rotation property as well.
- Advance to the next frame in the timeline by either scrubbing the timeline or using the arrow keys.
- Move, rotate, or scale the camera as desired to create the next pose in the animation.
- Again, insert keyframes for the Location and Rotation properties by hovering your cursor over each property and pressing I, then choosing Loc and Rot, respectively.
- Repeat steps 10-12 for all the frames you want to animate.
- Play the animation by either scrubbing the timeline or pressing Alt + A to see how the camera moves and modifies its perspective.
- Adjust the animation as needed by editing the keyframes or adding intermediate frames.
- Render the animation by going to the Render menu and choosing Render Animation (or press Ctrl + F12).
By following these steps, you can precisely animate the camera in Blender to achieve the desired behavior for your animation project.
READ MORE:
Understanding Keyframes for Camera Animation
Keyframes are the cornerstone of animation in Blender, marking the start and end points of any movement or transformation. Learning to animate the camera with keyframes is crucial for creating dynamic and engaging visuals in your projects.
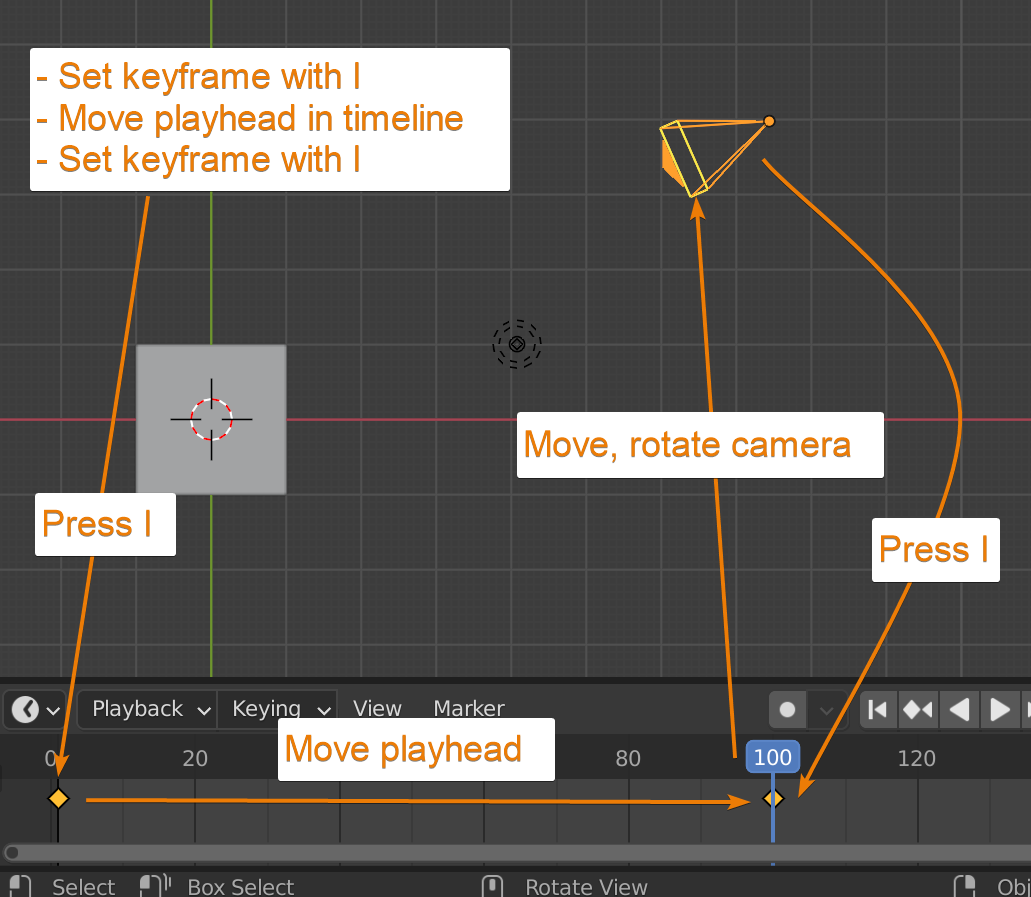
- Select the camera object in your scene.
- Move to the frame on the timeline where you want the animation to start.
- With the camera selected, press I to insert a keyframe. Choose Location, Rotation, or Scale depending on the animation.
- Move to the frame where you want the animation to end.
- Change the camera\"s position, rotation, or scale as desired.
- Press I again to insert another keyframe at this new position, rotation, or scale.
This sequence creates a basic animation path for the camera. Blender interpolates the movement between the start and end keyframes, creating smooth transitions. Experiment with different keyframe placements to achieve various camera effects, such as zooms, pans, and tilts.

Setting Up Your Camera
Before diving into animation, setting up your camera correctly is essential for capturing the perfect shot. This process ensures your animations will look professional and cinematic.
- Navigate to the scene where you want to add the camera.
- Press Shift + A to open the Add menu, then select Camera to add a new camera to your scene.
- Position the camera by selecting it, then using the G key to grab and move it. Use the R key to rotate the camera for the desired angle.
- Adjust the camera\"s lens settings in the Camera properties tab to fit your scene. You can change the focal length for a zoomed-in or wide-angle effect, or adjust the depth of field for focus effects.
- Use the Composition guides (such as thirds, center, or golden) available in the Camera\"s properties under the Viewport Display to aid in framing your shot perfectly.
- For animations involving multiple camera angles, consider adding more than one camera and switching between them in the animation.
With your camera properly set up, you’re now ready to create animations that bring your scenes to life with dynamic and compelling visuals.
Animating Camera Movement
Animating your camera breathes life into your scenes, making them more dynamic and engaging. Follow these steps to create smooth and captivating camera movements.
- With your camera selected, decide on the starting position and frame on the timeline where your animation will begin.
- Press I and select Location and Rotation to insert the initial keyframes, capturing the camera\"s starting position and orientation.
- Move the timeline to where you want the camera movement to end. Adjust the camera’s location and rotation to the final desired position.
- Press I again and insert another set of Location and Rotation keyframes.
- To create more complex movements, add additional keyframes between the start and end points by moving the timeline to different frames and adjusting the camera’s position and rotation as needed.
- Use the Graph Editor to fine-tune the animation curves for smoother acceleration and deceleration of the camera movement.
This process allows you to create everything from simple pans and tilts to complex tracking shots. Experiment with different types of movements to achieve the desired effect for your scene.

Creating Smooth Camera Movements
Smooth camera movements are key to professional-looking animations. These techniques will help you achieve fluid motion and enhance the visual appeal of your scenes.
- Start by ensuring your keyframes are properly spaced. Consistent spacing between keyframes can help maintain a steady motion pace.
- Use the Graph Editor to refine the movement curves. Adjust the handles of each keyframe to smooth out any sudden starts or stops in the animation path.
- Experiment with Blender’s interpolation modes, such as Bezier or Linear, to control the acceleration and deceleration of your camera movements.
- Incorporate Easy Ease effects by selecting keyframes in the Graph Editor and applying the easing option. This gives your camera movements a more natural feel, mimicking real-world physics.
- For complex movements, consider using a Camera Rig. Rigs offer additional control points for animating, allowing for smoother and more nuanced camera motions.
- Preview your animation frequently and adjust as necessary. Sometimes, the smallest tweaks can make a significant difference in the fluidity of your camera’s motion.
By applying these techniques, you can create animations that flow seamlessly, adding a layer of polish and professionalism to your projects.
_HOOK_
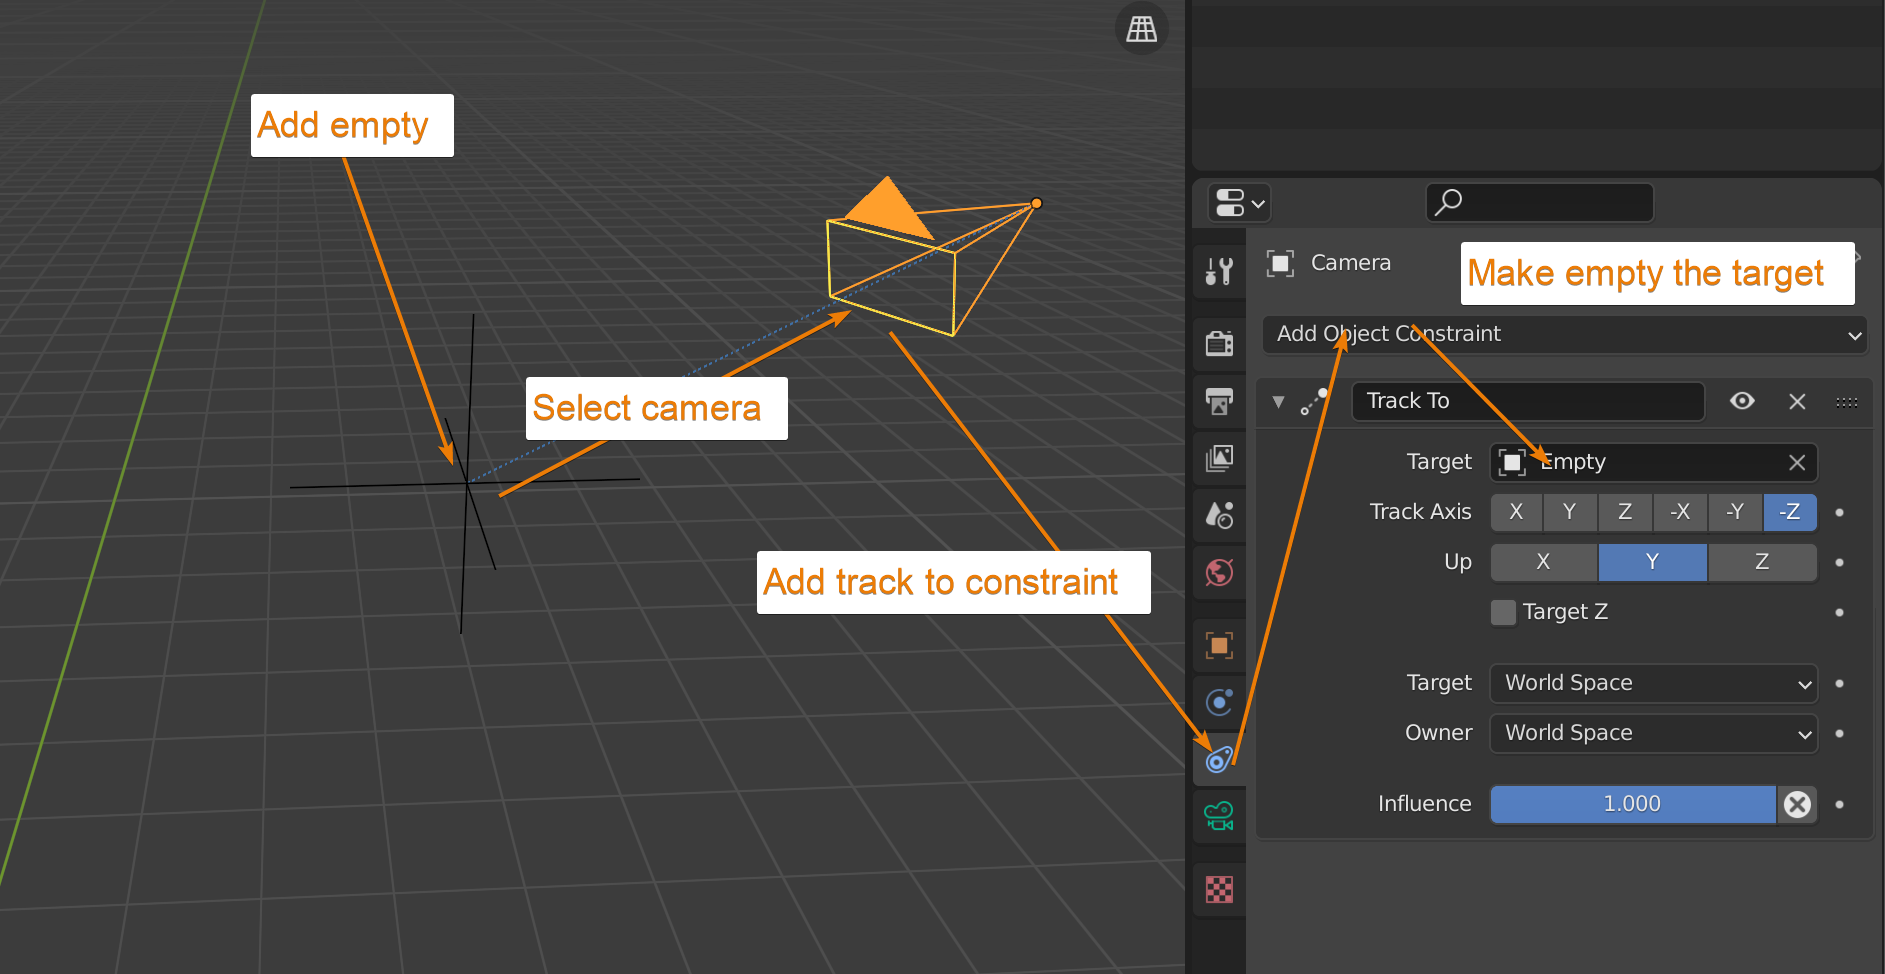
Using Camera Rigs for Advanced Animation
Camera rigs can greatly enhance the flexibility and complexity of your camera animations in Blender. Here’s how to use them for more advanced and dynamic shots.
- Begin by adding a camera rig to your scene. You can find pre-built rigs online or create your own. A basic rig might include a parent object for global movement and child objects for local adjustments.
- Parent your camera to the rig by selecting the camera, then the rig, and pressing Ctrl+P. Choose “Object” to make the rig the parent of the camera.
- Use the rig’s controllers to animate the camera. These might include handles for translation, rotation, and even zoom. Animate these controllers just like you would the camera directly, by inserting keyframes for their location, rotation, or scale.
- Take advantage of the rig’s flexibility to create complex camera motions such as cranes, dollies, and arcs that would be difficult to achieve with a camera alone.
- Adjust the rig’s constraints and settings to fine-tune the camera’s movement. For example, you can limit the rotation or movement along certain axes to simulate real-world camera behavior.
- Combine the rig’s animation with Blender’s Graph Editor and Dope Sheet to refine the timing and smoothness of the camera’s path through the scene.
Camera rigs are powerful tools that can unlock a new level of creativity in your animations, allowing for intricate movements and angles that add depth and drama to your scenes.

Animating Camera Switching in Blender
Animating camera switching can add dynamic storytelling and perspective shifts to your scenes. Here’s how to seamlessly switch between cameras in Blender.
- Ensure you have all the cameras set up in your scene for the various shots you plan to switch between.
- Go to the frame where you want the first camera switch to occur.
- Open the Timeline window, and switch to the Video Sequence Editor (VSE).
- In the VSE, add a Scene Strip for each camera view by selecting Add > Scene. Ensure each strip corresponds to a different camera.
- Select the strip you wish to associate with the first camera view, then go to the Strip properties panel. Here, select the camera you want to use for this part of the sequence.
- To animate the switch, keyframe the visibility (mute/unmute) of the strips, ensuring only one camera\"s strip is unmuted at any given time. Do this by hovering over the strip\"s eye icon and pressing I at the frames where you want to switch.
- Repeat this process for each camera switch throughout your animation, adjusting the timeline and muting/unmuting the relevant scene strips.
This method allows for smooth transitions between different camera angles and shots, enhancing the narrative and visual impact of your Blender projects.
Tutorial: Quick Smooth Camera Movements in Blender
Get ready to be immersed in a world of stunning visuals with the captivating camera movements in this video. Experience the excitement as the camera effortlessly glides, pans, and tilts, adding a dynamic perspective that will leave you breathless.
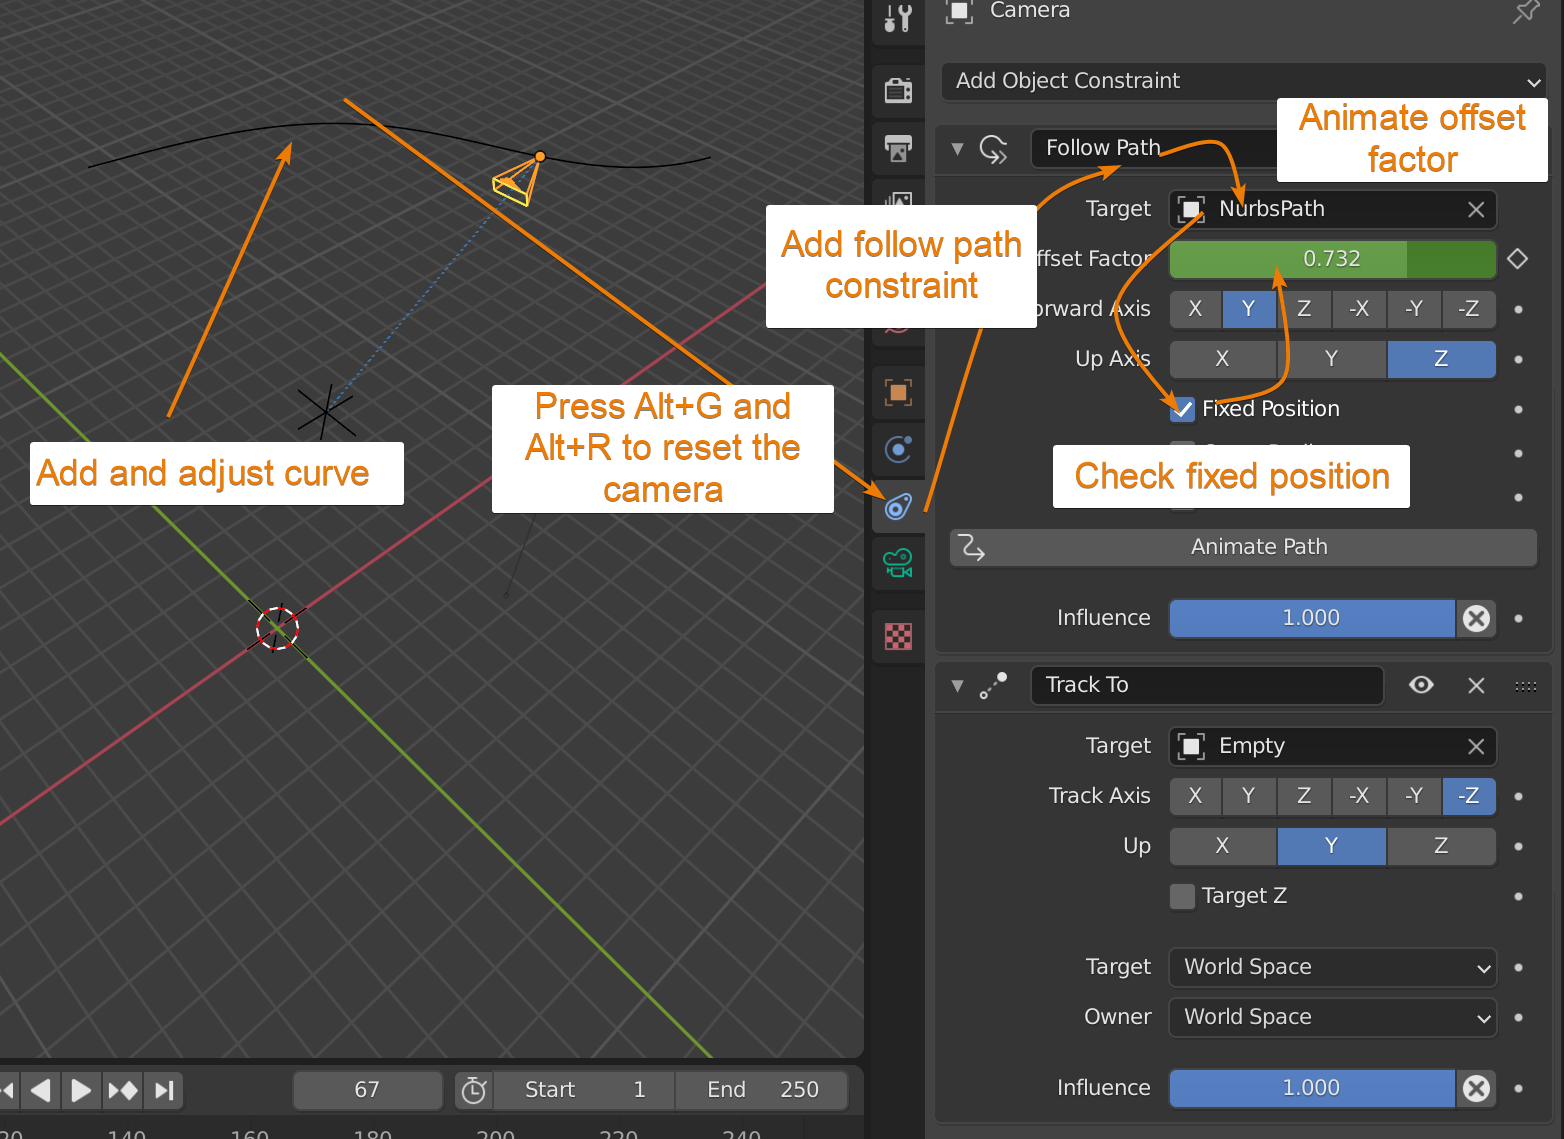
Blender 2.8: How to Make a Camera Follow Path
Embark on a mesmerizing journey as the camera gracefully follows a carefully crafted path, capturing every moment with precision and artistry. Watch as it smoothly tracks the action, transporting you into the heart of the scene, making you feel like a part of it all.
Adding Realism with Depth of Field
Depth of field (DoF) is a powerful tool in Blender that simulates the focus range of a camera, adding a layer of realism to your scenes. Here’s how to apply it effectively.
- Select the camera in your scene to which you want to add depth of field.
- In the Camera properties panel, locate the Depth of Field section.
- To control the focus, you can either specify a focus object or manually set the focus distance. Using a focus object allows the camera to automatically adjust the focus to this object.
- Adjust the F-stop value to control the depth of field’s intensity. A lower value results in a more pronounced blur effect for objects outside the focus area, while a higher value sharpens more of the scene.
- For more control over the blur effect, you can adjust the blade settings, simulating how different aperture shapes affect the out-of-focus light.
- Preview your scene with the depth of field enabled to fine-tune the settings. Blender’s Eevee renderer allows for real-time DoF preview, making adjustments easier.
By carefully setting up depth of field, you can guide viewers\" attention within your scene, enhance mood, and create more immersive and visually compelling renders.

Utilizing Blender\"s Graph Editor for Fine-tuning
The Graph Editor in Blender is an indispensable tool for refining animations, offering precise control over the interpolation of keyframes. Here’s how to use it for fine-tuning your camera animations.
- Open the Graph Editor by changing one of your Blender window views to the Graph Editor type.
- Select your camera object to display its animation curves. These curves represent the change in location, rotation, and scale over time.
- Click on a curve to select it. You can adjust the handles on each keyframe to smooth or sharpen the transitions between keyframes.
- To change the interpolation type (the way Blender calculates the path from one keyframe to another), select the keyframes and press T. Choose from options like Linear, Bezier, or Constant to achieve the desired motion effect.
- Use the Graph Editor\"s tools to scale, move, or extrude keyframes for broader adjustments across multiple frames.
- Experiment with the F-Curve modifiers like noise, cycles, or limits to add variation or cyclic movements to your camera animations without manually keyframing each change.
Mastering the Graph Editor allows for nuanced adjustments to your camera’s movement, ensuring smooth, natural-looking animations that can elevate your Blender projects.
Exporting Your Animated Camera Sequence
Once you\"ve perfected your camera animation in Blender, the final step is exporting your sequence for use in films, games, or other projects. Follow these steps to export your work.
- Ensure all your animations are finalized and preview them within Blender to confirm everything looks as expected.
- Go to the Properties panel, and select the Output properties tab. Here, you can choose your desired file format, such as PNG, JPEG for images, or MPEG, AVI for videos.
- Specify the output path where your files will be saved. Ensure the directory exists and you have write permissions for it.
- In the Output properties, set the Frame Start and Frame End to define the portion of the timeline you wish to export.
- For video exports, adjust the encoding settings to suit your needs. You can select codecs, bitrates, and audio settings if your sequence includes sound.
- Once all settings are configured, go to the top menu, select Render > Render Animation, or press Ctrl+F12. Blender will begin processing and exporting your animated sequence to the specified location.
- After the export is complete, navigate to the output folder to review your exported files or sequence.
Exporting your animated camera sequence properly ensures that your hard work can be showcased in the highest quality across various platforms and media.

_HOOK_
READ MORE:
Tips for Cinematic Camera Animation
To elevate your camera animations in Blender and achieve a cinematic quality, consider these expert tips:
- Study real film footage to understand how camera movements contribute to storytelling. Try to replicate these techniques in Blender.
- Pay attention to composition and framing. Use the rule of thirds and lead room to create balanced and engaging scenes.
- Vary your camera speeds to reflect the pace of your scene. Slow movements can enhance dramatic moments, while faster movements can add excitement.
- Incorporate depth of field to focus attention on your subject and blur out distractions, adding depth and realism to your shots.
- Use camera rigs for complex movements, such as cranes and dollies, to add professionalism to your animations.
- Experiment with lighting and shadows to enhance mood and atmosphere, complementing your camera work.
- Edit and refine your animations in the Graph Editor. Smooth keyframe transitions can significantly improve the flow of your camera movements.
- Lastly, always preview your animations and seek feedback. A fresh perspective can help you identify areas for improvement and polish your work.
Applying these tips will help you create more dynamic, engaging, and visually stunning camera animations in Blender.
Embark on your journey to master camera animation in Blender, unlocking endless possibilities to captivate your audience. With these insights, you\"re ready to bring your visions to life and create breathtaking visual stories.