Topic uv mapping blender: Discover the secrets of UV Mapping in Blender, a foundational skill for any 3D artist. Learn to unwrap models efficiently, creating detailed and lifelike textures that elevate your projects to the next level.
Table of Content
- How to use UV mapping in Blender?
- Understanding UV Mapping in Blender
- Common UV Mapping Problems and Solutions
- Techniques for Efficient UV Unwrapping
- Alternatives to UV Mapping: Box Mapping
- Essential Blender Add-ons for UV Mapping
- YOUTUBE: UV Unwrapping Explained for Beginners Blender Tutorial
- Exporting UV Layouts for External Use
- Advanced UV Mapping Techniques for Characters
- UV Mapping Workflow for Complex Models
- Maximizing Texture Resolution with UV Packing
- Using Blender\"s UV Editing Tools to Solve Overlapping Issues
- Adjusting UV Map Proportions for Accurate Texturing
- Practical Tips for UV Mapping in Blender Projects
How to use UV mapping in Blender?
To use UV mapping in Blender, follow these steps:
- Select the object you want to apply the UV mapping to.
- Enter Edit Mode by pressing the Tab key.
- Select the faces you want to map.
- Open the UV Editing workspace by selecting it from the top toolbar.
- In the UV Editing workspace, you should see an UV/Image Editor window and a 3D View window.
- In the 3D View window, make sure you are in Face Select mode by selecting it from the top toolbar.
- With the desired faces selected, unwrap them by selecting UV > Unwrap > Smart UV Project from the top menu.
- In the UV/Image Editor window, you will now see the UV coordinates of the unwrapped faces.
- You can manipulate and scale the UV coordinates by using the transform manipulators.
- Once you are satisfied with the UV mapping, you can assign a texture to the object by creating a new image.
- To export the UV layout, you can select UV > Export UV Layout from the top menu.
By following these steps, you can effectively use UV mapping in Blender to apply textures to your objects.
READ MORE:
Understanding UV Mapping in Blender
UV Mapping in Blender is a crucial process for any 3D artist, enabling the application of 2D textures to a 3D model\"s surface. This technique is fundamental for adding details, colors, and realism to models in 3D environments. Understanding how UV mapping works in Blender opens up endless possibilities for creativity and precision in texturing your 3D projects.
At its core, UV mapping involves unwrapping a 3D model into a 2D image layout, where \"U\" and \"V\" represent the axis of the 2D texture. This unwrapping process allows you to paint or attach images to the model\"s surface accurately. Blender offers various tools and methods for UV mapping, from automatic unwrapping to manual seam placement, catering to different needs and model complexities.
- Automatic Unwrapping: Blender can automatically generate UV maps based on the model\"s geometry, useful for quick texturing or simple models.
- Seams and Manual Unwrapping: For more control, you can manually mark seams on your model to guide the unwrapping process. This method is ideal for complex models or when precise texturing is required.
- UV Editing Tools: Blender\"s UV Editor provides a workspace to adjust UVs, ensuring textures align correctly on the model. This includes moving, scaling, and rotating UV islands.
- Live Unwrap: With live unwrap enabled, adjustments to seams or UVs automatically update the UV layout, simplifying the process of finding the best UV map for your model.
Mastering UV Mapping in Blender not only enhances the visual quality of your 3D models but also ensures that textures behave predictably under different lighting conditions and angles. By investing time in learning UV mapping techniques, you can significantly improve the realism and appeal of your 3D creations.

Common UV Mapping Problems and Solutions
UV mapping is an essential skill in 3D modeling, but it comes with its own set of challenges. Here, we delve into some common UV mapping problems encountered in Blender and offer practical solutions to overcome them, ensuring your texturing process is as smooth as possible.
- Overlapping UVs: Overlapping UVs can cause textures to display incorrectly. To fix this, use Blender\"s UV editing tools to manually adjust the UVs or utilize the \"Pack Islands\" feature to automatically separate them.
- Distortion: Distorted UVs often result from improper unwrapping. Applying a \"Smart UV Project\" can sometimes offer a quick fix. For more control, manually place seams around your model to guide the unwrapping process and reduce distortion.
- Scaling Issues: Inconsistent scaling can lead to textures appearing stretched or squashed. Ensure uniform scaling by applying the scale (Ctrl+A > Scale) in Object Mode before unwrapping.
- Seams Visibility: Visible seams can disrupt the appearance of a model. To minimize seam visibility, strategically place seams in less noticeable areas or use Blender\"s \"Blend\" options in the Texture Paint mode to smooth out visible edges.
- Difficulty Selecting UV Islands: If you\"re having trouble selecting or manipulating UV islands, ensure \"UV Sync Selection\" is enabled. This synchronizes the selection between the 3D Viewport and the UV Editor, making it easier to work with your UVs.
Understanding these common issues and knowing how to address them will enhance your UV mapping workflow in Blender, leading to better textured models and a more efficient texturing process.
Techniques for Efficient UV Unwrapping
Efficient UV unwrapping is key to achieving realistic textures on your 3D models in Blender. Mastering a few techniques can greatly enhance the quality of your projects. Here are some strategies to streamline your UV unwrapping process.
- Marking Seams: Identify and mark the edges where your model naturally divides or folds. This guides Blender in cutting the mesh for unwrapping, similar to peeling an orange in one piece.
- Project From View: Use \"Project from View\" for flat surfaces or when a specific angle needs to be maintained. This projects the UV layout directly from the current 3D view, useful for buildings or objects seen from one side.
- Live Unwrap: Enable \"Live Unwrap\" to see changes in real-time as you adjust seams or unwrap methods. This feature allows for quicker iteration and optimization of your UV map.
- Pin UVs: Pinning allows you to lock certain vertices in place, making it easier to manipulate surrounding UVs without losing previous adjustments. This is particularly useful for detailed areas requiring precise texture alignment.
- Minimize Stretching: Use the \"Minimize Stretch\" tool within the UV editor to reduce texture distortion. This adjusts UVs to more evenly distribute texture space, improving the overall appearance.
- Island Margins: Setting proper island margins prevents textures from bleeding over the edges of UV islands. Adjusting the margin space can ensure cleaner, more distinct texturing.
By incorporating these techniques into your workflow, you can achieve more accurate and visually appealing textures in your Blender projects. Each method offers unique advantages, so experimenting with combinations can yield the best results for your specific needs.

Alternatives to UV Mapping: Box Mapping
While UV Mapping is a powerful tool for texturing 3D models in Blender, there are scenarios where an alternative approach might be more suitable. Box Mapping is one such alternative, offering a quicker way to apply textures without the need for precise UV layouts. This method is particularly useful for objects where the texture does not need to align perfectly to specific features or for environmental elements where quick, realistic texturing is desired.
- What is Box Mapping: Box Mapping projects a texture onto a model from all six sides, similar to wrapping a box. This technique allows for textures to cover the model evenly without manual UV unwrapping.
- Advantages: The main advantage of Box Mapping is its simplicity and speed. It\"s especially effective for objects with simple shapes or when a non-specific, random texture application is acceptable.
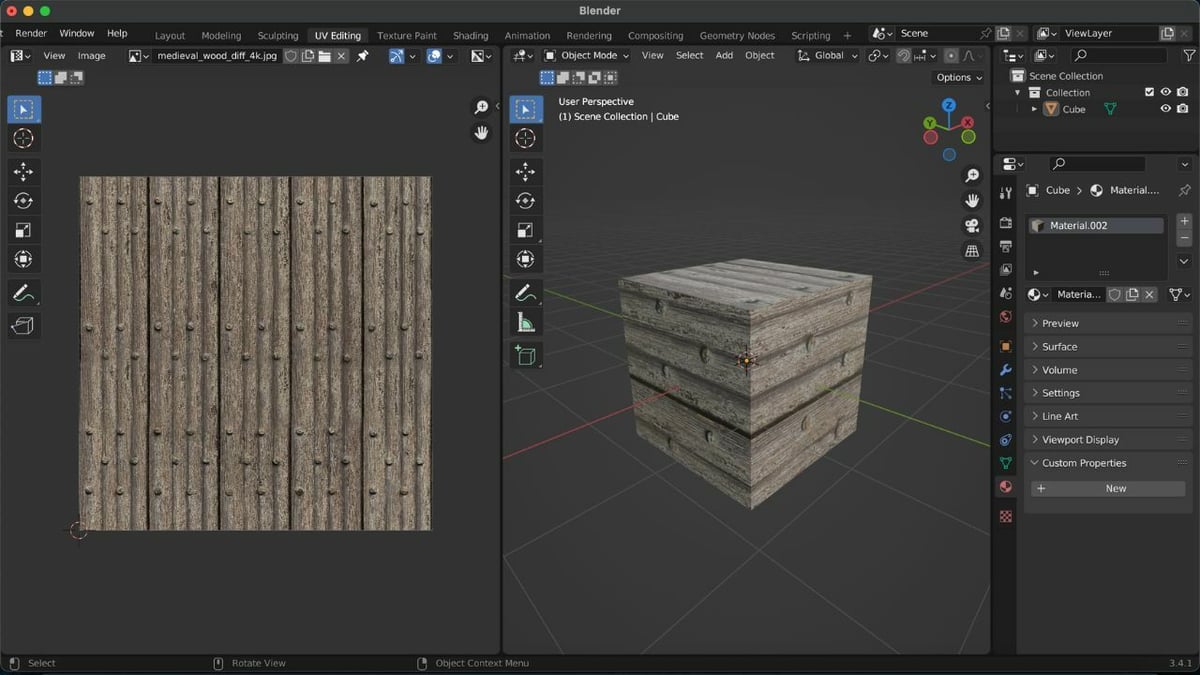
- How to Use Box Mapping in Blender: To apply Box Mapping in Blender, select your object, go to the Material properties, add a new material, then select an image texture. In the image texture node, set the projection method from \"Flat\" to \"Box\". Adjust the blend value to smooth the transitions between each side of the projection.
- Applications: Box Mapping is ideal for texturing large environmental elements like rocks, terrain, or buildings quickly. It\"s also useful for objects seen from a distance where the details of texture alignment are less noticeable.
- Limitations: Despite its ease of use, Box Mapping may not be suitable for models requiring precise texture details or alignment. For such models, traditional UV Mapping is recommended.
Exploring alternatives like Box Mapping can enhance your workflow in Blender, providing quick and effective texturing options for a variety of modeling scenarios.
_HOOK_
Essential Blender Add-ons for UV Mapping
Enhancing your UV Mapping workflow in Blender can significantly benefit from incorporating specialized add-ons. These tools can automate tedious tasks, provide more control over the UV unwrapping process, and help achieve more precise and efficient results. Here are some essential add-ons for UV Mapping in Blender, designed to streamline your texturing workflow.
- UV Squares: This add-on is perfect for straightening UV maps and transforming them into grid-like layouts. It\"s particularly useful for objects that require uniform texture distribution, such as architectural elements.
- TexTools: A comprehensive suite for texture work in Blender, TexTools offers a wide range of functionalities for UV mapping, including alignment, selection, and layout optimization tools.
- UV Packmaster: For optimizing the packing of UV maps, UV Packmaster is an indispensable tool. It maximizes the use of texture space, reducing waste and improving texture resolution.
- Magic UV: Magic UV contains various UV editing features, such as copy/pasting UVs between objects, UV stitching, and unwrapping. It\"s a versatile tool that enhances the default UV editing capabilities of Blender.
Integrating these add-ons into your Blender toolkit can vastly improve your efficiency and quality of UV mapping, making the process more intuitive and less time-consuming. Whether you\"re working on complex character models or simple environmental objects, these tools have something to offer for every project.

UV Unwrapping Explained for Beginners Blender Tutorial
Explained: This video has all the answers! Get ready to have complex concepts broken down into simple, easy-to-understand explanations. Don\'t miss this opportunity to expand your knowledge and gain a deeper understanding of the subject!
Exporting UV Layouts for External Use
Exporting UV layouts from Blender is a critical step for artists who wish to paint textures in external applications or need to share their UV maps with team members. This process allows for greater flexibility in the texturing workflow, enabling detailed texture creation in software specialized for digital painting or photo editing. Follow these steps to efficiently export your UV layouts for external use.
- Finalize Your UV Map: Ensure your UV mapping is complete and optimized within Blender. Check for any overlapping or stretching that might affect the texture work.
- Open the UV/Image Editor: Switch to the UV/Image Editor view in Blender. This area displays your UV layout.
- Select All UVs: In Edit Mode, ensure that all vertices of your model are selected so that the complete UV map is visible in the UV/Image Editor.
- Export UV Layout: With the UV map displayed, go to the UV menu and select \"Export UV Layout\". Choose your preferred file format, typically PNG for its transparency support, and set the export options such as file resolution.
- Edit in External Application: Open the exported UV layout in your chosen image editing software. You can now begin painting or adjusting your textures with precise reference to your UV map.
- Apply Textures in Blender: Once your texturing is complete, import the textures back into Blender and apply them to your model using the material settings.
Exporting UV layouts bridges the gap between Blender and external texturing tools, offering a non-destructive and versatile approach to creating high-quality textures for your 3D models.

UV Unwrapping for Beginners Blender Tutorial
Tutorial: Looking to learn something new or sharpen your skills? This video tutorial is perfect for you! From step-by-step instructions to valuable tips and tricks, you\'ll be guided towards mastering a new skill or technique in no time. Don\'t miss out on this opportunity to become an expert!
Advanced UV Mapping Techniques for Characters
Character UV mapping in Blender requires a nuanced approach to accommodate the complexity of human forms or creatures, ensuring textures appear realistic across various movements and poses. These advanced techniques can help achieve detailed and lifelike character textures.
- Seam Placement: Strategic seam placement is crucial for minimizing visible texture seams. Place seams along natural folds of the body or where clothing might naturally segment the body, such as underarms and the back of the knees.
- Pelt Mapping: Utilize pelt mapping techniques to unwrap organic shapes more naturally. This simulates the process of skinning an animal pelt, flattening out the character\"s skin for texturing without excessive stretching.
- Proportional Editing: Use Blender\"s proportional editing tool during UV unwrapping to adjust UV islands smoothly. This is especially useful for making minor tweaks to the UV map without distorting the overall layout.
- Painting Seams: To further hide seams, paint over them in the texture. Use texture painting tools in Blender or external applications to blend the seams with the surrounding textures.
- UDIM Tiles: For high-resolution textures, consider using UDIM tiles. This technique allows for multiple UV maps to be used on a single model, each with its own texture, enabling greater detail without compromising performance.
- Mirroring for Symmetry: When working with symmetrical characters, mirror the UV layout to save time and ensure uniformity. This also halves the texture work required for symmetrical details.
Advanced character UV mapping is a blend of art and technique, requiring attention to detail and an understanding of anatomy. By applying these techniques, artists can create immersive and visually compelling characters in Blender.

UV Mapping Workflow for Complex Models
UV mapping complex models in Blender involves several critical steps to ensure textures accurately conform to the 3D geometry. This workflow is designed to optimize the process, making it both efficient and effective for complex models.
- Initial Preparation: Begin by thoroughly inspecting your model to identify any potential challenges. Ensure the mesh is clean, with no unnecessary vertices, and consider the model\"s topology for optimal UV unwrapping.
- Marking Seams: Strategically place seams on your model to guide the unwrapping process. Seams should be placed in less noticeable areas and along natural breaks in the model to minimize texture stretching and distortion.
- Unwrapping: Use Blender\"s UV unwrapping tools to unfold your model. The goal is to lay out the 3D surface in 2D space as efficiently as possible, reducing overlap and maximizing texture space usage.
- UV Island Organization: Arrange UV islands (the sections of your model in the UV layout) to make the most of the available texture space. Pay attention to the scale of the islands to ensure texture details are evenly distributed across the model.
- Texture Density Check: Verify texture density across your model to ensure consistent texture detail. Adjust the scale of UV islands as needed to maintain uniform texture resolution.
- Pinning and Live Unwrap: For complex adjustments, use pinning to anchor specific UV vertices and use live unwrap to see changes in real-time, helping to distribute texture space more effectively.
- UV Packing: Utilize UV packing tools to automatically optimize the placement of UV islands, filling up the UV space efficiently and reducing wasted areas.
- Seamless Textures: Apply seamless textures where possible to hide seams and enhance the visual continuity across the model.
- Texture Baking: Bake detailed textures from high-poly models onto the UV layout of lower-poly versions to preserve detail without the computational overhead of complex geometry.
- Final Adjustments: Inspect your UV map for any stretching, overlapping, or other issues. Make final adjustments to ensure the highest quality texture application.
- Exporting UV Layouts: Export your UV layout for use in external texturing applications or for documentation purposes.
Following this structured workflow facilitates efficient and accurate UV mapping of complex models in Blender, enabling artists to achieve professional-level results in their texturing projects.
Maximizing Texture Resolution with UV Packing
Maximizing texture resolution in UV mapping is essential for achieving detailed and realistic textures on 3D models. UV packing is a technique that optimizes the arrangement of UV islands within the UV map to utilize the available space as efficiently as possible. This process helps in increasing the texture resolution without needing larger textures, thereby optimizing performance while maintaining high-quality visuals. Here\"s how to maximize texture resolution with UV packing in Blender:
- Analyze Your UV Map: Begin by examining your current UV map layout. Look for large gaps between UV islands and note areas where the space utilization can be improved.
- Choose the Right Packing Algorithm: Blender offers several UV packing algorithms. Experiment with different options to see which one provides the best compactness and space utilization for your specific UV map.
- Adjust Island Margin: Set the island margin to ensure there\"s a small gap between UV islands. This prevents textures from bleeding over from one island to another. A balance is needed; too small a margin may cause texture bleeding, while too large a margin wastes valuable texture space.
- Scale UV Islands Uniformly: Ensure UV islands are scaled uniformly to maintain consistent texture detail across the model. Non-uniform scaling can lead to varying texture resolutions, affecting the model\"s overall appearance.
- Manual Tweaking: After using the packing algorithm, you might still find some areas where manual adjustment can improve space utilization. Carefully move and rotate UV islands to fill empty spaces efficiently, paying close attention to maintaining uniform texture density.
- Utilize UV Packing Add-ons: Consider using specialized UV packing add-ons available for Blender. These tools often offer more advanced features and algorithms for packing, which can significantly improve the efficiency of your UV map layout.
- Optimize Texture Resolution: Once your UV islands are efficiently packed, adjust the texture resolution to match the new UV layout. This can mean increasing the resolution for more detailed textures or decreasing it when the efficiency of packing reduces the need for high-resolution textures.
- Test Textures on Your Model: Apply your textures to the model to test the visual results. Ensure that the texture details are consistent and that there are no issues with texture stretching or bleeding.
By following these steps and focusing on efficient UV packing, you can maximize texture resolution in your Blender projects, leading to higher quality models without the need for excessively large textures.
_HOOK_
Using Blender\"s UV Editing Tools to Solve Overlapping Issues
Overlapping UVs can create significant problems in texture mapping, leading to visual errors and inconsistencies in the final render. Blender\"s UV editing tools provide a robust set of features to identify and resolve overlapping issues, ensuring clean, accurate texture application. Here\"s how to use these tools effectively:
- Identify Overlaps: Begin by using Blender\"s UV editing view to locate overlapping UV islands. The \"UV Overlays\" options can highlight overlaps, making it easier to see where the issues lie.
- Utilize the \"Snap to Pixels\" Feature: To ensure precise placement of UV islands, enable the \"Snap to Pixels\" feature. This helps in aligning UV edges accurately to the texture\"s pixel grid, reducing the chances of overlaps, especially in tightly packed UV layouts.
- Separate Overlapping Islands: Manually adjust the position of overlapping UV islands. Use the move and rotate tools within the UV Editor to spread out the islands, ensuring they no longer overlap.
- Employ the \"Pack Islands\" Function: After manually adjusting the islands, use the \"Pack Islands\" feature to automatically arrange the UV islands efficiently within the UV space. Ensure you set an appropriate margin to prevent islands from being packed too closely.
- Scale Islands Uniformly: Uniform scaling is crucial to maintaining texture consistency. If overlaps are due to non-uniform scaling, use the \"Average Islands Scale\" to normalize the scale of UV islands before repacking them.
- Use the \"Minimize Stretch\" Tool: To reduce texture distortion and prevent overlaps, apply the \"Minimize Stretch\" operation. This tool adjusts the UVs to minimize stretching, which can help in evenly distributing the space and reducing overlap.
- Check for Hidden Overlaps: Sometimes, overlaps are not immediately visible, especially in complex models. Use the \"Select Overlap\" tool to highlight and address these hidden issues.
- Final Inspection: After adjusting the UV layout, conduct a thorough review. Use textured view modes to ensure there are no visual issues on the model and that all textures apply correctly without any overlaps or distortion.
By leveraging Blender\"s comprehensive UV editing toolkit, artists can effectively resolve overlapping issues, enhancing the overall quality of the texturing process. These steps not only improve the visual output but also streamline the workflow for UV mapping in Blender.
Adjusting UV Map Proportions for Accurate Texturing
Accurate texturing relies on well-adjusted UV map proportions to ensure that textures look correct on the 3D model. Misaligned or improperly scaled UV maps can lead to distorted or pixelated textures, undermining the quality of the final render. Here\"s a step-by-step guide to adjusting UV map proportions in Blender for more accurate texturing:
- Inspect the Initial UV Layout: Start by examining the existing UV map layout. Look for any obvious distortions or uneven scaling that could affect texture application.
- Normalize UV Island Sizes: Use the \"Average Islands Scale\" feature to normalize the size of the UV islands. This ensures that all parts of the model receive texture details uniformly, preventing distortion.
- Correct Distortions with \"Minimize Stretch\": Apply the \"Minimize Stretch\" tool to selected UV islands to reduce texture stretching. This tool adjusts the UVs to spread texture details more evenly across the surface.
- Utilize Proportional Editing: For manual adjustments, enable proportional editing in the UV Editor. This allows for smoother transitions and adjustments, maintaining the natural flow of texture across the model.
- Align UV Edges: To ensure textures align correctly at seams, use the \"Align\" and \"Straighten\" tools within the UV Editor. Proper alignment helps in creating seamless textures, especially on continuous surfaces.
- Adjust Texture Density: Check and adjust the texture density by scaling UV islands as needed. Ensuring consistent texture density across the model is crucial for maintaining a uniform appearance.
- Test Textures Early: Apply a test texture with a grid or checkerboard pattern to the model. This helps in visually identifying any distortions or scaling issues, allowing for early corrections.
- Finalize UV Proportions: Once satisfied with the adjustments, finalize the UV proportions. Pay special attention to critical areas where textures need to align perfectly, such as faces or patterned surfaces.
- Repack UV Islands: Use the \"Pack Islands\" function to efficiently utilize the UV space, ensuring no unnecessary gaps or overlaps. Adjust the packing margin as needed to prevent texture bleeding.
Adjusting UV map proportions is a critical step in preparing a model for texturing. By following these steps in Blender, artists can achieve more accurate and realistic textures, enhancing the overall quality of their 3D projects.
READ MORE:
Practical Tips for UV Mapping in Blender Projects
UV mapping is a crucial step in the 3D modeling process, allowing textures to be accurately applied to complex surfaces. Mastering UV mapping in Blender enhances the realism and detail of your projects. Here are practical tips to improve your UV mapping workflow in Blender:
- Start with Clean Geometry: Ensure your model has a clean, optimized topology before starting the UV mapping process. This simplifies the unwrapping process and results in cleaner, more manageable UV maps.
- Use the Seams Wisely: Mark seams on your model to control how it unwraps. Place seams in less visible areas or along natural edges where textures would naturally seem to separate.
- Unwrap Complex Models in Sections: For complex models, consider unwrapping in sections. This makes managing UVs easier and allows for more detailed control over each part of the model.
- Employ the Live Unwrap Feature: Use Blender\"s live unwrap feature to see how changes to seams and UV islands affect the overall unwrap in real-time, allowing for quicker adjustments.
- Optimize UV Space: Arrange UV islands to make the most of the available space. This reduces texture wastage and ensures higher resolution textures can be used effectively.
- Keep Texture Scale Consistent: Ensure the scale of UV islands is consistent to maintain uniform texture detail across the model. Use the \"Average Islands Scale\" function to help with this.
- Check for Overlapping UVs: Use Blender\"s tools to highlight and fix any overlapping UVs, as these can cause texturing errors and artifacts in the final render.
- Use Pinning for Complex Adjustments: Pin vertices in the UV editor to anchor parts of your unwrap while you adjust surrounding areas. This is particularly useful for fine-tuning the unwrap of complex models.
- Experiment with Different Projection Methods: Depending on the shape of your model, some projection methods may work better than others. Experiment with cube, cylinder, sphere, and project from view to find the best fit.
- Utilize Blender\"s Add-ons: Explore Blender\"s marketplace for add-ons that can streamline the UV mapping process, such as UV packing tools or advanced unwrapping functionalities.
Applying these practical tips can significantly improve the efficiency and quality of your UV mapping in Blender, leading to better-textured models and a more enjoyable texturing process.
UV mapping is a crucial step in the 3D modeling process, allowing textures to be accurately applied to complex surfaces. Mastering UV mapping in Blender enhances the realism and detail of your projects. Here are practical tips to improve your UV mapping workflow in Blender:
Applying these practical tips can significantly improve the efficiency and quality of your UV mapping in Blender, leading to better-textured models and a more enjoyable texturing process.