Topic blender 3d printing tutorial: Embark on a journey to unleash your creativity with our Blender 3D Printing Tutorial, guiding you through every step to masterfully crafting your own 3D models ready for printing.
Table of Content
- How to import and export 3D files in Blender for 3D printing?
- Understanding Blender for 3D Printing
- Getting Started with Blender: Basic Navigation and Tools
- Creating Your First 3D Model in Blender
- Optimizing Models for 3D Printing
- Advanced Modeling Techniques for 3D Printing
- Using Blender\"s Modifiers for 3D Printing
- YOUTUBE: Learn Blender for 3D Printing - Complete Quick and Easy Guide for Beginners
- Preparing Your Model for 3D Printing
- Exporting Your Model for 3D Printing
- Troubleshooting Common 3D Printing Issues in Blender
- Additional Resources and Community Support
How to import and export 3D files in Blender for 3D printing?
To import and export 3D files in Blender for 3D printing, follow the steps below:
- Open Blender and go to \"File\" in the top menu.
- Select \"Import\" and choose the file format of the 3D model you want to import (such as .obj, .stl, or .fbx).
- Navigate to the location of the 3D file on your computer and click \"Import\" to import the file into Blender.
- If needed, adjust the scale of the imported model using the \"Scale\" tool in the toolbar or by pressing \"S\" and dragging the mouse.
- Edit or modify the model as desired using the various tools and features available in Blender.
- Once you have finished editing the model, ensure that it is in a printable state.
- To export the model for 3D printing, go to \"File\" in the top menu and select \"Export\".
- Choose the appropriate file format for exporting (such as .stl) and save the file to your desired location.
- Configure the export settings if needed, such as adjusting the scale or applying transformations.
- Click \"Export\" to save the model in the specified file format for 3D printing.
By following these steps, you can easily import and export 3D files in Blender for 3D printing purposes.
READ MORE:
Understanding Blender for 3D Printing
Blender is a powerful, free, and open-source 3D modeling software that\"s perfect for creating models for 3D printing. It offers a comprehensive set of tools for sculpting, texturing, and editing models, making it ideal for both beginners and professionals. Understanding how to use Blender effectively for 3D printing involves grasping the basics of 3D modeling, knowing the software interface, and understanding the specific requirements that make a 3D model printable.
- Interface Basics: Familiarize yourself with Blender\"s user interface, including the 3D viewport, object mode, edit mode, and the properties panel.
- Modeling for 3D Printing: Learn how to create models with clean geometry and the importance of manifold edges, which ensure that your models are watertight and ready for printing.
- Mesh Resolution: Understand the balance between model detail and file size. Higher resolution models capture more detail but can be more challenging to print.
- Exporting Models: Discover how to export your models in STL or OBJ formats, which are widely supported by 3D printing software.
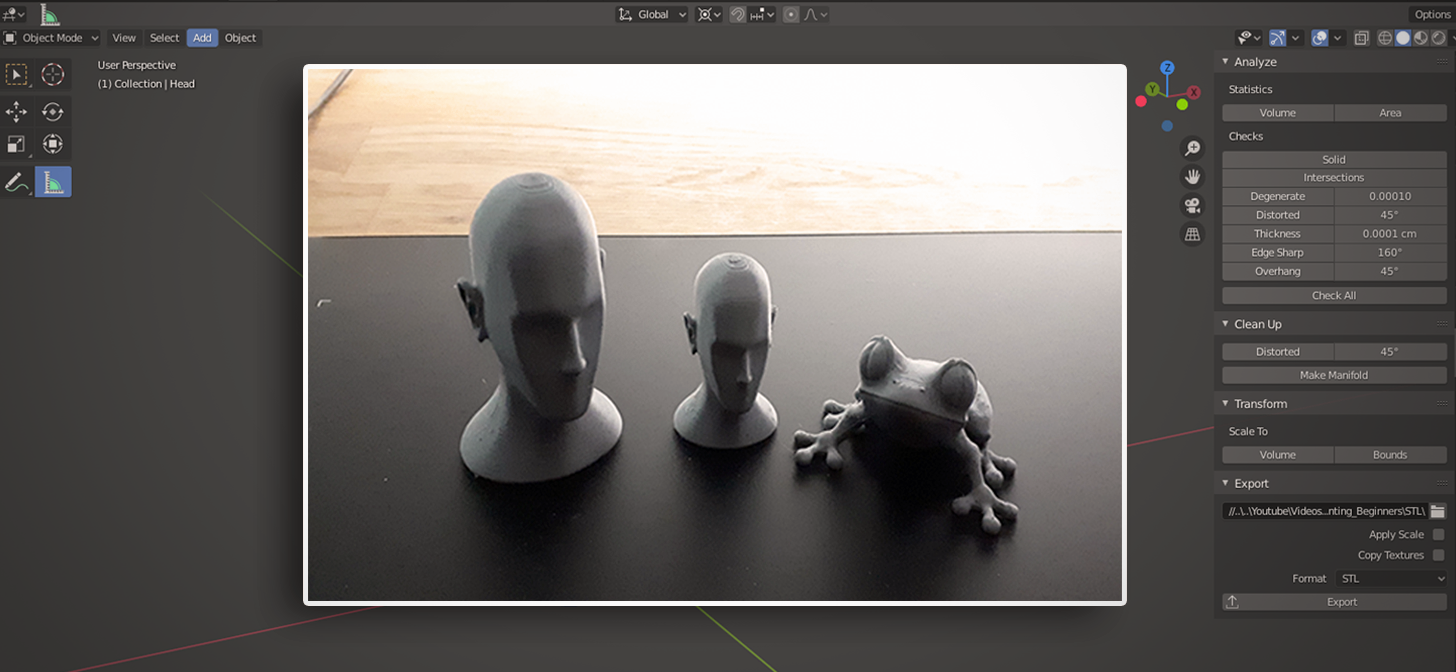
- Checking Model Integrity: Use Blender\"s tools to check for and repair any issues in your model that could affect printing quality, such as non-manifold edges or inverted normals.
By mastering these foundational aspects of Blender, you\"ll be well on your way to creating high-quality models suitable for 3D printing, bridging the gap between digital art and physical creation.

Getting Started with Blender: Basic Navigation and Tools
Beginning your journey in Blender starts with understanding its interface and the plethora of tools at your disposal. This section will guide you through the basics of navigating Blender and utilizing its essential tools, setting a solid foundation for your 3D modeling endeavors.
- Interface Overview: Blender\"s interface is divided into several areas, including the 3D Viewport, Timeline, Outliner, and Properties Panel. Familiarizing yourself with these areas will streamline your workflow.
- 3D Viewport Navigation: Learn how to rotate, pan, and zoom within the 3D Viewport using your mouse and keyboard shortcuts. For instance, pressing the middle mouse button allows you to rotate your view, while holding Shift and the middle mouse button lets you pan.
- Basic Tools: Blender offers a variety of tools for creating, editing, and transforming objects. Start with basic tools like Move, Rotate, and Scale, accessible through the toolbar or keyboard shortcuts (G for move, R for rotate, S for scale).
- Adding Objects: Discover how to add objects to your scene using the Add menu or the Shift+A shortcut. This menu allows you to insert various primitives like cubes, spheres, and cylinders, which are the building blocks of your models.
- Editing Mode: Switch between Object Mode and Edit Mode to manipulate your objects. Object Mode is used for object-level transformations, while Edit Mode allows for more detailed mesh editing.
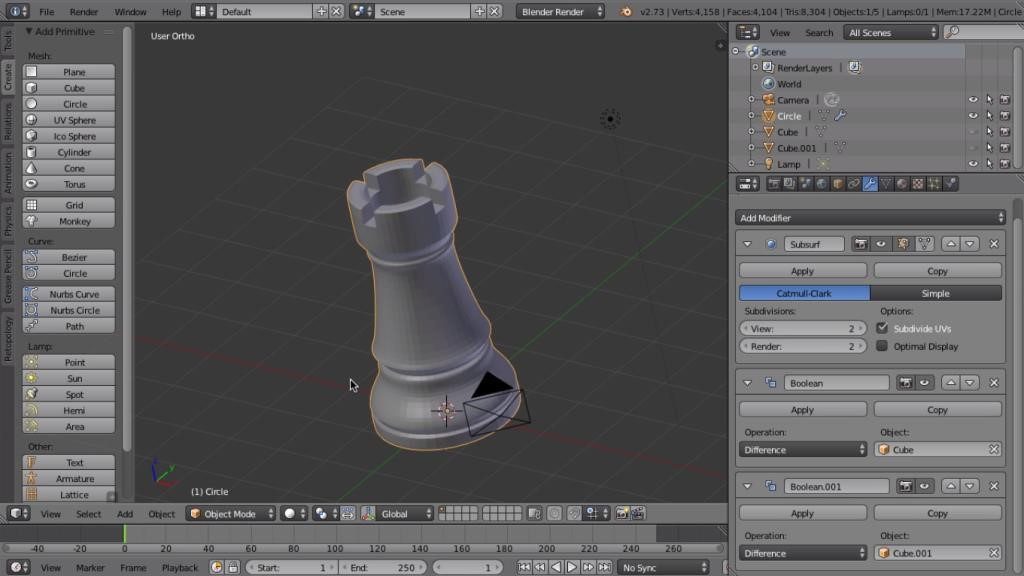
- Using Modifiers: Modifiers are automated operations that affect an object\"s geometry in non-destructive ways. Learn how to apply modifiers like Subdivision Surface to smooth your models or Boolean for complex shapes.
By mastering these initial steps, you\"ll be well-equipped to start creating and editing your own 3D models in Blender, paving the way for more advanced projects and, ultimately, successful 3D printing.
Creating Your First 3D Model in Blender
Creating your first 3D model in Blender is an exciting step into the world of 3D printing. This guide will walk you through the basic steps to bring your ideas to life, from conceptualization to the final model ready for printing.
- Plan Your Design: Start with a simple concept or idea. Sketching your design on paper can be a helpful way to visualize the final product.
- Set Up Blender: Open Blender and select a general workspace that suits 3D modeling, such as \"Layout\" or \"Modeling\".
- Add a Mesh Object: Begin by adding a basic mesh object to your scene (Shift+A > Mesh). A cube, sphere, or cylinder can serve as the starting point for your model.
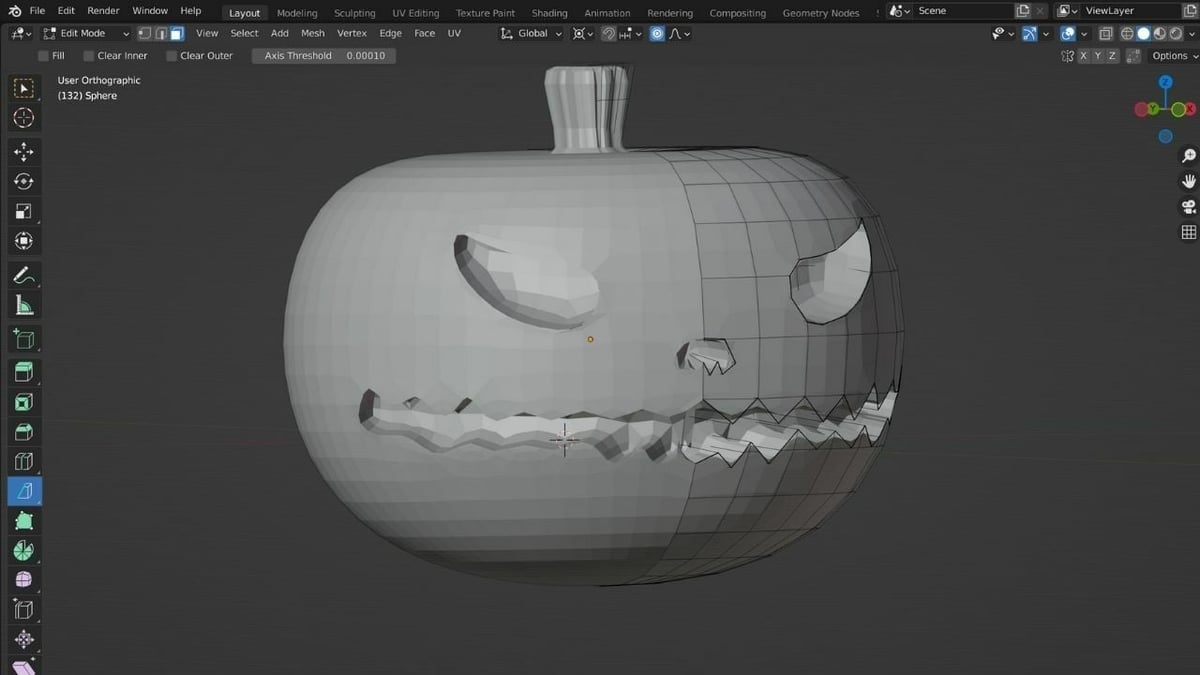
- Basic Modeling Techniques: Use the edit mode (Tab key) to modify your mesh. You can extrude (E key), scale (S key), and rotate (R key) faces, edges, or vertices to shape your object.
- Refining Your Model: Apply more advanced techniques like loop cuts (Ctrl+R) to add complexity and detail to your model. Remember to keep your geometry clean and avoid non-manifold edges.
- Checking for Printability: Regularly check your model for common 3D printing issues, such as thin walls or overhangs, using Blender\"s 3D Print Toolbox addon.
- Final Touches: Add any final details to your model, ensuring it matches your initial concept. Consider adding text, patterns, or other decorative elements to personalize your design.
- Prepare for Printing: Once satisfied with your model, ensure it\"s watertight and has no inverted normals or non-manifold edges. Use the STL export function to save your model in a format compatible with most 3D printers.
Following these steps will help you create a basic 3D model in Blender. With practice, you\"ll be able to tackle increasingly complex projects, bringing your imaginative designs to physical reality through 3D printing.

Optimizing Models for 3D Printing
Optimizing your 3D models for printing is crucial for ensuring quality prints and the structural integrity of your designs. This section covers essential tips and techniques to prepare your Blender models for successful 3D printing.
- Ensure Watertight Meshes: A model must be completely closed, or watertight, to be 3D printable. Use Blender\"s tools to check for and repair any holes or gaps in your model.
- Avoid Non-Manifold Edges: Non-manifold edges, where an edge is shared by more than two faces, can cause printing errors. Use the \"Select Non-Manifold\" option in Edit Mode to identify and correct these issues.
- Consider Wall Thickness: Thin walls can lead to weak prints or failure. Ensure your model\"s walls are thick enough to be printed by using the Solidify modifier to add thickness uniformly.
- Reduce Overhangs: Overhangs greater than 45 degrees may require support structures, which can leave blemishes on your final print. Design with minimal overhangs or plan for supports.
- Simplify Complex Geometry: While detail is important, overly complex models can be difficult to print and may require unnecessary resources. Simplify your models without sacrificing essential details.
- Optimize Orientation: The orientation of your model on the print bed affects both print quality and time. Experiment with different orientations to find the most efficient configuration.
- Scale Appropriately: Ensure your model is scaled correctly for your printing needs. Use Blender\"s measurement tools to adjust the size of your model to the desired dimensions.
- Export Correctly: Export your model in a format compatible with your 3D printer, typically STL or OBJ. Check the exported file for any errors before printing.
By following these guidelines, you can significantly improve the printability of your models, reducing the chance of printing failures and ensuring the best possible outcome for your 3D printed projects.
_qYYgrmi.jpg)
_HOOK_
Advanced Modeling Techniques for 3D Printing
As you become more comfortable with Blender and 3D modeling, you can explore advanced techniques that allow for more complex and detailed prints. These methods can enhance the functionality and aesthetics of your models, making them stand out.
- Boolean Operations: Use Boolean modifiers to combine or subtract mesh objects, creating complex shapes that would be difficult to model manually. This is particularly useful for creating interlocking parts.
- Sculpting for Detail: Blender\"s sculpting tools enable you to add intricate details to your models. For 3D printing, focus on creating features that are pronounced enough to be captured by your printer\"s resolution.
- Topology Optimization: A model\"s topology influences its printability and strength. Use retopology techniques to create a mesh flow that optimizes structural integrity and minimizes printing issues.
- Creating Supports: While many 3D printers offer automatic support generation, creating custom supports in Blender can result in cleaner prints with easier support removal.
- Multi-Part Models: Designing models in multiple parts can solve printing size limitations and facilitate complex assemblies. Learn to design interlocking connections for easy assembly without glue.
- Texturing and Color: While most 3D printers print in a single color, you can design models with texture and color in mind for multi-material or color 3D printers, enhancing the final appearance.
- Simulation for Function: Use Blender\"s simulation tools, such as rigid body physics or cloth simulation, to predict and improve the functionality of moving parts or flexible components.
These advanced techniques require patience and practice to master but can significantly enhance the quality and functionality of your 3D printed models. As you experiment with these methods, you\"ll discover new possibilities for your 3D printing projects.
Using Blender\"s Modifiers for 3D Printing
Blender\"s modifiers can significantly streamline the process of preparing your models for 3D printing. These powerful tools automate adjustments and enhancements, making it easier to achieve print-ready designs. Here\"s how to effectively use some of the most useful modifiers for 3D printing:
- Solidify Modifier: Adds thickness to objects that are too thin to print. Adjust the thickness parameter to ensure your model has sufficient strength and is not prone to breaking.
- Subdivision Surface Modifier: Increases the resolution of your model, making surfaces smoother for a more refined printed object. Use it judiciously to avoid creating overly complex meshes that are difficult to print.
- Boolean Modifier: Ideal for creating complex shapes by combining or subtracting objects. When designing parts that fit together, Boolean can help ensure precision and ease of assembly.
- Decimate Modifier: Reduces the polygon count of your model, which can be beneficial for lowering the file size and making the model easier to handle by slicing software without significantly compromising detail.
- Remesh Modifier: Creates a uniform mesh structure, which can be particularly useful for models scanned from real-world objects or those with irregular topology that might cause printing issues.
- Edge Split Modifier: Allows you to control the sharpness of edges by splitting them based on angle, which can be useful for emphasizing details or facilitating the printing of overhanging parts without supports.
When applying modifiers for 3D printing, it\"s crucial to consider the balance between model detail and printability. Excessive detail can make printing more challenging and time-consuming, while insufficient detail may result in a loss of the desired aesthetics. Experiment with different modifiers to find the best combination for your specific project.
Learn Blender for 3D Printing - Complete Quick and Easy Guide for Beginners
Discover the amazing capabilities of Blender, the versatile 3D modeling software used by professionals worldwide. Dive into a world of creativity and bring your imagination to life with stunning animations and visual effects. Watch our video to unlock the secrets of Blender and embark on an exciting journey of digital artistry.
How to Use Blender for 3D Printing - The Basics Tutorial
Explore the groundbreaking world of 3D printing and witness the revolution in manufacturing and design. From creating unique prototypes to customizing everyday objects, this video will showcase the limitless possibilities of 3D printing technology. Join us on this captivating journey and unleash your creativity in the realm of three-dimensional masterpieces.
Preparing Your Model for 3D Printing
Before sending your Blender model to the printer, it\"s essential to ensure it\"s fully prepared to avoid any printing issues. This preparation involves several crucial steps to optimize your model for the best possible outcome. Follow these guidelines to prepare your model for 3D printing:
- Check for Non-Manifold Edges: Use Blender\"s \"Select Non-Manifold\" feature in Edit Mode to identify and fix any non-manifold edges, ensuring your model is watertight.
- Ensure Correct Scale: Verify that your model is scaled accurately according to your desired dimensions. Use Blender\"s measurement tools to adjust the scale appropriately.
- Apply Modifiers: Before exporting, apply any modifiers to your model. This step is crucial as modifiers can change the geometry of your model, affecting the print.
- Remove Doubles: Simplify your mesh by removing duplicate vertices with the \"Merge by Distance\" tool. This can help reduce the complexity of your model without affecting its appearance.
- Check Wall Thickness: Use tools like the 3D Print Toolbox to analyze wall thickness and ensure all parts of your model are thick enough to be printed successfully.
- Orientation for Printing: Consider the best orientation for printing your model to minimize supports and ensure the best surface quality. Adjust the model\"s orientation in Blender accordingly.
- Export as STL or OBJ: Finally, export your model in a format compatible with your 3D printer. STL and OBJ are the most commonly supported formats for 3D printing.
Following these steps will help ensure that your Blender model is ready for 3D printing, optimizing it for a successful print with the desired accuracy and detail.
Exporting Your Model for 3D Printing
Before sending your Blender model to the printer, it\"s essential to ensure it\"s fully prepared to avoid any printing issues. This preparation involves several crucial steps to optimize your model for the best possible outcome. Follow these guidelines to prepare your model for 3D printing:
- Check for Non-Manifold Edges: Use Blender\"s \"Select Non-Manifold\" feature in Edit Mode to identify and fix any non-manifold edges, ensuring your model is watertight.
- Ensure Correct Scale: Verify that your model is scaled accurately according to your desired dimensions. Use Blender\"s measurement tools to adjust the scale appropriately.
- Apply Modifiers: Before exporting, apply any modifiers to your model. This step is crucial as modifiers can change the geometry of your model, affecting the print.
- Remove Doubles: Simplify your mesh by removing duplicate vertices with the \"Merge by Distance\" tool. This can help reduce the complexity of your model without affecting its appearance.
- Check Wall Thickness: Use tools like the 3D Print Toolbox to analyze wall thickness and ensure all parts of your model are thick enough to be printed successfully.
- Orientation for Printing: Consider the best orientation for printing your model to minimize supports and ensure the best surface quality. Adjust the model\"s orientation in Blender accordingly.
- Export as STL or OBJ: Finally, export your model in a format compatible with your 3D printer. STL and OBJ are the most commonly supported formats for 3D printing.
Following these steps will help ensure that your Blender model is ready for 3D printing, optimizing it for a successful print with the desired accuracy and detail.
Troubleshooting Common 3D Printing Issues in Blender
When preparing models for 3D printing using Blender, it\"s common to encounter several issues that can affect the printability and quality of your models. Here are some troubleshooting tips to help you overcome these challenges:
- Non-Manifold Edges:
- These are edges that do not belong to exactly two faces, causing printing errors. To fix, select your model, go to Edit Mode, and use Mesh > Cleanup > Select Non Manifold. You can then manually fix these areas by merging vertices or creating new faces.
- Inverted Normals:
- Inverted normals can cause parts of your model to print inside-out. To correct them, select your model, enter Edit Mode, and press Shift+N to recalculate the normals outside. For manual correction, select the problematic faces and flip them individually.
- Overlapping Faces:
- Overlapping faces can result in unpredictable printing results. Remove them by selecting the overlapping faces in Edit Mode and deleting them. You may need to rebuild parts of the mesh for a cleaner topology.
- Wall Thickness:
- Ensure your model\"s walls are thick enough to be printed. Use the Solidify modifier to adjust wall thickness, and check the manufacturer\"s guidelines for minimum thickness values.
- Printing Supports:
- Complex models may require supports to print correctly. Blender does not automatically generate these, so consider using external slicing software that can add supports based on your printer\"s specifications.
- Scaling Issues:
- Incorrect scaling can result in models that are too small or too large. Ensure your model is scaled correctly by applying the scale (Ctrl+A > Scale) in Object Mode. Use a ruler in Blender to verify dimensions match real-world measurements.
- Exporting Files:
- When exporting your model for 3D printing, typically STL or OBJ formats are used. Ensure you have the correct export settings, such as scale units and face orientation, to avoid issues with your 3D printer software.
Addressing these common issues can significantly improve the success rate of your 3D prints from Blender models. Always preview your model in your slicing software to catch any potential problems before printing.
_HOOK_
READ MORE:
Additional Resources and Community Support
The journey into 3D modeling and printing with Blender is an exciting one, full of learning and community collaboration. To further enhance your skills and solve any challenges you encounter along the way, consider tapping into the following resources and communities:
- Blender Artists Community:
- An active forum where you can ask questions, share your work, and get feedback from experienced Blender users.
- BlenderNation:
- A hub for daily news, tutorials, galleries, and more. It\"s a great place to stay updated on the latest Blender features and community projects.
- Blender Stack Exchange:
- A question and answer site for people who use Blender to create 3D graphics, animations, or games. It\"s perfect for getting help with specific problems.
- Blender 3D Tutorials on YouTube:
- YouTube hosts a vast array of tutorial channels dedicated to Blender, ranging from beginner to advanced levels. Channels like Blender Guru, CG Geek, and Grant Abbitt are highly recommended.
- Blender Official Documentation:
- The official Blender manual is an excellent resource for understanding the core functionalities and features, updated regularly with the latest version.
- Online Courses and Workshops:
- Platforms like Udemy, Coursera, and Skillshare offer comprehensive courses on Blender and 3D printing, suitable for all skill levels.
- Local Meetups and User Groups:
- Joining a local Blender user group or meetup can provide valuable networking opportunities, hands-on workshops, and peer support.
- 3D Printing Communities:
- Websites like Thingiverse and MyMiniFactory are not only places to share and download 3D models but also communities where you can get advice on 3D printing with Blender.
Utilizing these resources can significantly enhance your learning curve and help you connect with like-minded individuals passionate about 3D modeling and printing. Remember, the Blender community is known for its willingness to help beginners, so don\"t hesitate to reach out and ask for help when you need it.
Embark on your Blender 3D printing journey with confidence, knowing that a wealth of tutorials, community support, and resources are at your fingertips to guide you towards mastering your craft and bringing your creative visions to life.


