Topic blender uv mapping tutorial: Welcome to the ultimate Blender UV mapping tutorial, where we demystify the process and guide you through mastering UV unwrapping and texturing techniques to elevate your 3D modeling projects.
Table of Content
- How to do UV mapping in Blender?
- Understanding the Basics of UV Mapping
- Step-by-Step Process for UV Unwrapping
- Marking Seams for Efficient UV Layouts
- Using Blender\"s UV Mapping Tools and Features
- Adjusting and Optimizing UV Maps
- Texturing Tips for UV Mapped Models
- YOUTUBE: UV Unwrapping Explained for Beginners | Blender Tutorial
- Common UV Mapping Issues and Solutions
- Advanced UV Mapping Techniques
- Best Practices for UV Mapping in Blender
- Resources for Further Learning and Exploration
How to do UV mapping in Blender?
UV mapping is a process in Blender where you create a 2D representation of a 3D object\'s surface, allowing you to apply textures and materials accurately. Here is a step-by-step guide on how to do UV mapping in Blender:
- Open Blender and import the 3D object you want to apply UV mapping to.
- Select the object by right-clicking on it in the 3D viewport.
- Switch to \"Edit Mode\" by pressing the Tab key or selecting it from the Mode drop-down menu at the top of the viewport.
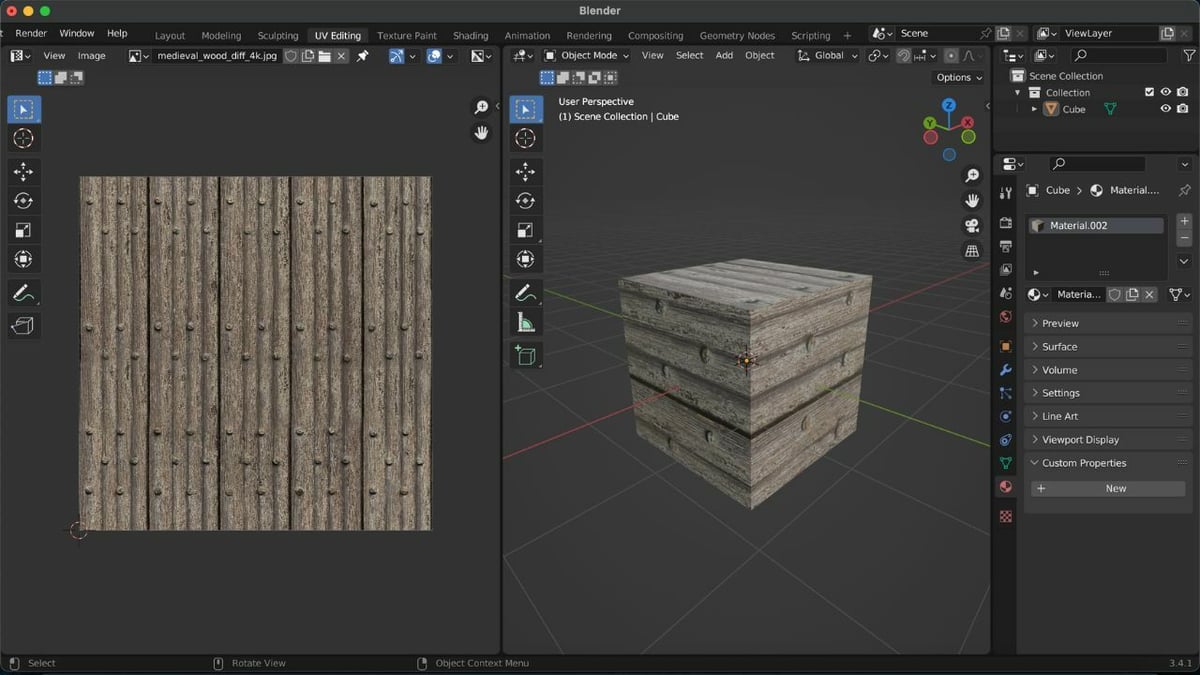
- In the UV Editing workspace, click on the \"UV Editing\" button at the top of the screen.
- In the 3D viewport, deselect everything by pressing the A key.
- Select the edges and vertices you want to map by right-clicking on them. You can also use various selection tools like the Box Select or Circle Select to make the process easier.
- Once you have selected the desired edges and vertices, press the U key or go to UVs > Unwrap from the top menu.
- A pop-up menu will appear with different unwrapping options. Choose the one that best suits your needs. \"Smart UV Project\" is a popular choice for complex objects.
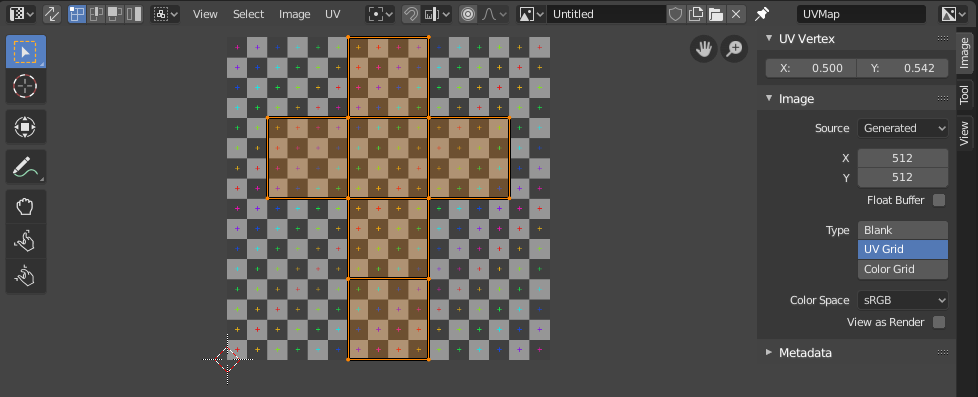
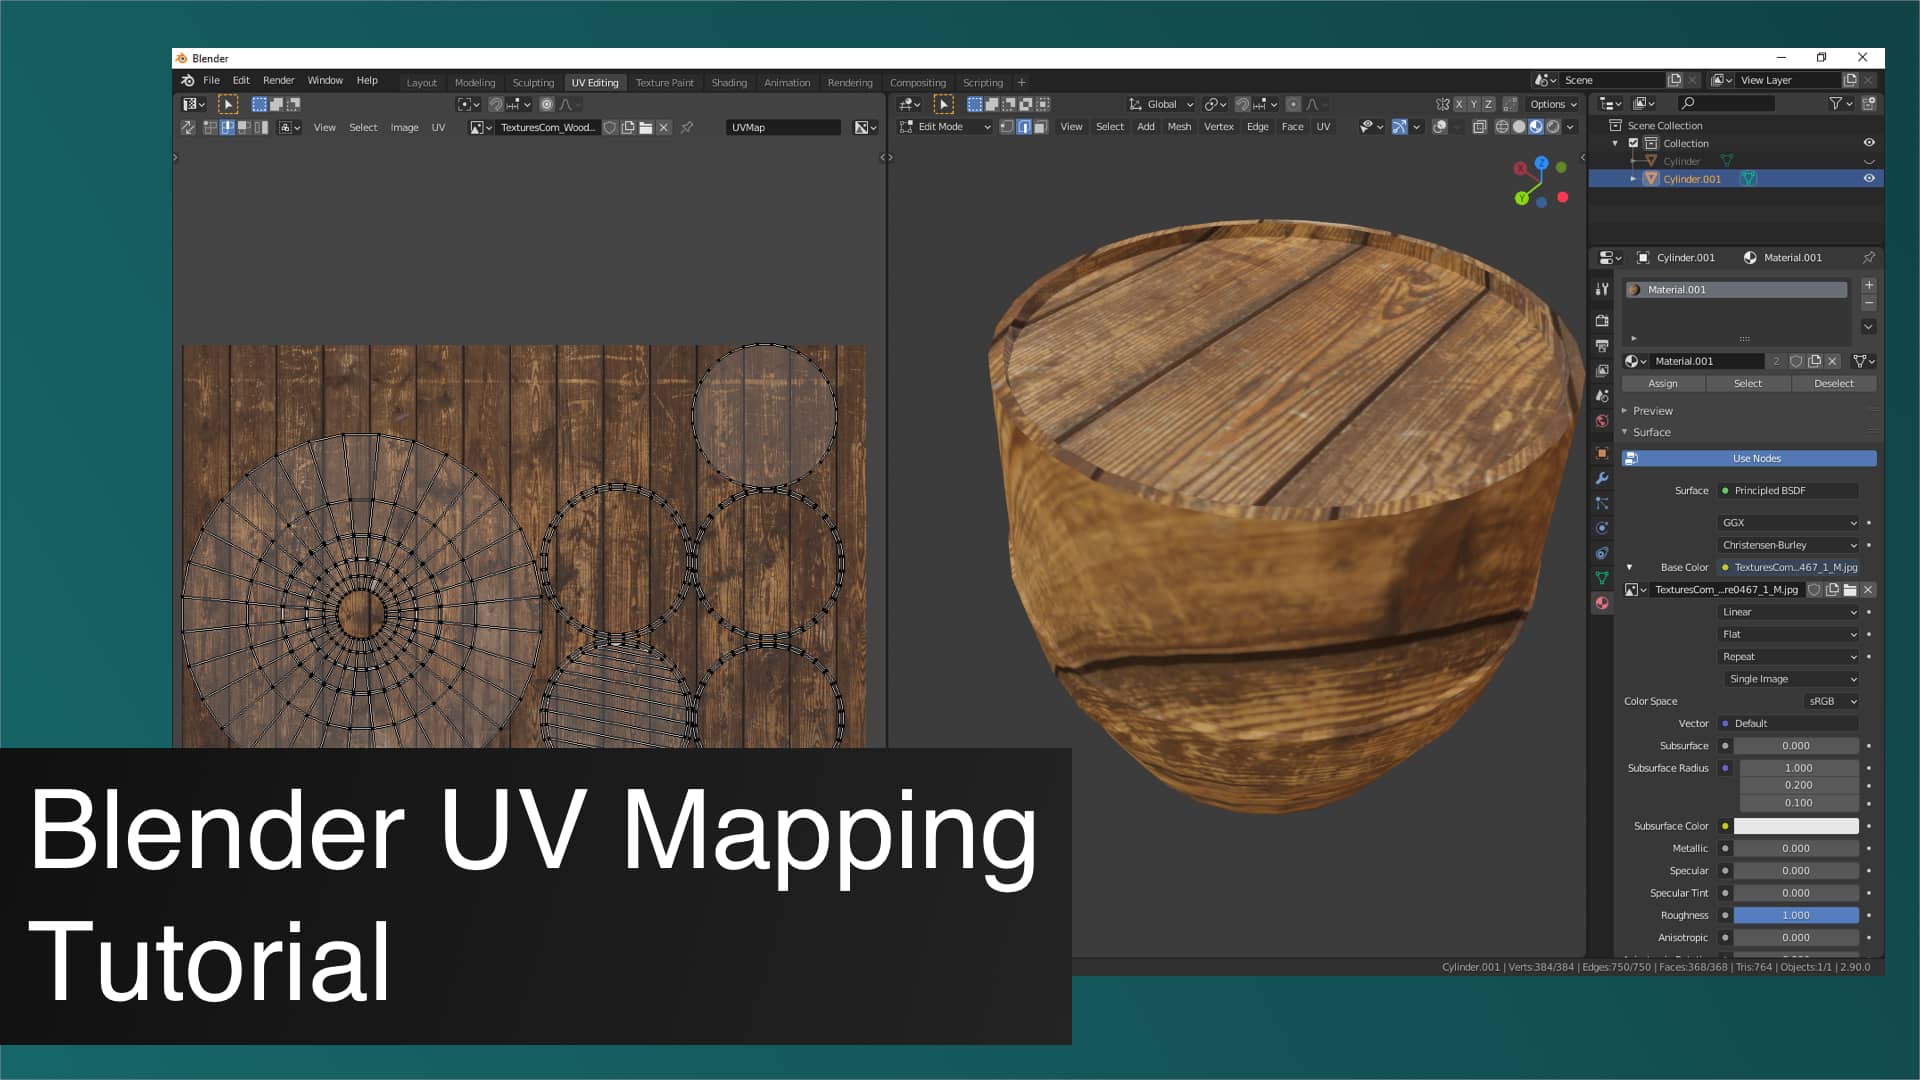
- After unwrapping, you will see the UV map in the UV/Image Editor workspace. You can manipulate and arrange the UV islands as desired.
- To apply a texture or material to your UV map, create a new image or open an existing one in the UV/Image Editor. You can then use the various painting and editing tools available to apply textures.
By following these steps, you can successfully perform UV mapping in Blender and prepare your 3D object for texturing and material application.
READ MORE:
Understanding the Basics of UV Mapping
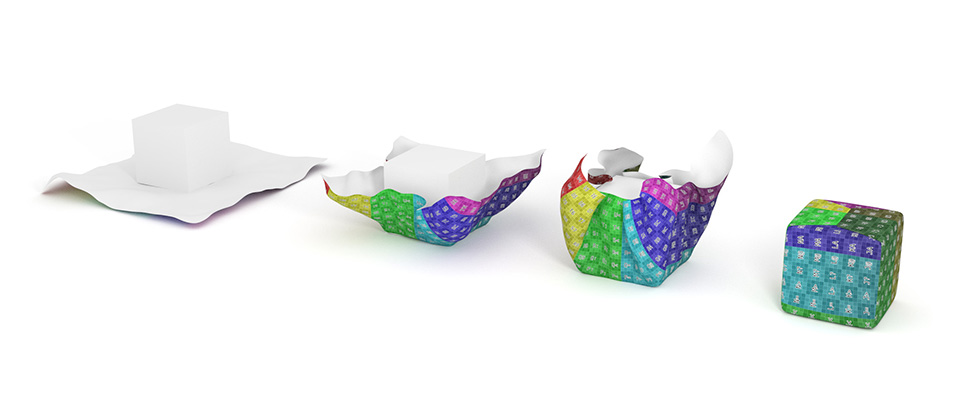
UV Mapping is a critical technique in 3D modeling, allowing artists to project 2D textures onto the surfaces of 3D models. It involves unwrapping a model\"s surface to create a flat, 2D representation that can be easily textured. This process is essential for adding detail, realism, and visual interest to 3D objects.
- Seams Identification: The first step in UV mapping involves identifying and marking seams on your model. Seams act like the edges of a paper model that has been unfolded. By strategically placing these seams, you can control how the 3D model unwraps into a 2D UV map.
- Unwrapping the Model: Once the seams are marked, the model can be unwrapped. This process translates the 3D model into a 2D UV map, spreading out the model\"s polygons to minimize stretching and distortion of textures.
- UV Mapping Methods: Blender offers several methods for unwrapping models, including the manual Unwrap method, which uses the seams you\"ve defined, and automatic options like Smart UV Project and Lightmap Pack, among others. Each method has its specific use case, with manual unwrapping providing the most control.
- Texture Application: After unwrapping, textures can be applied to the UV map. This step involves aligning a 2D image with the UV layout to ensure textures accurately cover the model\"s surface.
- Optimizing UV Layouts: The final step involves adjusting and optimizing the UV map to ensure efficient use of texture space and to minimize texture stretching or distortion. This might include scaling, rotating, or moving UV islands within the UV editor.
Understanding these basics and mastering UV mapping techniques are fundamental for creating textured models that look realistic and appealing in Blender.

Step-by-Step Process for UV Unwrapping
UV Unwrapping in Blender is a crucial process for applying textures accurately on 3D models. This step-by-step guide will walk you through the process of UV unwrapping in Blender, from preparing your model to the final UV layout adjustments.
- Prepare Your Model: Ensure your model is ready for unwrapping. This involves cleaning up the mesh, removing any unnecessary vertices, edges, or faces that might complicate the unwrapping process.
- Mark Seams: Select edges where you want your model to be \"cut\" for unwrapping. These edges are marked as seams. In Edit Mode, select edges, then press Ctrl+E and choose Mark Seam from the menu. Strategic placement of seams can significantly influence the unwrapping result.
- Select Faces for Unwrapping: In Edit Mode, select all faces you wish to unwrap. You can press A to select all or manually select specific faces.
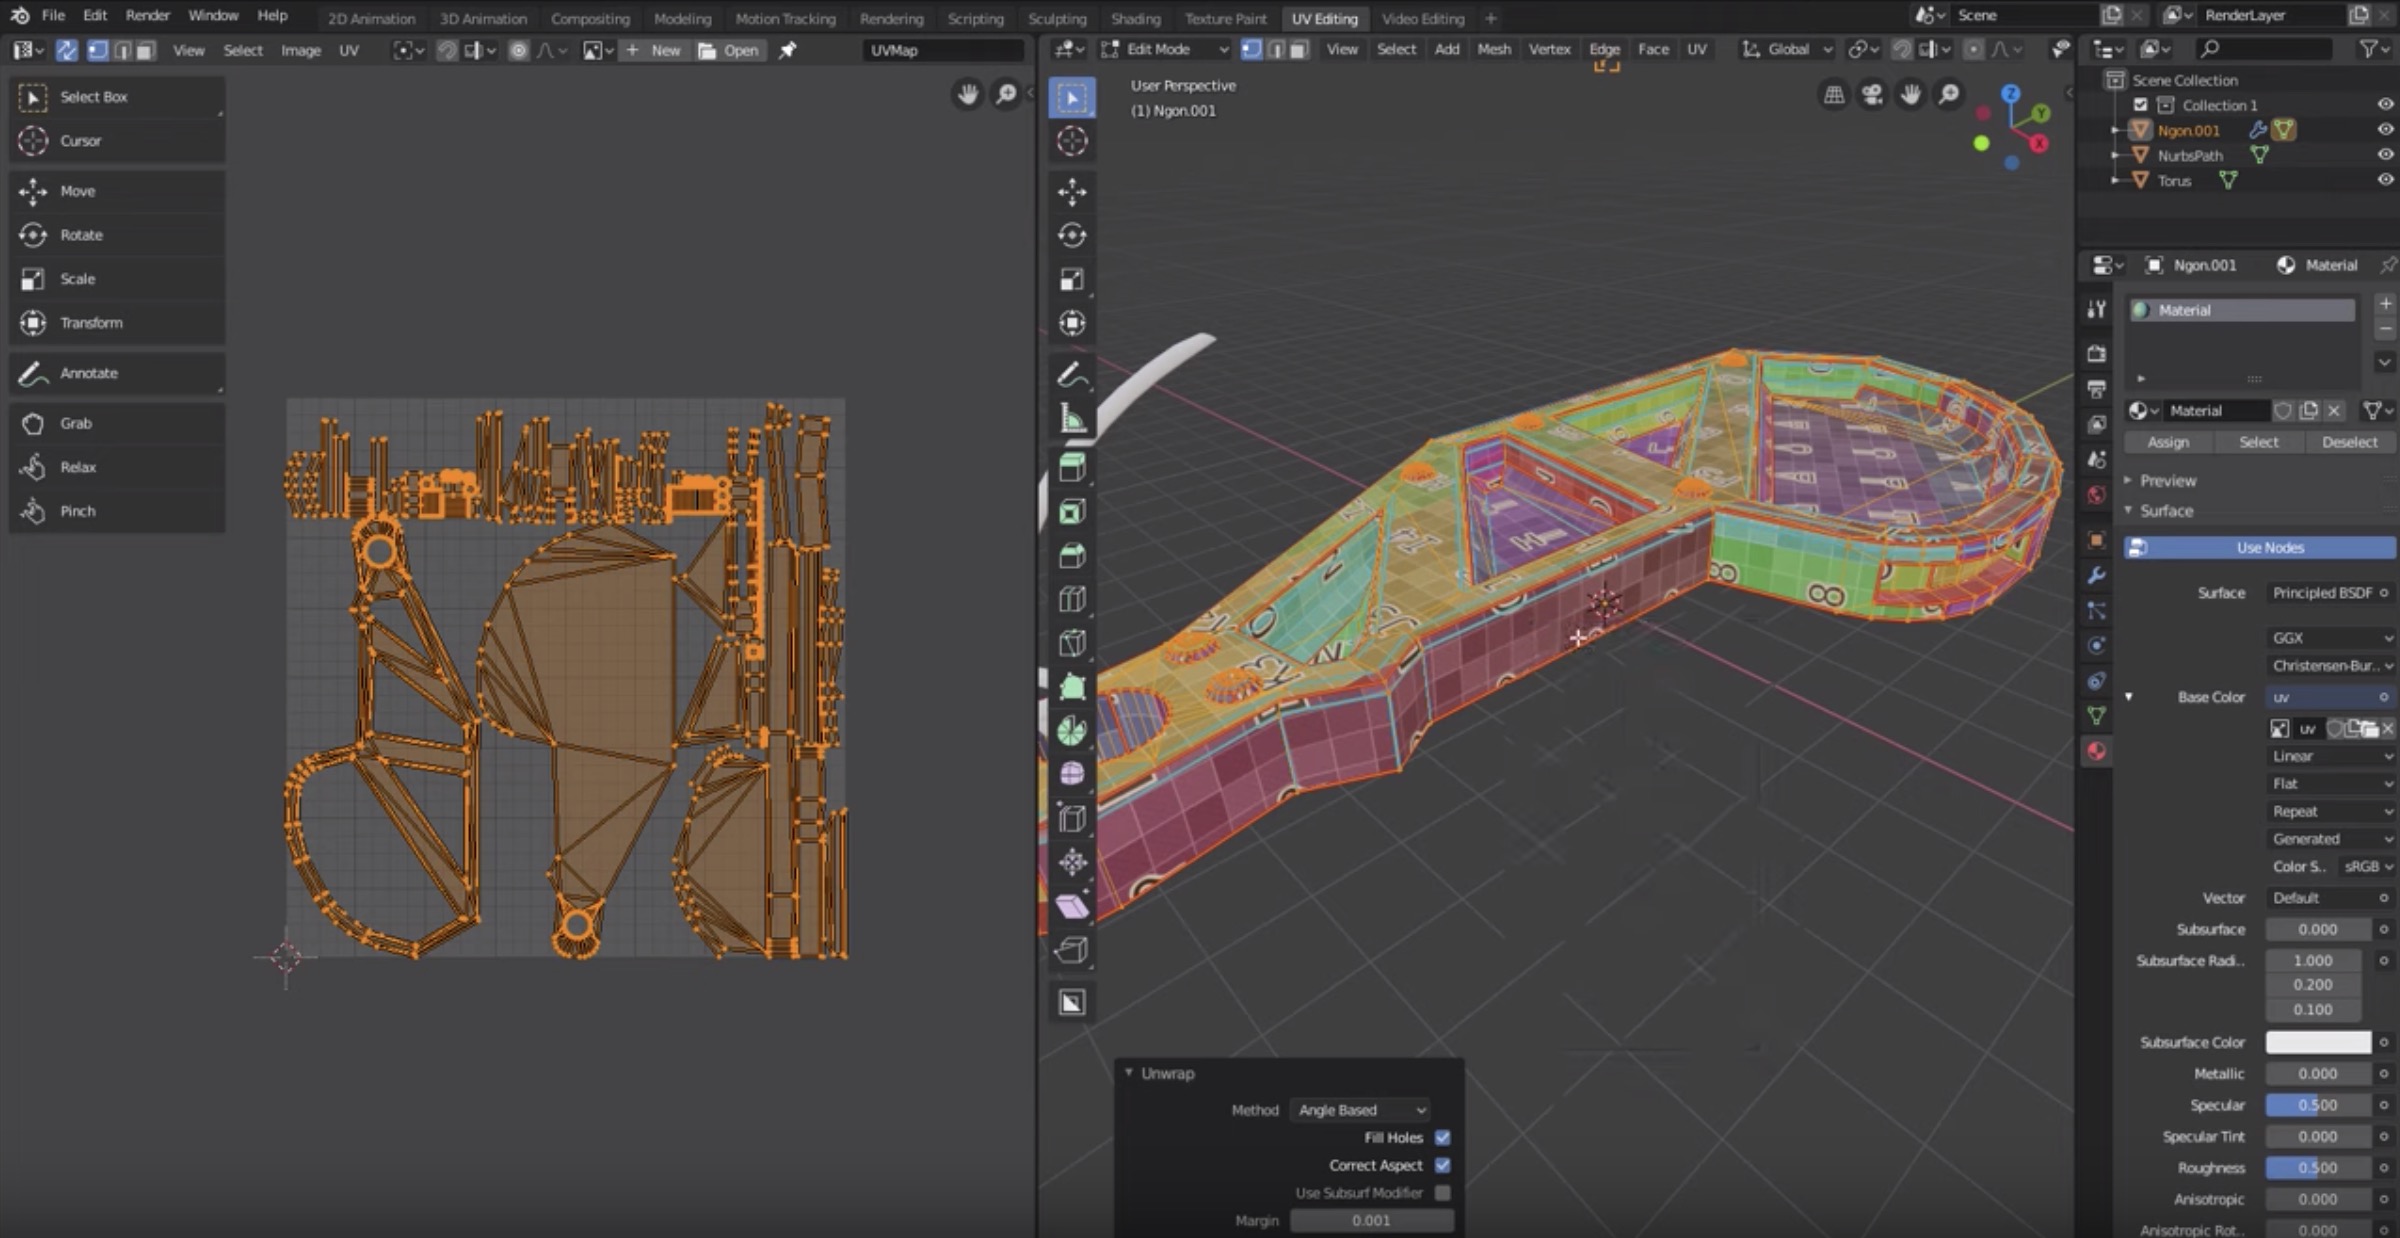
- Unwrap the Model: With your faces selected, press U to open the Unwrap menu, then select Unwrap. Blender will use the seams you\"ve marked to unfold the model onto a 2D UV map.
- Adjust the UV Map: Open the UV Editor window to see the UV map. You may need to adjust the layout to minimize stretching and make efficient use of the texture space. This can involve moving and scaling UV islands or even rotating them for a better fit.
- Pin UV Vertices: For more complex models, you might find it useful to pin vertices in the UV Editor to maintain their position while adjusting others. Select vertices and press P to pin them.
- Minimize Stretching: Use the Minimize Stretch option in the UV Editor (found in the UV menu) to automatically adjust the UV map and reduce texture distortion.
- Check for Overlapping: Ensure no UV islands are overlapping unless intentionally doing so for mirrored parts of the model. Overlapping UVs can cause texture artifacts.
- Export UV Layout: If needed, you can export the UV layout by going to UV > Export UV Layout. This can be useful for creating textures in external image editing software.
Following these steps will help you achieve a well-unwrapped model in Blender, ready for texturing. Remember, practice and experimentation are key to mastering UV unwrapping.
Marking Seams for Efficient UV Layouts
Marking seams is a critical step in UV mapping within Blender, guiding the unwrapping process to produce efficient and easy-to-texture UV layouts. Proper seam placement can significantly impact the quality of your texture mapping, reducing stretching and making texturing more straightforward.
- Understanding Seams: Seams in UV mapping act like the edges of a paper cut-out model. By marking seams along edges where the model should \"unfold\", you control how the 3D surface is laid out flat. Think of it as planning where to cut a 3D object to lay it out flat without distorting the surface.
- Selecting Edges for Seams: In Edit Mode, carefully select edges where your model naturally divides or bends. Common seam locations include behind ears in characters, under arms, or along the backs of objects. The goal is to hide seams in less noticeable areas.
- Marking Seams: With the edges selected, press Ctrl+E to access the Edge Menu, then choose \"Mark Seam\". Marked seams will appear highlighted in red, indicating where the mesh will split during unwrapping.
- Strategic Seam Placement: Place seams in inconspicuous areas to minimize visible transitions in textures. For characters, consider areas covered by clothing or hair. For objects, look for natural breaks or hidden faces.
- Testing and Adjusting Seams: After marking seams, perform a quick unwrap (U > Unwrap) to see how the UV map looks. Check for stretching or overlapping in the UV Editor. If necessary, adjust your seams and unwrap again until you achieve a satisfactory layout.
- Utilizing UV Squares: For objects with geometric patterns or structures, aim to create UV squares that resemble the object\"s natural shapes. This makes texturing easier and more efficient, especially for patterns and grids.
Effective seam marking is both an art and a science, requiring practice to perfect. By considering your model\"s geometry and the final texture\"s appearance, you can create UV maps that are both efficient and visually appealing.
Using Blender\"s UV Mapping Tools and Features
Blender offers a comprehensive suite of UV mapping tools and features that cater to the needs of both beginners and advanced users. Understanding these tools is crucial for efficient UV mapping and texturing of your 3D models. Here\"s an overview of the essential tools and how to use them effectively.
- UV Editing Workspace: Blender\"s UV Editing workspace provides a dedicated environment for UV mapping. It splits the screen between the 3D Viewport and the UV Editor, allowing you to see real-time updates as you make adjustments.
- Marking Seams: Before unwrapping, you need to mark seams on your model. Use the Edge Select mode in Edit Mode, select edges where you want your model to unfold, and then mark them as seams (Ctrl+E > Mark Seam).
- Unwrapping: With seams marked, select all faces of your model (A in Edit Mode) and press U to unwrap. Blender provides several unwrapping methods, including Smart UV Project and Lightmap Pack, to suit different types of models.
- UV Editor: The UV Editor is where you\"ll spend most of your time adjusting UVs. It allows you to move, rotate, and scale UV islands to optimize texture space usage. You can also use the Pack Islands feature to automatically arrange UV islands efficiently.
- Proportional Editing: For fine-tuning UVs, Proportional Editing can be enabled in the UV Editor to smoothly adjust UV islands and maintain organic shapes, which is particularly useful for character models.
- Pin and Unpin: Pinning UV vertices (P in UV Editor) allows you to lock certain parts of your UV map in place while editing others. This is helpful when making large-scale adjustments without affecting specific areas.
- Live Unwrap: Enabling Live Unwrap (in the UV menu) automatically updates the UV layout as you mark or clear seams, streamlining the process of finding the best unwrap for your model.
- Seams from Islands: This feature (Ctrl+E > Seams from Islands in Edit Mode) lets you quickly create seams around selected UV islands, simplifying the process of preparing models for unwrapping.
Mastering these tools will significantly enhance your UV mapping workflow in Blender, making it easier to achieve detailed and realistic textures on your 3D models.

_HOOK_
Adjusting and Optimizing UV Maps
After unwrapping your model in Blender, adjusting and optimizing the UV map is essential to ensure efficient texture usage and to improve the overall texture appearance. Here are steps and tips for refining your UV maps for better results.
- Inspecting UV Maps: Begin by inspecting your UV map in the UV Editor for any overlapping islands, excessive stretching, or wasted space. Use the \"UV -> Pack Islands\" feature to automatically space out the islands efficiently.
- Minimizing Stretching: Use the \"Minimize Stretch\" tool (found in the UV menu) to reduce texture distortion. This tool adjusts UV vertices to evenly distribute texture stretching across the map.
- Aligning and Snapping: For geometric models or models that require precise texturing, align UV edges or vertices using the \"Align\" (W) and \"Snap to Pixels\" (Shift+S) options to ensure clean, grid-aligned textures.
- Scaling UV Islands: Uniformly scale UV islands based on their importance or detail level. Larger islands will receive more texture detail, which is useful for faces or other focal points on your model.
- Seamless Textures: For models requiring seamless textures, adjust UV edges to ensure that texture seams are hidden or match up perfectly. This may involve manual tweaking of UV vertices or edges.
- Utilizing Texture Space: Ensure that the UV map makes efficient use of the available texture space. Avoid large gaps between islands, but also leave enough margin to prevent texture bleeding.
- Pinning for Control: Pin vertices in the UV Editor to lock parts of the UV map while adjusting others. This can be particularly useful when making large-scale modifications or when fine-tuning specific areas.
Adjusting and optimizing UV maps is a dynamic process that often involves iteration and refinement. By following these steps, you can create efficient and high-quality UV maps suitable for detailed texturing work in Blender.

Texturing Tips for UV Mapped Models
Applying textures to UV mapped models is an art that can bring your Blender creations to life. Here are some essential tips to enhance your texturing process and ensure your models look as realistic and appealing as possible.
- Choose High-Quality Textures: The foundation of great texturing is high-quality source images. Opt for high-resolution and clear textures to ensure your models look realistic.
- Consider Texture Scale: Ensure the scale of your texture matches the scale of your model. A texture that\"s too large or too small can break the illusion of realism.
- Use Non-Destructive Techniques: Utilize Blender\"s node-based materials to layer and adjust textures without altering the original image files. This approach offers flexibility to experiment and iterate.
- Employ Bump and Normal Maps: To add depth and detail to your textures without increasing geometry, use bump or normal maps. These can simulate surface irregularities and enhance realism.
- Seamless Textures: For textures that tile across your model, ensure they are seamless to avoid visible seams that can detract from the model\"s appearance.
- UV Mapping Overlap: For symmetrical models, overlapping UVs can save texture space and ensure uniformity in texture application. However, use this technique judiciously to avoid visible repetition.
- Texture Painting: Blender\"s texture painting tools allow you to paint directly onto the model. This is particularly useful for adding details or hiding seams.
- Lighting Matters: When applying textures, consider how lighting will interact with your model. Use Blender\"s lighting tools to preview and adjust how textures appear under different lighting conditions.
Texturing is a critical step in the 3D modeling process, and these tips can help you achieve more realistic and visually interesting results in Blender.

UV Unwrapping Explained for Beginners | Blender Tutorial
\"Looking to have complex concepts broken down in a simple and engaging way? This video has got you covered! Get ready to have your mind blown as the experts explain intricate topics in the most entertaining and informative manner.\"
Blender UV Unwrapping Tutorial Explained for Beginners
\"New to the world of [keyword]? No worries! This video is perfect for beginners like you who are eager to dive into the world of [keyword]. Learn all the fundamentals and start your journey towards mastering [keyword] with ease and confidence.\"
Common UV Mapping Issues and Solutions
UV mapping is a powerful technique in Blender, but it\"s not without its challenges. Here are some common issues encountered during UV mapping, along with practical solutions to overcome them.
- Stretching: When textures appear distorted on the model, it\"s often due to uneven UV stretching. Solution: Use the \"Minimize Stretch\" option in the UV editor or manually adjust the UV islands to distribute texture space more evenly.
- Seams Visibility: Seams can become visible in the final render, disrupting the model\"s appearance. Solution: Place seams in less noticeable areas or use texture painting to hide them.
- Texture Bleeding: Sometimes, textures bleed over from one UV island to another. Solution: Increase the margin between UV islands in the UV editor to ensure textures do not overlap.
- Overlapping UVs: Overlapping UVs can cause textures to display incorrectly. Solution: Use \"Pack Islands\" to automatically arrange UVs efficiently, or manually adjust them to prevent overlap.
- Difficulty in Selecting Edges for Seams: Identifying the best places for seams can be challenging, especially for complex models. Solution: Use the \"Select Boundary Loop\" and \"Select Sharp Edges\" tools to help identify potential seam locations.
- Unwanted Texture Tiling: Repeating textures can look unnatural, especially on large surfaces. Solution: Use varied textures, or adjust the UV layout to make the repetition less uniform and more natural.
- Inefficient UV Space Usage: Wasted texture space can result in lower-quality textures. Solution: Use \"Pack Islands\" feature with a good margin setting to maximize texture space usage.
Addressing these issues can significantly improve your UV mapping results, leading to more realistic and high-quality textures in your Blender projects.

Advanced UV Mapping Techniques
Once you\"re comfortable with the basics of UV mapping in Blender, you can start exploring more advanced techniques to tackle complex models and textures. These methods can help you achieve more precise control and better results in your texturing workflow.
- Live Unwrap: Use the Live Unwrap feature to dynamically adjust seams and see real-time updates in the UV Editor. This is particularly useful for making quick adjustments to your UV map without having to unwrap the model repeatedly.
- Custom UV Layouts for Animation: When working with animated models, create custom UV layouts that accommodate the movement and deformation of the mesh. This might involve strategic placement of seams to minimize texture stretching during animation.
- UV Sculpting: Blender’s UV sculpt tools allow you to tweak UV maps with brush-based tools. This can be particularly handy for making subtle adjustments to UVs without affecting the entire layout.
- Multiple UV Maps: For complex texturing tasks, such as light maps or detail overlays, consider using multiple UV maps on the same model. This technique allows for greater flexibility in texturing, as you can assign different textures to the same model without overlap.
- Texel Density Uniformity: Maintain consistent texel density across your model to ensure textures appear uniform in detail and scale. Use the \"Texel Density\" checker in Blender to visualize and adjust texel density across different parts of your model.
- Projection Painting: Use projection painting to blend textures seamlessly across UV seams, especially for organic models. This technique allows you to project texture details from photographs directly onto the model, using the UV map as a guide.
- Advanced Seam Placement: For organic models, place seams along natural creases or areas less likely to be observed closely. This approach helps in hiding the seams and making the texture application appear more natural.
These advanced techniques require practice and experimentation to master. However, they can significantly enhance the realism and quality of your textured models in Blender.
Best Practices for UV Mapping in Blender
UV Mapping is a foundational skill in 3D modeling, essential for adding detailed textures to models. Adhering to best practices in Blender not only streamlines the workflow but also ensures high-quality results. Here are key practices to follow:
- Plan Your Seams: Before unwrapping, strategically plan where to place seams for minimal visibility and distortion. Seams should ideally follow the model\"s natural breaks or less noticeable areas.
- Keep UV Islands Proportional: To avoid texture stretching, ensure UV islands are proportionally scaled to the model. This maintains texture detail consistency across the surface.
- Avoid Overlapping UVs: Except for intentionally mirrored textures, avoid overlapping UV islands to prevent texture conflicts and ensure each part of the model receives unique texturing.
- Utilize the Grid and Snap Tools: For models requiring precise texturing, use Blender\"s grid and snap tools in the UV Editor to align UV islands neatly, facilitating cleaner and more accurate texturing.
- Maintain Texel Density: Consistent texel density ensures that texture detail appears uniform across the model. Use Blender\"s Texel Density Checker to verify and adjust as needed.
- Optimize UV Space: Efficiently use the available UV space to maximize texture resolution. Arrange and scale UV islands to fill the UV layout without unnecessary gaps while leaving enough margin to prevent bleeding.
- Test Textures Early: Apply a test grid or checkerboard texture early in the UV mapping process to identify and correct issues with stretching or distortion before finalizing the texture application.
By following these best practices, you can create efficient, high-quality UV maps in Blender, setting a solid foundation for the texturing process.
_HOOK_
READ MORE:
Resources for Further Learning and Exploration
Mastering UV Mapping in Blender is a journey of continuous learning and practice. To further enhance your skills and understanding, here are valuable resources for deepening your knowledge in UV mapping and texturing:
- Blender Official Documentation: The Blender Manual offers comprehensive guides and tutorials covering all aspects of UV mapping and texturing.
- Online Courses and Tutorials: Platforms like Udemy, Coursera, and Blender Cloud offer courses ranging from beginner to advanced levels, taught by industry professionals.
- YouTube Channels: Numerous creators share free tutorials and project walkthroughs on YouTube. Channels like Blender Guru, CG Geek, and Darrin Lile offer in-depth lessons on UV mapping and texturing.
- Forums and Community Groups: Joining Blender forums and community groups on platforms like Blender Artists, Reddit, and Discord can provide support, feedback, and tips from fellow Blender users.
- Books: There are several informative books on Blender that include sections on UV mapping and texturing, providing both foundational knowledge and advanced techniques.
- Blender Add-ons: Explore add-ons designed to enhance UV mapping workflows, available through Blender Market and the Blender community. These tools can automate or simplify parts of the UV mapping process.
By leveraging these resources, you can continually grow your skills, stay updated with the latest techniques, and become more proficient in creating high-quality UV maps and textures in Blender.
Embark on your journey to mastering Blender UV mapping with our comprehensive guide. Unlock the secrets to creating stunning textures and bring your 3D models to life. Start exploring the endless possibilities today!