Topic blender uv mapping and texturing tutorial: Embark on a journey to master Blender"s UV mapping and texturing with our comprehensive tutorial, designed to elevate your 3D art to professional levels effortlessly.
Table of Content
- How to do UV Unwrapping in Blender for beginners?
- Understanding the Basics of UV Mapping in Blender
- Step-by-Step Guide to Unwrapping Your Model
- Applying Textures Using UV Maps
- Editing UV Maps for Better Texture Fit
- Techniques for Seamless Texturing
- Optimizing UV Layouts for Efficiency
- YOUTUBE: UV Unwrapping Explained for Beginners
- Using Blender’s Texture Painting Tools
- Advanced UV Mapping Tips and Tricks
- Common UV Mapping Problems and Solutions
- Real-World Project: UV Mapping and Texturing from Start to Finish
How to do UV Unwrapping in Blender for beginners?
To do UV Unwrapping in Blender for beginners, you can follow these steps:
- Open Blender and make sure you are in the 3D Viewport.
- Select the object you want to apply UV Unwrapping to.
- Switch to Edit Mode by pressing the Tab key or selecting it from the mode drop-down menu in the top-left corner.
- Select all the vertices of your object by pressing the A key.
- In the UV Editing workspace, click on the Unwrap menu in the UV Editor window.
- Select the desired unwrapping method. \"Smart UV Project\" is a common choice for beginners.
- You can adjust the settings for the chosen unwrapping method on the left-side panel (T-panel) or the operator panel (F6).
- Once the UV Unwrapping is done, you will see the unfolded UV map in the UV Editor window.
- Now, you can start manipulating the UV map by selecting and moving the individual vertices, edges, or faces in the UV Editor to arrange the UV islands and optimize the mapping.
- If you want to see how the texture looks on the object, switch back to the Shading workspace or the Layout workspace, add a material to your object, and assign the UV map as the texture coordinate.
- You can apply a texture to the UV-mapped object by adding an image texture node in the Shader Editor and connecting it to the material\'s input.
- Set up the image texture by adding the desired image and adjusting the mapping options.
- Finally, you can tweak the UV map and texture further until you achieve the desired result.
By following these steps, you should be able to perform UV Unwrapping in Blender and start texturing your objects.
READ MORE:
Understanding the Basics of UV Mapping in Blender
UV Mapping is a critical technique in 3D modeling that involves unwrapping a model into a 2D image to accurately apply textures. Blender offers robust tools for UV Mapping, making it accessible for artists of all levels.
- What is UV Mapping: UVs are coordinates that tell Blender how to project a 2D image onto a 3D model. The \"U\" and \"V\" refer to the axis of the 2D texture space, unlike the \"X\", \"Y\", and \"Z\" axis used for 3D space.
- Why it\"s Important: Without UV Mapping, textures cannot correctly adhere to the complex surfaces of 3D models. It allows for detailed texturing and is essential for realistic rendering.
- Getting Started with UV Mapping: Begin by selecting your object in Edit Mode, then proceed to the UV Editing workspace. This workspace provides the tools and views necessary for creating and editing UV maps.
- Unwrapping Your Model: Blender offers several unwrapping methods, such as Smart UV Project and Unwrap. These tools automatically generate a UV map based on the geometry of your model. Manual unwrapping allows for more control and precision.
- Adjusting UV Maps: Once unwrapped, you can adjust the UV layout in the UV Editor. This involves moving, scaling, and rotating UV islands to optimize texture space usage.
- Applying Textures: With a UV map in place, you can now apply textures to your model. This is done through the Shader Editor, where you can link image textures to the material\"s color, roughness, and other properties.
Understanding these basics is the first step towards mastering UV Mapping in Blender. Practice with different models and textures to fully grasp the concept and its application.

Step-by-Step Guide to Unwrapping Your Model
Unwrapping a model in Blender is a crucial step for accurate texturing. Follow this step-by-step guide to efficiently unwrap your 3D model.
- Select Your Model: In Object Mode, select the model you want to unwrap.
- Switch to Edit Mode: With the model selected, switch to Edit Mode (Tab key) to access the vertices, edges, and faces of your model.
- Marking Seams: Decide where to place the seams for unwrapping. Seams are edges where the mesh will be split. Right-click to select edges and press Ctrl+E to mark seams.
- Unwrapping the Model: After marking the seams, select all faces (A key) and press U to unwrap. Choose \"Unwrap\" from the menu, and Blender will use the seams to lay out the UV map in the UV/Image Editor.
- Adjusting the UV Map: In the UV/Image Editor, you can move, scale, and rotate the UV islands to better fit the texture space. This step is crucial for minimizing wasted space and avoiding texture stretching.
- Applying a Test Grid Texture: Applying a test grid texture can help identify stretching or overlapping UVs. To do this, go to the Shader Editor, create a new material, and assign a test grid texture to the base color.
- Finalizing the Unwrap: Adjust the UV map as needed based on the test grid results. Ensure that all parts of the model are adequately covered and that there\"s minimal stretching.
This step-by-step guide should help you unwrap your model in Blender, laying the groundwork for detailed and accurate texturing.

Applying Textures Using UV Maps
Once your model is unwrapped, applying textures using UV maps in Blender can transform your 3D objects with realistic details. Follow these steps to apply textures effectively.
- Prepare Your Texture Images: Ensure your texture images are ready. These can be photographs, digital paintings, or patterns designed to be applied to your model.
- Open the Shader Editor: With your object selected, switch to the Shader Editor. This workspace allows you to create and modify materials using nodes.
- Create a New Material: If your object doesn\"t already have a material, create a new one by clicking \"New\" in the Material properties panel.
- Add an Image Texture Node: In the Shader Editor, add an Image Texture node. You can do this by pressing Shift+A, selecting \"Texture\", and then \"Image Texture\".
- Load Your Texture Image: Click \"Open\" on the Image Texture node and select your texture file. This image will be used as the texture for your material.
- Connect the Nodes: Connect the Color output of the Image Texture node to the Base Color input of the Principled BSDF node. This links your texture to the material.
- UV Map Adjustment: Select the UV Map node (Shift+A, \"Input\", \"UV Map\") if your object has multiple UV maps. Connect it to the Vector input of your Image Texture node to specify which UV map to use.
- Preview the Texture: Switch to Material Preview mode in the 3D Viewport to see how the texture applies to your model. Adjust the scale and position of the UV map in the UV Editor if necessary.
- Final Adjustments: Make any final adjustments to the material settings, such as roughness and specular, to achieve the desired appearance of your texture.
Applying textures using UV maps is a powerful way to add realism and detail to your Blender projects. Experiment with different textures and settings to get the best results.

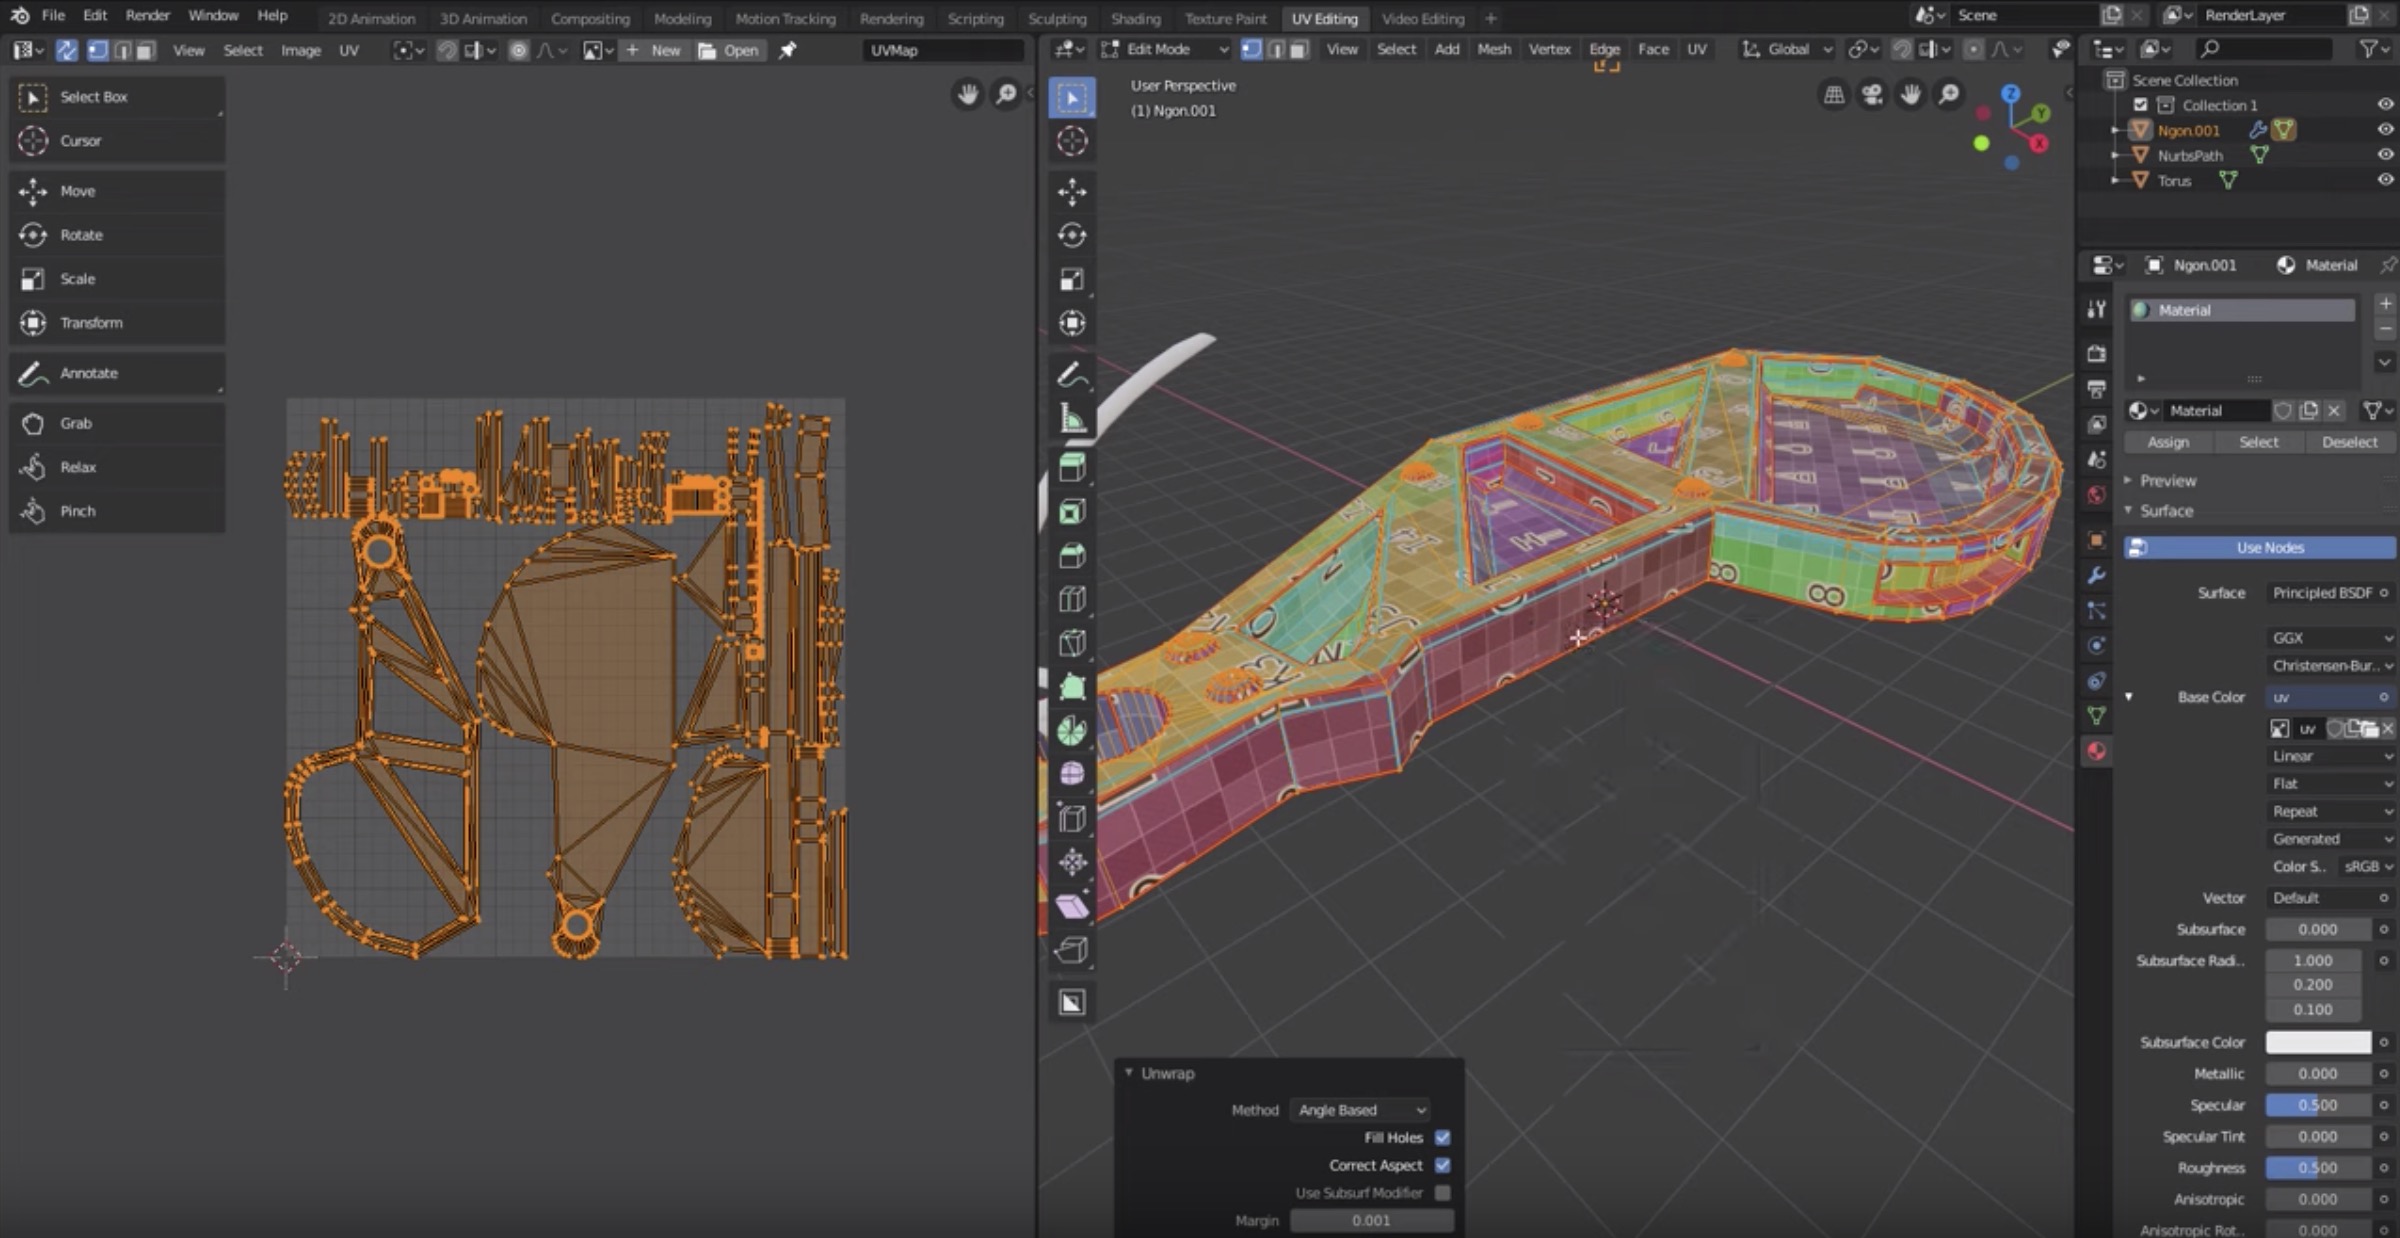
Editing UV Maps for Better Texture Fit
Properly editing UV maps is crucial for achieving a precise fit between your textures and 3D models in Blender. These steps will guide you through refining your UV maps for optimal texture alignment.
- Access the UV Editing Workspace: With your model selected, switch to the UV Editing workspace. This provides a split view with your 3D model and the UV map.
- Select UV Islands: In the UV Editor, select the UV islands you wish to adjust. Use the L key to select linked UV vertices for easier manipulation.
- Adjust Position and Scale: Use the G (grab/move), S (scale), and R (rotate) shortcuts to adjust the position, size, and orientation of the selected UV islands to better fit your texture.
- Utilize Proportional Editing: For smoother transitions and adjustments, use Proportional Editing (O key) in the UV Editor. This allows for more natural-looking modifications to the UV map.
- Minimize Stretching: Use the UV menu\"s \"Minimize Stretch\" option to reduce texture distortion. This tool adjusts UVs to make the texture appear more uniform across the surface.
- Align UV Edges: For better organization and space utilization, align edges of UV islands using the UV menu\"s \"Align\" options. This is particularly useful for straight edges and grid-like textures.
- Seamlessly Tile Textures: Ensure that textures tile seamlessly by carefully aligning the edges of UV islands. This is crucial for environments or objects where the texture needs to repeat without visible seams.
- Test with a Checkerboard Texture: Apply a checkerboard texture to evaluate the UV map\"s efficiency and make necessary adjustments. This texture helps identify stretching, compression, and misalignments.
Editing UV maps for a better texture fit requires patience and attention to detail. Continuously refine your UV layouts and test with different textures to achieve the best possible results.

_HOOK_
Techniques for Seamless Texturing
Achieving seamless texturing in Blender is essential for creating realistic and visually appealing 3D models. These techniques will help you master seamless texturing for your projects.
- Choosing the Right Textures: Start with high-quality, seamless textures. These textures are designed to tile without visible seams, making them ideal for 3D modeling.
- Using the Clone Brush in Texture Paint Mode: Blender\"s Texture Paint mode offers a Clone Brush tool. Use it to paint over seams and blend areas where textures meet, creating a seamless transition.
- Employing the Healing Brush: Similar to the Clone Brush, the Healing Brush can be used to blend seams in textures, especially useful for complex patterns or detailed surfaces.
- Customizing UV Maps for Texture Continuity: Edit UV maps to ensure texture continuity. This may involve moving and aligning UV islands closely to match the texture patterns seamlessly.
- Texture Baking for Uniformity: Bake your textures to create a new, seamless texture. This technique is particularly effective when dealing with multiple textures or when integrating procedural textures.
- Adjusting Texture Scales: Ensure all texture scales are uniform across your model. Inconsistent scales can break the illusion of seamlessness and realism.
- Utilizing Procedural Textures: Blender\"s procedural textures inherently tile seamlessly. Combining procedural textures with bitmap textures can enhance realism while maintaining seamlessness.
- Testing with Different Lighting Conditions: Check your textured model under various lighting conditions to ensure the textures appear seamless from every angle and under different lighting scenarios.
By applying these techniques, you can achieve seamless texturing in Blender, enhancing the overall quality and realism of your 3D projects.

Optimizing UV Layouts for Efficiency
Efficient UV layouts are crucial for maximizing texture detail and minimizing memory usage. These strategies will help you optimize your UV layouts in Blender for better performance and quality.
- Packing UV Islands: Use Blender\"s UV packing tools to arrange UV islands efficiently. This reduces wasted space and allows for higher resolution textures within the same texture space.
- Minimizing Texture Size: Scale UV islands according to the level of detail required. Less visible areas can have smaller UV islands, conserving texture space for more detailed parts.
- Consolidating Meshes: Where possible, consolidate multiple objects into a single UV map. This reduces the number of textures and materials needed, optimizing rendering times and memory usage.
- Utilizing Shared UV Spaces: For symmetrical or repeating elements, overlap UV islands to use the same texture space. This technique is especially useful for objects with repetitive patterns.
- Optimizing for Lightmaps: If your project involves baked lighting, ensure UV islands are spaced sufficiently to prevent lightmap bleeding. This may require adjusting UV island margins.
- Using UV Grids for Precision: Apply a UV grid texture to check for distortions and ensure that all UV islands are properly utilized and aligned. Adjust as necessary for even distribution of texture detail.
- Automated UV Unwrapping Tools: Experiment with Blender\"s automated UV unwrapping options, such as Smart UV Project, for quick results that can then be refined for efficiency.
- Regularly Reviewing UV Layouts: Continuously review and adjust your UV layouts as your model evolves. Early detection of inefficient UVs can save time in the later stages of development.
Optimizing UV layouts requires a balance between artistic goals and technical constraints. By applying these techniques, you can achieve efficient, high-quality texturing in Blender.
UV Unwrapping Explained for Beginners
Are you a beginner looking to learn something new? This video is the perfect place to start! Join us on a journey of discovery as we break down complex concepts into simple, easy-to-understand terms. You\'ll be amazed at how quickly you\'ll become a pro!
Blender Beginner UV Unwrapping Tutorial Chair Part 7
Looking for the ultimate chair buying guide? Look no further! This video will walk you through the must-know tips and tricks for finding the perfect chair for your space. From ergonomics to style, we\'ve got you covered. Sit back, relax, and get ready to upgrade your seating game!
Using Blender’s Texture Painting Tools
Blender\"s texture painting tools offer a flexible and powerful way to directly paint textures onto your 3D models. This guide will introduce you to the basics of texture painting in Blender, enabling you to add unique details to your creations.
- Setting Up for Texture Painting: Ensure your model has a UV map and is assigned a material with an image texture. This texture serves as the canvas for your painting.
- Accessing Texture Paint Mode: With your model selected, switch to Texture Paint mode from the mode menu in the 3D Viewport. This mode provides a variety of brushes and settings for painting.
- Choosing Brushes and Colors: Select a brush from the toolbar and pick a color using the color picker. Each brush has unique properties and settings for different effects.
- Adjusting Brush Settings: Fine-tune your brush settings for size, strength, and falloff according to the detail level you need. Use the options in the tool shelf (T) and the Properties panel (N).
- Painting on Your Model: Begin painting directly onto your model in the 3D Viewport. You can rotate, zoom, and pan around your model to access different areas for painting.
- Using Layers and Masks: Blender allows you to paint on multiple layers and use masks for non-destructive editing. This is useful for complex texturing workflows.
- Saving Your Work: Regularly save your texture images externally to prevent data loss. Use the Image Editor to save painted textures.
- Experimenting with Stencils and Projection Painting: Use stencils for precise control over texture placement and projection painting for complex textures and details.
Texture painting in Blender is a powerful technique for adding realism and character to your models. Practice with different tools and techniques to enhance your texturing skills.

Advanced UV Mapping Tips and Tricks
Take your UV mapping skills to the next level with these advanced tips and tricks. These techniques will help you tackle complex models and achieve more realistic texturing effects in Blender.
- Live Unwrap Feature: Utilize Blender\"s Live Unwrap feature for interactive UV editing. This allows you to see the effects of your seam placement in real-time, making adjustments more intuitive.
- Pin UV Vertices: Pinning UV vertices is crucial for maintaining specific parts of your UV map while editing others. Use this to control the layout of your UV map effectively.
- UV Sculpting: For organic models, UV sculpting tools can help you smooth out and adjust UV maps without distorting the texture. This is particularly useful for natural shapes and forms.
- Seam Placement Strategies: Develop strategies for seam placement that minimize visibility. For example, place seams in areas that are less likely to be seen, such as underarms or behind objects.
- Custom UV Layouts for Animation: If your model will be animated, consider how movement will affect the texture. Create UV layouts that accommodate for deformation, ensuring textures move naturally with the model.
- Utilizing Texture Atlas: For projects with multiple objects, a texture atlas can consolidate all UV maps into a single texture. This optimizes performance and simplifies the texturing process.
- Exporting UV Layouts for External Editing: Export your UV layout as an image for external texturing work. This allows for precise texture painting in software like Photoshop, which can then be re-imported into Blender.
- Advanced Selection Techniques: Use Blender\"s advanced selection tools, like select linked (L) and select similar (Shift+G), to speed up the UV mapping process by quickly selecting and editing related vertices, edges, or faces.
By mastering these advanced UV mapping techniques, you can significantly improve the quality and efficiency of your texturing workflow in Blender.

Common UV Mapping Problems and Solutions
UV mapping can sometimes be challenging, but understanding common problems and their solutions can streamline your workflow. Here are some frequent issues faced during UV mapping in Blender and how to resolve them.
- Stretching: Texture stretching occurs when UV islands are not proportionally scaled to the model. Solution: Use the UV Squares addon to make UVs square or manually adjust them for uniform scaling.
- Seams Visibility: Seams are necessary but can be visually intrusive. Solution: Place seams in less noticeable areas or use texture painting to hide them.
- Overlapping UVs: Overlapping UV islands can cause texture artifacts. Solution: Use the \"Pack Islands\" feature to automatically arrange UVs without overlap or manually adjust them in the UV editor.
- Distortion: Distorted textures indicate uneven UV mapping. Solution: Use the \"Minimize Stretch\" tool in UV editor to redistribute the UV layout evenly.
- Too Many Seams: Excessive seams can complicate texturing and reduce quality. Solution: Strategically reduce the number of seams, focusing on natural breaks in the model.
- Texture Pixelation: Caused by low-resolution textures or poor UV map scaling. Solution: Increase texture resolution or adjust UV islands to maximize texture space usage.
- Lightmap Bleeding: If using UV maps for lightmapping, you may encounter bleeding. Solution: Ensure there is enough padding between UV islands to prevent overlap in the lightmap.
- Difficulty Selecting UV Islands: Selecting complex or small UV islands can be tedious. Solution: Use the \"Sync Selection\" mode to select UVs directly from the 3D viewport for easier manipulation.
By familiarizing yourself with these common problems and solutions, you can improve the quality and efficiency of your UV mapping process in Blender.
_HOOK_
READ MORE:
Real-World Project: UV Mapping and Texturing from Start to Finish
Embark on a real-world project to understand the entire process of UV mapping and texturing in Blender. This comprehensive guide covers everything from initial setup to the final render, ensuring you gain practical experience and insights.
- Project Overview: Begin by defining your project scope, including the model you\"ll be working on and the type of textures required.
- Model Preparation: Ensure your model is ready for UV mapping. This includes checking the mesh for errors, applying necessary modifiers, and simplifying the geometry if needed.
- Seam Marking: Analyze your model and plan where to place seams for optimal unwrapping. Mark seams strategically to facilitate easier texture application and to minimize visibility.
- UV Unwrapping: Unwrap your model using Blender\"s unwrapping tools. Adjust the unwrap manually if needed to ensure a clean, efficient layout with minimal distortion.
- Texture Creation: Create or source textures for your model. This could involve photographing textures, painting them digitally, or finding resources online.
- Applying Textures: Import your textures into Blender and apply them to your model using the UV maps as guides. Adjust the scale and rotation for the best fit.
- Texture Adjustments and Fine-Tuning: Use Blender’s painting tools to fine-tune textures directly on the model, blending seams and adjusting colors as necessary.
- Lighting and Rendering: Set up lighting to highlight the details of your texturing work. Experiment with different lighting setups to find the most flattering angles for your model.
- Final Render: Adjust render settings for the best quality and perform a final render of your project. Evaluate the outcome and make any necessary adjustments.
- Review and Iteration: Review the completed project, noting areas for improvement. Iteration is key to mastering UV mapping and texturing, so consider revisiting earlier steps to refine your work.
This real-world project guide offers a hands-on approach to learning UV mapping and texturing in Blender, providing the skills necessary to bring your 3D models to life with realistic textures.
Embark on your journey to mastering Blender\"s UV mapping and texturing with our comprehensive guide, unlocking the full potential of your 3D projects and bringing your artistic visions to life with unparalleled detail and realism.