Topic blender tutorial for 3d printing: Embark on a journey to master 3D printing with Blender through our comprehensive tutorials, designed for enthusiasts eager to bring their digital creations to life.
Table of Content
- How to import and export files in Blender for 3D printing?
- Getting Started with Blender for 3D Printing
- Understanding Blender\"s Interface and Tools for 3D Modeling
- Creating Your First 3D Model in Blender
- Optimizing Models for 3D Printing
- Exporting Models for 3D Printing
- Advanced Modeling Techniques for Detailed Prints
- YOUTUBE: Learn Blender for 3D Printing - Quick and Easy Beginner\'s Guide
- Using Modifiers and Sculpting for 3D Printing
- Preparing Complex Models for Printing
- Common Pitfalls and How to Avoid Them
- Resources for Further Learning and Community Support
How to import and export files in Blender for 3D printing?
To import and export files in Blender for 3D printing, you can follow the steps below:
- Open Blender and make sure you are in the Modeling workspace.
- To import a file, go to File > Import > Choose file type. Blender supports various file formats such as STL, OBJ, and FBX.
- Select the desired file from your computer and click Import.
- The imported object will be displayed in the 3D viewport. You can now manipulate and modify it as needed.
- To export the 3D model for 3D printing, go to File > Export > Choose file type.
- Select the appropriate file format for exporting, typically STL is widely used for 3D printing.
- Choose the export location and specify a filename for the exported model.
- Click Export to save the file. Make sure to remember the export location for easy access later.
By following these steps, you can import existing 3D models into Blender for further editing or create your own models and export them for 3D printing.
READ MORE:
Getting Started with Blender for 3D Printing
Beginning your 3D printing journey with Blender is an exciting step towards creating tangible models from your digital designs. Here’s how to get started:
- Download and Install Blender: Visit the official Blender website to download the latest version. Installation is straightforward, follow the prompts.
- Familiarize Yourself with the Interface: Spend some time getting to know Blender’s user interface. Look for tutorials on navigation, the properties panel, and the 3D viewport.
- Basic Modeling Techniques: Learn the basics of 3D modeling. Start with simple shapes and gradually move to more complex models. Pay attention to dimensions and proportions, essential for 3D printing.
- Setting Up for 3D Printing: Discover how to set up your models for 3D printing by understanding mesh integrity, ensuring water-tight models, and optimizing your design for the printing process.
- Exporting Your Model: Learn about the different file formats used for 3D printing, such as STL or OBJ, and how to export your models correctly for the best printing results.
With these steps, you\"ll be well on your way to transforming your Blender creations into real-world objects. Practice is key, so start with simple projects and gradually challenge yourself with more complex designs.

Understanding Blender\"s Interface and Tools for 3D Modeling
Blender\"s interface may seem daunting at first, but it\"s designed to streamline the 3D modeling process. Here\"s a breakdown of essential areas and tools you\"ll use for 3D printing projects:
- 3D Viewport: The central area where you\"ll spend most of your time modeling. It provides a real-time view of your scene and objects.
- Properties Panel: Located on the right side, this panel gives you access to the properties of your selected object or scene, including modifiers, materials, and scene settings.
- Outliner: The hierarchical list of all objects in your scene, located typically on the top right. It allows for easy selection and organization of your models.
- Tool Shelf: A context-sensitive area on the left side of the viewport that offers tools for editing your objects, depending on what mode you\"re in (e.g., Object mode, Edit mode).
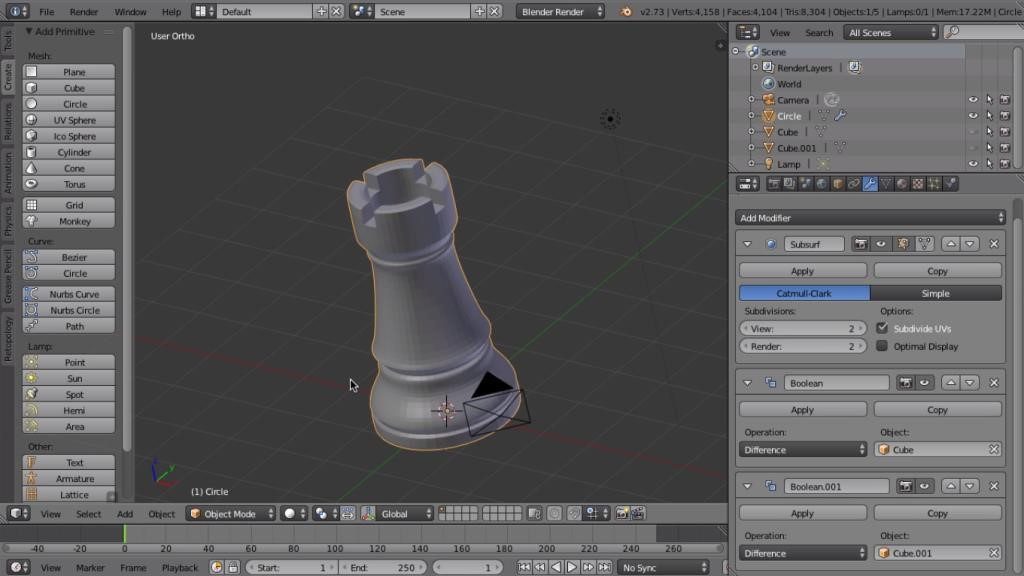
- Modifiers: Non-destructive tools that allow you to easily manipulate and adjust your models. Common modifiers for 3D printing include Boolean, Solidify, and Subdivision Surface.
For 3D printing, understanding how to navigate and utilize these tools efficiently is crucial. Begin with simple tasks like moving, scaling, and rotating objects. As you become more comfortable, experiment with more advanced features like sculpting, texturing, and using modifiers to refine your designs. Remember, practice and exploration are key to mastering Blender\"s extensive toolset for your 3D printing projects.
Creating Your First 3D Model in Blender
Creating your first 3D model in Blender is a milestone in your 3D printing journey. Follow these steps to bring your ideas to life:
- Start with a Plan: Before opening Blender, have a clear idea of what you want to model. Sketching your concept can be a helpful first step.
- Set Up Your Blender Scene: Open Blender and select a general workspace suited for modeling. Adjust your scene settings, particularly units, to match the scale needed for your 3D print.
- Choose a Primitive Object: Begin by adding a primitive object (e.g., cube, sphere, cylinder) that closely matches the basic shape of your model. You can find these in the \"Add\" menu under \"Mesh.\"
- Modify Your Object: Enter Edit Mode (Tab key) to start shaping your object. Use tools like Extrude, Scale, and Rotate to modify the primitive into your desired form.
- Apply Modifiers for Refinement: Use Blender’s modifiers, such as Subdivision Surface, to smooth or add complexity to your model without permanently altering the mesh.
- Check for 3D Printing Compatibility: Ensure your model is solid (manifold) and does not have any non-manifold edges or inverted normals, which could cause issues during printing.
- Export Your Model: Once satisfied with your model, export it in a 3D printing-friendly format, such as STL or OBJ, ensuring to apply any necessary transformations.
Remember, 3D modeling for printing is an iterative process. Don’t be afraid to experiment and make adjustments as you go. Your first model is a learning experience, paving the way for more complex and detailed creations.

Optimizing Models for 3D Printing
Optimizing your 3D models is crucial for successful printing. Here are key steps to ensure your models are print-ready:
- Ensure Solidity: Your model must be watertight. Use Blender\"s \"Select Non-Manifold\" feature under Edit Mode to identify and fix any gaps or holes.
- Check Wall Thickness: Thin walls can lead to print failures. Use the \"Solidify\" modifier to add thickness to your model where needed, ensuring it meets the minimum thickness recommended by your printer.
- Reduce Overhangs: Overhangs greater than 45 degrees may require support material, which can affect surface finish. Modify your design to minimize overhangs or plan for support removal post-printing.
- Optimize Geometry: Complex models with numerous vertices can slow down slicing software and printers. Use the \"Decimate\" modifier to reduce polygon count without significantly altering the model\"s appearance.
- Avoid Intricate Details: While detailed models look impressive, extremely small features may not print well. Scale down or simplify details that are too small to be printed effectively.
- Split Large Models: Large models can be divided into smaller parts for printing. This can reduce warping and the need for supports. Use Blender\"s boolean modifiers to cut the model, ensuring each part has flat surfaces for easy assembly.
- Export Correctly: Finally, export your model in a format compatible with your 3D printer, typically STL or OBJ. Ensure to apply all transformations and check the export settings for scale and orientation accuracy.
By following these optimization steps, you can significantly improve the printability of your models, reduce printing errors, and achieve better quality prints.
_HOOK_
Exporting Models for 3D Printing
Correctly exporting your Blender models is a critical step to ensure they are ready for 3D printing. Follow these steps to prepare your files:
- Finalize Your Model: Make sure your model is optimized for printing, including solidity, wall thickness, and minimized overhangs.
- Apply Scale and Rotation: In Object Mode, select your model and apply scale and rotation (Ctrl+A) to avoid any discrepancies in size or orientation during printing.
- Choose the Right Format: STL and OBJ are the most commonly used formats for 3D printing. STL is widely supported and recommended for most prints.
- Export Your Model: Go to File > Export and select the format you need. In the export options, ensure the scale is set correctly, usually in millimeters or inches, based on your 3D printer\"s preferences.
- Check the Exported File: Use a 3D printing validation tool or the slicing software you plan to use for printing to check the exported file for any issues that might affect the print quality.
Exporting your model correctly ensures that what you’ve created in Blender translates effectively into a physical object. Paying attention to these details can save time and materials by reducing the likelihood of print failures.
_qYYgrmi.jpg)
Advanced Modeling Techniques for Detailed Prints
For those looking to push the boundaries of 3D printing with Blender, mastering advanced modeling techniques is key. These strategies will help you create detailed and complex models:
- Sculpting for Fine Details: Blender\"s sculpting tools allow you to add intricate details to your models that are difficult to achieve with traditional modeling methods. Use dynamic topology for best results.
- Simulations for Realistic Effects: Utilize Blender\"s physics simulations, like cloth and fluid, to add realism to your models. These can be converted into static meshes suitable for printing.
- Retopology for Optimal Flow: For complex models, retopology is essential to maintain a clean geometry flow, which is crucial for printing. Use Blender\"s retopology tools to create a mesh with the optimal number of polygons.
- Boolean Operations for Complex Shapes: Combine or subtract objects using Boolean operations to create complex shapes that would be difficult to model by hand. Ensure to clean up any resulting non-manifold edges.
- Hard Surface Modeling Techniques: Use hard surface modeling for mechanical parts or objects with sharp edges and precise dimensions. This approach is ideal for creating parts that fit together.
- Multi-Resolution Modifiers for Detail Levels: Apply multi-resolution modifiers to your model to work at different detail levels without affecting the overall shape, allowing for fine adjustments and detailing.
These advanced techniques require patience and practice but can significantly enhance the quality and complexity of your 3D printed models, opening up new possibilities for your creations.

Learn Blender for 3D Printing - Quick and Easy Beginner\'s Guide
Witness the future of manufacturing unfold before your eyes with the mesmerizing world of 3D printing. Explore the endless opportunities and innovative creations made possible by this groundbreaking technology in this captivating video.
Using Modifiers and Sculpting for 3D Printing
Blender\"s modifiers and sculpting tools can dramatically enhance your 3D models for printing. Here\"s how to use them effectively:
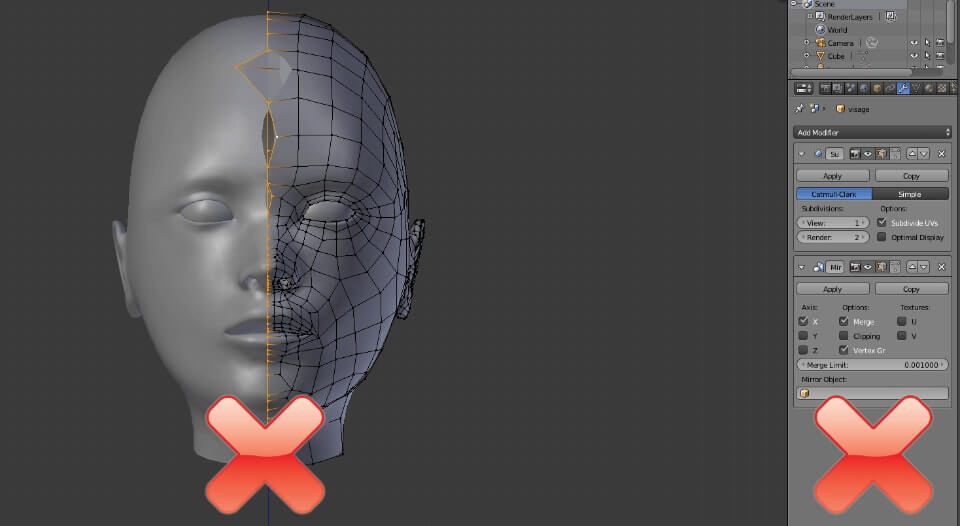
- Subdivision Surface Modifier: This modifier smooths your model by subdividing its polygons, creating a more refined appearance. It\"s essential for adding details to organic shapes.
- Solidify Modifier: Increase the thickness of your model’s walls, crucial for ensuring your print has enough structural integrity without wasting material.
- Boolean Modifier: Use Boolean operations to add or subtract shapes from your model. This is particularly useful for creating complex, interlocking parts.
- Remesh Modifier: Remesh your model to create a uniform topology, which can be particularly helpful after using Boolean operations that may leave complex geometries.
- Sculpt Mode for Detailing: Enter Sculpt Mode to add fine details to your model. Use dynamic topology to add geometry only where it\"s needed, allowing for detailed textures and features.
- Decimate Modifier: Reduce the polygon count of your model without significantly impacting its appearance. This is crucial for large or complex models to ensure they\"re manageable for slicing software and printers.
Combining these tools allows for a workflow that balances artistic freedom with the technical requirements of 3D printing. Experiment with different modifiers and sculpting techniques to find the best approach for your project.
Preparing Complex Models for Printing
Complex models pose unique challenges for 3D printing, but with careful preparation, you can achieve high-quality prints. Follow these steps to ensure your complex models are ready for the printer:
- Analyze and Repair Mesh: Use Blender\"s mesh analysis tools to identify and repair issues such as non-manifold edges, inverted normals, and internal faces that could cause printing errors.
- Optimize Geometry: Reduce the complexity of your model without compromising detail by using modifiers like Decimate. This can help in maintaining a balance between detail and printability.
- Ensure Proper Wall Thickness: For models with thin elements, use the Solidify modifier to ensure that all parts of your model have sufficient thickness to be printed.
- Split Large Models: Divide larger models into smaller, manageable parts that can be easily printed and then assembled. Ensure each part has flat surfaces for better adhesion to the print bed.
- Use Supports Wisely: Strategically add support structures to overhanging parts to prevent drooping or warping. However, be mindful of their placement to minimize post-processing work.
- Test Print Sections: For particularly complex or large models, consider test printing small sections to ensure the settings and supports are optimized for the best outcome.
- Final Check with Slicing Software: Before printing, use your slicing software to do a final check on the model. Look for any areas that might need additional supports or adjustments.
Preparing complex models requires a thoughtful approach, focusing on both the aesthetics and structural integrity of the print. By following these steps, you can ensure your complex designs are not only printable but also durable and visually striking.

Common Pitfalls and How to Avoid Them
Avoiding common pitfalls in 3D printing is crucial for achieving successful prints. Here are some frequent issues and how to prevent them:
- Ignoring Mesh Errors: Non-manifold edges and inverted normals can ruin prints. Use Blender\"s mesh analysis tools regularly to check and fix these issues.
- Overlooking Model Scale: Ensure your model\"s scale matches the physical world to avoid prints that are too small or too large. Use Blender\"s unit system to set accurate dimensions.
- Thin Walls: Walls too thin to be printed can lead to failure. Use the Solidify modifier to add necessary thickness.
- Complex Supports: Overly complex supports can be difficult to remove and may damage the model. Plan your model\"s orientation and supports carefully to minimize this risk.
- High Detail Overkill: Extremely high detail can be lost in the printing process, especially on small prints. Optimize your model\"s detail level to match the printer\"s capabilities.
- Forgetting to Hollow Out Models: Solid models use excessive material and take longer to print. Where appropriate, hollow out your model to save on printing material and time.
- Lack of Testing: Always test print smaller versions or sections of your model to identify and correct issues before committing to a full print.
By being mindful of these pitfalls and implementing strategies to avoid them, you can greatly enhance the quality and success rate of your 3D printed projects.
_HOOK_
READ MORE:
Resources for Further Learning and Community Support
Expanding your skills in Blender for 3D printing is an ongoing journey. Here are resources to help you grow and connect with the community:
- Blender\"s Official Website: Offers tutorials, forums, and documentation to get you started and advance your skills.
- Online Courses and Tutorials: Platforms like Udemy, Coursera, and YouTube have numerous courses ranging from beginner to advanced levels.
- Blender Communities: Join Blender forums, subreddits, and Facebook groups to share your work, get feedback, and ask for advice.
- 3D Printing Blogs and Websites: Sites like Thingiverse and MyMiniFactory not only offer downloadable models but also tips and tutorials on 3D modeling and printing.
- Books on Blender: There are many comprehensive guides and books available that cover Blender\"s interface, tools, and how to use them for 3D printing.
- Workshops and Meetups: Participating in workshops and meetups can provide hands-on experience and networking opportunities with other Blender enthusiasts.
Utilizing these resources will help you to continuously improve your 3D modeling skills, stay updated with the latest techniques, and become part of the vibrant Blender community.
Embarking on the Blender for 3D printing journey opens up a world of creative possibilities. With dedication and the right resources, you can bring your most ambitious projects to life. Happy printing!