Topic layout tutorial autocad: Dive into our Layout Tutorial AutoCAD guide to transform your drafting skills, ensuring precision and efficiency in every design project you undertake.
Table of Content
- How to create layouts in AutoCAD?
- Understanding Model Space and Paper Space
- Creating and Managing Layouts
- Working with Layout Tabs and Viewports
- YOUTUBE: How to Do Page Setup in a Layout in AutoCAD
- Inserting and Customizing Title Blocks
- Utilizing Viewports for Detailed Presentation
- Advanced Layout Techniques
- Optimizing Workflow with Layouts
- Common Issues and Solutions in Layout View
- Customizing Layouts with AutoCAD Templates
- Tips for Efficient Plotting and Publishing
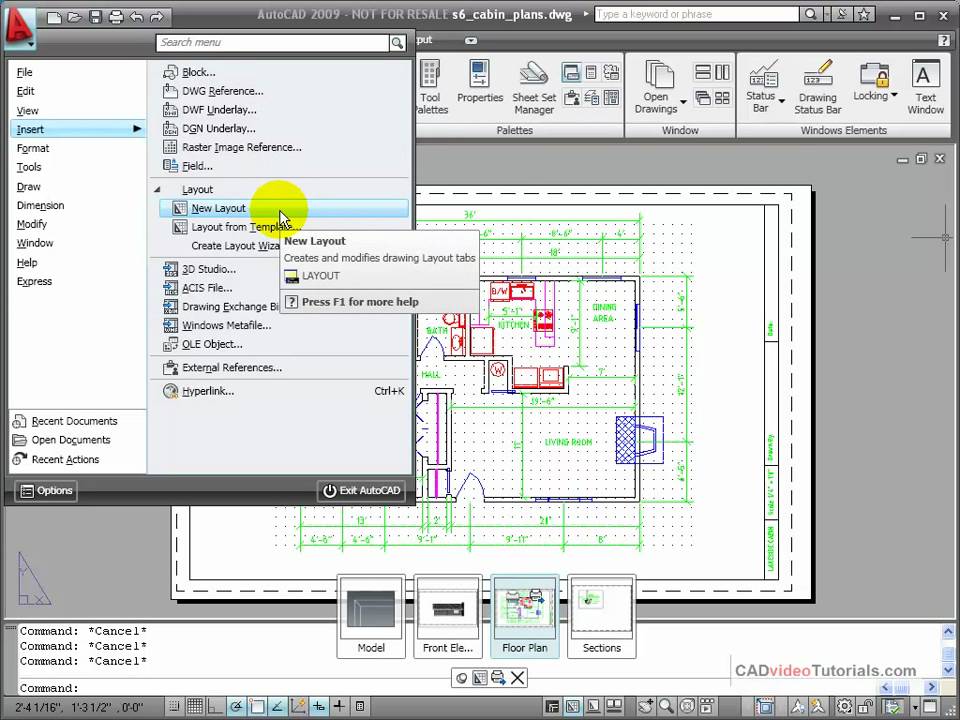
How to create layouts in AutoCAD?
To create layouts in AutoCAD, follow these steps:
- Open AutoCAD and start a new drawing.
- Switch to the layout tab by clicking on the \"Layout\" button at the bottom of the screen.
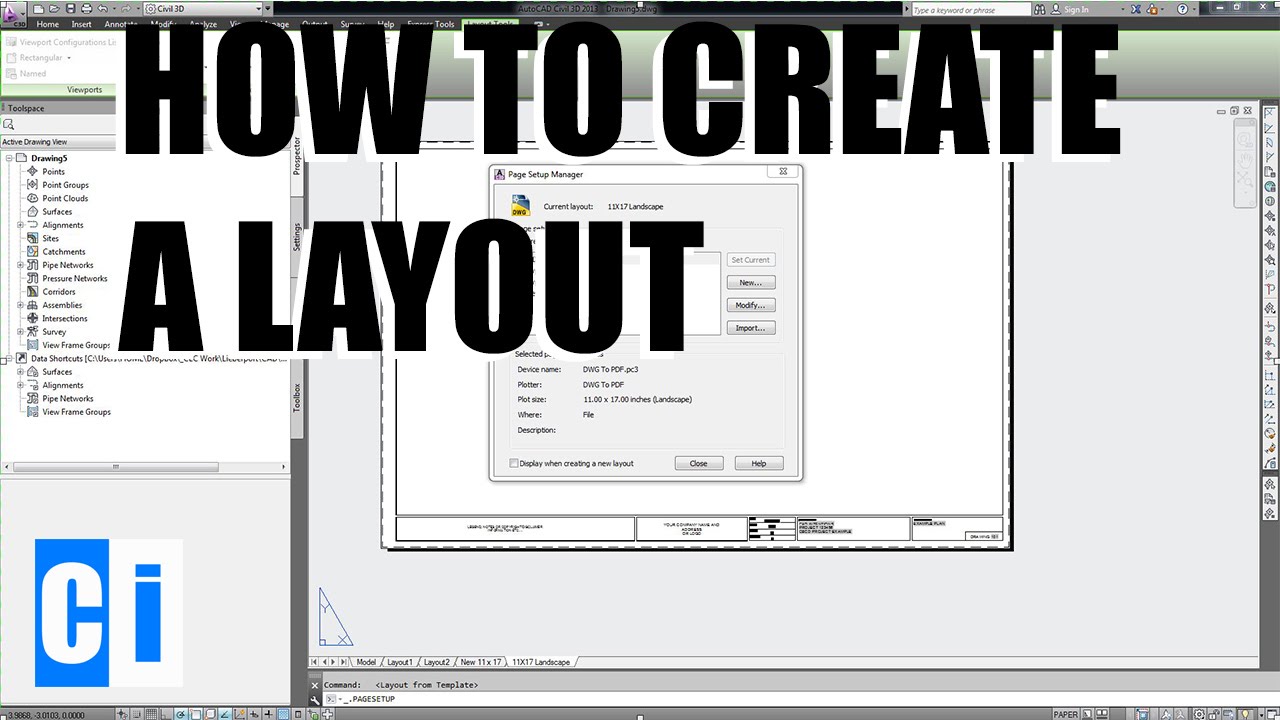
- Right-click on the layout tab and select \"Page Setup Manager\".
- In the Page Setup Manager dialog box, click on \"New\" to create a new page setup.
- Specify a name for the new page setup and click on \"OK\".
- In the Page Setup dialog box, you can set various parameters such as paper size, plot scale, plot style, etc. Adjust these settings as per your requirements and click on \"OK\".
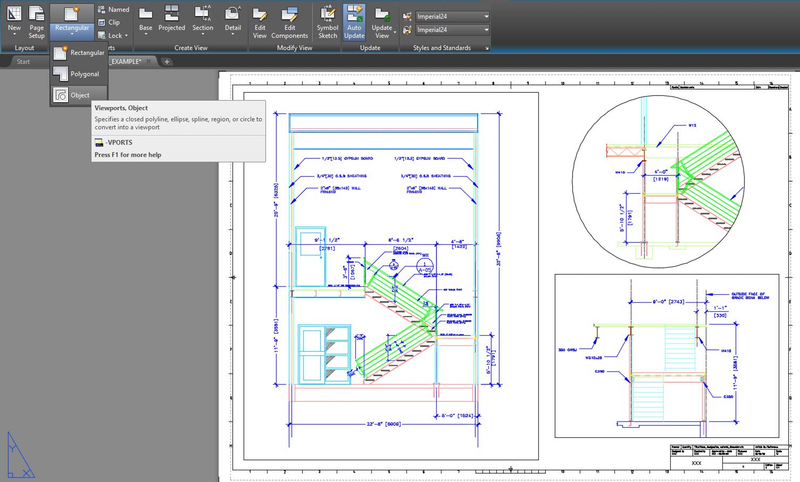
- Click on the \"Layout Viewports\" button in the \"Layout\" tab to create viewports on the layout.
- Specify the insertion point of the viewport and its size. You can have multiple viewports on the same layout.
- After creating viewports, you can adjust their properties by right-clicking on them and selecting \"Properties\".
- You can also arrange the viewports by selecting them and using the \"Move\", \"Resize\", or \"Align\" options in the \"Modify Viewports\" panel.
- To modify the content of a viewport, double-click inside it to switch to model space. Make the necessary changes in the model and then switch back to the layout by double-clicking outside the viewport.
- To print the layout, click on the \"Plot\" button in the \"Output\" tab. Select the desired printer and plot settings, and click on \"OK\" to print.
By following these steps, you can create and work with layouts in AutoCAD.
READ MORE:
Understanding Model Space and Paper Space
AutoCAD\"s Model Space and Paper Space are fundamental concepts that every user must master for effective design. Model Space is where the creation and detailed modification of your design occur. Think of it as the drafting board where you draw your design at a 1:1 scale. In contrast, Paper Space, introduced with the concept of layouts, represents your virtual paper, allowing you to organize, annotate, and present your design more effectively.
- Model Space: This is your primary drawing workspace where you create and edit your designs. All elements are drawn to scale, and it\"s ideal for the meticulous construction of your model.
- Paper Space (Layouts): Here, you can display views of your model at different scales, add annotations, and prepare the drawing for printing or publishing. Paper Space allows you to arrange your design on a virtual sheet, ensuring that the presentation is clean and communicative.
To switch between Model Space and Paper Space, you can use the tabs located at the bottom of the drawing area or use the command \"TILEMODE\". Understanding how to navigate and utilize both spaces will significantly enhance your workflow, enabling a seamless transition from design to presentation.
Creating and Managing Layouts
Creating and managing layouts in AutoCAD is essential for presenting your drawings professionally. The process involves several key steps to ensure your layouts are well-organized and visually appealing.
1. Creating a New Layout
- Begin by launching AutoCAD and selecting the \"Layout\" tab to enter the Layout environment.
- Use the \"Create Layout\" button to access the \"Page Setup Manager,\" where you can manage settings for your new layout.
- Name your layout and choose the appropriate paper size and orientation from the standard options provided.
- Customize your layout by setting the scale, inserting a title block, and arranging elements to fit your design needs.
2. Setting Up Viewports
- Select the layout tab where you wish to add viewports.
- Use the \"VPORTS\" command for viewport configuration, selecting the number and arrangement of viewports.
- Adjust the size and position of each viewport as needed by clicking and dragging its boundaries.
3. Adding Objects to Layouts
- Activate the desired layout tab to add objects like annotations, titles, or borders.
- Utilize commands like \"MVIEW\" or \"DTEXT\" for creating viewports or adding text annotations, respectively.
- Insert title blocks or borders using the \"INSERT\" command, and adjust their position as needed.
4. Mistakes to Avoid
- Ensure correct paper size and orientation to avoid incorrect plot outputs.
- Avoid overcrowding the layout with too many viewports or objects.
- Regularly update the layout after changes in the drawing to keep views in viewports current.
By following these steps, you can create multiple layouts in a single AutoCAD drawing, each tailored to specific views and configurations. This process not only enhances the presentation of your designs but also improves the clarity and professionalism of your drawings.
Working with Layout Tabs and Viewports
Mastering Layout Tabs and Viewports in AutoCAD is crucial for precise drawing presentation and scaling. Layout Tabs represent paper sheets and are pivotal for plotting, while Viewports offer a window into your model space, allowing you to display your drawing at various scales and orientations.
1. Understanding Layout Tabs and Viewports
- Layout Tabs: Located at the bottom of the AutoCAD interface, they represent paper sheets for plotting, with objects in Layout Tabs existing in Paper Space.
- Viewports: Serve as \"windows\" into your Model Space from a Layout Tab, allowing you to view and scale different sections of your drawing.
2. Setting Up a Layout Tab
- Select the desired layout tab and access the Layout panel in the Ribbon menu.
- Initiate the PAGESETUP command, create a new page setup, and define paper size, printer, and other details, ensuring \"Layout\" is chosen in the Plot Area dropdown.
3. Working with Viewports
- Create a viewport within a Layout Tab to view your model. Type MV (Make Viewport) and specify its location by drawing a rectangle.
- To scale the viewport, \"enter\" it by clicking on it or using the MS (model space) command, and use the ZOOM command with a specific scale ratio.
- Assign a specific scale to the viewport in Model Space, lock the viewport to prevent accidental zooming, and ensure measurements align with the ruler or architectural scale on paper.
4. Navigating Between Model and Paper Space
- Use the Model Space/Paper Space button or double-click inside/outside a viewport to switch between spaces.
- Objects in Model Space can be viewed through viewports, but cannot be interacted with in Paper Space.
5. Advanced Tips
- Remember that objects in Model Space are only editable in Model Space. Avoid modifying your model in Paper Space.
- For presenting drawings like elevations at the correct angle, use the DVIEW command in a layout to rotate the view within a viewport.
By effectively utilizing Layout Tabs and Viewports, you can create detailed and accurately scaled representations of your models, ensuring a professional output for presentation or printing.
How to Do Page Setup in a Layout in AutoCAD
\"Discover the secrets of perfect page setup! In this informative video, we\'ll guide you through easy-to-follow steps to ensure your documents are formatted correctly for professional printing or online publishing. Don\'t miss out on this valuable knowledge!\"
AutoCAD Layout Tutorial for Beginners
\"Attention all beginners! Are you ready to embark on an exciting journey into the world of [topic]? This video is specially designed to provide you with the essential knowledge and skills you need to get started. Let\'s explore together and unlock your full potential!\"
Inserting and Customizing Title Blocks
Title blocks are essential in AutoCAD layouts as they provide key information about the drawing. Inserting and customizing title blocks involves a few detailed steps to ensure all necessary data is included and presented professionally.
1. Inserting a Title Block
- Navigate to the \"Layout\" tab, where your virtual paper sheet is represented.
- Click on the \"Insert\" button and select \"Title Block\" from the dropdown menu.
- Choose an existing template or create a new title block that suits your project\"s requirements.
- Edit the title block fields to include pertinent information like project name, sheet number, author, and date.
2. Drawing a Simple Title Block
- Start by creating an 8-1/2\"x11\" rectangle in Layout 1, ensuring it overlaps the edge of the virtual sheet for complete printing.
- Offset the initial rectangle inward by a specific margin and erase the outer rectangle to define the title block boundary.
- Draw smaller rectangles within this boundary for text fields and add necessary text like project name and details.
3. Creating and Scaling Viewports within the Title Block
- Use the MV (Make Viewport) command to create a viewport within the title block, allowing a view into your model space.
- Enter the viewport using the MS (model space) command or by double-clicking within the viewport.
- Scale the viewport accurately for plotting by using the ZOOM command and specifying the desired scale.
4. Customizing and Setting Up the Layout for Printing
- After finalizing the title block and viewports, access the \"Page Setup Manager\" by right-clicking the layout tab.
- Set up your printer, choose the correct paper size, plot style, and orientation in the \"Page Setup\" dialog box.
- Ensure your layout\"s scale is set to 1:1 and the plot is centered for a professional appearance.
- Use CTRL+P or the PLOT command to initiate printing, previewing the layout before confirming the print.
By carefully following these steps, you can ensure your AutoCAD layouts are well-organized, informative, and ready for professional presentation or printing.
_HOOK_
Utilizing Viewports for Detailed Presentation
Viewports in AutoCAD are powerful tools that allow detailed presentation of different aspects of your model within the same layout. They enable precise scaling and positioning of drawings on a sheet, effectively bridging the gap between Model Space and Paper Space.
1. Introduction to Viewports
Viewports are windows into your Model Space, positioned within the Layout tabs. They enable you to display and scale different parts of your model on a sheet for plotting. While working in a Layout, remember that objects in the Model exist in Model Space and are only accessible through viewports, whereas objects on the Layout tab exist in Paper Space.
2. Creating and Configuring Viewports
- Select a Layout tab that matches your desired paper size for plotting.
- Activate the layout tab where you intend to add viewports.
- Use the \"VPORTS\" command or the viewport configuration option to set the desired number and arrangement of viewports.
- Adjust the size and position of each viewport by clicking and dragging its boundaries.
3. Scaling and Locking Viewports
- Assign specific scales to each viewport to ensure that measurements align with physical rulers or architectural scales on the printed sheet.
- Lock the viewport scale to prevent unintentional zooming or scaling changes.
4. Navigating Between Model Space and Paper Space
Efficiently switch between Model Space and Paper Space using the Model Space/Paper Space button or by double-clicking inside or outside a viewport. This feature ensures that you can work on detailed model parts while also managing the overall layout presentation.
5. Utilizing Layout Tabs for Multiple Presentations
Layout tabs can be duplicated and manipulated to create various sheets, each focusing on different parts of the model. This capability allows for diverse and detailed presentations of your project within a single AutoCAD file.
Mastering the use of viewports in your layouts enhances the clarity and precision of your design presentations, making it a vital skill for professional and detailed project plotting.

Advanced Layout Techniques
Mastering advanced layout techniques in AutoCAD can significantly enhance the precision and effectiveness of your drawings. These techniques go beyond basic layout creation, offering detailed control over every aspect of your layout design and presentation.
1. Advanced Viewport Configuration
- Utilize the \"VPORTS\" command to create complex viewport configurations, arranging multiple views of your model on a single layout.
- Assign specific scales to each viewport to ensure accurate representation of your model at different magnifications.
- Lock the scales of your viewports to maintain consistency across your layout.
2. Model Space and Paper Space Mastery
Deepen your understanding of the difference between Model Space and Paper Space. Recognize that while objects in Model Space can be viewed through viewports, they can\"t be directly interacted with when in Paper Space. This understanding is crucial for effectively managing and navigating your layouts.
3. Layout Tab Manipulation
- Learn to duplicate and manipulate layout tabs to create multiple sheets within a single drawing, each focusing on different parts of your model.
- Use this technique to present various perspectives or detailed sections of your project, enhancing the comprehensiveness of your presentation.
4. Leveraging DVIEW for Dynamic Views
Explore the use of the DVIEW command to twist or rotate the view within a viewport. This command is particularly useful for aligning views correctly for presentation, ensuring that elevations or specific sections are displayed from the best perspective.
By incorporating these advanced layout techniques into your workflow, you can elevate the quality and clarity of your AutoCAD drawings, leading to more effective communication and presentation of your designs.
Optimizing Workflow with Layouts
Optimizing your workflow with AutoCAD layouts involves understanding and utilizing the features of layouts and viewports effectively. This not only ensures precision in your drawings but also enhances the efficiency and clarity of your design presentation.
1. Creating and Managing Layouts
- Begin by creating a new layout using the \"LAYOUT\" command or by right-clicking on the \"Model\" tab and choosing \"New Layout\".
- Configure your layout with the right paper size, orientation, and page setup to match your plotting requirements.
- Use the \"PAGESETUP\" command to access the Page Setup Manager and modify settings like printer options, paper size, plot style, and orientation.
2. Utilizing Viewports Effectively
- Create viewports using the \"VPORTS\" command to display different views of your model on the layout.
- Assign specific scales and lock each viewport to ensure that measurements align with physical rulers or architectural scales on the printed sheet.
- Understand the difference between Paper Space and Model Space, and use the Model Space/Paper Space button to switch between them efficiently.
3. Advanced Layout Features
- Copy existing layouts or create new ones from templates for consistent presentation across multiple drawings.
- Customize each layout with its own page setup to change the size, appearance, and format of paper space as per printing needs.
- Add detailed elements like title blocks, notes, and dimensions to your layouts for a professional look and comprehensive information display.
By integrating these techniques into your workflow, you can leverage AutoCAD\"s powerful layout features to create well-organized, precise, and visually appealing drawings, significantly enhancing your productivity and design presentation.

Common Issues and Solutions in Layout View
Working with Layouts in AutoCAD can streamline your drawing process, but it can also present challenges. Here are some common issues and their solutions to help you maintain efficiency in Layout View:
- Viewport Scaling Issues
- To correct viewport scaling, first, double-click inside the viewport to activate it. Then, use the Properties palette to adjust the scale, ensuring it matches your drawing\"s scale. Remember to lock the viewport after scaling to prevent accidental changes.
- Difficulty in Switching Between Model Space and Paper Space
- Use the \"MSPACE\" and \"PSPACE\" commands to toggle between Model Space and Paper Space within a viewport. These commands allow you to easily edit and navigate your drawing without leaving the Layout tab.
- Clipping Viewports
- To clip a viewport, select it and then use the \"VPCLIP\" command. Choose a clipping object or specify a new boundary. This is useful for focusing on specific parts of your drawing within a layout.
- Title Block Alignment Issues
- For aligning title blocks, ensure your title block is inserted as a block reference on the layout. Use the ALIGN command if you need to adjust its position according to specific points within the layout space.
- Printing and Plotting Color Discrepancies
- Color discrepancies can be resolved by adjusting the plot styles. Use the \"PAGESETUP\" command to access the Page Setup Manager, where you can assign different plot styles for accurate color representation in prints.
- Managing Multiple Viewports
- When managing multiple viewports, organize them strategically on the layout. Utilize layers to control the visibility of elements within each viewport for a clean and efficient presentation.
- Customizing Layouts with Templates
- For repetitive projects, create layout templates with pre-defined viewports, title blocks, and plot settings. This saves time and ensures consistency across similar projects.
By addressing these common issues with the provided solutions, you can enhance your productivity and accuracy in AutoCAD\"s Layout View, leading to a more streamlined and effective design process.
Customizing Layouts with AutoCAD Templates
AutoCAD templates are a powerful tool for standardizing the look and feel of your drawings, saving time, and ensuring consistency across projects. Here\"s how you can customize layouts using AutoCAD templates:
- Creating a Template
- Start by opening a new drawing and setting up your drawing units, layers, text styles, and dimension styles as you prefer. Configure your layout tabs, including viewport setups, title blocks, and any other recurring layout elements. Once everything is set, save this drawing as a template (.dwt) file by selecting Save As > Drawing Template.
- Adding Title Blocks and Borders
- In your template, insert a title block and borders that you’ll use across multiple projects. You can create these in paper space to ensure they are scaled properly for printing. Make sure to include attributes in your title block for easy customization like project name, date, and drawn by.
- Setting Up Layouts
- Prepare one or more layouts with predefined viewports. These viewports can be positioned and scaled according to the standard scales your projects require. Remember to lock the viewports to prevent unintentional scaling or panning.
- Configuring Plot Settings
- Define plot settings including paper size, plot area, plot scale, and plot style tables. By setting these up in your template, you ensure consistent printouts, reducing the need to adjust settings for each new project.
- Using Layer States
- Manage layer visibility, color, and linetype by saving layer states in your template. This allows for quick adjustments to the drawing\"s visibility options without altering each layer individually.
- Implementing Annotation Styles
- Define text styles, dimension styles, and multileader styles within your template to maintain consistency in annotations across your drawings. This ensures that all text and dimensions conform to your standards.
- Distributing Your Template
- Once your template is configured, distribute it to your team or save it in a shared location. This ensures everyone is working with the same standards, leading to uniformity across all projects.
By customizing layouts with AutoCAD templates, you streamline the drawing process, enhance consistency, and reduce errors and adjustments in your projects. Templates are not only a foundation for your work but also a means to enforce best practices within your team or organization.
_HOOK_
READ MORE:
Tips for Efficient Plotting and Publishing
Plotting and publishing in AutoCAD are crucial for sharing your designs. Here are several tips to enhance your efficiency and ensure high-quality outputs:
- Use Page Setups
- Before plotting, create and save page setups for different paper sizes, plot styles, and plot devices. This allows you to quickly apply consistent plot settings across various drawings and layouts.
- Preview Before Plotting
- Always preview your plots before sending them to the printer or plotter. This step can help identify issues with layer visibility, text overlap, and margins, saving time and resources.
- Configure Plot Styles
- Plot styles control the appearance of your drawing when plotted, including line weights, colors, and linetypes. Configuring plot styles ensures that your printed drawing conveys the intended design clearly.
- Batch Plot for Multiple Files
- Use the Batch Plot feature to plot multiple drawings or layouts at once. This is especially useful for large projects, reducing the time spent on individual plotting tasks.
- Optimize Plotter Configuration
- Ensure your plotter\"s drivers are up to date and its configuration is optimized for AutoCAD. This can help prevent errors and improve both the speed and quality of your plots.
- Manage Layers Wisely
- Use layer properties to control which layers are visible, printable, or locked. Organizing your layers effectively can simplify the plotting process and improve the clarity of your final output.
- Utilize eTransmit for Sharing
- When sending drawings to clients or colleagues, use the eTransmit command in AutoCAD. This tool packages your drawings and all related files, including external references and plot styles, ensuring the recipient can view the drawing as intended.
- Keep Track of Plot Logs
- Maintain plot logs to keep a record of all plots. This can be useful for tracking revisions, troubleshooting issues, and maintaining a history of your project\"s documentation process.
Implementing these tips can significantly streamline your plotting and publishing workflow, ensuring your designs are communicated accurately and efficiently.
Master the art of AutoCAD layouts with our comprehensive guide, designed to boost your productivity and elevate your designs. From basic setups to advanced techniques, embark on a journey to transform your drafting process today.