Topic autocad architecture 2023 tutorial: Dive into the world of architectural design with our comprehensive AutoCAD Architecture 2023 tutorial, crafted to guide beginners and seasoned professionals alike through the intricacies of creating sophisticated designs with ease and precision.
Table of Content
- How can I learn AutoCAD Architecture 2023 through tutorials and learning resources?
- Getting Started with AutoCAD Architecture 2023
- Understanding the Interface and Basic Tools
- Creating Your First Drawing: Simple 2D and 3D Projects
- Advanced Drawing Techniques: Using Layers and Object Snaps
- YOUTUBE: AutoCAD Architecture Tutorial for Beginners
- Mastering Editing Tools: Modify and Manipulate Designs
- Working with Text and Dimensions for Detailed Designs
- Creating Complex Structures: Walls, Doors, and Windows
- Developing Site and Floor Plans
- Efficient Space Planning and Layouts
- Designing Roofs and Using Structural Members
- Enhancing Drawings: Rendering and Materials
- Finalizing Projects: Documentation and Plotting
- Utilizing AutoCAD Architecture\"s Advanced Features
- Customizing AutoCAD for Efficiency: Macros and LISP API
How can I learn AutoCAD Architecture 2023 through tutorials and learning resources?
To learn AutoCAD Architecture 2023 through tutorials and learning resources, you can follow these steps:
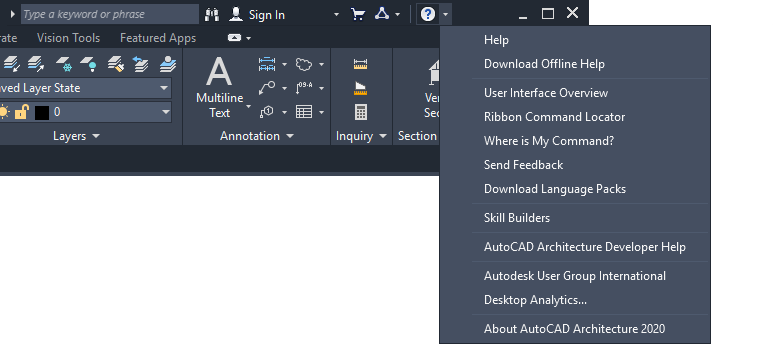
- Visit the official AutoCAD Architecture website.
- Look for the \"Learning Resources\" section on the website.
- Explore the available tutorials and guides.
- Click on the tutorials that match your skill level (e.g., beginner, intermediate, advanced).
- Start with the introductory tutorial if you are a beginner.
- Follow the step-by-step instructions provided in the tutorial.
- Practice the exercises and examples given in the tutorial.
- Refer to the AutoCAD Architecture documentation for further details and explanations.
- If available, attend training courses or webinars offered by Autodesk or authorized training centers.
- Join online forums or communities where AutoCAD Architecture users share their experiences and knowledge.
By following these steps and utilizing the resources provided, you can learn AutoCAD Architecture 2023 and enhance your skills in architectural drawing and design.
READ MORE:
Getting Started with AutoCAD Architecture 2023
Embark on your journey into AutoCAD Architecture 2023 with a step-by-step guide tailored for new users. This section will help you set up the software, understand its interface, and begin your first project with confidence.
- Introduction to AutoCAD Architecture 2023: Overview of features and new updates.
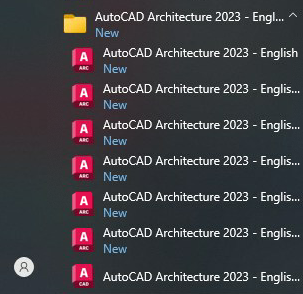
- Installing AutoCAD Architecture 2023: Detailed instructions on how to download and install the software on your computer.
- Navigating the Interface: Learn about the workspace, ribbon, toolsets, and how to customize your environment.
- Setting Up Your First Project: Tips for creating a new file, setting drawing units, and using drawing templates.
- Basic Drawing Tools: Understanding the use of line, polyline, circle, and other essential drawing tools for creating simple architectural elements.
- Layer Management: How to organize your drawing with layers, including creating, modifying, and assigning properties.
- Saving and Managing Files: Best practices for saving, opening, and managing your AutoCAD files to ensure smooth workflow.
By following these initial steps, you will gain a solid foundation in AutoCAD Architecture 2023, setting the stage for more advanced projects and techniques.
Understanding the Interface and Basic Tools
AutoCAD Architecture 2023\"s interface is designed for architectural drafting, offering an intuitive workspace that enhances productivity. This section will guide you through the essential components and basic tools to get you started.
- Ribbon: The ribbon at the top contains all the tools and commands organized in tabs. Each tab relates to specific types of activities such as drawing, modifying, and annotating.
- Tool Sets: On the left side, you\"ll find tool sets specific to architectural design, including walls, doors, and windows, making it easy to access the tools you need quickly.
- Command Line: Located at the bottom, the command line allows you to input commands directly, offering suggestions and auto-complete features to speed up your workflow.
- Properties Palette: This palette gives detailed information about selected objects and allows for the adjustment of their properties.
- Project Navigator: An essential feature for managing your drawings and related files, making it easier to switch between views and layouts.
- ViewCube: Located in the top right corner, the ViewCube helps in navigating 3D models, allowing you to rotate and switch between standard viewpoints easily.
By familiarizing yourself with these basic tools and interface elements, you\"ll be well-equipped to start creating detailed architectural designs in AutoCAD Architecture 2023.
Creating Your First Drawing: Simple 2D and 3D Projects
Welcome to the exciting world of architectural design with AutoCAD Architecture 2023! Whether you are a beginner or looking to refine your skills, this tutorial will guide you through the process of creating your first 2D and 3D projects. Follow these steps to start transforming your creative ideas into professional drawings.
Getting Started with 2D Drawings
Begin your journey into AutoCAD Architecture 2023 with simple 2D drawings. This foundational skill will set the stage for more complex projects.
- Open AutoCAD Architecture 2023 and select \"Start Drawing\" to open a new workspace.
- Choose the \"2D Drafting and Annotation\" workspace from the workspace switching menu to access 2D tools.
- Use the \"Line\" tool from the \"Draw\" panel to start your drawing. Click in the drawing area to set the starting point and another click to define the line\"s end point.
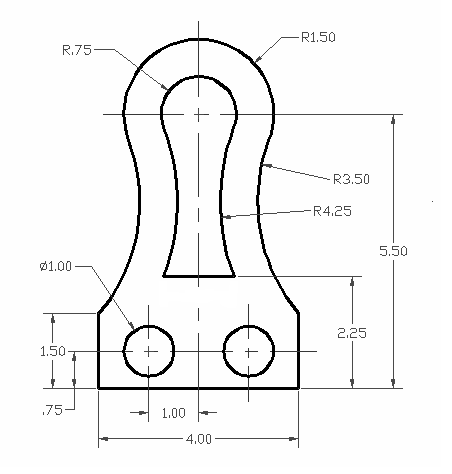
- Add dimensions to your drawing by selecting the \"Dimension\" tool, which will help in maintaining accuracy and scale.
- Explore other drawing tools like \"Rectangle\", \"Circle\", and \"Arc\" to add different shapes to your project.
- Save your project frequently to avoid losing progress.
Transitioning to 3D Projects
After mastering 2D drawings, elevate your skills by venturing into 3D modeling. AutoCAD Architecture 2023 offers powerful tools for creating realistic 3D architectural models.
- Switch to the \"3D Modeling\" workspace to access 3D tools.
- Start with a simple 3D project by using the \"Box\" tool to create a basic shape. Click in the drawing area to set the first corner, drag to set the opposite corner, and move upwards to define the height.
- Utilize the \"Extrude\" tool to turn 2D shapes into 3D forms. Select a 2D object and then click \"Extrude\" to pull the shape into the third dimension.
- Apply different visual styles from the \"Visual Styles\" panel, such as \"Wireframe\", \"Shaded\", or \"Realistic\" to view your project from various perspectives.
- Experiment with the \"Orbit\" tool to rotate your view and examine your model from all angles.
- Save your 3D project and consider exporting it in a format that can be shared with clients or colleagues.
By following these steps, you will gain a solid foundation in both 2D drafting and 3D modeling with AutoCAD Architecture 2023. Remember, practice is key to mastering these skills, so don\"t hesitate to experiment with different tools and techniques. Happy designing!

Advanced Drawing Techniques: Using Layers and Object Snaps
As you become more familiar with AutoCAD Architecture 2023, incorporating advanced drawing techniques such as using layers and object snaps can significantly enhance the precision and efficiency of your projects. Layers help in organizing different elements of your drawing, while object snaps enable you to align objects with exactitude. Let\"s delve into these advanced techniques to elevate your architectural drafting.
Mastering Layers for Organized Drawings
Layers in AutoCAD Architecture 2023 are akin to transparent sheets stacked upon one another, where each sheet represents a different element of your drawing. Managing layers effectively can streamline your workflow and make your drawings more manageable.
- Open the \"Layer Properties\" manager by clicking on the \"Layer Properties\" icon in the \"Home\" tab. Here, you can create, modify, and manage your layers.
- Create a new layer by clicking the \"New Layer\" button. Name it according to the element it will represent, such as \"Walls\", \"Doors\", or \"Furniture\".
- Assign colors, line types, and line weights to each layer. This helps in differentiating between various elements in your drawing visually.
- Make sure to activate the appropriate layer before drawing an element. You can switch between layers by clicking on them in the \"Layer Properties\" manager.
- Utilize the \"Layer Freeze\" feature to hide layers that are not currently needed, reducing clutter and improving drawing performance.
Utilizing Object Snaps for Precision
Object snaps (osnaps) are a crucial tool for achieving precision in your drawings. They allow you to snap your cursor to specific geometric points on your objects, such as endpoints, midpoints, centers, and intersections.
- Enable object snaps by clicking on the \"Object Snap\" button in the \"Status Bar\" or by pressing the F3 key.
- Right-click on the \"Object Snap\" button and choose \"Object Snap Settings\" to select which snaps you want to use. Commonly used snaps include \"Endpoint\", \"Midpoint\", \"Center\", \"Intersection\", and \"Perpendicular\".
- When drawing or modifying objects, hover over an object to see the snap points. Click when the desired snap point is highlighted to place your object or endpoint precisely.
- Use the \"Snap Overrides\" (shift + right-click) to temporarily enable specific snaps without changing your global snap settings. This is useful for executing precise movements without altering your standard snap preferences.
By mastering the use of layers and object snaps in AutoCAD Architecture 2023, you\"ll enhance the organization, efficiency, and accuracy of your architectural projects. These advanced techniques are fundamental for professional-quality drawings and are instrumental in your development as a skilled CAD user.

_HOOK_
AutoCAD Architecture Tutorial for Beginners
Are you new to the world of painting? Join us as we guide beginners step by step in creating beautiful artwork, unlocking your artistic potential and igniting your passion for painting!
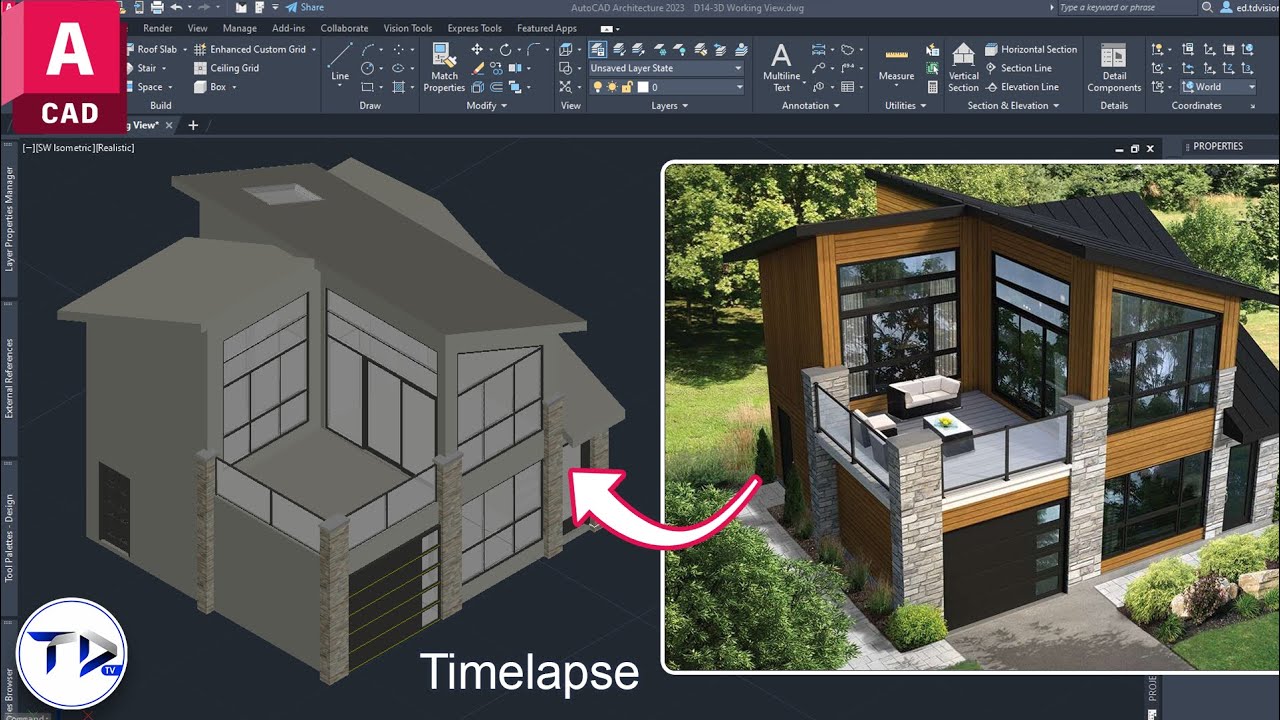
Modern Home Design in AutoCAD Architecture 2023 Timelapse
Witness the captivating beauty of nature unfold before your eyes in this mesmerizing timelapse video. From sunrises to blooming flowers, every frame is a breathtaking masterpiece worth watching in this incredible visual journey.
Mastering Editing Tools: Modify and Manipulate Designs
Enhancing your proficiency with AutoCAD Architecture 2023 involves not just creating drawings but also modifying and manipulating designs efficiently. The software offers a suite of powerful editing tools designed to refine and adjust your projects with precision. From simple modifications to complex alterations, understanding how to leverage these tools is essential for any architect or designer aiming to bring their visions to life.
Essential Editing Tools and Their Uses
AutoCAD Architecture 2023 is equipped with an array of editing tools that allow for the precise adjustment of drawings. Familiarizing yourself with these tools and their capabilities is the first step towards mastering design manipulation.
- Move: Select objects and move them to a new location. This tool is fundamental for adjusting the positioning of elements within your design.
- Copy: Create duplicates of selected objects. This is useful for repeating elements without having to redraw them.
- Rotate: Rotate selected objects around a base point. This tool aids in aligning objects with your design layout.
- Scale: Resize selected objects proportionally or non-proportionally, allowing for flexible adjustments to your design\"s dimensions.
- Trim: Remove parts of objects to meet the edges of another object, enabling the creation of precise interfaces and connections.
- Extend: Lengthen objects to meet the edges of another object, perfect for closing gaps or extending boundaries.
- Mirror: Create a mirrored copy of selected objects, useful for symmetrical designs or patterns.
- Offset: Create parallel copies of lines or curves at a specified distance, ideal for creating concentric shapes or parallel structures.
Advanced Manipulation Techniques
Beyond basic modifications, AutoCAD Architecture 2023 provides advanced tools for complex design manipulation, offering greater control and flexibility in your projects.
- Stretch: Select and stretch portions of objects to modify their shape while keeping other parts intact. This tool is invaluable for custom adjustments.
- Fillet: Create a rounded corner between two objects, enhancing aesthetics and functionality in your design.
- Chamfer: Create a beveled edge between two objects, useful for joining elements at an angle.
- Array: Create multiple copies of objects in a rectangular, polar, or path arrangement, enabling the efficient replication of components in a systematic manner.
- Explode: Break a compound object into its individual components, allowing for independent modification of parts.
Mastering these editing tools in AutoCAD Architecture 2023 empowers you to refine and adjust your designs with unparalleled precision. Through practice and exploration, you\"ll discover the full potential of these tools, enabling you to tackle any project with confidence and creativity.

Working with Text and Dimensions for Detailed Designs
Creating detailed and informative designs in AutoCAD Architecture 2023 involves more than just drawing shapes and lines. Adding text and dimensions is crucial for conveying the specifics of your architectural plans, making your designs both understandable and actionable. This section will guide you through the process of incorporating text and dimensions effectively, ensuring your drawings communicate clearly and accurately.
Incorporating Text into Your Designs
Text annotations are essential for identifying components, providing instructions, or noting important information. AutoCAD Architecture 2023 makes adding and formatting text straightforward.
- Use the \"Text\" tool in the \"Annotate\" tab to add textual annotations. Click on the drawing area where you want the text to appear, and then type your text.
- Adjust the text properties (font, size, style) in the \"Text Editor\" tab that appears when entering text. These settings can significantly affect the readability and appearance of your annotations.
- For longer paragraphs or notes, use the \"MText\" (Multiline Text) tool, which allows for text formatting adjustments similar to word processing software.
- Organize your text layers separately from your drawing layers. This organization helps in managing the visibility of annotations without affecting the visibility of the design elements.
Adding Dimensions to Your Drawings
Dimensions are vital for specifying the size, distance, and spatial relationships in your designs. AutoCAD Architecture 2023 offers a variety of dimensioning tools to suit different needs.
- Select the \"Dimension\" tool from the \"Annotate\" tab to start adding dimensions. AutoCAD offers several types of dimensions (linear, aligned, angular, radius, diameter) to match the specific needs of your drawing.
- Click on the object or specify points between which you want to place the dimension. AutoCAD automatically calculates and displays the distance or angle.
- Customize the appearance of your dimensions (text size, dimension line, arrowheads) in the \"Dimension Style Manager\". Creating a custom dimension style ensures consistency across your project.
- Use \"Leader\" lines to create annotations with pointers, ideal for indicating parts of your design that require further explanation or specific notes.
Mastering the use of text and dimensions in AutoCAD Architecture 2023 will enhance the clarity and detail of your architectural designs. These elements not only provide critical information but also ensure that your designs are interpreted and executed correctly. With practice, you can leverage these tools to make your drawings comprehensive and professional.
Creating Complex Structures: Walls, Doors, and Windows
AutoCAD Architecture 2023 simplifies the process of creating detailed architectural elements such as walls, doors, and windows, enabling designers and architects to construct complex structures with precision and ease. This guide will walk you through the steps to add these essential components to your projects, enhancing the realism and functionality of your designs.
Designing Walls
Walls form the basic structure of any architectural design, providing support and defining spaces within your project.
- Select the \"Wall\" tool from the \"Build\" panel. AutoCAD Architecture 2023 offers various wall styles, including single, double, and curtain walls.
- Before drawing, specify the wall\"s properties (height, width, justification, and location) in the Properties palette. Setting these attributes first ensures consistency in your design.
- Click in the drawing area to start the wall and drag to extend it to the desired length. Click again to place the wall. Use the \"Ortho Mode\" (F8) for straight walls.
- For complex wall shapes, use the \"Polyline\" tool to sketch the wall path first, then select \"Wall\" tool and choose the \"Polyline\" option to convert the sketch into a wall.
Adding Doors and Windows
Doors and windows are key elements that add functionality and aesthetic value to buildings, allowing for movement and light.
- Doors:
- Access the \"Door\" tool from the \"Build\" panel. AutoCAD Architecture provides a variety of door styles.
- Hover over a wall where you want to insert a door. The tool automatically aligns the door with the wall.
- Click to place the door. Use the properties palette to adjust the door\"s dimensions and swing direction.
- Windows:
- Select the \"Window\" tool from the \"Build\" panel. Choose from various window styles to suit your design.
- Like the door tool, hover over a wall to automatically align the window. Click to insert the window into the wall.
- Adjust the window\"s properties (size, sill height, and header) in the properties palette for a perfect fit.
Creating complex structures in AutoCAD Architecture 2023 is a straightforward process with the right tools. By mastering the use of the Wall, Door, and Window tools, you can efficiently design buildings that are both aesthetically pleasing and functionally robust. Remember to explore different styles and configurations to achieve the desired outcome for your architectural projects.

Developing Site and Floor Plans
Developing detailed site and floor plans is a crucial step in the architectural design process, allowing for the effective planning and layout of spaces. AutoCAD Architecture 2023 is equipped with tools and features that streamline the creation of these plans, making it easier to visualize and adjust layouts according to project requirements. Follow these steps to create comprehensive and accurate site and floor plans for your next project.
Creating a Site Plan
A site plan gives an overview of the entire project, including buildings, landscaping, and features. It sets the foundation for your design, providing critical information about the site\"s topography and context.
- Start by importing a base map or using the \"Polygon\" tool to outline the property boundaries based on your site measurements or survey data.
- Utilize layers to separate different elements of the site plan, such as landscaping, utilities, and structures. This organization aids in managing the complexity of the design.
- Add details such as driveways, walkways, vegetation, and site features using the \"Line\", \"Polyline\", and \"Arc\" tools. Customize these elements to reflect the specific conditions of your site.
- Label important features and dimensions using the \"Text\" and \"Dimension\" tools to provide clear and precise information about the site layout.
Designing Floor Plans
Floor plans are essential for detailing the interior layout of buildings, showing the arrangement of walls, doors, windows, and other features.
- Define the perimeter of your floor plan using the \"Wall\" tool. Consider the site plan and design requirements to determine the placement and dimensions of exterior and interior walls.
- Insert doors, windows, and other architectural elements using the \"Door\" and \"Window\" tools. Place these components thoughtfully to ensure functional flow and accessibility.
- Add interior details such as furniture, fixtures, and equipment to enhance the functionality and appearance of the space. Use the \"Block\" library for standard elements or create custom blocks for unique items.
- Annotate your floor plan with room labels, dimensions, and notes to provide a comprehensive understanding of the space. Customize text styles and dimension settings for clarity and consistency.
By following these steps in AutoCAD Architecture 2023, you can develop site and floor plans that accurately represent your architectural vision. These plans are fundamental to the design process, serving as a blueprint for the development and construction phases of your project. With practice and exploration of AutoCAD\"s capabilities, you can create detailed and informative plans that meet professional standards.
Efficient Space Planning and Layouts
Efficient space planning and creating effective layouts are critical components of architectural design, ensuring that spaces are functional, accessible, and aesthetically pleasing. With AutoCAD Architecture 2023, architects and designers have access to a suite of tools that facilitate the thoughtful arrangement of spaces. This guide will walk you through the steps to leverage these tools for optimizing space utilization and achieving harmonious layouts in your projects.
Understanding Space Requirements
Before diving into layout creation, it\"s essential to understand the needs and requirements of the space you are designing. Consider factors such as the purpose of the space, the expected flow of movement, and the needs of its occupants.
Utilizing the DesignCenter and Tool Palettes
AutoCAD Architecture\"s DesignCenter and Tool Palettes are invaluable for efficient space planning, offering quick access to symbols, blocks, and objects that can be used to represent furniture, fixtures, and other elements within a layout.
- Open the DesignCenter (Ctrl+2) to browse and insert blocks and symbols that represent different elements of your layout, such as furniture and fixtures.
- Use the Tool Palettes (Ctrl+3) to access a wide range of predefined objects tailored for architectural designs, including chairs, desks, and more.
- Drag and drop these elements onto your layout, positioning them according to your space planning objectives.
Creating Functional Zones
Dividing your space into functional zones is key to creating an effective layout. This approach allows for the efficient use of space and enhances the overall functionality of the area.
- Identify the main functions that your space needs to accommodate, such as work areas, relaxation zones, or storage.
- Use the \"Polyline\" tool to outline these zones on your layout, applying different layers or colors to distinguish between them.
- Consider the flow between zones, ensuring there are clear paths for movement and interaction among the different areas.
Optimizing Layouts for Flow and Accessibility
Ensuring that your layout promotes easy movement and accessibility is crucial for the effectiveness of your design.
- Arrange furniture and fixtures to create clear paths of travel within and between spaces. Avoid creating obstacles that could hinder movement.
- Use the \"Dimension\" tool to ensure adequate space between elements, adhering to accessibility standards and ergonomic principles.
- Consider the visual flow of the space, arranging elements in a way that guides the occupant\"s eye through the area, creating a cohesive and inviting environment.
By following these steps in AutoCAD Architecture 2023, you can develop efficient and functional space plans that meet the needs of your clients and enhance the livability of the spaces you design. Remember, the key to successful space planning is a deep understanding of the intended use of the area, combined with strategic placement of elements to support those activities.

_HOOK_
Designing Roofs and Using Structural Members
Designing roofs and integrating structural members are key aspects of creating comprehensive architectural models in AutoCAD Architecture 2023. These elements not only contribute to the aesthetic appeal of a design but also ensure its structural integrity. This guide provides step-by-step instructions on how to design roofs and incorporate structural members effectively, enhancing the functionality and durability of your projects.
Designing Roofs
Roofs are critical for protecting structures from environmental elements and can significantly impact the overall look of a building. AutoCAD Architecture 2023 offers tools to design various types of roofs efficiently.
- Access the \"Roof\" tool from the \"Build\" panel. You can choose from a range of predefined roof styles or create a custom design to meet your specific requirements.
- Define the perimeter of the roof by clicking to specify the corners. Use the \"Ortho Mode\" (F8) for straight edges, ensuring accurate angles.
- Adjust the properties of the roof, such as pitch, overhang, and materials, in the Properties palette. These settings allow you to customize the appearance and functionality of the roof.
- For complex roof shapes, consider using the \"Polyline\" tool to sketch the outline first, then convert it into a roof using the \"Roof\" tool.
Using Structural Members
Structural members, including beams, columns, and braces, are essential for providing support to buildings. AutoCAD Architecture 2023 facilitates the placement and customization of these elements.
- Beams:
- Select the \"Structural Member\" tool and choose \"Beam\" from the tool options. Beams are crucial for supporting floors and roofs.
- Specify the start and end points of the beam in your drawing area. Adjust the beam\"s properties, such as size and material, for structural requirements and aesthetics.
- Columns:
- Use the \"Structural Member\" tool again, but select \"Column\" this time. Columns provide vertical support and are fundamental in load-bearing structures.
- Place the column by clicking in the desired location. Modify its properties to match the design and structural needs of your project.
- Braces:
- For additional structural support, especially in areas susceptible to lateral forces, add braces using the \"Structural Member\" tool.
- Like beams and columns, specify the placement and adjust their properties to ensure they meet both functional and aesthetic requirements.
Through the effective design of roofs and the strategic use of structural members, you can enhance the resilience and visual appeal of your architectural projects in AutoCAD Architecture 2023. These components are vital for creating realistic and structurally sound models that adhere to architectural standards and satisfy client expectations.
Enhancing Drawings: Rendering and Materials
Bringing your architectural designs to life in AutoCAD Architecture 2023 involves more than just drawing precise lines and shapes. By applying rendering techniques and materials, you can transform your 2D drawings and 3D models into visually striking representations that closely mimic real-life objects. This section will guide you through the process of enhancing your drawings with rendering and materials, adding depth, texture, and realism to your architectural projects.
Applying Materials to Your Designs
Materials add color, texture, and realism to your models, conveying more information about the design\"s intended appearance and feel.
- Navigate to the \"Materials\" browser by selecting the \"Materials\" panel on the \"Render\" tab. Here, you can explore a wide range of material libraries.
- Choose a material that suits your design\"s aesthetic, such as brick for walls or wood for floors. You can also customize materials to match your specific requirements.
- Apply the material to your model by dragging and dropping it onto the desired surface in the model space. Use the \"Assign to Layer\" option to apply materials based on layer, streamlining the process for complex models.
- Adjust the material\"s properties, such as scale, rotation, and reflection, to achieve the desired effect on your model.
Rendering Your Design
Rendering is the process of generating a photorealistic or non-photorealistic image from a 3D model. AutoCAD Architecture 2023\"s rendering tools allow you to visualize your designs in high quality, providing a glimpse of how they would look in the real world.
- Setting Up the Scene: Before rendering, adjust the scene settings. This includes setting up the lighting, camera angles, and environmental settings to enhance the realism of your render.
- Choosing the Render Quality: Select the desired render quality from the \"Render\" tab. Higher quality renders produce more detailed images but require more processing time.
- Starting the Render Process: Once you\"ve set up your scene and chosen the render quality, start the rendering process. AutoCAD Architecture will generate the image, allowing you to see the final outcome.
- Post-Processing: After rendering, you may want to adjust the image further using post-processing tools. This can include tweaking the brightness, contrast, or adding filters to achieve the desired visual effect.
By effectively using rendering and materials in AutoCAD Architecture 2023, you can create compelling and realistic representations of your architectural designs. These enhancements not only improve the presentation of your projects but also help clients and stakeholders better understand your vision. With practice, you can master these tools to produce high-quality visuals that stand out in the architectural field.
Finalizing Projects: Documentation and Plotting
The final phase of any architectural project in AutoCAD Architecture 2023 involves preparing comprehensive documentation and plotting high-quality drawings for presentation or construction purposes. This crucial step ensures that your designs are communicated effectively and accurately to clients, contractors, and regulatory bodies. Follow these guidelines to finalize your projects with professionalism and precision.
Preparing Your Documentation
Documentation includes all necessary drawings, details, and specifications required to understand and construct the project. AutoCAD Architecture 2023 provides tools to efficiently organize and present these elements.
- Ensure all drawings are up-to-date and accurately reflect the final design. This includes checking dimensions, annotations, and layer assignments.
- Organize your drawings into sheets using the \"Sheet Set Manager\". This tool allows you to manage your project\"s drawings in one location, simplifying the process of assembling your documentation.
- Create a title block that includes relevant project information (project name, date, scale, etc.) and insert it into each drawing sheet. The title block is essential for identification and professionalism.
- Include a table of contents or sheet index to guide readers through the documentation, especially for large projects with multiple drawings and sheets.
Plotting Your Drawings
Plotting transforms your digital drawings into physical documents or high-quality digital formats. Proper plotting is vital for the accurate representation of your design.
- Setting Plot Parameters: Access the \"Plot\" dialog box from the \"Application menu\" or the \"Quick Access Toolbar\". Here, you can select the plotter, paper size, scale, and orientation.
- Choosing the Right Scale: Ensure your drawings are plotted at the correct scale to maintain accuracy. Use the \"Preview\" function to check the scale and layout before finalizing the plot.
- Exporting to PDF: For digital submissions, export your drawings to PDF. Select \"Export to PDF\" in the \"Plot\" dialog box and adjust the settings to ensure high quality and readability.
- Quality Control: Before distributing the final plots or PDFs, perform a quality control check to ensure all elements are visible, legible, and accurately represented.
Finalizing your projects in AutoCAD Architecture 2023 with detailed documentation and precise plotting ensures that your design intentions are clearly communicated and ready for implementation. By following these steps, you can confidently present your projects to stakeholders, contributing to their successful realization.
Utilizing AutoCAD Architecture\"s Advanced Features
AutoCAD Architecture, a specialized toolset provided by Autodesk, offers a plethora of advanced features designed to enhance architectural drafting and documentation. Mastering these features can significantly improve your workflow and project outcomes. Below, we delve into some of these advanced capabilities and provide guidance on how to use them effectively.
- Dynamic Blocks and Block Palettes
- Dynamic blocks allow for more flexibility in design modifications. Learn to create and modify these blocks to streamline your drawing process. Utilize the Block Palettes for quick access and organization of your blocks, enhancing efficiency in your design phase.
- Layer Management and Property Set Definitions
- Efficient layer management is crucial in complex projects. Use AutoCAD Architecture\"s Layer Properties Manager to create, merge, and organize layers effectively. Property Set Definitions enable you to add additional information to your objects, making data management more comprehensive.
- Customizable Tool Palettes
- Customize tool palettes to suit your specific workflow needs. This feature allows you to have all the necessary tools at your fingertips, reducing the time spent searching for commands and increasing productivity.
- Project Navigator for Managing Drawings
- The Project Navigator is an essential tool for managing the drawings and related information within a project. Learn to use it for organizing, sharing, and navigating through your project files efficiently.
- Annotation and Scheduling
- AutoCAD Architecture automates the creation of annotations, tags, and schedules. Understanding how to customize and use these tools can save you time and ensure consistency across your documentation.
- Creating Detailed Sections and Elevations
- Utilize the software\"s powerful section and elevation tools to generate detailed views automatically from your model. This feature not only speeds up the drafting process but also ensures accuracy and consistency in your designs.
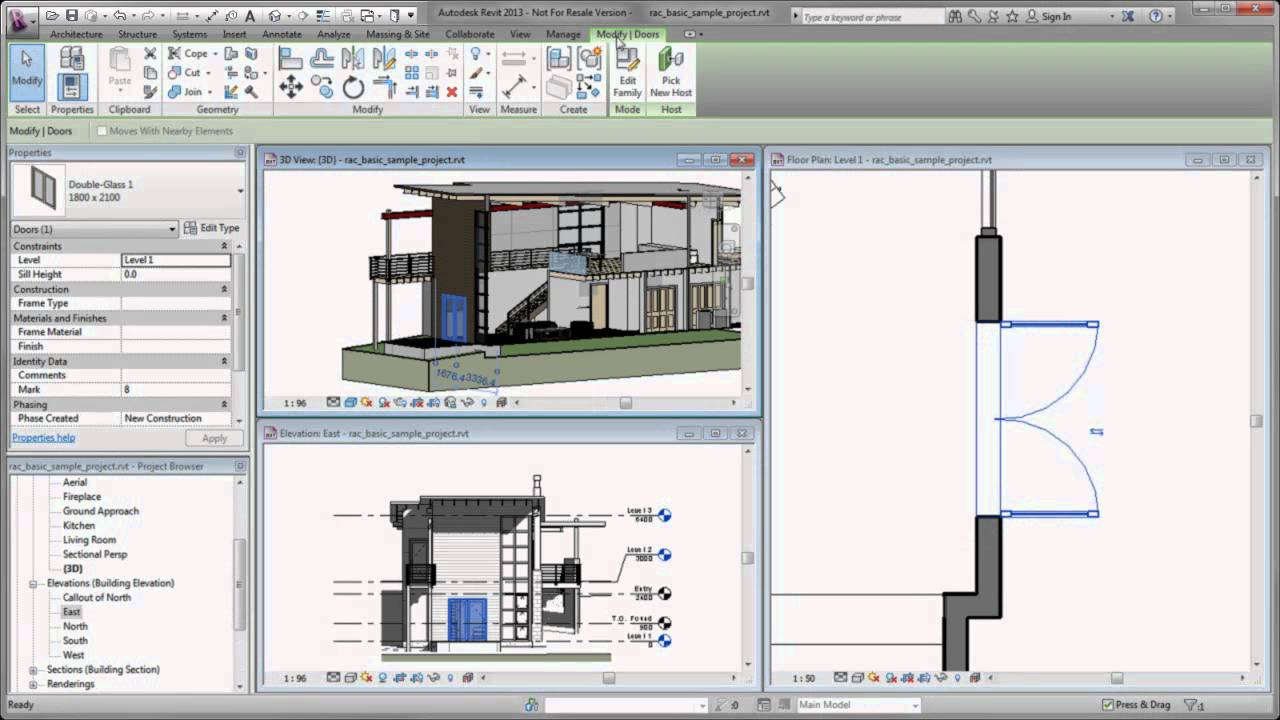
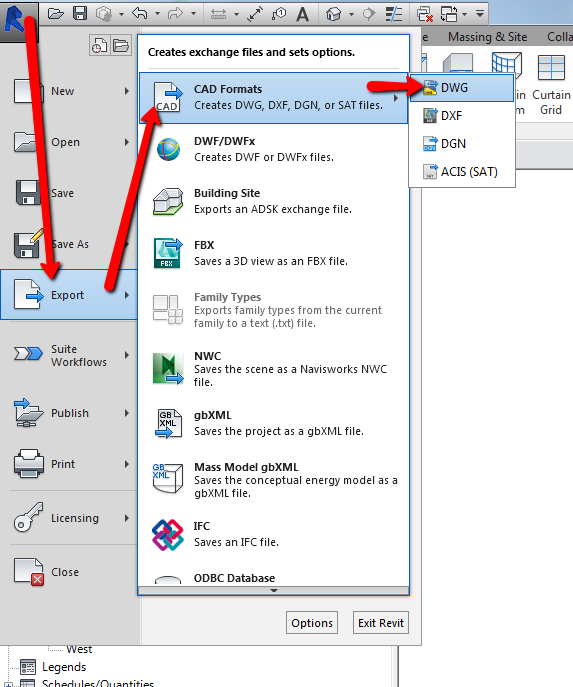
- Integration with Revit for BIM Projects
- For projects requiring Building Information Modeling (BIM), AutoCAD Architecture offers seamless integration with Revit. This integration allows for efficient collaboration and data exchange between different project stakeholders.
By leveraging AutoCAD Architecture\"s advanced features, you can enhance your architectural projects with greater precision and efficiency. Invest time in learning these features to fully harness the potential of this powerful software tool.
READ MORE:
Customizing AutoCAD for Efficiency: Macros and LISP API
Enhancing productivity in AutoCAD Architecture 2023 can be significantly achieved through customizing the software with macros and the LISP API. These tools allow for the automation of repetitive tasks, customization of commands, and much more, offering a personalized and efficient drafting experience. Here\"s how you can leverage these powerful features:
- Understanding AutoLISP Basics
- AutoLISP is a dialect of the LISP programming language built specifically for use with AutoCAD. It\"s a powerful tool for automating tasks, customizing functions, and creating new commands. Begin by learning the syntax and structure of AutoLISP, and how it can interact with AutoCAD objects and properties.
- Creating Simple Macros
- Macros are sequences of commands and actions that perform complex operations. Start by recording simple tasks you perform regularly, such as drawing setup or object placement. Use the Action Recorder to save these sequences, and then assign them to custom toolbar buttons or keyboard shortcuts for quick access.
- Developing Custom AutoLISP Functions
- Once you\"re comfortable with AutoLISP basics, start developing custom functions. These can range from simple tasks, like changing layer properties, to more complex operations, like generating specific geometry based on user input. Test your functions thoroughly to ensure they work as intended.
- Integrating with the LISP API
- The LISP API provides a bridge between your custom scripts and the AutoCAD environment, allowing for deep customization and automation. Use it to access and modify AutoCAD\"s database, respond to events, and interact with the user interface.
- Creating Custom Toolbars and Palettes for LISP Functions
- For easy access to your custom LISP functions, integrate them into the AutoCAD interface through custom toolbars and tool palettes. This allows you and your team to quickly access and use the functions without needing to remember complex commands or navigate through menus.
- Sharing and Collaborating
- Custom scripts and macros can be shared with your team, improving efficiency across your organization. Ensure to include documentation on how to install and use your custom tools, and consider creating a shared repository for easy access and updates.
By customizing AutoCAD Architecture 2023 with macros and the LISP API, you unlock a new level of efficiency and personalization in your drafting work. Whether you\"re automating repetitive tasks, creating custom commands, or integrating complex functions, these tools open up a world of possibilities for enhancing your productivity.
Embark on your journey to mastering AutoCAD Architecture 2023 with our comprehensive tutorials, designed to unlock your potential and elevate your projects. Discover the path to unparalleled efficiency and creativity today!
_HOOK_