Topic autocad inventor tutorial: Embark on a journey to mastery with our AutoCAD Inventor tutorial, designed to guide you through the essentials of 3D design, from basic sketches to advanced modeling techniques.
Table of Content
- Where can I find a comprehensive Autodesk Inventor tutorial?
- Getting Started with Autodesk Inventor
- Basic Sketching and Part Modeling
- Creating Assemblies and Advanced Modeling Techniques
- Detail Drawings and Dimensioning
- Introduction to Sheet Metal Design
- Working with Weldments and Frames
- YOUTUBE: Autodesk Inventor Tutorial for Beginners: Exercise 1
- Design Automation and Configurations
- Simulation and Stress Analysis Basics
- Introduction to CAM and 3D Printing with Inventor
- Customization and Advanced Tools
- Best Practices for Efficient Design Workflow
- Tips and Tricks for Power Users
Where can I find a comprehensive Autodesk Inventor tutorial?
You can find a comprehensive Autodesk Inventor tutorial on various platforms. Here are some popular options:
- Autodesk\'s Official Inventor Tutorials: Autodesk provides a range of tutorials on their official website. These tutorials cover various topics and provide step-by-step instructions to learn different aspects of Autodesk Inventor.
- YouTube Tutorials: YouTube has a wide selection of video tutorials for Autodesk Inventor. You can find comprehensive tutorials created by experienced users and educators. Some popular Autodesk Inventor YouTube channels include Tech3D, CAD CAM TUTORIAL, and SourceCAD.
- CADTrainingOnline.com: CAD Training Online offers online courses specifically designed for Autodesk Inventor. These courses encompass comprehensive tutorials and interactive learning materials to help you master Autodesk Inventor.
- Udemy: Udemy is an online learning platform that offers a variety of Autodesk Inventor courses. These courses range from beginner to advanced levels and are created by industry professionals.
By utilizing these resources, you can access comprehensive tutorials and enhance your skills in using Autodesk Inventor.
READ MORE:
Getting Started with Autodesk Inventor
Embarking on your Autodesk Inventor journey begins with understanding the basics of 3D design. This section is dedicated to getting you up and running with Inventor, providing you with the foundational skills needed to start creating your own projects.
- Installation: Ensure your system meets the requirements, then download and install Autodesk Inventor from the official Autodesk website.
- Interface Familiarization: Get to know the Inventor interface, including the ribbon, toolbars, browser, and project window to navigate through the software efficiently.
- Setting Up a Project: Learn how to set up a new project, specifying the project type and folder locations to keep your files organized.
- Basic Sketching Tools: Dive into sketching by learning about the sketch environment, using tools like line, circle, rectangle, and constraint tools to create your first sketch.
- 3D Modeling Basics: Convert your sketches into 3D models using features like extrude, revolve, and loft, understanding the importance of each feature in creating complex shapes.
- View Manipulation: Master the art of manipulating the view of your model, including zooming, panning, and rotating, to work effectively on your designs.
- Material and Appearance: Apply materials and modify appearances to give your model a realistic look and feel, preparing it for rendering.
By following these steps, you\"ll be well on your way to becoming proficient in Autodesk Inventor, ready to tackle more complex designs and challenges.
Basic Sketching and Part Modeling
Mastering basic sketching and part modeling is essential in Autodesk Inventor, forming the foundation of your 3D design skills. This section guides you through creating your first sketches and transforming them into detailed parts.
- Starting a New Sketch: Open a new file and select the \"Start Sketch\" option. Choose a plane to begin drawing your sketch.
- Using Sketch Tools: Familiarize yourself with tools like line, circle, arc, rectangle, and polygon to draw your sketch. Utilize dimension and constraint tools to define the size and relationships between sketch entities.
- Editing Sketches: Learn how to edit sketches by using trim, extend, offset, and mirror tools to refine your designs.
- Creating Basic Features: Turn your sketches into 3D parts using features such as extrude, revolve, sweep, and loft. Understand how each feature works and when to use them for your design.
- Modifying Parts: Discover how to modify parts with tools like fillet, chamfer, shell, and hole. These tools add detail and functionality to your parts.
- Sketching and Modeling Best Practices: Learn best practices for sketching and modeling, such as keeping sketches simple, fully defining sketches, and using features effectively for a clean, efficient design process.
By mastering these basic sketching and modeling techniques, you\"ll be equipped to tackle more advanced projects and challenges in Autodesk Inventor, enhancing your design capabilities.
Creating Assemblies and Advanced Modeling Techniques
Building upon your knowledge of sketching and part modeling, this section delves into the creation of assemblies and the application of advanced modeling techniques in Autodesk Inventor. Assembling parts into a cohesive whole and utilizing advanced tools are crucial for complex projects.
- Introduction to Assemblies: Understand the concept of assemblies, where multiple parts are combined to form a complete product or system. Learn how to start a new assembly file and insert components.
- Mating Components: Explore the use of constraints to mate components together in an assembly, ensuring parts fit together correctly with options like mate, flush, tangent, and insert.
- Manipulating Assembly Views: Learn techniques for manipulating the view of your assembly, including zoom, pan, rotate, and the use of the View Cube for better visualization of the assembly.
- Subassemblies: Discover how to create and manage subassemblies within larger assemblies for better organization and efficiency.
- Advanced Part Modeling Techniques: Dive into advanced modeling techniques such as adaptive design, surface modeling, and the use of iFeatures for reusable design elements.
- Design Accelerators: Utilize Inventor’s design accelerators to quickly add common features like gears, fasteners, and springs to your designs.
- Interference Checking: Use the interference check tool to identify and resolve clashes between components, ensuring a functional assembly.
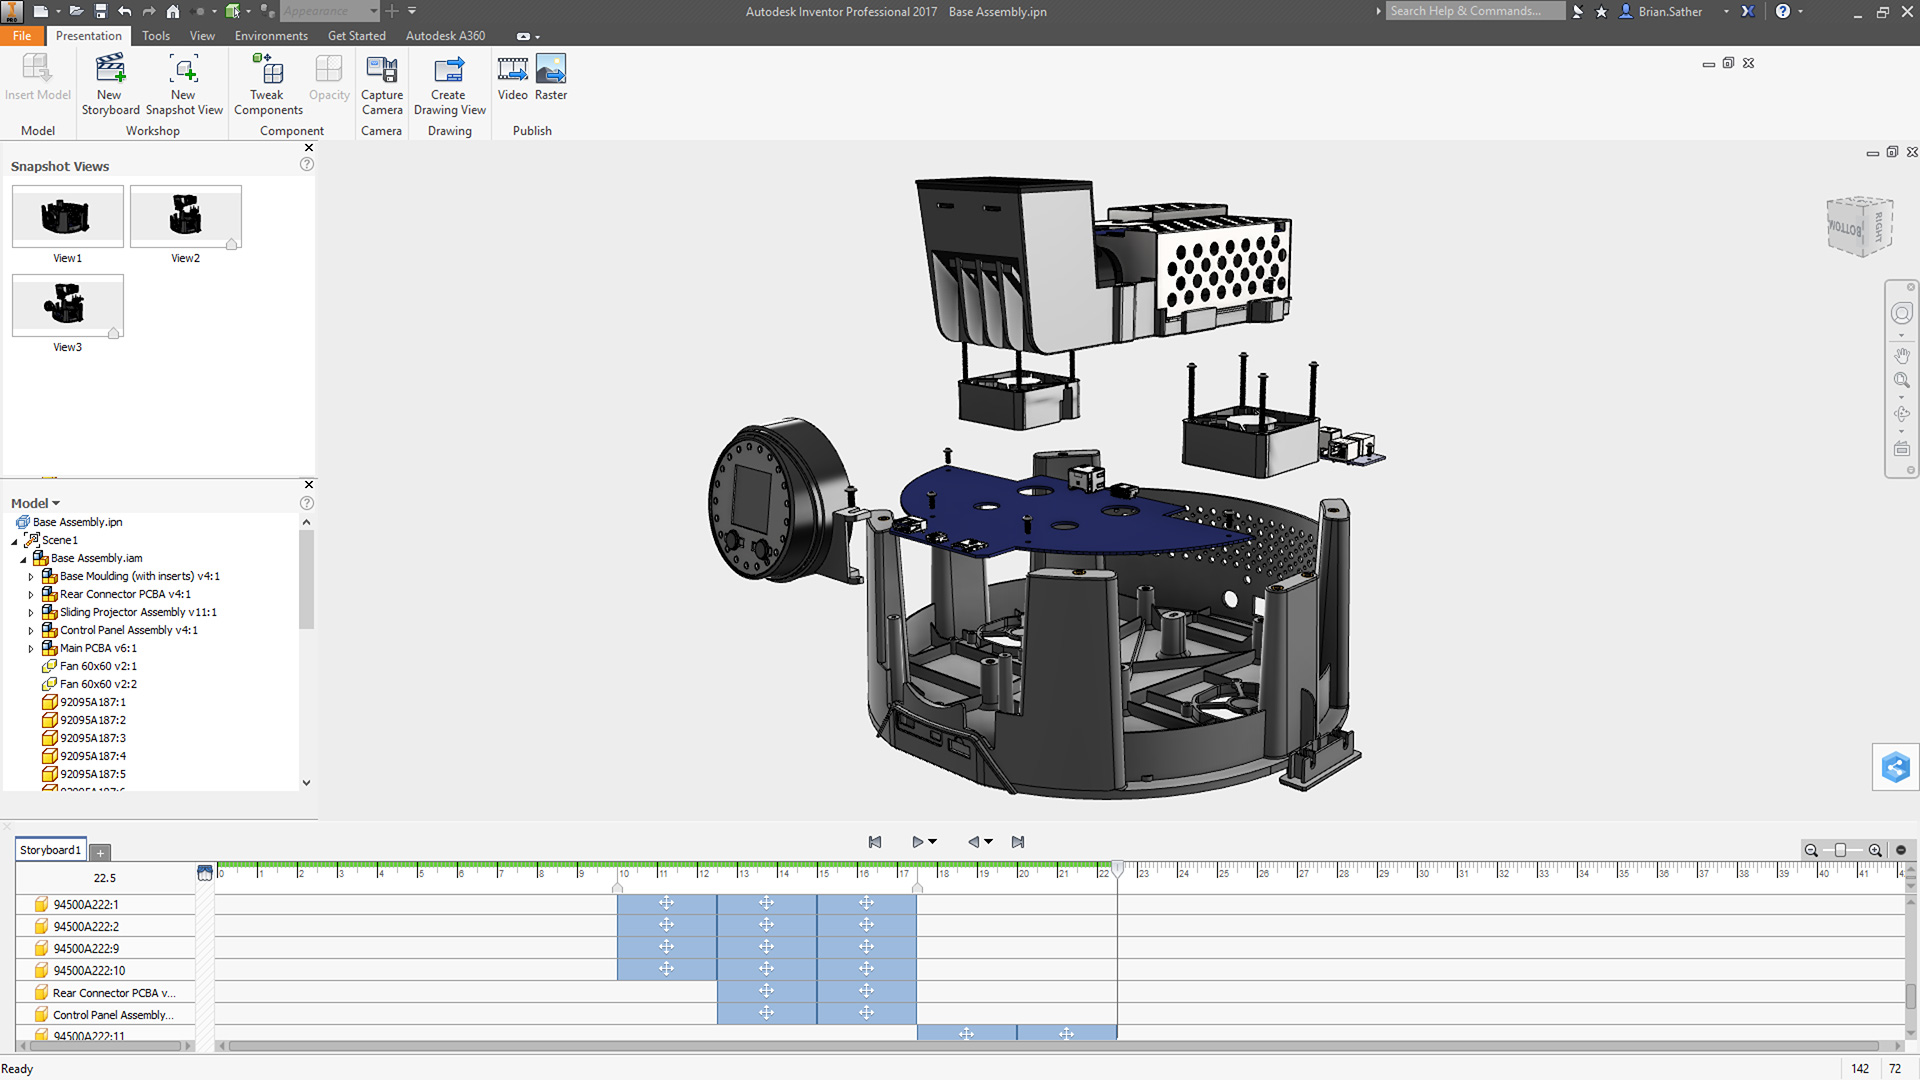
- Creating Exploded Views: Learn how to create exploded views of your assembly to illustrate how parts fit together, essential for manuals and assembly instructions.
With these skills, you\"ll be able to create detailed and functional assemblies in Autodesk Inventor, bringing your designs to life with precision and professionalism.
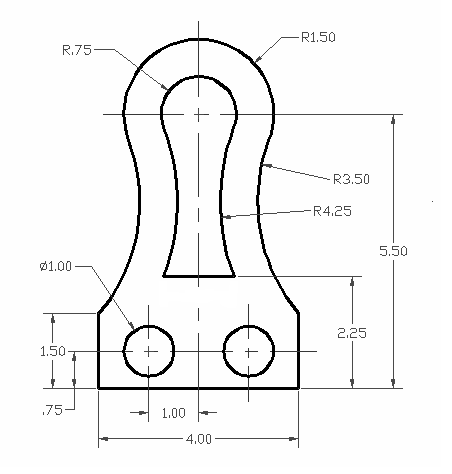
Detail Drawings and Dimensioning
Creating detailed drawings and applying precise dimensioning are fundamental steps in bringing your Autodesk Inventor designs from the screen to the real world. This section guides you through the process of generating detailed drawings and adding accurate dimensions to ensure your designs are accurately represented and manufacturable.
- Generating Drawing Views: Learn how to generate base, projected, section, and detail views from your 3D models. This step is crucial for creating comprehensive drawing sheets that represent different aspects of your design.
- Applying Dimensions: Understand the importance of dimensioning for the manufacturing process. Use Inventor’s dimensioning tools to add linear, radial, angular, and ordinate dimensions to your drawing views.
- Adding Annotations: Beyond dimensioning, learn how to add annotations such as text, notes, and symbols to provide additional information necessary for fabrication or assembly.
- Using Dimension Styles: Customize your dimension styles to adhere to company standards or industry practices, ensuring that your drawings communicate effectively with engineers, fabricators, and other stakeholders.
- Tolerancing: Incorporate geometric dimensioning and tolerancing (GD&T) to specify allowable variations in form, orientation, and location of features, which is critical for parts that fit together in assemblies.
- Creating Parts Lists and BOMs: Automatically generate parts lists and bill of materials (BOMs) from your assemblies to accompany your drawings, ensuring that all components are accounted for and specified.
- Checking Drawing Accuracy: Utilize tools within Inventor to check the accuracy and completeness of your drawings, helping to avoid costly mistakes during the manufacturing process.
- Exporting and Sharing Drawings: Finally, learn how to export your detailed drawings in various formats for sharing with stakeholders or for use in manufacturing and assembly processes.
By mastering these detailed drawing and dimensioning techniques, you ensure that your designs are clearly understood and can be accurately produced, bridging the gap between digital creation and physical realization.

_HOOK_
Introduction to Sheet Metal Design
Autodesk Inventor\"s sheet metal design capabilities enable you to create detailed, accurate models of sheet metal parts. This section introduces you to the tools and techniques for designing with sheet metal, from initial concept to ready-for-manufacturing models.
- Understanding Sheet Metal Fundamentals: Begin with an overview of sheet metal design principles, including material properties, manufacturing processes, and the importance of design considerations like bend allowance and k-factor.
- Creating a Sheet Metal Part: Learn how to start a new sheet metal project in Inventor, using the software’s specialized tools to create your base face, flanges, and tabs, applying proper bend reliefs and corners.
- Applying Sheet Metal Rules: Discover how to apply and modify sheet metal rules that govern the default parameters such as thickness, bend radius, and relief shape, ensuring your designs are manufacturable.
- Converting Parts to Sheet Metal: Convert standard parts into sheet metal components by defining a base face and bends, allowing for the creation of complex sheet metal parts from existing models.
- Adding Features: Add essential features like louvers, flanges, and ribs to your sheet metal parts, enhancing their functionality and strength while considering manufacturing requirements.
- Flat Pattern Creation: Understand the process of creating a flat pattern from your 3D sheet metal model, which is crucial for manufacturing and provides a 2D representation of the part for cutting and bending.
- Documenting for Fabrication: Generate detailed drawings from your sheet metal models, including flat patterns with annotations, bend tables, and dimensions, to communicate your design intent to fabricators.
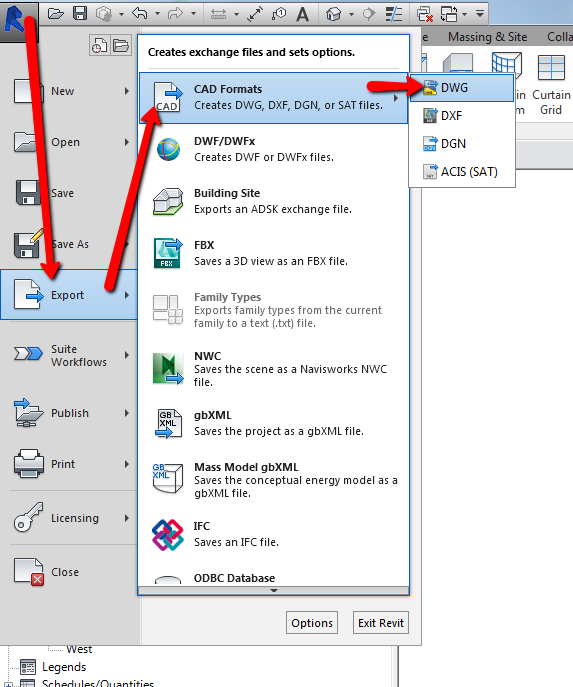
- Exporting for Manufacturing: Learn how to export your sheet metal designs in formats compatible with manufacturing equipment, such as DXF or DWG, ensuring a smooth transition from design to production.
With these foundational skills in sheet metal design using Autodesk Inventor, you\"ll be equipped to tackle projects that require precise, manufacturable sheet metal components.

Working with Weldments and Frames
Autodesk Inventor simplifies the design and assembly of weldments and frames, allowing for the efficient creation of complex structures. This section guides you through the tools and processes for building robust frames and adding welds to your designs.
- Introduction to Frame Design: Start by understanding the basics of frame design, including the selection of standard profiles and the use of Inventor’s Frame Generator to create frames for your projects.
- Creating a Frame Assembly: Learn how to use the Frame Generator to select, place, and trim frame members to fit your design requirements. Understand how to apply end treatments and notches for a precise fit.
- Inserting Frame Components: Discover how to insert additional components into your frame design, such as gussets and brackets, to increase the strength and functionality of your assembly.
- Applying Welds: Get to know the Weld Environment in Inventor, which allows you to apply fillet and groove welds to your assemblies. Learn to specify the size, type, and location of welds for accurate fabrication documentation.
- Weldment Drawings and Documentation: Generate detailed drawings of your weldments, including weld symbols, annotations, and bills of materials that include all components and welds.
- Analyzing Frame Strength: Use Inventor’s built-in analysis tools to simulate loads and stresses on your frame, ensuring the design meets required strength and safety standards.
- Optimizing Frame Designs: Learn tips for optimizing your frame designs for weight, cost, and manufacturability, including the selection of appropriate materials and profiles.
- Exporting for Fabrication: Finally, prepare your frame and weldment designs for fabrication by exporting detailed plans and cut lists, ensuring a seamless transition from design to production.
By mastering these techniques for working with weldments and frames in Autodesk Inventor, you’ll be able to design and document complex structures with confidence and efficiency.

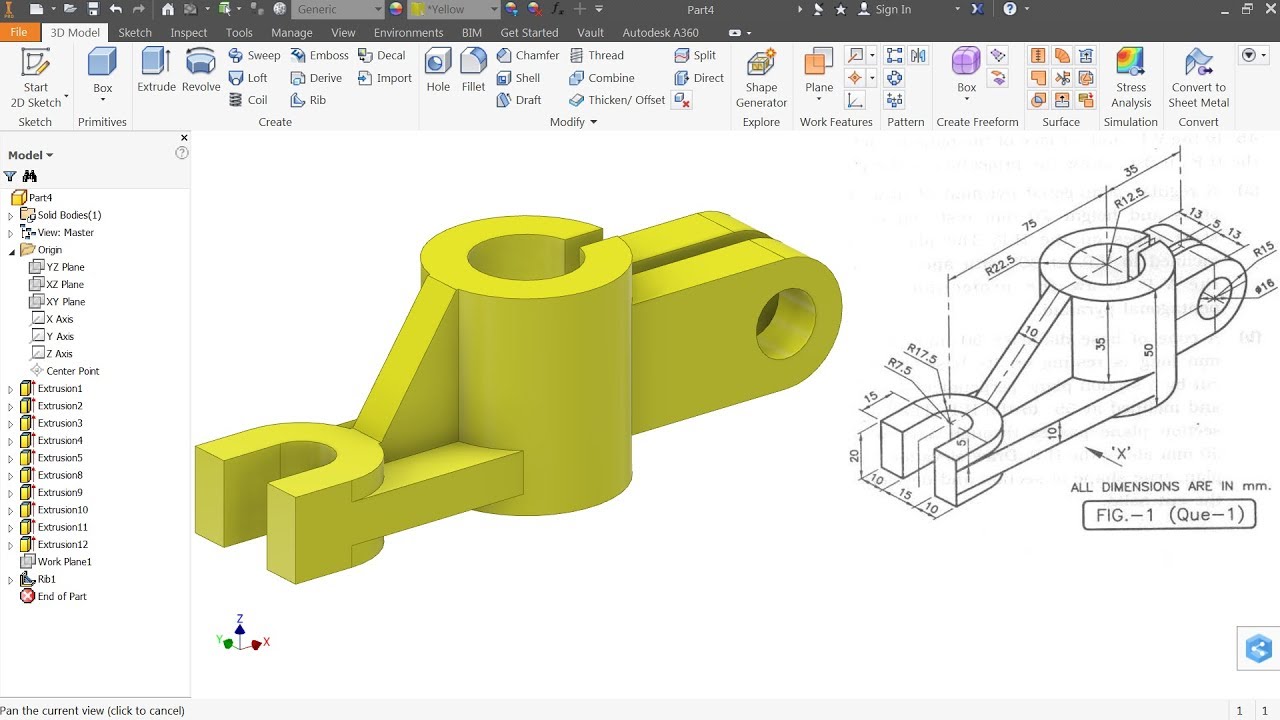
Autodesk Inventor Tutorial for Beginners: Exercise 1
Looking to enhance your design skills? Join us in this Autocad tutorial as we walk you through the essential tools and techniques to create stunning 2D and 3D drawings. Don\'t miss out on this opportunity to take your architectural and engineering projects to the next level!
Autodesk Inventor Tutorial for Beginners
Want to master Autocad? Our comprehensive tutorial is packed with step-by-step instructions, tips, and tricks to help you become a pro at this powerful software. Whether you\'re a beginner or experienced user, our tutorial will empower you to create impressive designs with ease. Start watching now and unlock your creative potential!
Design Automation and Configurations
Autodesk Inventor\"s capabilities for design automation and configurations empower users to streamline their workflows and create customizable designs efficiently. This section explores how to leverage Inventor\"s tools to automate repetitive tasks and configure designs for various requirements.
- Understanding iLogic: Begin with an introduction to iLogic, Inventor’s built-in tool for design automation. Learn how iLogic allows you to create rules that automate and standardize design processes.
- Creating iLogic Rules: Learn the basics of writing iLogic rules, including how to control parameters, features, and properties to automate design changes and configurations.
- Using Parameters for Configurations: Discover how to use user-defined and model parameters to drive design changes, enabling the creation of configurable parts and assemblies.
- Developing Configurable Templates: Create templates for commonly used designs that can be quickly customized through parameters and iLogic rules, significantly reducing design time for similar projects.
- Implementing Conditional Logic: Apply conditional logic in iLogic to create smart designs that adapt based on specific criteria, enhancing the flexibility and intelligence of your models.
- Automating Documentation: Use iLogic to automate the generation of bills of materials (BOMs), parts lists, and drawing annotations, ensuring that documentation keeps pace with design changes.
- Sharing and Collaborating on Configurable Designs: Understand how to share your configurable designs with others, maintaining the integrity of your iLogic rules and ensuring that collaborators can adapt designs as needed.
- Best Practices for Design Automation: Learn best practices for implementing design automation and configurations in your projects, including tips for rule management, testing, and documentation.
By integrating design automation and configurations into your workflow with Autodesk Inventor, you can significantly enhance efficiency, reduce errors, and create more versatile and adaptable designs.

Simulation and Stress Analysis Basics
Understanding the fundamentals of simulation and stress analysis in Autodesk Inventor is crucial for designing parts and assemblies that are both efficient and reliable. This section covers the basics of setting up and interpreting simulations to ensure your designs can withstand real-world conditions.
- Introduction to Simulation: Start with an overview of the simulation features in Inventor, including the types of analysis available such as static stress, dynamic analysis, and modal analysis.
- Preparing Your Model for Simulation: Learn the steps for preparing your model for simulation, including simplifying geometry, applying materials, and defining boundary conditions to accurately represent real-world constraints.
- Applying Loads and Constraints: Discover how to apply various types of loads (force, pressure, gravity) and constraints to your model, simulating the conditions your design will face in operation.
- Meshing Your Model: Understand the importance of meshing in simulation, including how to control mesh size and density for accurate results without excessive computation times.
- Running the Simulation: Learn how to run simulations, including setting up analysis parameters and solving your model to obtain results.
- Interpreting Simulation Results: Gain insights into how to interpret the results of your simulations, including reading stress, displacement, and safety factor results to make informed decisions about your design.
- Making Design Modifications: Based on simulation outcomes, learn how to iterate on your design, making modifications to improve performance, reduce weight, or address areas of high stress.
- Reporting and Documentation: Finally, understand how to create reports and documentation from your simulation results, providing valuable insights into the design process and justifying design decisions.
By incorporating simulation and stress analysis into your Autodesk Inventor workflow, you can significantly enhance the reliability and performance of your designs, ensuring they meet or exceed operational requirements.

Introduction to CAM and 3D Printing with Inventor
Integrating Computer-Aided Manufacturing (CAM) and 3D printing into your Autodesk Inventor workflow opens up new possibilities for prototyping and production. This section provides an overview of how to use Inventor for CAM operations and 3D printing, from design to finished product.
- Overview of CAM in Inventor: Begin with an introduction to the CAM capabilities within Inventor, including the types of machining operations supported, such as milling, turning, and drilling.
- Preparing Your Design for Machining: Learn how to prepare your 3D models for machining, including setting up workpieces, selecting tools, and defining machining strategies to optimize manufacturing efficiency.
- Generating Toolpaths: Discover how to generate toolpaths for your designs, using Inventor\"s CAM tools to create efficient and effective paths for your cutting tools.
- Simulating Machining Operations: Use Inventor’s simulation features to preview and refine your machining operations, ensuring that the toolpaths are correct and the machining process is optimized for your equipment.
- Exporting CAM Data: Understand how to export CAM data to your machine’s control software, ensuring compatibility and a smooth transition from digital design to physical production.
- Introduction to 3D Printing with Inventor: Explore the basics of preparing models for 3D printing, including considerations for material selection, print orientation, and support structures.
- Slicing Your Model for 3D Printing: Learn about the process of slicing your model into layers for 3D printing, and how to use Inventor or external slicing software to prepare your design for printing.
- From Design to 3D Print: Finally, understand the workflow of taking a design from Inventor, through the slicing phase, and onto the 3D printer, culminating in a physical prototype or finished part.
By mastering the use of CAM and 3D printing with Autodesk Inventor, you can bring your designs to life with precision and efficiency, whether for prototyping or production.
_HOOK_
Customization and Advanced Tools
Autodesk Inventor offers extensive customization options and advanced tools to enhance productivity and meet specific design requirements. This section explores how to tailor Inventor to fit your workflow, utilizing its powerful features to their fullest potential.
- Customizing the User Interface: Learn how to customize the Inventor interface to suit your preferences, including modifying the ribbon, toolbars, and command aliases for faster access to frequently used functions.
- Using Application Options: Dive into the application options to adjust settings for part, assembly, and drawing environments, optimizing performance and workflow efficiency.
- Creating Custom Templates: Discover how to create custom templates for parts, assemblies, and drawings that include predefined settings, styles, and objects, speeding up the design process.
- Advanced Sketching Techniques: Explore advanced sketching techniques and tools, such as using equations and parameters for dynamic sketches, and importing external geometry to enhance sketch accuracy and creativity.
- Utilizing Advanced Assembly Tools: Get to know advanced assembly tools, including flexible components, assembly joints, and motion constraints, to simulate real-world movement and interactions within your designs.
- Implementing Design Automation: Further explore Inventor\"s design automation capabilities with iLogic, enhancing design efficiency through the use of rules-based engineering and automated part configurations.
- Advanced Surface Modeling: Learn about advanced surface modeling techniques to create complex shapes and surfaces, improving the aesthetic and functional aspects of your designs.
- Extending Inventor with Add-Ins: Understand how to extend Inventor\"s capabilities with add-ins, integrating additional functionality for simulation, CAM, 3D printing, and more, tailored to your specific project needs.
By customizing Autodesk Inventor and utilizing its advanced tools, you can significantly enhance your design capabilities, leading to more innovative solutions and efficient workflows.
Best Practices for Efficient Design Workflow
Adopting best practices for an efficient design workflow in Autodesk Inventor ensures productivity and reduces the time from concept to production. This section outlines key strategies to streamline your design process, improve quality, and enhance collaboration.
- Organize Your Project Files: Maintain a structured approach to organizing project files, using a consistent naming convention and folder structure to save time and avoid confusion.
- Use Templates: Leverage Inventor templates for parts, assemblies, and drawings to standardize design elements, saving time and ensuring consistency across projects.
- Master Sketching and Modeling Techniques: Develop proficiency in sketching and modeling techniques to create accurate and efficient designs. Fully define sketches to ensure stability and predictability in your models.
- Employ Design Accelerators: Utilize Inventor’s design accelerators for gears, frames, bolts, and more to automate the creation of complex features, enhancing both speed and accuracy.
- Implement iLogic for Automation: Use iLogic to automate repetitive tasks and create configurable designs, reducing manual input and minimizing errors.
- Regularly Check for Errors: Perform regular checks for modeling errors or conflicts, especially in assemblies, to catch and resolve issues early in the design process.
- Optimize Your Use of Assemblies: For large assemblies, use techniques such as simplification and subassemblies to improve performance and manage complexity.
- Collaborate Effectively: Take advantage of Inventor’s collaboration tools to share and review designs with team members, clients, and stakeholders, ensuring feedback is integrated efficiently.
- Stay Updated with Inventor Updates: Keep your software up to date to benefit from the latest features, improvements, and bug fixes, ensuring you’re working as efficiently as possible.
- Invest in Training and Development: Continuously improve your skills and knowledge in Inventor through training, tutorials, and community forums to stay proficient and competitive.
By incorporating these best practices into your workflow, you can maximize the capabilities of Autodesk Inventor, leading to a more efficient, productive, and successful design process.
READ MORE:
Tips and Tricks for Power Users
For those looking to elevate their Autodesk Inventor skills, mastering certain tips and tricks can significantly enhance efficiency and design capability. This section is dedicated to empowering power users with advanced techniques and shortcuts that streamline tasks and foster innovation.
- Keyboard Shortcuts: Memorize and utilize Inventor’s keyboard shortcuts for common actions to speed up your design process significantly.
- Custom Macros and Scripts: Create custom macros and scripts for repetitive tasks or complex operations to save time and ensure consistency across projects.
- Efficient Sketching Strategies: Use sketch constraints and dimensions effectively to create flexible, easily modifiable sketches that serve as a strong foundation for your designs.
- Feature and Part Reuse: Leverage the Content Center and iParts for feature and part reuse to streamline the creation of new models based on existing designs.
- Advanced Assembly Techniques: Utilize advanced assembly techniques such as skeletal modeling and top-down design for complex assemblies to maintain control and flexibility.
- Effective Use of Work Features: Master the use of work planes, axes, and points to create more dynamic and adaptable models.
- Parametric and Adaptive Design: Enhance your designs with parametric and adaptive features to create smart models that can easily be modified to meet different requirements.
- Surface Modeling Mastery: Develop your surface modeling skills to tackle complex shapes and aesthetic features, enhancing the visual appeal and functionality of your designs.
- Optimization with Simulation Tools: Use Inventor’s simulation tools early and often in your design process to optimize designs for performance and manufacturability.
- Stay Informed on Latest Features: Keep up to date with the latest Inventor updates and features, and incorporate them into your workflow to stay ahead of the curve.
By integrating these tips and tricks into your daily use of Autodesk Inventor, you can unlock new levels of productivity and creativity, setting your designs apart from the competition.
Embark on your Autodesk Inventor journey with confidence, armed with the knowledge from these tutorials. Enhance your design skills, unlock new possibilities, and bring your innovative visions to life with efficiency and precision.