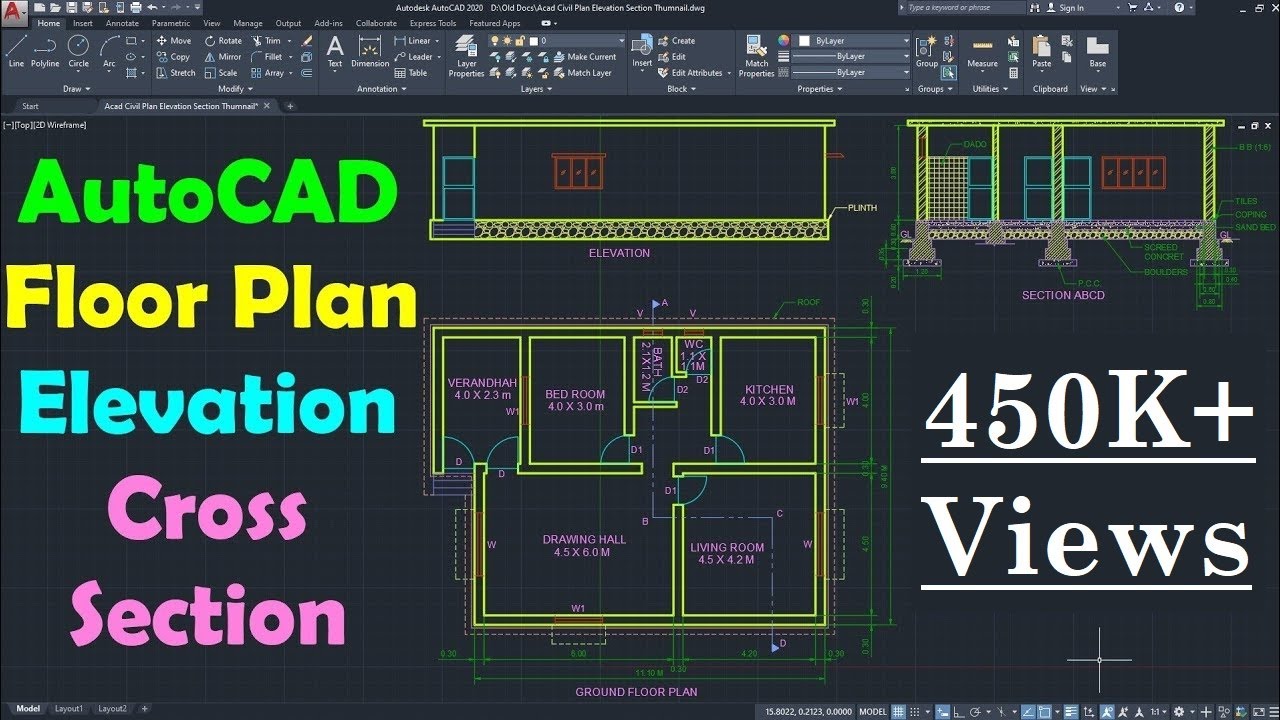
Topic autocad tutorial for civil engineers: Dive into our comprehensive AutoCAD tutorial for civil engineers, designed to equip you with the skills to create precise designs and elevate your engineering projects. Start mastering AutoCAD today and transform your conceptual ideas into reality.
Table of Content
- How to get started with AutoCAD for civil engineers?
- Getting Started with AutoCAD for Civil Engineering
- Understanding AutoCAD Interface and Basic Operations
- Creating Precise 2D Drawings and 3D Models
- Advanced Sketching, Editing, and Drawing Aids
- Annotation Techniques in AutoCAD Drawings
- Mastering Hatching, Blocks, and Block Attributes
- YOUTUBE: Best Healthy Recipes for Breakfast, Lunch, Dinner, and Snacks Your new corresponding title is: Best Healthy Recipes: Breakfast, Lunch, Dinner, Snacks
- External References and Layout Management
- Efficient Use of Design Center and Tool Palettes
- Project Management Features in AutoCAD
- Working with Surveys and Geospatial Data
- Designing Roads, Grading, and Drainage Systems
- Calculating Material Quantities and Costs
- Integrating AutoCAD with Civil 3D for Enhanced Projects
- Exploring Alternative CAD Software for Civil Engineers
- Improving Efficiency and Productivity in AutoCAD
- Engaging with Online Communities for Support and Learning
How to get started with AutoCAD for civil engineers?
To get started with AutoCAD for civil engineers, you can follow these steps:
- Download and install AutoCAD: Visit the official AutoCAD website and download the software. Once downloaded, run the installer and follow the on-screen instructions to install AutoCAD on your computer.
- Launch AutoCAD: After installation, open AutoCAD by double-clicking on the desktop icon or searching for it in your computer\'s applications.
- Set up the workspace: When AutoCAD opens, you will see a workspace with various tabs and panels. You can customize the workspace according to your preference. To set up the workspace for civil engineering, follow these steps:
- Click on the \"Workspace\" dropdown in the top menu bar and select \"3D Modeling\" or \"Drafting & Annotation\" depending on your requirements.
- Click on the \"Home\" tab in the top menu bar to access common tools and commands.
- Customize the interface by rearranging or docking the panels according to your workflow.
- Learn basic navigation: Familiarize yourself with the navigation tools in AutoCAD to move around the drawing area. Some essential navigation commands include:
- Pan: Click and drag the middle mouse button to move the view horizontally and vertically.
- Zoom: Use the scroll wheel on your mouse to zoom in and out. Alternatively, you can use the \"+\" and \"-\" keys on the keyboard.
- Orbit: Press and hold the Shift key, then click and drag the middle mouse button to orbit the view around a specific point.
- Zoom Extents: Press the \"Z\" key and then \"E\" to zoom to the extents of the drawing.
- Learn basic drawing commands: AutoCAD offers a wide range of drawing commands that you can use to create 2D and 3D objects. Some essential drawing commands for civil engineers include:
- Line: Draw a straight line segment by specifying two points.
- Polyline: Draw a series of connected line segments.
- Circle: Create a circle by specifying its center point and radius.
- Arc: Draw an arc by specifying three points (start, center, and end).
- Rectangle: Create a rectangular shape by specifying two corner points.
- Practice with tutorials: There are numerous online tutorials and resources available to help you learn AutoCAD for civil engineering. Take advantage of these tutorials to practice and enhance your skills.
- Explore advanced features: Once you have a solid foundation in AutoCAD, you can explore advanced features and functionalities specific to civil engineering. These may include commands for creating profiles, cross-sections, surface modeling, and more.
READ MORE:
Getting Started with AutoCAD for Civil Engineering
Welcome to the world of AutoCAD for Civil Engineering, a comprehensive guide designed for beginners and professionals alike. This section will introduce you to the fundamentals of AutoCAD, a powerful design and drafting software used by civil engineers worldwide. Learn how to navigate the interface, use basic commands, and start drafting simple 2D and 3D models.
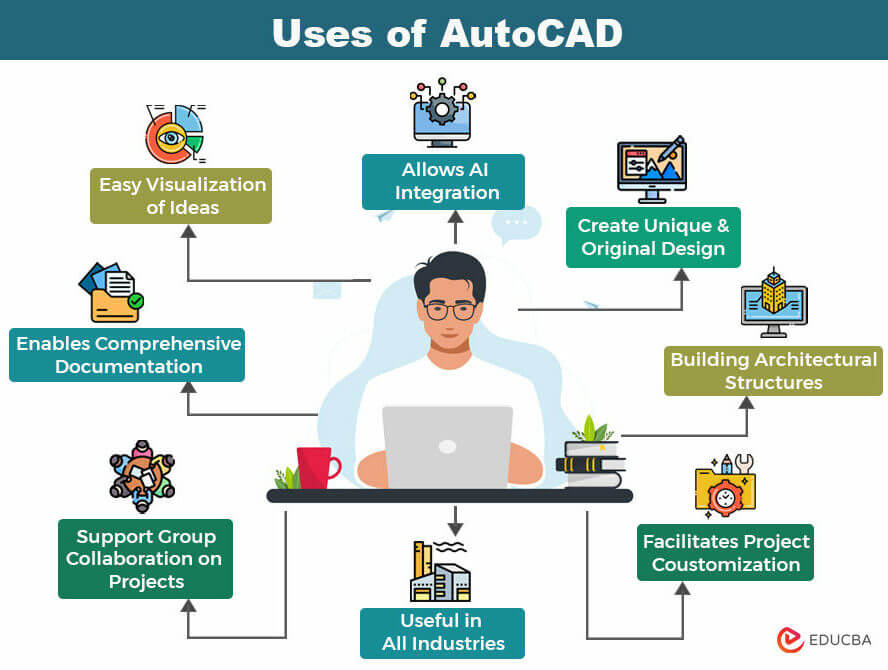
- Introduction to AutoCAD: Understand what AutoCAD is, its significance in civil engineering, and an overview of its capabilities.
- Navigating the Interface: Familiarize yourself with the AutoCAD workspace, including toolbars, the ribbon, command line, and drawing area.
- Setting Up a Project: Learn how to set up your first project, including units, drawing limits, and layers to organize your work effectively.
- Basic Drawing Tools: Get to grips with fundamental drawing commands like LINE, POLYLINE, CIRCLE, and RECTANGLE to create your initial designs.
- Modifying Objects: Discover how to edit your designs with commands like MOVE, COPY, ROTATE, and TRIM to refine your drawings.
- Creating Simple 3D Models: Introduction to basic 3D modeling techniques for visualizing civil engineering projects.
By the end of this section, you\"ll have a solid foundation to confidently explore more advanced topics and tools in AutoCAD, enabling you to bring your civil engineering projects to life with precision and efficiency.

Understanding AutoCAD Interface and Basic Operations
Mastering the AutoCAD interface is the first step toward becoming proficient in civil engineering design. This section will guide you through the layout and essential operations of AutoCAD, enabling you to navigate the software with confidence and start creating your designs efficiently.
- The AutoCAD Workspace: Learn about the various components of the AutoCAD interface, including the Ribbon, Tool Palettes, Command Line, Status Bar, and Drawing Area. Understand how to customize the workspace to suit your workflow.
- Basic Drawing Commands: Get acquainted with the core drawing tools like LINE, CIRCLE, RECTANGLE, and POLYLINE. Discover how to initiate commands using the command line, toolbars, or ribbons.
- Using the Command Line: Explore the power of the command line for efficient drawing and editing. Learn about AutoComplete, command aliases, and repeating the last command.
- Object Snapping: Master object snaps (Osnap) for precision drawing. Understand how to use endpoint, midpoint, center, and intersection snaps to align objects perfectly.
- Layer Management: Discover the importance of layers in organizing your drawing. Learn how to create, modify, and assign objects to layers for better control over your designs.
- Properties and Measurements: Understand how to use the Properties palette to inspect and modify the attributes of selected objects. Learn the basics of measuring distances and areas within your drawing.
- Zooming and Panning: Navigate through your drawings with ease using zoom and pan. Understand the different methods to view your project in detail or see the big picture.
This foundational knowledge will set you up for success as you progress to more complex designs and projects in AutoCAD, enhancing your capability to tackle civil engineering challenges with precision.
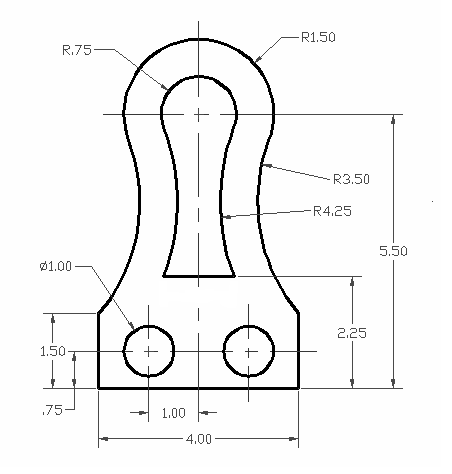
Creating Precise 2D Drawings and 3D Models
Developing accurate 2D drawings and 3D models is a critical skill for civil engineers using AutoCAD. This section delves into techniques and strategies to ensure precision in your designs, from initial sketches to complex models, enabling you to convey your engineering ideas effectively.
- Starting with 2D Drawings: Begin by creating basic geometrical shapes. Learn to use commands like LINE, POLYLINE, CIRCLE, and ARC, ensuring each element is precisely placed using object snaps.
- Dimensioning: Add dimensions to your 2D drawings to specify distances and angles. Understand how to use the DIM command for accurate measurements, facilitating clear communication and fabrication.
- Layers and Properties: Organize your drawings by assigning elements to layers. Utilize layer properties to manage visibility, color, and linetype, making your drawings more readable and easier to edit.
- Transition to 3D Modeling: Elevate your designs from 2D to 3D by learning the basics of 3D modeling. Explore commands like EXTRUDE, REVOLVE, and SWEEP to create solid objects from your 2D sketches.
- Applying Materials and Textures: Enhance your 3D models by applying materials and textures, giving a realistic appearance to your designs. Learn how to use the MATERIALS command to browse and apply finishes.
- Lighting and Rendering: Introduce lighting to your 3D models to highlight features and improve realism. Utilize the RENDER command to create high-quality visualizations of your designs.
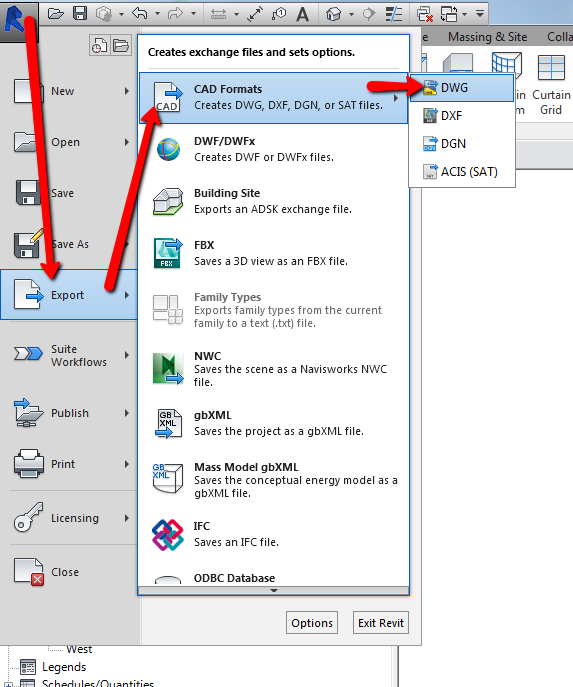
- Exporting and Sharing: Learn how to export your 2D drawings and 3D models for sharing with stakeholders or for further analysis. Understand the various file formats supported by AutoCAD and their uses.
By mastering these skills, you will be able to create detailed and precise 2D drawings and 3D models that accurately represent civil engineering projects, from infrastructure to construction plans.
Advanced Sketching, Editing, and Drawing Aids
Unlock the full potential of AutoCAD with advanced sketching, editing, and drawing aids designed for civil engineers. This section explores sophisticated tools and techniques that enhance precision, efficiency, and creativity in your civil engineering projects.
- Dynamic Blocks: Learn to create and modify dynamic blocks, which offer flexibility and efficiency by allowing you to adjust the shape, size, or configuration of your blocks on the fly.
- Parametric Constraints: Understand how to use parametric constraints to maintain relationships and geometrical constraints between objects, ensuring your designs adhere to specified standards and changes are automatically updated across your drawing.
- Advanced Editing Tools: Master advanced editing tools such as ALIGN, STRETCH, and LENGTHEN, which enable precise manipulation of drawing elements to meet complex design requirements.
- Customization Techniques: Customize the AutoCAD interface and toolsets to streamline your workflow. Learn to create custom tool palettes, command aliases, and macros for repetitive tasks.
- Using External References (Xrefs): Efficiently manage large projects by attaching external references. Learn how to insert other drawings, images, or PDFs as Xrefs and maintain a link to the original file for easy updates.
- Layouts and Viewports: Create and customize layouts and viewports for printing. Understand how to set up multiple views of your model on a single sheet, including setting scale and annotative properties for accurate output.
- Data Extraction: Extract information from your drawings for use in tables or external files. Learn how to use the DATAEXTRACTION command to generate bills of materials, schedules, or other reports.
By incorporating these advanced techniques into your AutoCAD skill set, you\"ll be able to tackle more complex civil engineering challenges, streamline your design process, and deliver high-quality results with greater efficiency.

_HOOK_
Annotation Techniques in AutoCAD Drawings
Effective annotation is key to creating clear and comprehensible AutoCAD drawings for civil engineering projects. This section covers essential annotation techniques, helping you communicate detailed information within your drawings accurately and efficiently.
- Text and Multiline Text: Learn to use TEXT and MTEXT commands for adding single or multiline text annotations. Customize text style, font, and size to ensure legibility and consistency across your project documentation.
- Leaders and Dimensioning: Master the use of LEADER and various dimensioning commands (DIMLINEAR, DIMALIGNED, DIMRADIUS, etc.) to guide readers through your drawings. Understand how to apply appropriate dimension styles and leader lines to indicate measurements and notes.
- Hatching Patterns: Utilize hatching to represent different materials and areas within your designs. Explore the use of the HATCH command to apply patterns and control their scale, angle, and color for effective visual communication.
- Tables and Schedules: Incorporate tables into your drawings to summarize quantities, specifications, and other project data. Learn to create and customize tables using the TABLE command, enhancing your drawing\"s informational value.
- Using Fields: Automate the inclusion of dynamic data within your annotations through fields. Discover how to insert fields that can display attributes like date, filename, or drawing properties, which automatically update as your project evolves.
- Annotation Scaling: Ensure your text, dimensions, and other annotations are correctly sized across different viewports and scales. Practice setting up annotation scales to maintain readability and consistency in various drawing views.
- Layer Management for Annotations: Organize your annotations on separate layers for better control over visibility and appearance. Learn strategies for layer naming and usage to streamline the management of annotated elements.
Adopting these annotation techniques in AutoCAD will significantly improve the clarity and professional appearance of your civil engineering drawings, ensuring that they convey all necessary project details effectively.

Mastering Hatching, Blocks, and Block Attributes
Efficient use of hatching, blocks, and block attributes in AutoCAD enhances the quality and productivity of civil engineering drawings. This section provides a step-by-step guide to mastering these essential elements, ensuring your projects are both detailed and efficiently executed.
- Hatching Techniques: Explore the use of the HATCH command for filling areas in your drawings to represent materials, objects, or special areas. Learn how to select patterns, adjust scale, and apply hatch boundaries for effective visual representation.
- Creating and Using Blocks: Blocks are essential for reusing geometry. Discover how to create blocks from common drawing elements, save them, and insert them into your drawings. Understand the benefits of using blocks for consistency and drawing efficiency.
- Block Attributes: Enhance your blocks with attributes for dynamic text, such as part numbers or specifications that can vary from one instance of the block to another. Learn how to define attributes, insert them into blocks, and edit attribute information.
- Dynamic Blocks: Take your block creation to the next level with dynamic blocks. Understand how to add parameters and actions to your blocks, making them adjustable for different situations without needing to create multiple block variations.
- Managing Block Libraries: Organize your blocks into libraries for easy access and sharing among team members. Learn strategies for creating and managing a block library, ensuring you can quickly find and use the right blocks for any project.
- Advanced Hatching and Editing: Master advanced hatching techniques, such as using gradients, custom patterns, and editing hatch properties post-application. Learn how to refine hatch applications for clarity and visual appeal in your designs.
By incorporating these advanced techniques into your AutoCAD workflow, you can significantly improve the detail, readability, and efficiency of your civil engineering drawings, making your design process more productive and your final outputs more professional.
Best Healthy Recipes for Breakfast, Lunch, Dinner, and Snacks Your new corresponding title is: Best Healthy Recipes: Breakfast, Lunch, Dinner, Snacks
Healthy: Discover simple and delicious healthy recipes that will nourish your body and make you feel amazing. Learn how to create nutrient-packed meals that are both tasty and good for you. Recipes: Get ready to be inspired by a wide range of recipes from around the world. Whether you\'re a beginner or an experienced cook, there\'s something here for everyone. Join us on a culinary journey and unleash your inner chef. Breakfast: Start your day off right with a mouthwatering variety of breakfast recipes. From hearty classics to innovative twists, we\'ve got you covered. Say goodbye to the morning rush and hello to a satisfying and delicious start to your day. Lunch: Tired of the same boring sandwiches for lunch? Explore a world of exciting lunchtime options that will satisfy your taste buds and keep you energized throughout the day. From light salads to hearty soups, discover a whole new way to enjoy your midday meal. Dinner: Take your evening meals to the next level with our collection of dinner recipes. Say goodbye to repetitive dishes and hello to flavorful, satisfying dinners that will impress your family and friends. Discover new flavors and get creative in the kitchen. Snacks: Say goodbye to unhealthy snacks and hello to delicious, guilt-free treats. Whether you\'re craving something sweet or savory, our collection of snack recipes has got you covered. Enjoy flavorsome snacks that will keep you feeling satisfied and fuelled throughout the day.
External References and Layout Management
Effective management of external references (Xrefs) and layouts is crucial for complex civil engineering projects in AutoCAD. This section guides you through incorporating external drawings and managing paper space layouts to streamline your design process.
- Understanding External References: Learn the concept of using Xrefs in your projects. External references allow you to include other CAD files in your drawing without increasing file size, facilitating easier collaboration and file management.
- Attaching Xrefs: Explore the steps to attach an external reference. Understand how to navigate the Xref Manager, choose between attachment and overlay options, and manage file paths to ensure references remain linked.
- Managing Xref Layers: Gain insights on controlling the visibility and appearance of layers from Xref files. Learn techniques to override Xref layer properties within your drawing for better integration and clarity.
- Layouts and Viewports: Master the creation and customization of paper space layouts. Discover how to set up multiple viewports within a layout, each with different scales and views of your model, to prepare your drawing for printing or publication.
- Plotting and Publishing: Finalize your project by learning the plotting process. Understand how to configure plot settings, select paper sizes, and manage plot styles to ensure your drawings are accurately reproduced on paper or digital formats.
- Using Page Setups: Streamline your printing and plotting workflow with page setups. Save your plot configurations as page setups to quickly apply consistent plot settings across different layouts and projects.
By mastering external references and layout management in AutoCAD, you can enhance the efficiency of your civil engineering projects, ensuring accurate, organized, and professionally presented drawings.

Efficient Use of Design Center and Tool Palettes
AutoCAD\"s Design Center and Tool Palettes are powerful features that enhance efficiency and productivity in civil engineering design. This section will guide you through maximizing these tools for your projects, streamlining your workflow and ensuring consistency across your designs.
- Exploring Design Center: Discover how to access and navigate the Design Center. Learn to import blocks, layers, styles, and other elements from existing drawings into your current project, saving time and ensuring consistency.
- Customizing Tool Palettes: Understand how to customize and organize your Tool Palettes. Add frequently used commands, blocks, and tools to a palette for quick access, reducing drawing time and improving efficiency.
- Creating and Sharing Tool Palettes: Learn the steps to create your own tool palettes tailored to specific project needs. Explore methods for sharing these palettes with team members to standardize design processes across your organization.
- Managing Content with Design Center: Utilize the Design Center for managing and reusing content such as drawings, blocks, hatches, and more. Understand how to search for specific items and how to incorporate them into your current drawing efficiently.
- Importing Layouts and Styles: Leverage the Design Center to import layouts and styles from other drawings. This feature enables you to maintain consistent presentation standards across various projects.
- Utilizing Drag and Drop Features: Maximize productivity by using the drag-and-drop functionality of the Design Center and Tool Palettes. This simple yet effective method allows for quick insertion of blocks, styles, and other elements into your drawings.
By mastering the Design Center and Tool Palettes, civil engineers can significantly enhance their drawing efficiency, maintain high standards of design consistency, and foster a collaborative working environment through the effective sharing of resources.

Project Management Features in AutoCAD
AutoCAD\"s project management capabilities are indispensable for civil engineers, offering tools to streamline workflow, enhance collaboration, and manage documents efficiently. This section highlights how to leverage these features to optimize your project management process.
- Sheet Set Manager: Learn how to use the Sheet Set Manager to organize your drawings into a single project file, making it easier to publish, transmit, and archive complete sets of drawings.
- Reference Manager: Understand the functionality of the Reference Manager for managing external references more efficiently. Keep track of Xrefs, images, and font files to ensure all dependencies are correctly linked and up to date.
- Data Linking: Discover how to link external data from spreadsheets or databases into your AutoCAD drawings. This feature allows for real-time updates, ensuring your drawings always reflect the most current information.
- Collaboration Tools: Explore collaboration tools that facilitate team-based design projects. Learn about sharing drawings and collaborating with stakeholders using AutoCAD\"s cloud-based services and mobile applications.
- Version Control: Utilize version control features to track changes over time. Learn how to compare different versions of a drawing, see what has changed, and revert to previous versions if necessary.
- Customization and Automation: Customize AutoCAD\"s project management features to fit your specific workflow needs. Use scripts, macros, and AutoLISP to automate repetitive tasks and increase efficiency.
By mastering these project management features, civil engineers can significantly improve the efficiency and accuracy of their design and documentation workflows, ensuring projects are completed on time and within budget.
_HOOK_
Working with Surveys and Geospatial Data
Integrating surveys and geospatial data into AutoCAD is crucial for civil engineers to create accurate and informed designs. This section outlines how to effectively work with this data, from importing survey information to utilizing geospatial tools within AutoCAD.
- Importing Survey Data: Discover the steps to import survey data into AutoCAD. Learn about different file formats, such as CSV or TXT, and how to use the DATAIMPORT command to bring this data into your drawings.
- Using Map 3D Toolset: Explore the capabilities of the AutoCAD Map 3D toolset for managing geospatial data. Understand how to add GIS and mapping data to your drawings, enhancing the context and accuracy of your designs.
- Coordinate Systems: Learn how to set up and use coordinate systems in AutoCAD to ensure your survey and geospatial data align correctly with your project. This includes defining geographic locations and transforming coordinates.
- Creating Topographic Maps: Utilize survey data to create detailed topographic maps. Understand how to use contour lines, elevation points, and surface analysis tools to represent the terrain in your designs accurately.
- Geolocation and Online Maps: Take advantage of AutoCAD\"s geolocation features to overlay online map services (like Bing Maps) onto your drawings. Learn how this real-world context can aid in planning and visualization.
- Analyzing Geospatial Data: Explore the tools available in AutoCAD for analyzing geospatial data. This includes performing queries, creating thematic maps, and extracting information to support your civil engineering decisions.
By effectively working with surveys and geospatial data, civil engineers can enhance the precision, relevance, and depth of their AutoCAD drawings, leading to better-informed design decisions and project outcomes.
Designing Roads, Grading, and Drainage Systems
Creating efficient road networks and effective grading and drainage systems is a cornerstone of civil engineering projects. This section delves into the use of AutoCAD for designing these critical components, ensuring functionality and sustainability of infrastructure projects.
- Road Design Basics: Start with an overview of road design principles, including alignment, profile, and cross-sections. Learn how to use AutoCAD features to lay out roads, considering factors like curvature, grade, and safety standards.
- Grading Plans: Explore how to create grading plans in AutoCAD, which are essential for managing water flow and preventing erosion. Understand the tools for modeling land surfaces, calculating volumes, and designing slopes to ensure proper drainage and structural integrity.
- Designing Drainage Systems: Learn the steps to design comprehensive drainage systems using AutoCAD. This includes the placement of stormwater management facilities, culverts, and sewer lines to effectively remove water and prevent flooding.
- Utilizing Civil 3D: For more advanced projects, delve into AutoCAD Civil 3D, a specialized toolset that offers enhanced features for civil engineering tasks. Discover how Civil 3D integrates with AutoCAD to streamline the design of roads, grading, and drainage systems.
- Applying Geotechnical Data: Understand how to incorporate geotechnical data into your designs to make informed decisions about soil stability, excavation needs, and foundation requirements.
- Simulation and Analysis: Use AutoCAD\"s simulation tools to analyze traffic flow, water runoff, and environmental impact. This predictive analysis helps refine designs for better performance and compliance with regulations.
By mastering these techniques in AutoCAD, civil engineers can ensure their road, grading, and drainage designs meet the necessary standards and contribute to the creation of resilient and efficient infrastructure.
Calculating Material Quantities and Costs
Accurately estimating material quantities and costs is essential for the planning and budgeting of any civil engineering project. AutoCAD provides tools and features to assist in these calculations, ensuring projects stay on budget and resources are used efficiently.
- Using AutoCAD\"s Measure Tools: Learn how to utilize AutoCAD\"s measure tools to calculate areas, volumes, and lengths directly from your drawings. This step is crucial for determining the quantities of materials needed for construction.
- Data Extraction: Extract information from your drawings to create detailed material lists. Explore the DATAEXTRACTION command to select objects and extract their properties into a table format, which can be used for further analysis and costing.
- Creating Dynamic Blocks with Attributes: Dynamic blocks can include attributes that specify material types and quantities. Discover how to create and use these blocks to streamline the calculation of material quantities as designs change.
- Linking with Excel: Understand how to link your AutoCAD drawings with Excel spreadsheets. This connection allows for real-time updates to material cost estimates as design changes occur, facilitating accurate budgeting and cost management.
- Applying Cost Analysis: After calculating material quantities, apply cost analysis techniques to determine the overall budget for your project. Learn to assign unit costs to materials and sum total costs for comprehensive budgeting.
- Visualization for Stakeholder Presentations: Use AutoCAD\"s visualization tools to create compelling presentations for stakeholders. Highlighting material choices and their associated costs can help in securing project approvals and funding.
Mastering these techniques in AutoCAD enables civil engineers to accurately estimate material quantities and costs, leading to more efficient project management and cost control throughout the construction process.
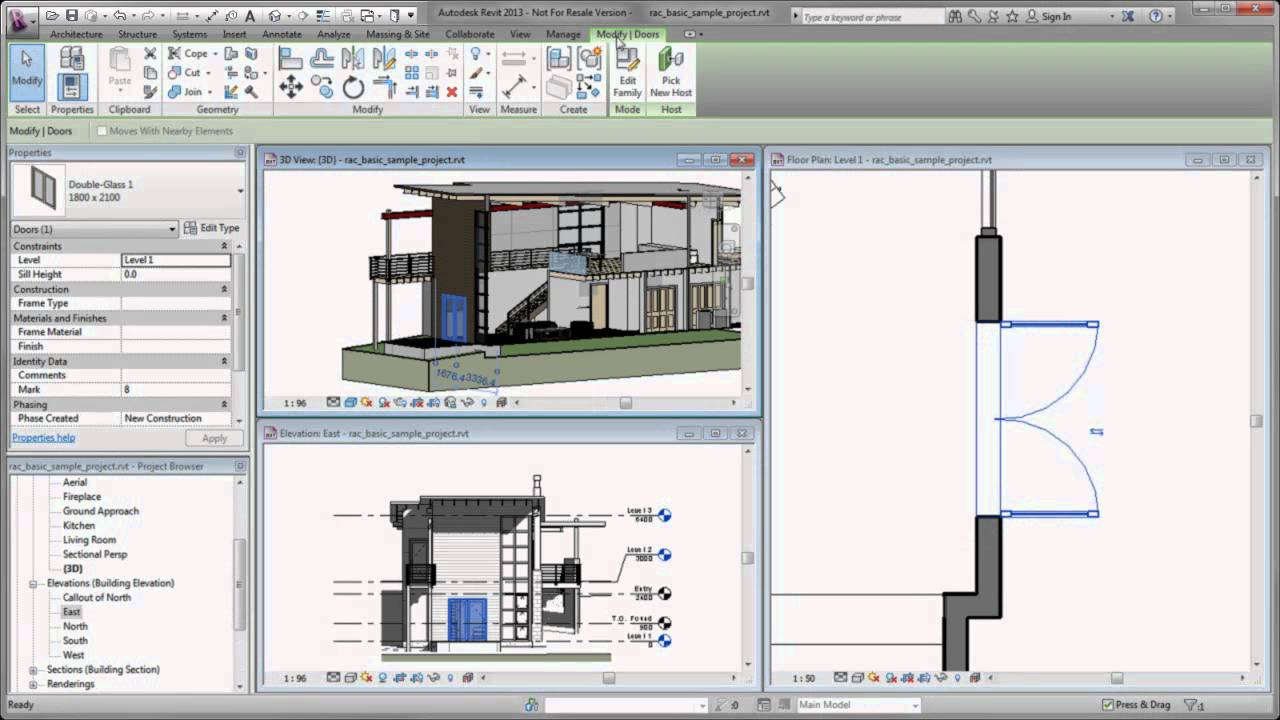
Integrating AutoCAD with Civil 3D for Enhanced Projects
Combining AutoCAD\"s drafting capabilities with Civil 3D\"s specialized civil engineering tools can significantly enhance project outcomes. This section explores how to leverage the integration of AutoCAD and Civil 3D to streamline workflows, improve accuracy, and deliver more sophisticated designs.
- Understanding the Integration: Begin by understanding how AutoCAD and Civil 3D work together. Civil 3D is built on AutoCAD\"s platform, providing additional civil engineering-specific functionalities, such as dynamic modeling, grading, and piping.
- Sharing Data Between Platforms: Learn to efficiently share data between AutoCAD and Civil 3D. This includes importing AutoCAD drawings into Civil 3D for further enhancement and exporting Civil 3D designs back to AutoCAD for documentation.
- Dynamic Models and Simulations: Take advantage of Civil 3D\"s dynamic modeling capabilities. Understand how changes in design elements automatically update related components, reducing manual adjustments and ensuring consistency across the project.
- Utilizing Civil 3D\"s Design Tools: Explore Civil 3D’s tools for road design, site layout, and water management. Learn how these tools can enhance your AutoCAD designs with more detailed and accurate civil engineering solutions.
- Collaboration and Project Management: Discover how integrating AutoCAD with Civil 3D can improve collaboration among team members. Use Civil 3D\"s project management tools to track changes, manage versions, and ensure that all stakeholders have access to the most current designs.
- Training and Resources: Acknowledge the importance of training for maximizing the integration benefits. Explore available resources, including Autodesk tutorials, online courses, and user communities, to build proficiency in using AutoCAD and Civil 3D together.
By integrating AutoCAD with Civil 3D, civil engineers can deliver more complex and accurate designs, streamline their workflows, and enhance collaboration across all stages of the project lifecycle.
Exploring Alternative CAD Software for Civil Engineers
While AutoCAD is a standard in the industry, exploring alternative CAD software can offer specialized features, innovative tools, and different pricing models that may better suit specific project needs. This section introduces several notable alternatives to AutoCAD for civil engineering applications.
- Bentley Systems MicroStation: Known for its robust modeling capabilities, MicroStation offers advanced features for civil engineering projects, including road, rail, terrain, and environmental design.
- Trimble Tekla Structures: Specializes in detailed 3D structural engineering design and modeling, Tekla Structures is ideal for managing complex structural projects, from bridges to skyscrapers.
- Dassault Systèmes CATIA: While known for its aerospace applications, CATIA also provides powerful tools for surface modeling and complex infrastructure design, making it a versatile choice for civil engineers.
- Graphisoft ArchiCAD: Focused on architectural design, ArchiCAD offers intuitive design and documentation tools for civil engineers involved in integrated building projects.
- Siemens PLM Software NX: Offers comprehensive capabilities for product design, engineering, and manufacturing, NX is suitable for civil engineers looking for a wide range of design and simulation tools.
- SketchUp: With its user-friendly interface, SketchUp is a great tool for conceptual design and visualization, making it popular among civil engineers for preliminary designs and client presentations.
Each of these CAD software options brings unique strengths to civil engineering projects. Evaluating them in the context of your specific needs can help determine the best fit for enhancing your design capabilities.
_HOOK_
Improving Efficiency and Productivity in AutoCAD
Maximizing efficiency and productivity in AutoCAD is essential for civil engineers to meet project deadlines and maintain high-quality designs. This section provides strategies and tips to streamline your AutoCAD workflow, enhancing your overall design process.
- Customizing the Workspace: Tailor your AutoCAD interface to fit your workflow. Customize toolbars, command aliases, and palette positions to reduce the time spent searching for frequently used functions.
- Using Keyboard Shortcuts: Learn and apply keyboard shortcuts for common commands to speed up your drawing process. Memorizing these shortcuts can significantly reduce your design time.
- Implementing Block Libraries: Create and maintain a library of commonly used blocks. This allows for quick insertion of standard components, saving time on drawing and ensuring consistency across projects.
- Leveraging Sheet Sets: Utilize sheet sets to organize your drawings efficiently. This feature helps manage multiple drawings within a project, streamlining printing and publishing tasks.
- Applying Data Extraction: Use data extraction tools to automatically generate tables and schedules from your drawings. This reduces manual counting and calculation errors, improving accuracy and saving time.
- Automating Repetitive Tasks: Automate repetitive tasks with scripts, macros, or AutoLISP routines. Automation can significantly increase productivity by reducing manual input for common operations.
- Staying Updated: Keep your software up to date and explore new features and tools offered in the latest versions. Regularly updating your skills can lead to more efficient design techniques.
By adopting these strategies, civil engineers can improve their efficiency and productivity in AutoCAD, leading to faster project completion times and higher-quality designs.
READ MORE:
Engaging with Online Communities for Support and Learning
Engaging with online communities is a valuable way for civil engineers to find support, share knowledge, and learn new AutoCAD techniques. These communities offer a platform for professionals to connect, ask questions, and share insights. This section highlights how to make the most of these resources.
- Autodesk Forums: Participate in the Autodesk forums, a place where users can ask questions, share tips, and connect with other AutoCAD users, including Autodesk technical support staff.
- LinkedIn Groups: Join AutoCAD and civil engineering groups on LinkedIn to network with professionals, discover job opportunities, and participate in industry discussions.
- Reddit Communities: Explore subreddits related to AutoCAD and civil engineering for informal advice, project feedback, and tutorials shared by a diverse user base.
- YouTube Channels: Follow YouTube channels dedicated to AutoCAD training and civil engineering. Video tutorials can be an excellent way to learn new techniques or software updates visually.
- Online Courses and Webinars: Enroll in online courses or attend webinars offered by educational platforms and industry leaders. These can provide structured learning paths and up-to-date knowledge on specific AutoCAD applications in civil engineering.
- Local User Groups: While primarily online, don\"t overlook the value of local user groups and meetups. These can offer opportunities for hands-on learning and networking with peers in your area.
By actively participating in these online communities, civil engineers can enhance their AutoCAD skills, stay informed about the latest industry trends, and build a supportive network of peers and mentors.
Embrace the journey of mastering AutoCAD for civil engineering with our comprehensive tutorials. Enhance your design skills, streamline your projects, and connect with a community of experts to bring your engineering visions to life.