Topic how to model a fnaf character in blender: Dive into the world of FNAF and Blender with our comprehensive guide, teaching you step-by-step how to bring your favorite animatronic characters to life with ease and creativity.
Table of Content
- How can I model a Fnaf character in Blender?
- Understanding FNAF Character Design and Blender Basics
- Choosing the Right Reference Images for Modeling
- Setting Up Blender for Character Modeling
- Modeling the Basic Shape of Your FNAF Character
- Detailing Your Character: Adding Textures and Colors
- Rigging Your FNAF Character for Animation
- YOUTUBE: FNAF Modeling Tutorial (Head)
- Animating Your FNAF Character: Basic Movements and Expressions
- Lighting and Rendering Your FNAF Character
- Tips for Optimizing Workflow in Blender
- Common Mistakes to Avoid When Modeling FNAF Characters
How can I model a Fnaf character in Blender?
Modeling a Fnaf character in Blender can be a fun and creative process. Here are the steps you can follow:
- Start by gathering reference images of the Fnaf character you want to model. These images will help you understand the character\'s shape, proportions, and details.
- Open Blender and create a new project.
- Select the default cube in the 3D viewport and press the \"X\" key followed by \"Delete\" to remove it.
- Import the reference images into Blender. To do this, go to the \"View\" menu at the top of the viewport and select \"Background Images\". Choose the appropriate view (Front, Side, Back, etc.) for each reference image and adjust their opacity to make them visible but not distracting.
- Next, add a new mesh object to start modeling the basic shape of the character. You can use various tools like the \"Cube\", \"Sphere\", or \"Cylinder\" to create the initial base.
- Using the reference images as a guide, start sculpting and shaping the mesh to match the character\'s proportions. Use tools like \"Grab\", \"Scale\", and \"Rotate\" to manipulate the mesh vertices.
- Continue refining the shape by adding more detail, such as facial features, limbs, and any other distinctive elements of the character. You can use tools like \"Extrude\", \"Subdivide\", and \"Proportional Editing\" to achieve this.
- To make the model symmetrical, you can enable the \"Mirror\" modifier. This will automatically mirror any changes you make on one side to the other.
- Once you\'re satisfied with the overall shape and details, go ahead and assign materials and textures to the different parts of the model. Use the \"Materials\" and \"Texture\" panels in Blender to do this.
- Finally, remember to save your model and you can also render it to see how it looks. Adjust lighting, cameras, and any other settings to achieve the desired result.
With practice and experimentation, you can create impressive Fnaf character models in Blender. Don\'t be afraid to explore different techniques and add your own personal touch to make the character truly unique!
READ MORE:
Understanding FNAF Character Design and Blender Basics
Before diving into modeling a FNAF character in Blender, it\"s crucial to grasp the foundational elements of FNAF character design alongside Blender\"s interface and tools. This section provides a roadmap to get started.
- Study FNAF Characters: Examine the unique features, proportions, and textures of FNAF characters. Pay attention to their iconic elements, such as facial expressions, body shapes, and accessories.
- Learn Blender\"s Interface: Familiarize yourself with Blender’s interface, focusing on the 3D viewport, object mode, edit mode, and sculpt mode. Understanding these areas is key to modeling.
- Basic Modeling Techniques: Get comfortable with basic modeling tools in Blender such as extrude, loop cut, and bevel. These tools are fundamental for creating the shapes and details of your character.
- Texturing and Materials: Learn about Blender\"s texturing options and how to apply materials to give your character color and realism.
- Rigging Basics: Introduction to rigging, which is essential for animating your character. Understand how to create a basic rig that can be used for movement.
By mastering these basics, you\"ll be well-prepared to tackle the more complex aspects of modeling a FNAF character in Blender, ensuring a solid foundation for your creative project.

Choosing the Right Reference Images for Modeling
Selecting appropriate reference images is a critical step in accurately modeling FNAF characters in Blender. This ensures your model is both accurate and detailed.
- Identify Character Specifics: Determine which FNAF character you want to model. Each character has unique features that must be captured accurately.
- Search for High-Quality Images: Look for high-resolution images that clearly show the character\"s front, side, and back views. This will help in creating accurate proportions and details.
- Include Close-Ups: Obtain close-up images of key details like the face, hands, and any accessories. These are essential for adding fine details to your model.
- Variety of Poses: Collect images of the character in different poses to understand the range of motion and how the character looks from various angles.
- Concept Art and Fan Art: Utilize official concept art and high-quality fan art for additional perspectives and inspiration.
- Organize Your References: Create a folder on your computer to keep all your reference images organized. This will make it easier to access them while modeling.
By carefully selecting and organizing your reference images, you\"ll create a solid foundation for your FNAF character modeling project, ensuring a more accurate and detailed final product.

Setting Up Blender for Character Modeling
Properly setting up Blender is essential for an efficient and effective character modeling process. This section guides you through configuring Blender to best suit FNAF character creation.
- Choose the Right Version of Blender: Ensure you have the latest version of Blender installed to access the newest features and tools for modeling.
- Configure User Preferences: Adjust Blender’s settings to your liking. This includes setting up your input devices, selecting your preferred theme, and configuring add-ons.
- Setup the Scene: Before starting your model, prepare your Blender scene. Set the unit scale to match real-world sizes for accurate modeling.
- Import Reference Images: Use the ‘Add’ menu to import your collected reference images into Blender. Position them in the front, side, and top views to guide your modeling process.
- Adjust Viewport Shading: Choose the shading mode that works best for you. Wireframe or solid view can be helpful during the early stages of modeling.
- Organize Your Workspace: Split your Blender window into multiple views so you can see different angles of your model simultaneously. This helps in maintaining proportion and symmetry.
- Create a Save File Structure: Develop a consistent file naming and saving routine. This ensures you can easily find and access different versions of your work.
With Blender correctly set up, you’re now ready to start the actual modeling process, with all tools and references at your disposal for creating a detailed FNAF character.

Modeling the Basic Shape of Your FNAF Character
Creating the basic shape of your FNAF character in Blender is the first step towards bringing your character to life. Follow these steps to model the foundational structure accurately.
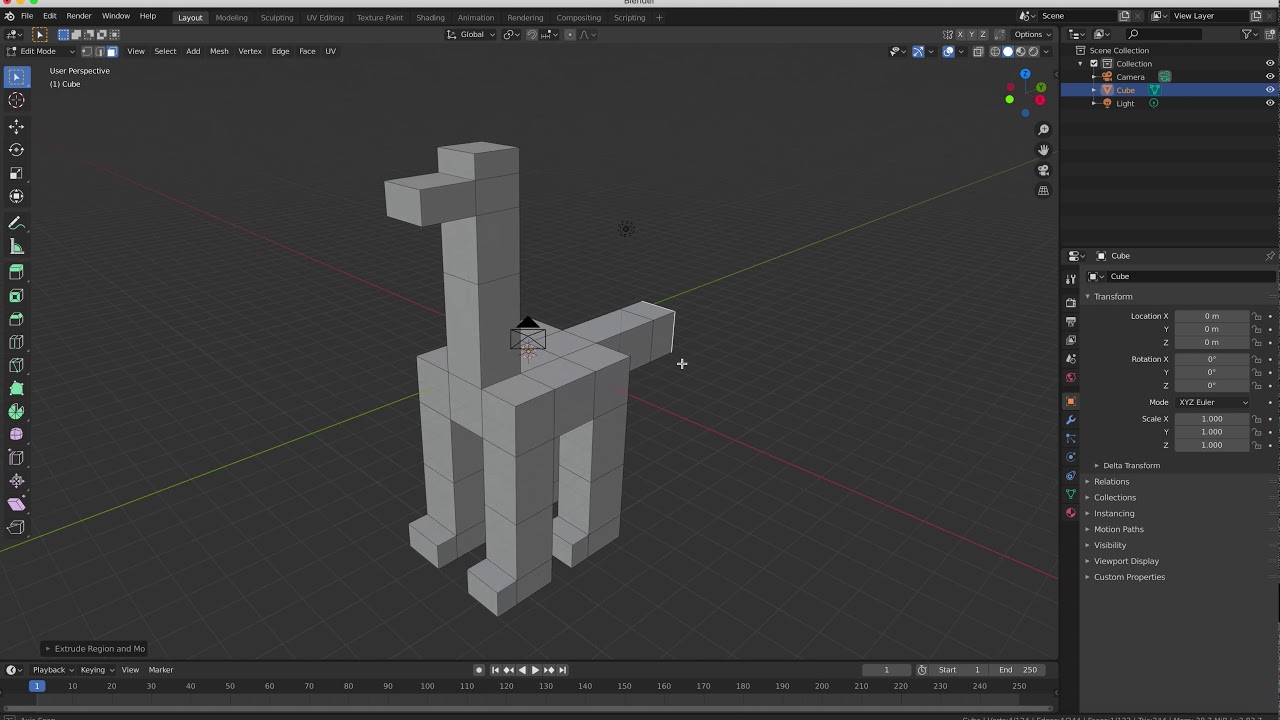
- Start with a Cube: Begin by adding a cube to your scene. This cube will serve as the starting point for your character\"s body.
- Modify the Cube: Use the scale, move, and rotate tools to adjust the cube into the basic shape of your character’s torso.
- Add More Geometry: Use the loop cut tool to add more geometry to your model. This allows for more detailed shaping in later steps.
- Extrude Limbs: Select faces where the limbs will be and use the extrude tool to create arms and legs. Adjust the scale to match the character\"s proportions.
- Shape the Head: Add a new sphere or cube to model the head, using reference images to guide the shaping process.
- Refine Shapes: Continuously refine the shapes of each body part, adjusting vertices, edges, and faces to closely match your reference images.
- Detailing: Begin adding basic details like eyes, mouth, and clothing by extruding or adding new geometry.
This process creates the basic structure of your FNAF character. With the foundational shape established, you can proceed to add details, textures, and colors in the following steps.
_HOOK_
Detailing Your Character: Adding Textures and Colors
After shaping the basic form of your FNAF character, the next step is to add textures and colors to bring your character to life. This phase involves several detailed steps to ensure your character looks as realistic as possible.
- Unwrap Your Model: Begin by unwrapping your model. This process involves projecting the 3D model onto a 2D surface to apply textures accurately.
- Select Textures: Choose textures that closely match the materials of the FNAF character you\"re modeling. This can include fabrics, metals, and skin textures.
- Apply Textures: Use Blender\"s shading editor to apply the selected textures to your model. Adjust the mapping and scaling to ensure they fit correctly on your character.
- Add Color: Colors can be added directly through the shading editor by adjusting the base color of the material. Pick colors that match the original character designs.
- Create Materials: For more complex surfaces like eyes, clothes, and accessories, create custom materials that mimic the look of these elements in real life.
- Adjust Lighting: Lighting plays a crucial role in how textures and colors appear. Experiment with different lighting setups to highlight the details of your character.
- Preview and Adjust: Continuously preview your model in different lighting and angles. Make adjustments to textures and colors as needed to achieve the desired look.
With textures and colors applied, your FNAF character will start to look more dynamic and realistic. This detailing phase is critical in transforming a basic model into a vibrant, life-like character.

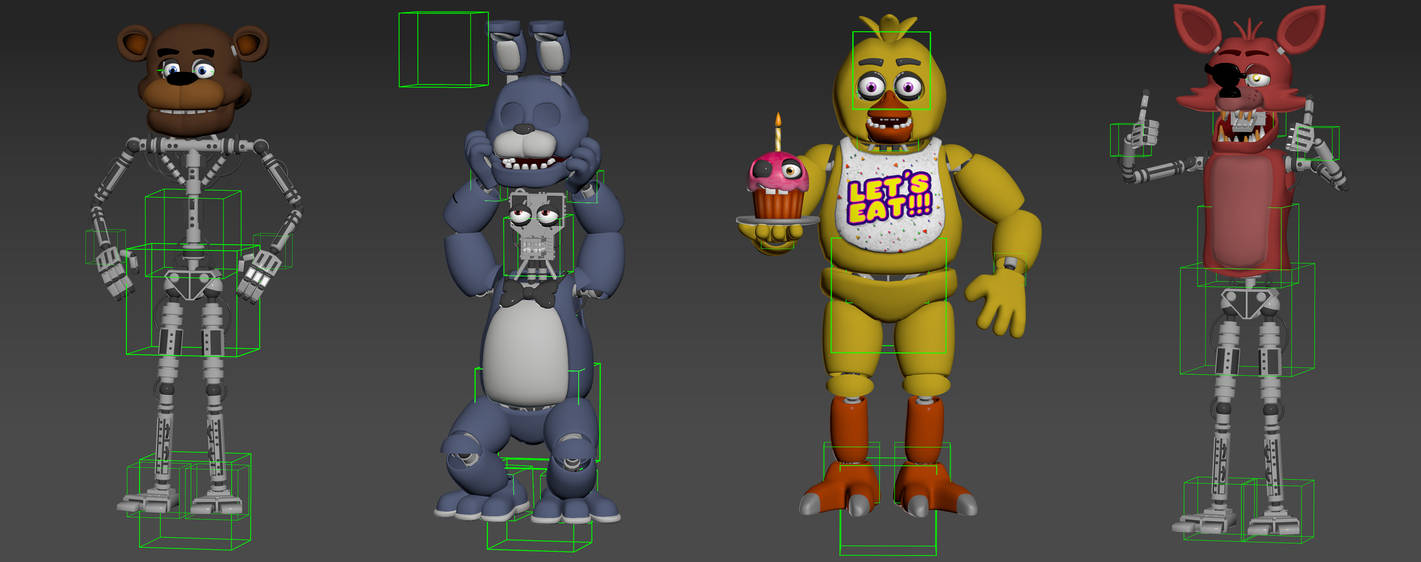
Rigging Your FNAF Character for Animation
Rigging is the process of adding bones to your character, making it possible to animate movements and expressions. This crucial step transforms your model into a puppet that can be animated within Blender.
- Create the Armature: Start by adding an armature object to your scene. This will serve as the skeleton of your character.
- Place Bones Strategically: Position bones to match the major joints of your character, such as the shoulders, elbows, hips, and knees. Ensure bones for the spine and neck are also added for flexibility.
- Adjust Bone Sizes: Modify the length and orientation of each bone to align with your character’s anatomy. This accuracy is crucial for realistic movement.
- Name Your Bones: Properly name all bones for easy identification. This is especially important for symmetrical bones (e.g., left arm vs. right arm).
- Parent Mesh to Armature: Once your skeleton is complete, parent the character’s mesh to the armature. Use automatic weights to allow Blender to calculate how the mesh deforms with bone movements.
- Test the Rig: Pose your character in various positions to test the rigging. Look for areas where the mesh may deform unnaturally and adjust the weights as needed.
- Refine Weight Painting: Use weight painting to fine-tune how the mesh deforms in relation to the bones. This step is crucial for achieving smooth and realistic animations.
With your character rigged, you\"re now ready to bring them to life through animation, creating movements that are as dynamic and expressive as those of the FNAF characters themselves.
FNAF Modeling Tutorial (Head)
Modeling: Dive into the fascinating world of modeling and unlock your creative potential! Discover the art of sculpting intricate shapes and bringing your ideas to life. Join us on this incredible journey of imagination and craftsmanship in our video that showcases the wonders of modeling.
A Guide to Animating FNAF Characters in Blender!
Animating: Get ready to be captivated by the magical realm of animation! Watch our awe-inspiring video that unravels the secrets of giving life to still images. Join us as we delve into the realm of movement and storytelling through the power of animation. Let your imagination soar with us!
Animating Your FNAF Character: Basic Movements and Expressions
Animation brings your FNAF character to life, allowing it to move and express emotions. This section covers the basics of animating your character in Blender, focusing on simple movements and facial expressions.
- Understand Keyframes: Learn how to use keyframes in Blender. Keyframes are points in time that define the start and end of any movement or expression.
- Start with Simple Movements: Begin by animating basic movements such as walking or waving. Insert keyframes for each major position of the movement cycle.
- Animate Facial Expressions: Use the rigging of the face to animate expressions. Adjust the bones or shape keys for emotions like happiness, anger, or surprise and set keyframes for these changes.
- Use the Dope Sheet and Graph Editor: The Dope Sheet gives an overview of all keyframes, while the Graph Editor allows for fine-tuning the timing and flow of animations.
- Looping Animations: For movements like walking or background characters, create looping animations. Ensure the start and end keyframes are similar for a seamless loop.
- Adding Sound: Incorporate sound effects or dialogue to enhance the animation. Synchronize the movements or lip-syncing with the audio for a more immersive experience.
- Preview and Adjust: Regularly preview your animation. Adjust timings, keyframes, and expressions as needed to achieve smooth and lifelike movements.
Animating your FNAF character involves patience and practice. Start with these basic techniques to create compelling animations that bring your character to life.

Lighting and Rendering Your FNAF Character
Lighting and rendering are final, crucial steps in showcasing your FNAF character in its best form. Proper lighting highlights the details and textures of your model, while rendering transforms it into a polished, shareable image or animation.
- Choose Your Lighting Setup: Experiment with different lighting setups to find the one that best highlights the features of your character. Three-point lighting is a popular choice for its versatility and depth.
- Adjust Light Properties: Modify the properties of each light source, including intensity, color, and distance, to enhance the mood or atmosphere of your scene.
- Use HDRI for Environmental Lighting: High Dynamic Range Images (HDRI) can provide realistic environmental lighting and reflections, adding another layer of realism to your character.
- Set Up Cameras: Position your camera(s) strategically to capture the best angles of your character. Consider the rule of thirds for a more appealing composition.
- Choose Rendering Engine: Decide between Blender’s Eevee and Cycles rendering engines. Eevee is faster and great for real-time feedback, while Cycles offers more photorealistic results.
- Configure Render Settings: Adjust the render settings to optimize for quality or speed, depending on your needs. This includes resolution, sampling rates, and any post-processing effects.
- Render Your Character: Once satisfied with the lighting and setup, render your character. For animations, ensure your frame rate and output format are correctly set.
With your character lit and rendered, you\"re ready to share your creation with the world. These final touches can dramatically enhance the visual appeal and impact of your FNAF character.
Tips for Optimizing Workflow in Blender
Efficiency in Blender is key to a smooth modeling and animation process, especially when working on detailed projects like FNAF characters. Here are some tips to streamline your workflow and enhance productivity.
- Use Shortcuts: Familiarize yourself with Blender\"s keyboard shortcuts. This can significantly speed up your modeling, rigging, and animation tasks.
- Customize Your Interface: Arrange Blender’s layout to suit your workflow. Customizing the interface can help you access tools more quickly and work more efficiently.
- Implement Add-ons: Explore and integrate add-ons that can automate or simplify tasks. Blender has a wide range of community-developed add-ons for various purposes.
- Model with Modifiers: Use modifiers to speed up the modeling process. Modifiers like Mirror, Subdivision Surface, and Boolean can help create complex shapes and details more quickly.
- Organize Your Scene: Use layers and collections to organize your scene. Keeping your project organized can save time when selecting objects and navigating your scene.
- Reuse Assets: Build a library of reusable assets, such as rigs or textures. This can save time in future projects or when creating multiple characters for the same scene.
- Batch Render: For animations, consider batch rendering. This allows you to render multiple scenes or animations overnight or while you’re away from your computer.
By incorporating these tips into your Blender workflow, you can work more efficiently, leaving more time for creativity and refinement in your FNAF character modeling and animation projects.
_HOOK_
READ MORE:
Common Mistakes to Avoid When Modeling FNAF Characters
Modeling FNAF characters in Blender can be challenging, especially for beginners. Avoiding common pitfalls can help improve the quality of your models and make the process more enjoyable. Here are key mistakes to watch out for.
- Ignoring Reference Images: Failing to use or accurately follow reference images can lead to disproportionate or unrecognizable characters. Always keep reference images handy for accurate modeling.
- Overlooking Proportions: One of the most critical aspects of character modeling is maintaining correct proportions. Pay careful attention to the size relationships between different parts of your character.
- Skipping the Rough Draft: Jumping straight into detailing without first creating a basic shape can complicate the modeling process. Start with a simple structure and gradually add details.
- Overcomplicating the Mesh: Adding too many vertices or faces early on can make the model difficult to manage. Use modifiers and maintain a simpler mesh for as long as possible.
- Ignoring Topology: Poor topology not only affects the aesthetics of your model but also its functionality, especially in animation. Ensure your mesh flows well and deforms correctly.
- Neglecting Rigging Requirements: When modeling, keep in mind how the character will be rigged and animated. Ensure there is enough geometry in areas that will bend or move.
- Forgetting to Save Frequently: Blender, like any software, can crash. Regular saving prevents the loss of hours of work. Consider using Blender’s auto-save feature as a backup.
By avoiding these common mistakes, you can create more accurate, appealing, and functional FNAF characters in Blender. Remember, practice and patience are key to mastering the art of 3D modeling.
Embark on a creative journey to bring your favorite FNAF characters to life in Blender. With patience, practice, and our comprehensive guide, you\"ll master the art of 3D modeling and animation, creating captivating characters that stand out.