Topic how to model a face in blender: Dive into the world of 3D art with our guide on how to model a face in Blender, designed to help beginners master realistic facial modeling with ease and confidence.
Table of Content
- How to model a face in Blender?
- Understanding Blender\"s Interface and Setup
- Starting with Basic Shapes and Proportions
- Refining the Model: Adding Detail and Symmetry
- Using Modifiers for a Smooth Finish
- Sculpting Tools and Techniques for Realism
- Texturing and Material Application for Lifelike Skin
- YOUTUBE: Beginners Head Sculpt Tutorial in Blender | Easy
- Lighting and Rendering for a Professional Look
- Common Pitfalls and How to Avoid Them
- Additional Resources and Tutorials
How to model a face in Blender?
To model a face in Blender, you can follow these steps:
- Start by creating a new project in Blender and delete the default cube.
- Switch to Edit Mode by selecting the object and pressing Tab.
- Select all vertices by pressing A.
- Press X and choose \"Delete\" to remove the selected vertices.
- Now, press Shift+A to add a new object and choose \"Mesh\" > \"Cube\".
- Resize the cube to match the proportions of a human face using the Scale tool (shortcut: S).
- Go to the Modifier panel and add a \"Mirror\" modifier. This will allow you to work on one side of the face and have it mirrored to the other side.
- Switch to Front view by pressing 1 on your number pad.
- Start manipulating the vertices of the cube to shape the basic structure of the face. Use the Move tool (shortcut: G) and the Scale tool (shortcut: S) to modify the vertices.
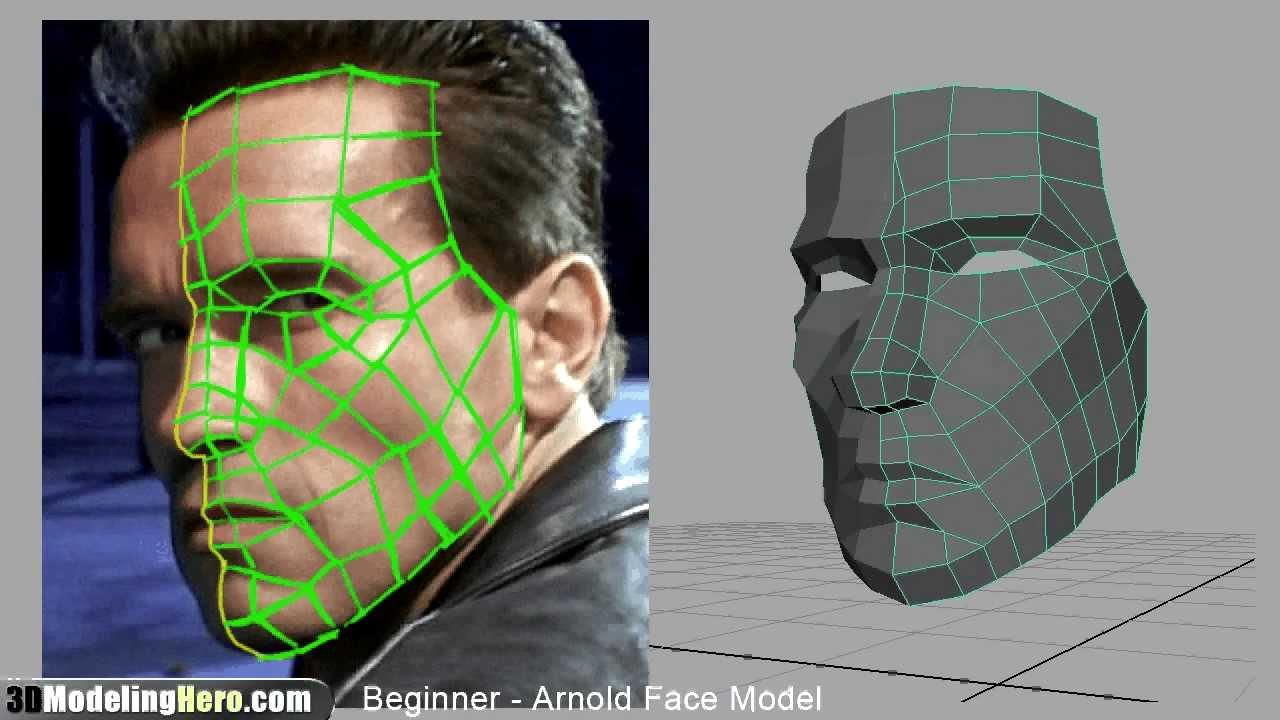
- Pay attention to the topology of the face, ensuring that the edges and vertices flow in a way that follows the anatomical features of a face.
- Continue adjusting and refining the shape of the face until you are satisfied with the overall structure.
- Add additional details like the eyes, nose, mouth, and ears by extruding vertices and shaping them accordingly.
- Use supporting reference images or sketches to guide you through the process.
- Once you finish modeling the face, you can apply the Mirror modifier to see the complete result.
- If needed, you can further refine the model by sculpting or using other modeling tools.
Remember to save your progress regularly and experiment with different techniques and approaches to achieve the desired result. Don\'t be afraid to make mistakes and learn from them as you go. Practice and patience are key to mastering face modeling in Blender.
READ MORE:
Understanding Blender\"s Interface and Setup
Getting familiar with Blender\"s interface is the first step to mastering modeling, especially when creating realistic faces. Follow these steps to get started:
- Launch Blender: Open Blender and start with a new project to ensure a clean workspace.
- Interface Overview: Familiarize yourself with the main areas - the 3D Viewport, Outliner, Properties Panel, and Timeline.
- Customizing the Layout: Adjust the layout by dragging the borders of each section to suit your workflow. You can also switch between different workspaces using the tabs at the top.
- Navigation: Practice navigating the 3D Viewport. Use the middle mouse button to orbit, scroll to zoom, and Shift + middle mouse button to pan.
- Selecting Objects: Left-click to select objects in the viewport. Shift + left-click allows for multiple selections.
- Adding a Mesh: To start modeling a face, add a mesh by pressing Shift + A, select Mesh, and then choose a starting shape, like a Sphere or Cube, as the base for your face model.
- Basic Modeling Tools: Familiarize yourself with basic tools like Grab, Rotate, and Scale, accessible via the toolbar or keyboard shortcuts G, R, and S, respectively.
- Editing Mode: Switch to Edit Mode (Tab key) to modify your mesh with more precision. This mode offers vertices, edges, and faces manipulation for detailed modeling.
Understanding these basics will significantly ease the process of modeling faces and any other 3D objects in Blender. Take your time to explore and get comfortable with the interface and tools.
Starting with Basic Shapes and Proportions
Modeling a face in Blender begins with understanding and applying basic shapes and proportions. This foundational step is crucial for achieving realistic results:
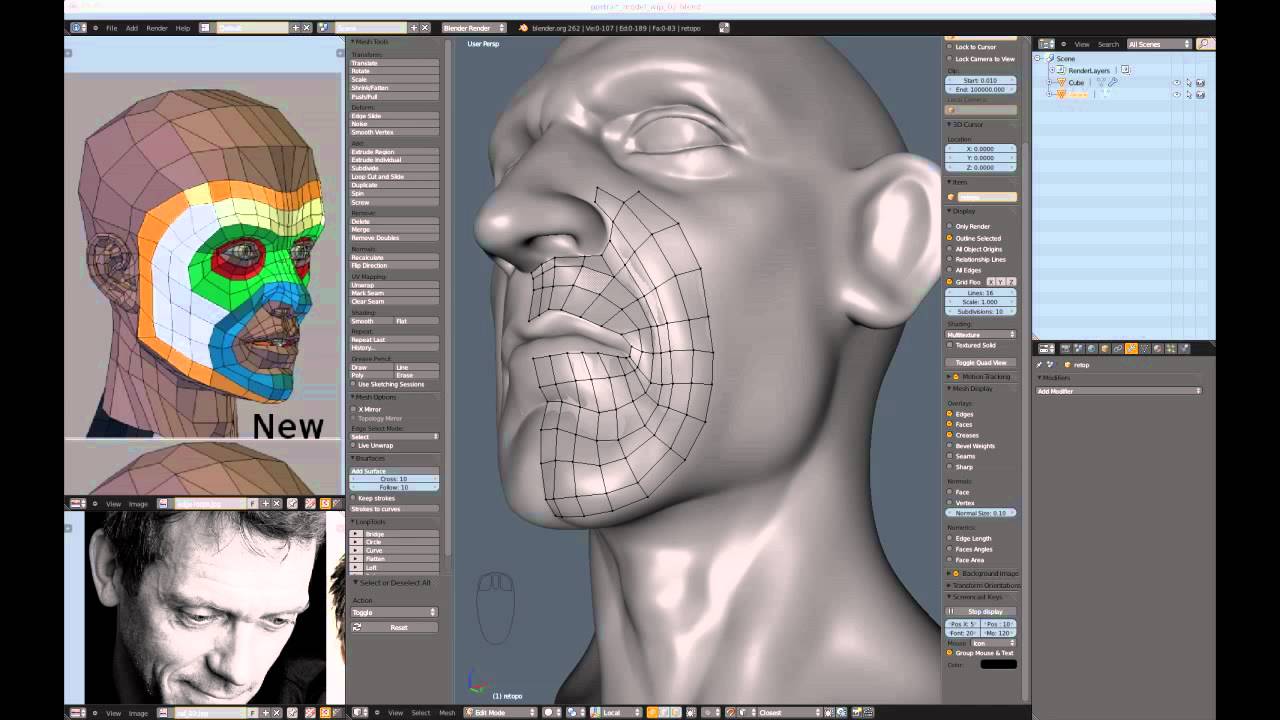
- Choose a Reference Image: Start by importing a front-facing reference image of a face into Blender. This will guide your modeling process and ensure accuracy in proportions.
- Adding the Base Mesh: Use a sphere or a cube as the starting shape. Press Shift + A, select Mesh, and then choose Sphere or Cube to add it to the 3D Viewport.
- Shape the Basic Form: Begin shaping the mesh to match the basic outline of the face in your reference. Focus on the overall shape rather than details at this stage.
- Define Facial Regions: Identify and mark out key facial areas such as the forehead, cheeks, nose, mouth, and chin. Use loop cuts (Ctrl + R) to add more geometry where needed for detailed shaping.
- Adjust Proportions: Pay attention to critical proportions, such as the distance between the eyes, the size of the nose, and the width of the mouth. Use the reference image to adjust these proportions accurately.
- Symmetry Mode: Enable the Mirror Modifier to ensure that modifications to one side of the face are mirrored on the other. This saves time and maintains symmetry.
- Refinement: Continuously refine the basic shapes and proportions, adjusting vertices, edges, and faces to more closely match the reference image.
This phase sets the foundation for your face model, emphasizing the importance of getting the basic shapes and proportions right before moving on to detailed modeling and sculpting.
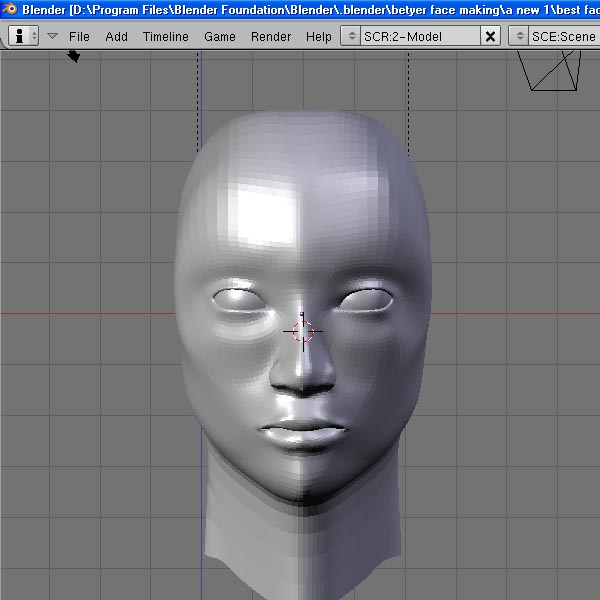
Refining the Model: Adding Detail and Symmetry
After establishing the basic shape and proportions of the face, the next step involves refining the model by adding details and ensuring symmetry for a lifelike appearance:
- Enhancing Features: Begin to add more definition to the facial features. Use the sculpting tools in Blender to refine the eyes, nose, lips, and ears, making them more distinct and realistic.
- Mirror Modifier: Make sure the Mirror Modifier is applied to keep your model symmetrical. This is crucial for maintaining the natural balance of facial features.
- Adding Edge Loops: Insert additional edge loops (Ctrl + R) around key areas like the eyes and mouth to increase mesh density. This allows for finer detail and more precise control over the shape.
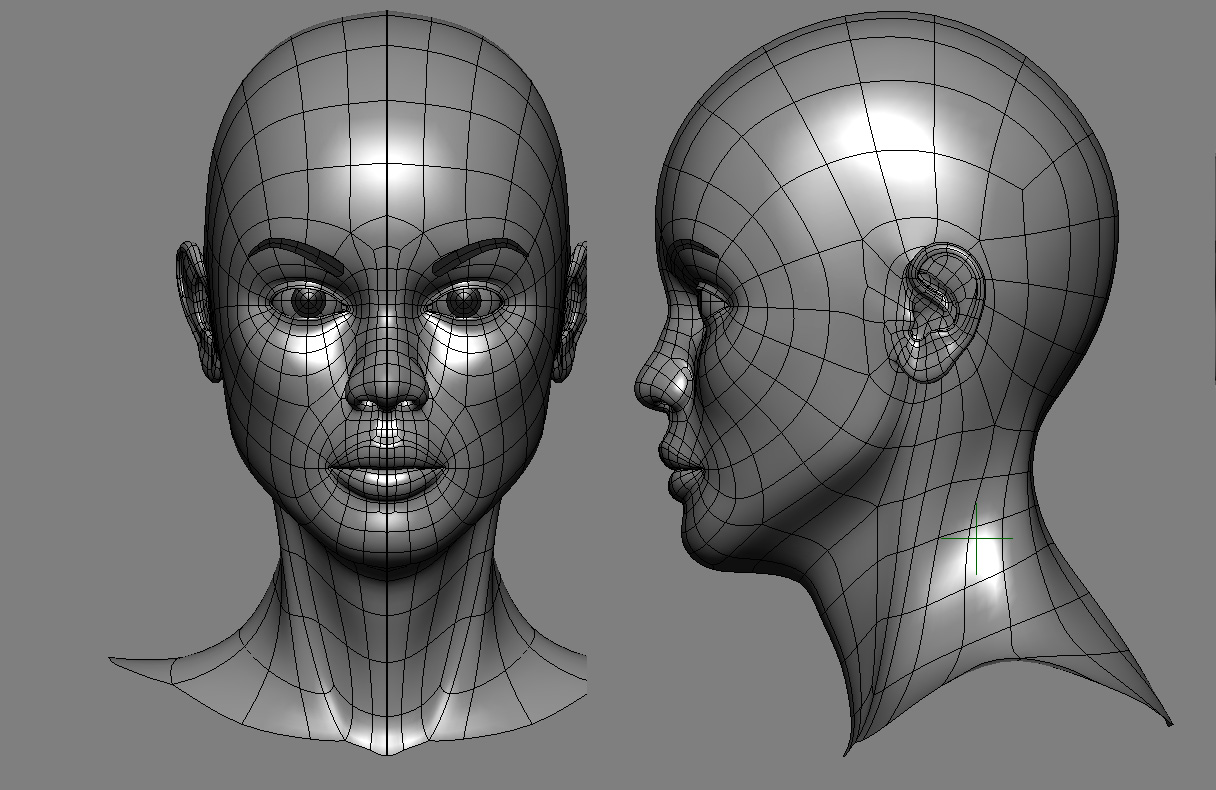
- Topology Considerations: Pay attention to the topology of your model. Ensure that the edge flow follows the natural lines of the face, which is important for animation and further detailing.
- Sculpting Details: Switch to Sculpt Mode for detailed work on facial features. Use brushes to add wrinkles, creases, and other fine details that contribute to the character\"s expression and realism.
- Checking Proportions: Continuously compare your model to the reference image. Adjust the proportions and details as needed to match the reference closely.
- Final Symmetry Check: Before moving on to texturing and rendering, do a final check to ensure that the model is symmetric and that all details are accurately represented.
This stage is critical for breathing life into your model, transforming a basic shape into a recognizable and detailed face.
Using Modifiers for a Smooth Finish
Blender\"s modifiers can greatly enhance your face model by adding smoothness and realism without permanently altering the mesh. Here\"s how to utilize them effectively:
- Subdivision Surface Modifier: This modifier is key for adding smoothness. Apply it to your model to subdivide the mesh, smoothing out the geometry. Adjust the subdivision levels for the right balance between smoothness and manageability.
- Setting Up the Modifier: Go to the Modifiers tab, click \"Add Modifier,\" and select \"Subdivision Surface.\" Increase the \"View\" and \"Render\" levels to smooth the model while keeping an eye on performance.
- Shrinkwrap Modifier: Use the Shrinkwrap Modifier to refine the facial features further by making the mesh hug a target shape closely, which is great for tweaking specific areas like the nose or eyelids.
- Applying Smooth Shading: After adding modifiers, ensure your model has smooth shading for a more realistic appearance. Select the object, then click \"Object\" > \"Shade Smooth\" in the 3D Viewport.
- Corrective Smooth Modifier: If you encounter any deformation or irregularities from sculpting or modifying, the Corrective Smooth Modifier can help smooth these out without losing detail.
- Review and Adjust: Continuously review your model as you apply and adjust modifiers. It\"s important to find a balance that adds realism without overcomplicating the mesh.
- Finalize Modifiers: Once satisfied with the smoothness and detail, you can apply the modifiers to make the changes permanent, but it\"s often advisable to keep them unapplied for non-destructive editing flexibility.
Modifiers are powerful tools for achieving a polished and realistic finish on your face model, enhancing both the visual appeal and the quality of your work.
_HOOK_
Sculpting Tools and Techniques for Realism
Sculpting in Blender is a powerful process that allows for intricate detail and realism. Here\"s how to use sculpting tools and techniques effectively:
- Choosing the Right Brushes: Blender offers various sculpting brushes. Use the Clay Strips brush for adding volume, the Crease brush for defining lines, and the Smooth brush for softening areas.
- Dyntopo (Dynamic Topology): Enable Dyntopo to dynamically adjust the mesh resolution as you sculpt. This allows for detailed sculpting without worrying about the initial mesh density.
- Symmetry Sculpting: Turn on symmetry in the sculpting settings to ensure that your edits on one side are mirrored on the other, crucial for facial symmetry.
- Detailing with Alphas: Use alpha textures with your brushes for skin textures, wrinkles, and other fine details. This can add a layer of realism that\"s hard to achieve manually.
- Masking for Controlled Edits: Use the mask tool to isolate areas of the model you want to work on without affecting the rest. This is particularly useful for sculpting detailed areas like the eyes and mouth.
- Stylized vs. Realistic: Decide on the level of realism you want. Stylized characters might require less intricate detail compared to hyper-realistic portraits.
- Reference Images: Always have reference images on hand. Realistic sculpting is greatly enhanced by understanding how facial features behave in different expressions and lighting.
- Practice and Patience: Realism comes with practice. Spend time experimenting with different brushes and techniques to understand their effect on your model.
Mastering sculpting tools and techniques in Blender can dramatically increase the realism of your face models, bringing your characters to life with depth and emotion.
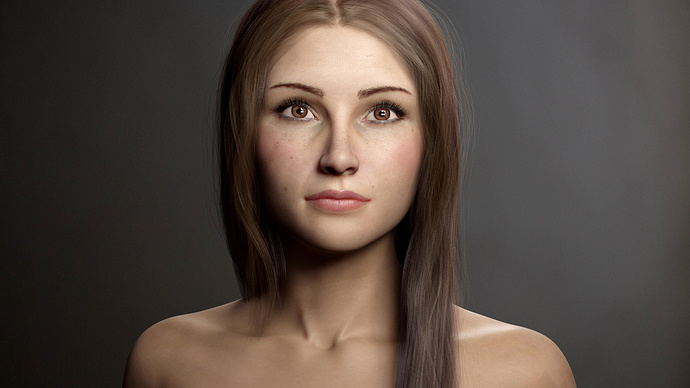
Texturing and Material Application for Lifelike Skin
Creating lifelike skin in Blender involves careful texturing and material application. Follow these steps to achieve realistic skin for your face models:
- UV Unwrapping: Begin by UV unwrapping your model. This process projects the 3D model onto a 2D plane for texturing. Use the \"Smart UV Project\" option for a quick unwrap or manually adjust seams for more control.
- Subsurface Scattering (SSS): In the Shader Editor, add a Subsurface Scattering shader to your material. This simulates light passing through skin, which is crucial for realism. Adjust the SSS radius and color to match the skin tone.
- Texture Painting: Blender\"s texture painting tools allow you to paint directly onto your model. Use this to add color variations, freckles, wrinkles, and other skin details. Import high-resolution skin textures for added realism.
- Bump and Normal Maps: Use bump and normal maps to add surface detail without increasing the model\"s polygon count. These maps simulate fine details like pores and wrinkles.
- Specular Highlights: Adjust the material\"s specular settings to mimic the oily surface of skin, which reflects light differently than other materials.
- Shader Nodes for Advanced Effects: Utilize Blender\"s powerful shader nodes to layer effects. Combine textures, adjust glossiness, and fine-tune the SSS effect to create depth and lifelike skin.
- Testing in Different Lighting: Evaluate your skin material under various lighting conditions. Realistic skin should maintain its natural look in both bright and dim light.
Texturing and material application are art forms that require patience and experimentation. By carefully applying these techniques, you can achieve remarkably realistic skin for your Blender face models.

Beginners Head Sculpt Tutorial in Blender | Easy
\"Experience the magic of Blender as it effortlessly brings your creativity to life! Learn amazing techniques and tools in this video that will help you create mesmerizing 3D animations like never before.\"
Blender Sculpting Tutorial for Beginners | Stylized Head Sculpt
\"Unlock the artist within you with the captivating art of sculpting. Watch this incredible video and discover the secrets to transforming a mere block of clay into breathtaking masterpieces that will leave you in awe.\"
Lighting and Rendering for a Professional Look
Effective lighting and rendering techniques are essential for showcasing your face model in Blender with a professional look. Follow these guidelines to enhance the realism and appeal of your models:
- Three-Point Lighting: Utilize a three-point lighting setup to create depth and dimension. This includes a key light, fill light, and back light, strategically placed to highlight the model\"s features and contours.
- HDRI Lighting: Use HDRI (High Dynamic Range Imaging) environments for realistic lighting and reflections. This simulates real-world lighting conditions and adds a layer of realism to your scene.
- Camera Settings: Adjust the camera\"s focal length and aperture to mimic how the human eye perceives faces. A slight depth of field effect can focus attention on the face, blurring the background slightly.
- Material and Shader Adjustments: Before rendering, make final adjustments to your materials and shaders. Ensure that the skin looks natural under the lighting setup you\"ve chosen.
- Rendering Engine: Choose between Blender\"s rendering engines—Eevee for real-time rendering and Cycles for photorealistic results. Cycles, while slower, offers advanced light interactions for a more detailed outcome.
- Render Settings: Experiment with different render settings such as sample rates, resolution, and light bounces. Higher sample rates reduce noise but increase render time.
- Post-Processing: Use Blender\"s Compositor for post-processing effects. Adjust the contrast, saturation, and brightness to enhance the final image. Adding a slight vignette can focus the viewer\"s attention on the center.
By carefully planning your lighting and rendering, you can present your face model in the best possible light, showcasing your skills and the model\"s details with a professional-grade finish.
Common Pitfalls and How to Avoid Them
Modeling a face in Blender can be a rewarding yet challenging process. To ensure success, be mindful of these common pitfalls and their solutions:
- Ignoring Topology Basics: Ensure your model has clean topology, using quads for easier subdivision and avoiding N-gons in animated areas. Quads help maintain a smooth surface and make future edits more manageable.
- Overlooking Edge Flow: Proper edge flow is crucial for facial expressions and animation. Ensure edges follow the natural lines of the face for more realistic movement and easier sculpting.
- Misusing Modifiers: While modifiers like Subdivision Surface enhance detail, they can also introduce unwanted softness or complexity. Use them judiciously and consider applying creases or support loops to maintain sharp edges where needed.
- Neglecting Reference Material: Always use reference photos or drawings to guide your modeling. This ensures accurate proportions and helps capture the unique features of the face you are modeling.
- Underestimating the Importance of Lighting: Poor lighting can hide flaws in your model or give a false sense of depth and detail. Use a three-point lighting setup to reveal the form of your model accurately as you work.
- Avoiding Sculpting for Detail: For realistic faces, transition from basic shapes to sculpting for adding fine details like wrinkles and pores. Sculpting adds the level of realism that basic modeling cannot achieve.
- Ignoring Material and Texture Work: Realistic skin texture and material properties are essential for lifelike models. Spend time on the shader setup and texture painting to achieve realistic skin tones and specular highlights.
- Forgetting to Check Normals: Incorrect normals can cause rendering issues, making parts of the model appear inverted. Always recalculate normals outside (Shift+N in Edit Mode) after making significant changes to your mesh.
- Leaving Duplicate Vertices: Duplicate vertices can cause shading and rendering problems. Use the Merge by Distance feature to remove them and ensure your mesh is clean.
- Overcomplicating the Model: Start simple and add detail where necessary. Overcomplicated models are harder to edit, animate, and can cause performance issues.
By avoiding these pitfalls, you\"ll be better positioned to create detailed, realistic, and animation-ready facial models in Blender.
READ MORE:
Additional Resources and Tutorials
Embarking on the journey of modeling a face in Blender is an exciting venture that requires both skill and creativity. To aid in your quest, here\"s a compilation of invaluable resources and tutorials that cater to both beginners and advanced users alike:
- For an introduction to basic character modeling, including face modeling, YouTube provides beginner-friendly tutorials that guide you through the process with practical examples.
- ConceptArtEmpire.com offers a comprehensive collection of Blender 3D modeling tutorials for beginners, covering everything from character faces to hands and feet, ideal for those aspiring to create high-resolution characters for video games or movies.
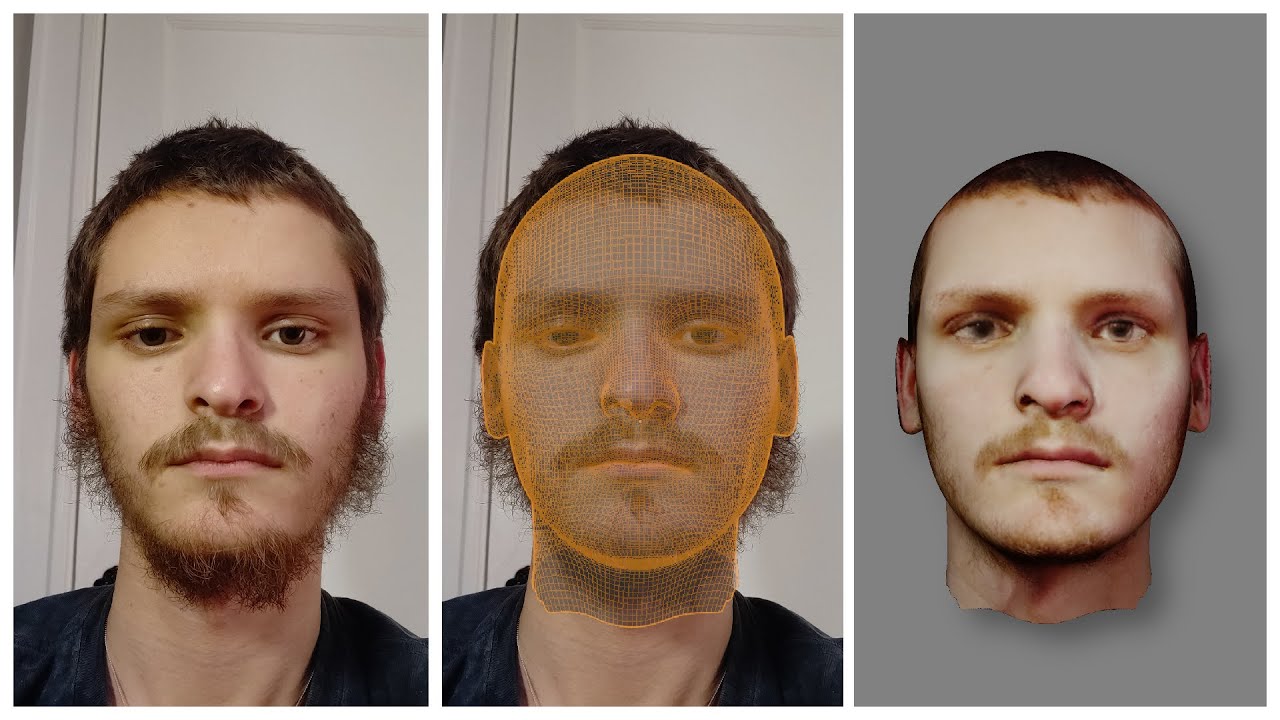
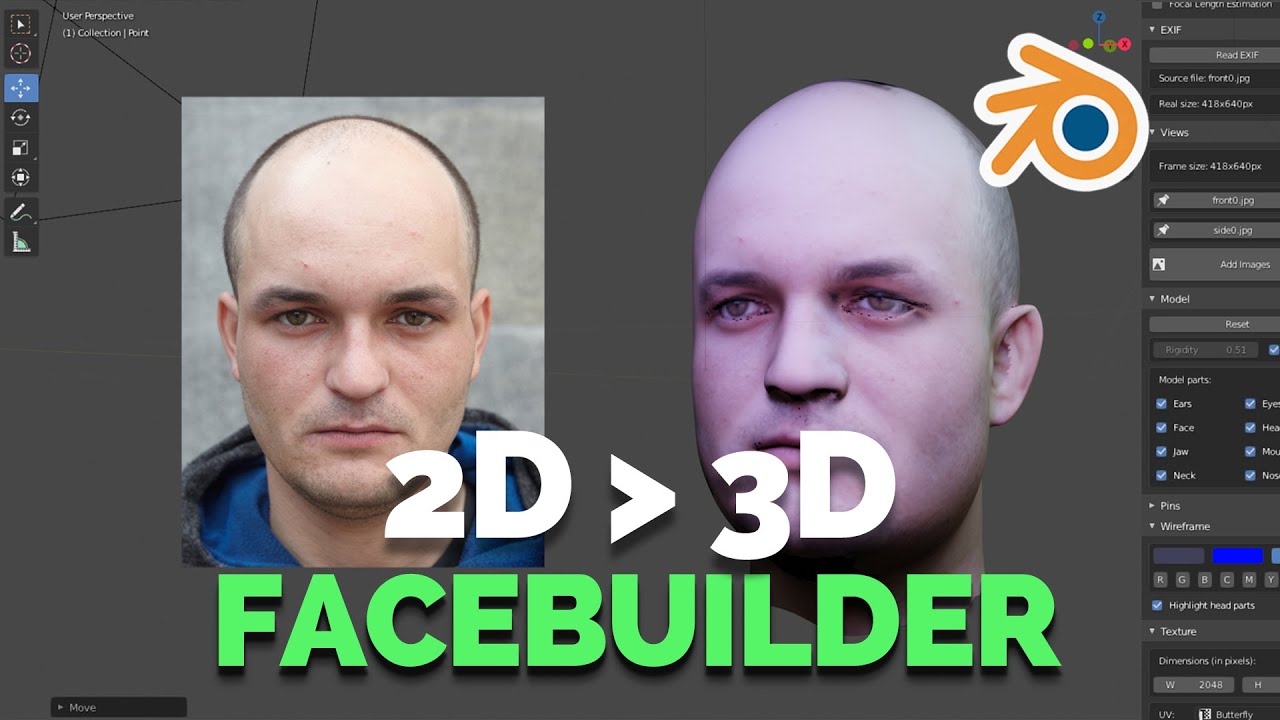
- Harish Studios on YouTube demonstrates how to convert a 2D image into a 3D face model in Blender, providing an easy method for beginners to start with face modeling.
- The official Blender.org tutorials cover the basics of the new 2D and 3D workflows in Blender, including modeling and sculpting, perfect for getting acquainted with Blender’s interface and tools.
- Blender-Models.com walks through the process of creating a face with correct topology, highlighting the importance of edge loops and offering tips on modeling complex facial features like the nose.
- ArtStation offers a paid tutorial focused on realistic face creation in Blender, covering anatomy, base sculpting, detailing, and texturing, alongside introducing Blender\"s hair particle system for facial hair grooming.
- GameDev Academy delves into the intricacies of face rigging in Blender, underscoring its significance in animation and storytelling within the gaming and animation industries.
- Vandelay Design compiles 25 beginner tutorials that include sculpting, lighting, and animation in Blender, ensuring a well-rounded foundation for creating realistic models and animations.
- KeenTools.io introduces FaceBuilder for Blender, a tool designed to build 3D models of human faces and heads using photographs, streamlining the process of creating realistic face models.
These resources are designed to elevate your Blender modeling skills, from sculpting detailed facial features to rigging for animation. Whether you\"re a novice seeking to learn the basics or an experienced artist looking to refine your technique, these tutorials offer a wealth of knowledge and inspiration to help you bring your digital creations to life.
Embark on the transformative journey of mastering face modeling in Blender with our comprehensive guide, designed to equip you with the skills needed to bring your digital sculptures to life. Discover the secrets of creating lifelike facial features, realistic textures, and dynamic expressions that captivate and inspire.
_HOOK_