Topic how to make a character model in blender: Embark on a creative journey to master character modeling in Blender, unlocking the secrets to crafting detailed, lifelike characters with our comprehensive guide.
Table of Content
- How can I create a character model in Blender?
- Understanding Blender\"s Interface and Setup
- Basic Modeling Techniques and Tools
- Starting with a Base Mesh
- Sculpting Your Character
- Retopology for a Cleaner Mesh
- UV Mapping and Texturing
- YOUTUBE: Tutorial: Blender Modeling for Absolute Beginners - Simple Human
- Adding Materials and Shaders
- Rigging Your Character for Animation
- Weight Painting for Realistic Movement
- Final Touches and Exporting Your Model
How can I create a character model in Blender?
To create a character model in Blender, you can follow these steps:
- Start by gathering references and sketches of the character you want to create. Understanding the character\'s design and features will help you during the modeling process.
- Open Blender and delete the default cube by selecting it and pressing the X key, then confirm the deletion.
- Select the Add menu at the top-left corner of the Blender window and choose Mesh > Human (Meta-Rig). This will add a base human mesh that you can customize.
- With the base human mesh selected, go to the Modifiers panel in the properties panel on the right side of the Blender window. Click on the Armature modifier and select Generate Rig. This will create a rig for your character.
- To start shaping the character, switch to Sculpt Mode by selecting it from the dropdown menu at the top of the 3D viewport. Then use tools like Grab, Smooth, and Inflate to manipulate the mesh and sculpt the character\'s form.
- To add finer details to the character, you can use texture painting or sculpting brushes. This step is optional but can enhance the overall look of the character.
- Once you are satisfied with the sculpted model, switch back to Object Mode and go to the Modifiers panel again. Apply the Armature modifier to make the rig permanent.
- Now, you can proceed to UV unwrapping and texturing the character if desired. This involves creating a UV layout and painting textures onto the model.
- Finally, you can pose and animate your character using the rig you created. This step requires knowledge of animation principles and keyframe animation.
Remember to save your progress regularly to avoid losing your work. Have fun creating your character in Blender!
READ MORE:
Understanding Blender\"s Interface and Setup
Before diving into character modeling, familiarizing yourself with Blender\"s interface is crucial. Blender offers a comprehensive set of tools for 3D modeling, animation, rendering, and more. Here\"s how to get started:
- Workspace Customization: Blender\"s interface is highly customizable. You can adjust layouts and panels to suit your workflow. Start by selecting a layout that complements character modeling, such as the \"Layout\" or \"Modeling\" workspace.
- Navigation: Learn the basics of navigating the 3D viewport. Use the middle mouse button to orbit, scroll to zoom, and Shift+middle mouse button to pan. Mastering viewport navigation will significantly enhance your modeling efficiency.
- Object and Edit Modes: Understanding the difference between Object Mode (for selecting and manipulating whole objects) and Edit Mode (for modifying the geometry of the selected object) is fundamental. You can switch between these modes by pressing Tab.
- Basic Tools and Operations: Get acquainted with essential tools such as the move (G), rotate (R), and scale (S) operations. These are fundamental for shaping your character model.
- Add-on Activation: Blender supports numerous add-ons that can streamline the modeling process. Activate useful add-ons via Edit > Preferences > Add-ons. Consider enabling \"LoopTools\" for advanced mesh operations.
- Viewport Shading: Explore different viewport shading options (wireframe, solid, material, and rendered) to get the best view of your work at different stages. Switch between these modes using the Z key.
With a solid understanding of Blender\"s interface and setup, you\"re now well-prepared to start the exciting journey of character modeling. Remember, practice and experimentation are key to mastering Blender.

Basic Modeling Techniques and Tools
Creating a character model in Blender involves mastering basic modeling techniques and utilizing a variety of tools available within the software. These foundational skills are essential for crafting detailed and expressive 3D characters. Here’s a step-by-step guide to get you started:
- Understand Blender\"s Interface: Familiarize yourself with Blender’s interface, including the 3D viewport, outliner, properties panel, and tool shelf. Knowing where tools are located and how to navigate the interface efficiently is crucial for a smooth modeling process.
- Selecting and Transforming Objects: Learn to select objects using the right-click (or left-click, depending on your settings) and transform them using the grab (G), rotate (R), and scale (S) commands. These basic commands allow you to position and modify your objects in the 3D space.
- Mesh Modeling Basics: Start with simple shapes (primitives) like cubes, spheres, and cylinders to block out your character\"s form. Use the edit mode to modify mesh objects by manipulating vertices, edges, and faces. This is where you begin shaping your character.
- Extrusion and Loop Cuts: Extrude (E) is a powerful tool for extending your mesh, adding detail and complexity to your model. Loop Cut (Ctrl+R) allows you to add more geometry to specific areas, enabling finer control over the shape and detail of your character.
- Modifiers for Efficiency: Utilize modifiers like Mirror (for symmetrical models), Subdivision Surface (for smoothing geometry), and Solidify (for giving volume to thin surfaces) to enhance your character. Modifiers can drastically speed up the modeling process and improve your model’s quality.
- Proportions and Topology: Pay attention to the proportions of your character for realism or to meet the desired style. Clean topology, with well-placed edge loops and minimal n-gons, is crucial for animation and sculpting stages.
- Detailing and Refinement: Once the basic shape is established, refine your character by adding details such as facial features, clothes, and accessories. This can be done through a combination of mesh modeling techniques and sculpting for more organic forms.
Throughout the modeling process, constantly check your model from different angles and use reference images to ensure accuracy and proportionality. Remember, practice and patience are key to mastering character modeling in Blender.
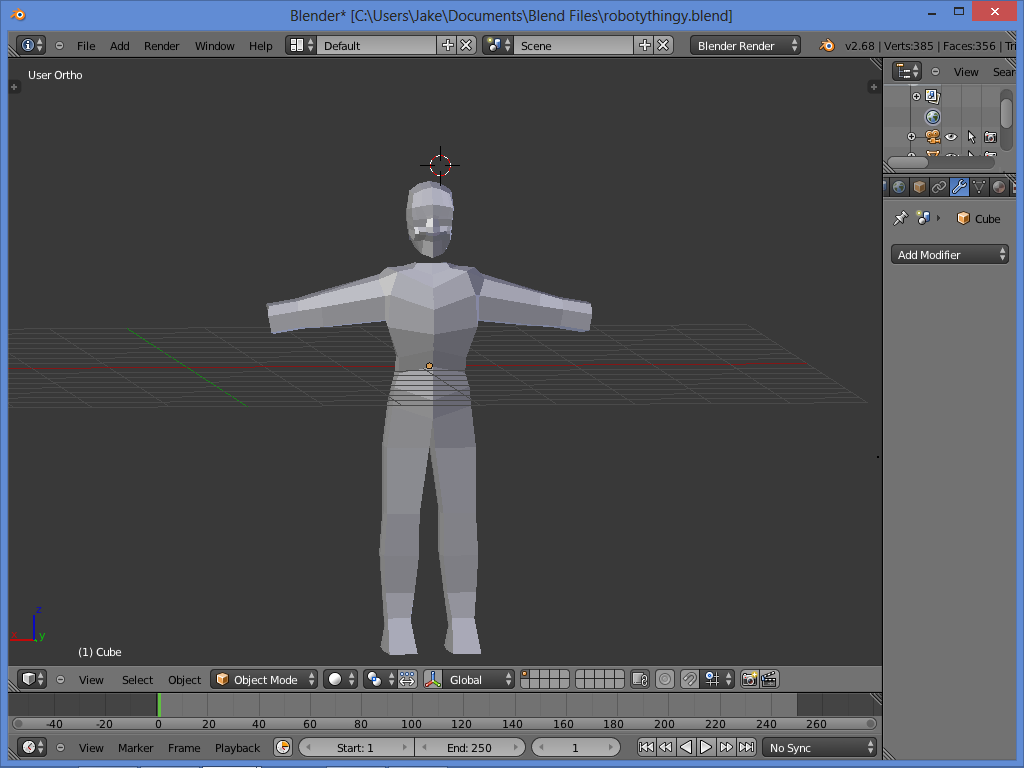
Starting with a Base Mesh
Beginning your character modeling journey in Blender with a base mesh is a strategic approach to achieve realistic and complex models efficiently. A base mesh serves as a low-resolution, simplified version of your final model, which you can then refine and detail. Here’s how to start with a base mesh:
- Choose Your Approach: Decide whether to create your base mesh from scratch using Blender’s modeling tools or to start with a premade base mesh. Creating from scratch offers more flexibility and learning opportunities, while using a premade base mesh can save time.
- Blocking Out Basic Shapes: If creating from scratch, begin by blocking out the basic shape of your character using simple geometric shapes (like cubes, spheres, and cylinders). This step is about establishing the overall proportions and silhouette of your character.
- Adjusting Proportions: Use the transform tools (grab, rotate, scale) to adjust the proportions of your basic shapes to match your character’s design. Reference images aligned in the background can be incredibly helpful during this stage.
- Connecting and Refining Shapes: Start connecting your basic shapes by bridging edge loops or using the F key to create faces. This is where your character begins to take on a more unified and coherent form.
- Adding Detail with Modifiers: Use Blender’s modifiers, such as the Subdivision Surface modifier, to smooth out the mesh and add more geometry for detailing without manually adding tons of vertices.
- Retopology Tools: For a premade base mesh or after blocking out your character, you might need to perform retopology. This means creating a new mesh over your base mesh with cleaner topology, which is essential for animation and further detailing.
- Checking for Mesh Integrity: Ensure your base mesh has no unnecessary n-gons (faces with more than 4 sides) or non-manifold geometry that could complicate later stages like sculpting, texturing, and rigging.
Starting with a strong base mesh is crucial for a successful character modeling process. It sets the foundation for all subsequent detailing and can significantly influence the quality and efficiency of your workflow. Remember, the goal of the base mesh is to capture the basic form and proportions of your character; detailing comes later in the sculpting phase.

Sculpting Your Character
Once you have a base mesh, the next step in creating a character model in Blender is sculpting. Sculpting allows you to add intricate details and organic shapes that bring your character to life. This process is akin to digital clay modeling, offering a highly intuitive way to shape your character. Follow these steps to sculpt your character:
- Switch to Sculpt Mode: Blender’s Sculpt Mode provides a set of brushes and tools designed for sculpting. Switch from Object Mode to Sculpt Mode to start shaping your model.
- Selecting Brushes: Familiarize yourself with different brushes available in Sculpt Mode, such as the Grab, Clay, Inflate, Smooth, and Crease brushes. Each brush has a unique effect on the mesh, allowing for a wide range of detailing techniques.
- Dyntopo for Dynamic Topology: Enable Dyntopo (Dynamic Topology) to add geometry dynamically as you sculpt. This feature allows for detailed sculpting without worrying about the underlying mesh structure. It’s particularly useful for high-detail areas like facial features.
- Adding Major Features: Begin with larger brushes to add major features and forms to your character, such as muscles, clothing folds, or facial shapes. Work from larger to smaller details to ensure a cohesive overall form.
- Refining Details: Gradually reduce the size of your brush to add finer details, such as wrinkles, hair, textures, and other small features. It’s important to regularly switch between different brushes to achieve the desired effects.
- Symmetry for Efficiency: Use the symmetry option to mirror your sculpting actions across the model. This is especially useful for humanoid characters, saving time while ensuring consistency between symmetrical features.
- Regularly Smooth: Use the Smooth brush to blend and soften areas where details may become too harsh or pronounced. Smoothing helps in achieving a more natural and organic look.
- Checking Proportions and Forms: Periodically step back and review your character from different angles. Adjust proportions and forms as necessary to maintain accuracy and aesthetic appeal.
Sculpting is a creative and flexible process that allows for endless possibilities in character creation. Patience and practice are key, as is a keen eye for detail and anatomy. Through sculpting, you can truly bring your character to life with depth, expression, and personality.

_HOOK_
Retopology for a Cleaner Mesh
Retopology is a crucial step in the character modeling process in Blender, especially after sculpting. It involves creating a new topology for your model that is cleaner and more efficient, which is essential for animation, texturing, and further detailing. Here’s how to perform retopology for a cleaner mesh:
- Understanding the Need for Retopology: Sculpting often results in a high-density mesh that is not suitable for animation or efficient rendering. Retopology helps to reduce the polygon count and organize the flow of edges to better support these tasks.
- Setting Up the Sculpted Mesh: Start by making a duplicate of your sculpted mesh to preserve the original. Then, reduce its opacity or use it as a background reference to guide the retopology process.
- Using the Shrinkwrap Modifier: Add a Shrinkwrap modifier to your new, low-poly mesh. This modifier allows the new mesh to conform to the surface of the high-poly sculpt, making it easier to capture the original details accurately.
- Creating New Geometry: Begin creating new geometry over your sculpted model. Use tools like the F2 addon, the Poly Build tool, or the BSurfaces addon to efficiently draw new faces on the surface of the sculpted mesh.
- Focusing on Edge Flow: Pay special attention to edge flow, which is the direction and arrangement of your edges and faces. Proper edge flow is crucial for deformation during animation, and it should follow the natural lines of muscle and bone structure.
- Quads over Triangles and N-Gons: Aim to create a mesh composed primarily of quads (four-sided polygons). Quads are more flexible for animation and generally work better with subdivision surfaces than triangles or n-gons.
- Maintaining Consistent Density: Keep the density of your mesh consistent across the model. Areas that will deform more, like the face, may require slightly more density to capture expressions accurately.
- Checking for Mistakes: Regularly check your work for mistakes such as flipped normals, non-manifold edges, or overlapping vertices. Correcting these issues early can save time in later stages of the character creation process.
Retopology can be a time-consuming process, but it’s essential for creating a model that is both visually appealing and functional. With practice, you’ll become more efficient at retopology, leading to cleaner, more professional results in your character modeling projects.

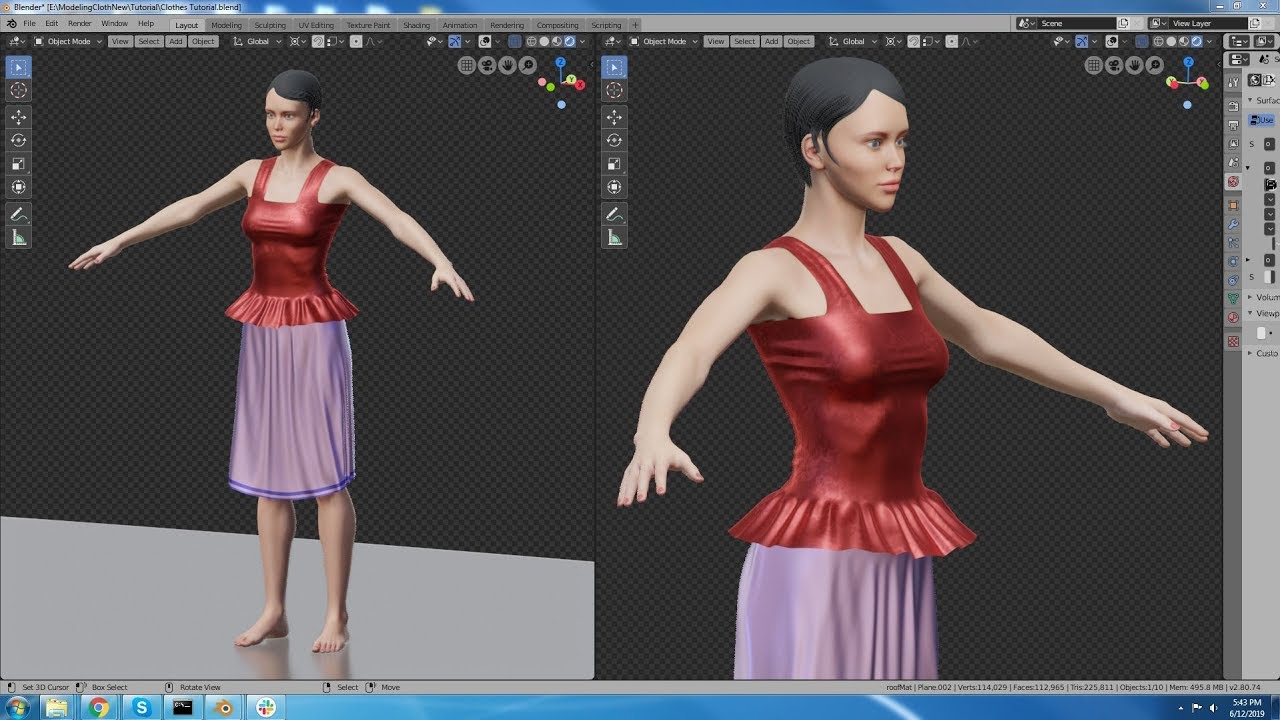
UV Mapping and Texturing
UV mapping and texturing are crucial steps in the character modeling process in Blender, transforming your 3D model into a lifelike character with colors, patterns, and textures. UV mapping is the process of projecting a 3D model\"s surface onto a 2D plane to apply textures accurately. Here’s a step-by-step guide to UV mapping and texturing your character:
- Understanding UV Mapping: Before starting, understand that UV mapping allows you to lay out the surface of your 3D model in a way that textures can be applied evenly and accurately. Each vertex in your mesh is assigned a coordinate on a 2D texture, which corresponds to a specific point on the 3D model.
- Marking Seams: Start by selecting edges on your model and marking them as seams. Seams define the borders of the UV islands, which are sections of the model that will be laid out flat. Think of this like cutting a skin suit into pieces that can lay flat without overlapping.
- Unwrapping the Model: With your seams marked, select all faces of your model and unwrap it (U key > Unwrap). Blender will use the seams to split the mesh into flat sections. Adjust the unwrap method based on your model’s needs, such as angle-based or conformal.
- Editing UVs: Open the UV/Image Editor window to see your model\"s UV layout. You may need to adjust the layout manually to minimize stretching and make efficient use of the texture space. This can include moving, scaling, and rotating UV islands.
- Applying Textures: Once your UV map is laid out satisfactorily, you can start applying textures. Textures can be created in image editing software, downloaded, or painted directly in Blender using texture painting tools.
- Using Texture Maps: For more detailed texturing, use various types of texture maps such as diffuse (color), bump (for simulating surface irregularities), specular (reflectivity), and normal maps (to simulate surface details without adding geometry).
- Material Setup: In Blender’s Shader Editor, create materials for your character by connecting texture maps to the appropriate shader nodes. This step involves a lot of tweaking to get the look and feel of the character just right.
- Testing and Adjusting: Render your model with the applied textures to test how they look. Adjust the UV layout, texture resolution, and shader settings as necessary to achieve the desired result.
UV mapping and texturing are where your character really starts to come to life. By applying detailed textures and materials, you add color, depth, and realism to your model, making it ready for rendering or animation.

Tutorial: Blender Modeling for Absolute Beginners - Simple Human
\"Discover the incredible world of Blender modeling and unleash your creativity! Join us as we delve into the limitless possibilities of creating stunning 3D models that will leave you in awe. Whether you\'re a seasoned professional or just starting out, this video is a must-watch for anyone looking to take their modeling skills to the next level!\"
Blender Character Modeling Tutorial for Absolute Beginners - Part 1
\"Get ready to bring your characters to life with our comprehensive guide to character modeling! Step into the world of digital artistry as we explore the art of sculpting and creating lifelike characters from scratch. From facial expressions to intricate details, this video will provide you with the knowledge and techniques to create captivating characters that jump off the screen!\"
Adding Materials and Shaders
Adding materials and shaders to your character model in Blender is an essential step in the process of bringing your creation to life. Materials define the color and texture of your model, while shaders determine how your model interacts with light, creating realism through shadows, highlights, and other effects. Follow these steps to add materials and shaders to your character:
- Understanding Materials and Shaders: A material in Blender is a collection of settings and shaders that define the appearance of a surface. Shaders are mathematical algorithms that calculate the rendering of each pixel based on light and the material properties.
- Creating a New Material: In the Properties panel, select the Material tab, then click the \"New\" button to create a new material. You can create multiple materials for different parts of your character, such as skin, clothes, and accessories.
- Configuring the Principled BSDF Shader: The Principled BSDF shader is a versatile shader in Blender that can simulate a wide range of materials. Adjust its parameters, such as Base Color, Roughness, Metallic, and Subsurface Scattering (for skin materials), to achieve the desired look.
- Applying Textures: Connect texture maps to the shader nodes to add detail to your materials. Use the Shader Editor to drag and drop textures into the node setup and connect them to the Principled BSDF shader’s corresponding inputs.
- Adjusting Material Settings: Experiment with the material settings to simulate different effects, such as translucency in thin objects (like cloth or leaves) or emission for objects that emit light.
- Using Nodes for Advanced Effects: For more complex materials, use the Shader Editor to combine different nodes. For example, mix shaders to blend between two material types or add a Bump node to simulate surface irregularities.
- Previewing Materials: Use the LookDev mode in the 3D viewport to preview how your materials look under different lighting conditions. Adjust your materials as needed to achieve the best result.
- Organizing Materials: If your character has multiple materials, organize them by naming each material clearly. This makes it easier to manage and adjust materials as your project progresses.
Materials and shaders play a critical role in the visual quality of your character model. By carefully selecting and configuring these elements, you can create a wide range of effects, from realistic skin to fantastical armor, enhancing the overall impact of your character in Blender.

Rigging Your Character for Animation
Rigging is the process of creating a skeleton for your character model in Blender, allowing it to move and be animated. This involves setting up bones and joints in a way that mirrors the natural movements of a living being or mechanical object. Follow these steps to rig your character for animation:
- Understanding the Rigging Process: Rigging involves creating an armature (skeleton) that defines how your character can move. Each bone in the armature controls a specific part of the character\"s mesh.
- Creating the Armature: In Object Mode, add an Armature object and begin placing bones at key points of your character, such as joints. Adjust the size and orientation of the bones to match the anatomy of your character.
- Naming Bones: Properly name each bone according to the part of the body it controls (e.g., \"Arm.L\" for the left arm). Consistent naming is crucial for organization and when mirroring bones to the opposite side of the character.
- Parenting Mesh to Armature: Once your armature is complete, select your character mesh, then shift-select the armature and use Ctrl+P to parent the mesh to the armature. Choose \"With Automatic Weights\" for Blender to automatically assign vertex groups to bones.
- Adjusting Weight Paint: Enter Weight Paint Mode to fine-tune how the mesh deforms in relation to the bones. Areas painted red are fully influenced by the selected bone, while blue areas are not influenced at all.
- Creating Inverse Kinematics (IK) Constraints: For parts of the rig that require more natural movement (like arms and legs), add IK constraints. This allows for easier manipulation of limbs with more realistic motion.
- Testing the Rig: Pose your character in various positions to test the rig. Ensure that the mesh deforms naturally and that all movements are as expected. Adjust the armature, weight paints, or constraints as needed.
- Adding Control Bones: For more advanced rigs, add control bones that do not directly influence the mesh but control other bones. These can simplify the animation process, making it easier to create complex movements.
Rigging is a detailed and technical process, but it\"s essential for bringing your character to life through animation. A well-rigged character can be posed and animated in a variety of ways, making it a versatile asset for any animation project.

Weight Painting for Realistic Movement
Weight painting is a critical step in the rigging process in Blender, allowing animators to define how different parts of the mesh deform in response to the movements of the bones in the armature. This ensures that your character moves in a lifelike and realistic manner. Here’s how to apply weight painting for realistic movement:
- Understanding Weight Painting: Weight painting assigns a weight value (from 0 to 1) to the vertices of your mesh. These values determine how much influence a bone has on the vertices. The closer the weight is to 1, the more influence the bone has.
- Selecting the Armature for Weight Painting: Select your character model and switch to Weight Paint Mode. Ensure your armature is visible and selectable. Select a bone to start painting the influence it will have on the mesh.
- Using Weight Paint Brushes: Use the brushes in Weight Paint Mode to paint the influence areas. The Add brush increases influence, while the Subtract brush decreases it. The weight of the influence is indicated by a color gradient, from blue (no influence) to red (full influence).
- Adjusting Brush Settings: Adjust the brush radius, strength, and weight to get the desired level of influence. Start with broad strokes to define the general areas of influence, then refine with smaller adjustments.
- Painting for Natural Deformations: Focus on areas around joints, like elbows and knees, where deformation is most noticeable. Ensure these areas have smooth gradients of influence for more natural movement.
- Testing and Refining: Regularly switch back to Pose Mode to test how the mesh deforms with the bone movements. This will help you identify areas that need more refinement in weight painting.
- Using Auto Normalize and Auto Smooth: Enable the Auto Normalize feature to automatically adjust weights so that the total influence for each vertex equals 1. Use Auto Smooth to smooth out the weights across the mesh for more natural transitions.
- Mirroring Weights: If your character is symmetrical, use the Mirror Weight option to copy weights from one side of the character to the other, saving time and ensuring consistency.
Weight painting is a blend of art and technique, requiring patience and attention to detail to achieve realistic movement. By carefully painting weights, you ensure that your character’s animations look natural and convincing, bringing your digital creation to life.

_HOOK_
READ MORE:
Final Touches and Exporting Your Model
After completing the modeling, texturing, and rigging processes, the final stage involves applying the finishing touches to your character model in Blender and preparing it for export. This ensures your model is ready for use in games, animations, or other 3D projects. Follow these steps to finalize and export your model:
- Reviewing Your Model: Start by carefully reviewing your model for any missed details or errors. Check the mesh, textures, materials, and rigging to ensure everything is as it should be. Make any necessary adjustments.
- Optimizing the Mesh: If your model is intended for real-time applications like games, it’s important to optimize the mesh. This can involve reducing the polygon count, ensuring textures are appropriately sized, and cleaning up any unnecessary vertices or edges.
- Applying Modifiers: Before exporting, apply any necessary modifiers to your mesh, except those needed for animation like the Armature modifier. This ensures the exported model maintains the intended shape and detail.
- Setting Up Materials for Export: Ensure that materials and textures are correctly set up for export, especially if exporting to a format that supports them. You may need to bake some procedural textures or shaders into image textures.
- Choosing the Right Export Format: Choose the appropriate export format based on your project\"s needs. Common formats include FBX for games and animation projects, OBJ for static models, or GLTF/GLB for web-based applications.
- Exporting the Model: Go to File > Export and select your chosen format. Adjust the export settings according to your needs, such as selecting which objects to export, applying transformations, and including textures.
- Testing the Exported Model: After exporting, import your model into the target software or engine to test. Check for any issues with the mesh, textures, or rigging, and make any necessary adjustments back in Blender.
- Creating Documentation: For complex models or when working in a team, it’s helpful to create documentation. Include information on the model’s scale, texture details, rigging notes, and any other relevant details to assist those working with the model.
Finalizing and exporting your model is a crucial step in the character creation process, marking the transition from development in Blender to application in your chosen field. By following these steps, you can ensure that your model is ready for animation, game development, or any other 3D project.
Embark on the rewarding journey of character modeling in Blender, where creativity meets technique. From initial sketches to final exports, each step unfolds new possibilities, empowering you to bring your unique visions to life in the 3D world.