Topic how to texture model in blender: Embark on a journey to master the art of texturing models in Blender, enhancing your 3D creations with realistic details and vibrant colors. This guide promises to transform beginners into skilled artists.
Table of Content
- How can I add an image texture to a model in Blender 2.8 Eevee?
- Understanding Blender\"s Interface for Texturing
- Preparing Your Model for Texturing
- UV Mapping Essentials
- Creating and Assigning Materials
- Importing and Applying Textures
- Using Blender\"s Texture Paint Tool
- YOUTUBE: Texture Painting Quick Start Guide Blender
- Advanced Texturing Techniques: Bump and Specular Mapping
- Utilizing Nodes for Complex Textures
- Exporting Your Textured Model
- Resources for Free Textures and Materials
How can I add an image texture to a model in Blender 2.8 Eevee?
To add an image texture to a model in Blender 2.8 Eevee, follow these steps:
- Open Blender and import the model you want to add the texture to.
- Select the model by right-clicking on it.
- In the Properties panel on the right-hand side, click on the Material tab (shaped like a sphere).
- Click on the \"New\" button to create a new material.
- Scroll down to the \"Surface\" section and click on the \"Use Nodes\" checkbox to enable the Node Editor.
- Switch to the Node Editor by clicking on the \"Editor Type\" drop-down menu at the top of the window and choosing \"Shader Editor.\"
- In the Node Editor, click on the \"Add\" button or press \"Shift + A\" to open the Add menu.
- Hover over \"Texture\" and choose \"Image Texture.\"
- Connect the \"Color\" output of the Image Texture node to the \"Base Color\" input of the Material Output node.
- Click on the \"Open\" button in the Image Texture node to import the image you want to use as the texture.
- Select the image file from your computer and click \"Open.\"
- The image texture should now be applied to your model in Blender 2.8 Eevee.
READ MORE:
Understanding Blender\"s Interface for Texturing
Blender\"s interface for texturing is a powerful workspace that allows artists to apply detailed textures to their 3D models. Familiarizing yourself with this environment is key to unlocking your creative potential.
- Workspace Selection: Start by selecting the \"Shading\" workspace from the top menu. This workspace is specifically designed for texturing and shading tasks.
- Material Properties: In the right-hand panel, navigate to the \"Material Properties\" tab. Here, you can create new materials or select existing ones to modify.
- Shader Editor: The central part of the shading workspace is the Shader Editor. It\"s where you connect nodes to create and edit materials and textures.
- Node-based Editing: Blender uses a node-based system for texturing. You can add various nodes, such as Texture, Shader, and Color nodes, and connect them to create complex textures.
- Texture Nodes: To add a texture, you can drag and drop an image file directly into the Shader Editor or use the \"Add\" menu to select an \"Image Texture\" node. Connect this node to the \"Base Color\" input of a shader node like the Principled BSDF.
- UV Editing: For textures to appear correctly, your model must be UV unwrapped. Switch to the \"UV Editing\" workspace to map your 3D model\"s surface onto a 2D image.
Understanding these elements of Blender\"s interface for texturing will provide a solid foundation for creating detailed and realistic textures for your 3D models.

Preparing Your Model for Texturing
Before applying textures, it\"s crucial to properly prepare your Blender model. This preparation ensures textures adhere correctly and look realistic on your model.
- Cleaning Your Model: Begin by examining your model for any unnecessary vertices, edges, or faces. Remove doubles and fix any non-manifold edges to ensure a clean mesh.
- Applying Scale and Rotation: In Object Mode, select your model and apply the scale and rotation by pressing Ctrl+A. This step ensures the texture scales and wraps correctly.
- Marking Seams for UV Unwrapping: Identify edges where the mesh can be \"cut\" for flattening. In Edit Mode, select these edges, right-click, and choose \"Mark Seam\". This facilitates accurate UV mapping.
- UV Unwrapping: With seams marked, select all faces in Edit Mode (A), then press U and choose a method like \"Unwrap\" or \"Smart UV Project\". Adjust the UV map in the UV Editor to match the texture layout.
- Checking Normals: Ensure all normals are facing outwards for correct shading and texturing. In Edit Mode, select all, then go to Mesh > Normals > Recalculate Outside (Shift+N).
- Setting Up Materials: Go to the Material Properties tab and create a new material for your object. This material will serve as a base for your textures.
Following these steps will ensure your model is optimally prepared for texturing, allowing for a smoother and more efficient workflow in Blender.

UV Mapping Essentials
UV mapping is a critical step in texturing models in Blender, allowing you to project a 2D image onto the surface of a 3D model. Understanding UV mapping is essential for creating realistic textures.
- Understanding UV Maps: UV maps are representations of how a 2D texture fits onto a 3D model. \"U\" and \"V\" represent the axes of the 2D texture space, analogous to \"X\" and \"Y\" in 3D space.
- Marking Seams: Seams are edges where the mesh is \"cut\" to lay flat. In Edit Mode, select edges you want as seams, then Ctrl+E > Mark Seam. Proper seam placement is crucial for minimizing visible texture stretching.
- Unwrapping Your Model: After marking seams, select all faces (A) and unwrap (U > Unwrap). Blender will unfold the 3D model based on the seams, creating a UV map in the UV/Image Editor.
- Adjusting the UV Layout: In the UV/Image Editor, you can move, rotate, and scale UV islands (groups of connected polygons) to optimize texture space usage and minimize distortion.
- Project From View: For flat surfaces, the \"Project From View\" unwrap method can be more efficient. It projects the UV layout from the current camera view, useful for faces directly facing the camera.
- Using UV Grids and Test Patterns: Applying a UV grid or test pattern as a texture can help identify and correct stretching or distortion in the UV map.
- Pin and Live Unwrap: Pinning vertices in the UV/Image Editor allows you to manually adjust parts of the UV map without affecting pinned areas, while \"Live Unwrap\" updates the rest of the UV layout automatically.
Mastering UV mapping in Blender is a balance of art and technique, enabling you to create detailed and lifelike textures on your 3D models.

Creating and Assigning Materials
Creating and assigning materials in Blender is a pivotal process for texturing models, allowing you to define the surface appearance of your objects. This section guides you through the steps to create visually compelling materials.
- Accessing the Material Properties: Select your object and go to the Properties panel. Click on the Material Properties tab (represented by a little ball icon).
- Creating a New Material: Click on the \"New\" button to create a new material. This action assigns a default material to your selected object, which you can customize.
- Understanding Material Settings: Explore the material settings such as Base Color, Specularity, Roughness, and Metallic to adjust the visual characteristics of your material. These settings control how the material interacts with light.
- Adding Textures to Materials: In the Shader Editor, you can add texture nodes (e.g., Image Texture) to your material. Connect these nodes to the appropriate inputs (e.g., Base Color) on the Principled BSDF shader to apply textures.
- UV Mapping for Texture Alignment: Ensure your model is correctly UV unwrapped to accurately map the textures onto the model\"s surface. Adjust the UV layout if necessary for optimal texture alignment.
- Previewing Materials: Use the Viewport Shading mode to preview your material and texture application in real-time. Adjust settings as needed to achieve the desired appearance.
- Assigning Materials to Multiple Objects: You can assign the same material to multiple objects by selecting them and using the \"Link Materials\" option (Ctrl+L > Materials) in Object Mode.
By following these steps, you can create detailed and realistic materials for your Blender models, enhancing the overall visual quality of your projects.

_HOOK_
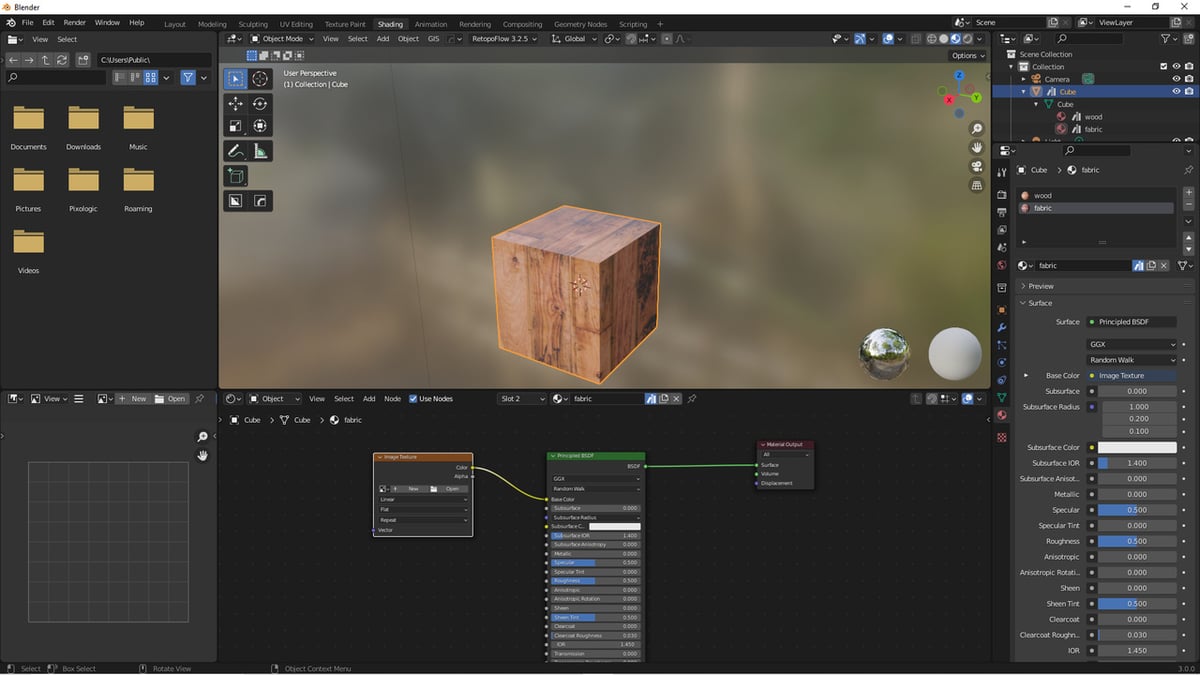
Importing and Applying Textures
Applying textures to your Blender models can dramatically enhance their realism and visual appeal. This guide will walk you through the process of importing and applying textures in Blender.
- Preparing Texture Files: Ensure your textures are in a compatible format (e.g., JPEG, PNG). Organize them in an accessible folder.
- Accessing the Shader Editor: With your object selected, switch to the \"Shading\" workspace to access the Shader Editor. This is where you\"ll connect your textures to materials.
- Adding an Image Texture Node: In the Shader Editor, press \"Shift+A\" to add a node. Select \"Texture\" > \"Image Texture\". Connect this node to the \"Base Color\" input of the Principled BSDF node for a basic texture application.
- Importing the Texture: Click \"Open\" on the Image Texture node and navigate to your texture file. Select the file to import it into Blender.
- UV Mapping: For the texture to display correctly, your model must be UV unwrapped. This maps the 2D texture onto the 3D model surface. Adjust the UV map in the UV Editing workspace for the best fit.
- Adjusting Texture Settings: Within the Image Texture node, you can adjust settings like the extension and projection method to control how the texture is displayed on your model.
- Previewing Your Textured Model: Use the Viewport Shading mode to see how the texture appears on your model. Make any necessary adjustments to the UV map or texture settings for the desired outcome.
By following these steps, you can import and apply textures to your Blender models, adding depth, color, and realism to your 3D projects.
Using Blender\"s Texture Paint Tool
Blender\"s Texture Paint tool allows artists to directly paint textures onto their 3D models, offering a hands-on approach to adding color and detail. This section outlines how to use this powerful feature.
- Switching to Texture Paint Mode: With your model selected, switch to \"Texture Paint\" mode from the mode menu in the 3D Viewport\"s header.
- Preparing the Canvas: Before painting, ensure your model has a UV map and a material with an image texture node connected to the base color. This image acts as your canvas.
- Choosing Brushes: Texture Paint mode provides a variety of brushes for different effects, such as softening, smearing, and cloning. Select a brush from the tool shelf or press \"T\" to reveal brush settings.
- Selecting Colors: Use the color picker to choose your paint color. You can also adjust the brush\"s opacity and strength for different painting effects.
- Layer Management: For complex textures, work in layers by adding multiple image textures in the Shader Editor. This approach allows for non-destructive editing and greater control over the final look.
- Using Masks: Masks can be used to protect certain areas of your model from being painted. This is useful for adding detailed textures to specific parts while leaving other areas untouched.
- Saving Your Work: Regularly save your painted textures by saving the image in the UV/Image Editor. Failure to manually save can result in loss of work.
Texture Paint mode in Blender is a versatile tool for adding personalized touches to your models, enhancing realism, and bringing your creations to life.
Texture Painting Quick Start Guide Blender
Get ready to dive into the world of texture painting! Watch this captivating video and learn how to add depth and realism to your artwork by masterfully applying different textures. Get inspired and unleash your creativity today!
How to Import Models With Textures in Blender
Calling all 3D modeling enthusiasts! Discover the magic of importing models with textures in this mind-blowing video. Learn step by step how to bring your creations to life by adding stunning textures that breathe life into every detail. Don\'t miss out on this incredible opportunity to take your skills to the next level!
Advanced Texturing Techniques: Bump and Specular Mapping
Advanced texturing techniques such as bump and specular mapping are essential for adding realism to 3D models in Blender. These techniques simulate surface details and reflections without altering the model\"s geometry.
- Bump Mapping:
- Prepare a grayscale bump map where white represents height and black represents depth.
- In the Shader Editor, add an \"Image Texture\" node connected to a \"Bump\" node. Then, connect the \"Bump\" node\"s output to the \"Normal\" input of the Principled BSDF shader.
- Adjust the \"Strength\" parameter in the Bump node to control the intensity of the bump effect.
- Specular Mapping:
- Create a specular map to define how shiny or matte surfaces are. Brighter areas will appear more glossy.
- Add an \"Image Texture\" node linked to your specular map. Connect this node\"s color output to the \"Specular\" input of the Principled BSDF shader.
- Tweak the \"Specular\" and \"Roughness\" settings in the Principled BSDF shader to fine-tune the reflectivity of the surface.
- Combining Techniques: For more complex textures, combine bump and specular maps with other texture types (e.g., diffuse, displacement) for rich, multi-layered surfaces.
Mastering these advanced texturing techniques in Blender can dramatically enhance the visual quality of your 3D models, making them more lifelike and detailed.
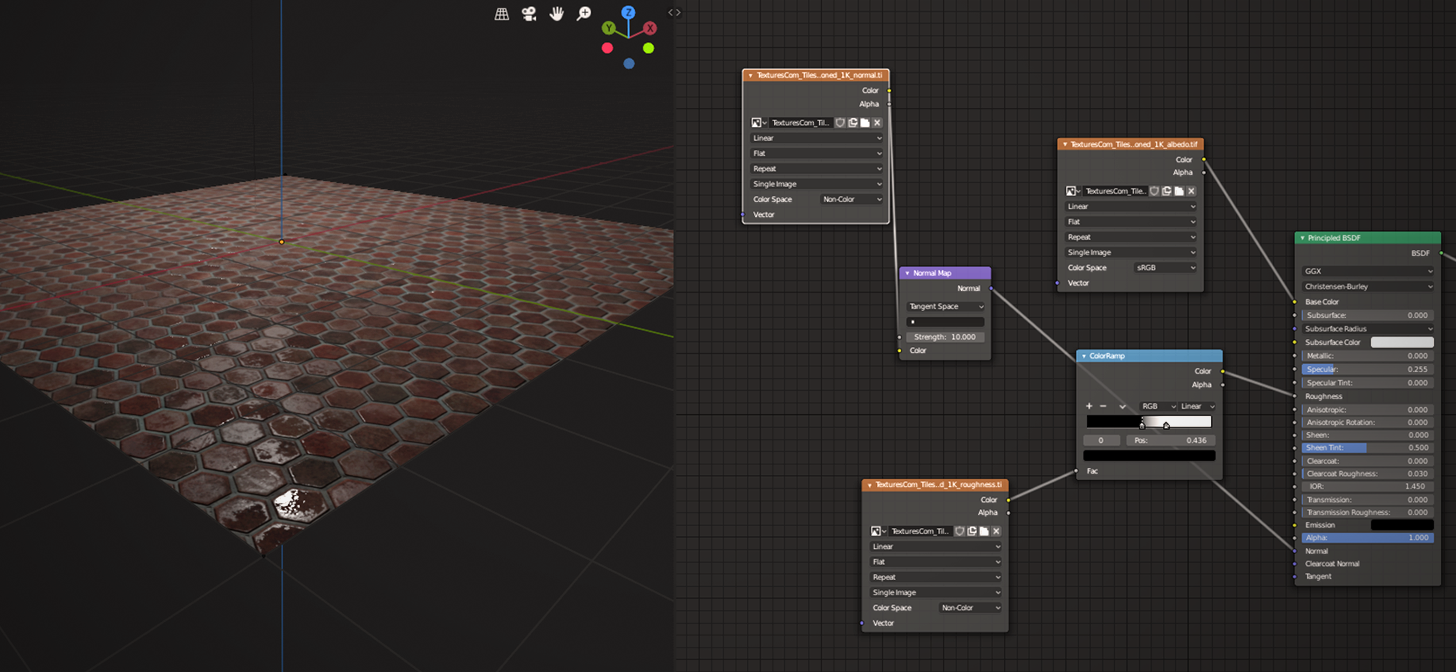
Utilizing Nodes for Complex Textures
Blender\"s node-based system offers unparalleled control over texturing, allowing for the creation of complex, multi-layered textures. This section delves into how to leverage nodes for intricate texture designs.
- Introduction to Nodes: Nodes are the building blocks of materials and textures in Blender. Each node performs a specific function, like generating textures, altering colors, or affecting material properties.
- Shader Nodes: Begin by creating a material and opening the Shader Editor. Use Shader nodes to define the surface appearance of your object. The Principled BSDF node is a versatile shader for creating a wide range of materials.
- Texture Nodes: Add complexity to your materials with Texture nodes. For instance, use the \"Image Texture\" node to apply bitmap textures or the \"Noise Texture\" node for procedural effects.
- Mixing Textures: Combine different textures using the \"Mix RGB\" or \"Mix Shader\" nodes. This allows for layering and blending textures to achieve unique effects.
- Utilizing Vector Nodes: Vector nodes control how textures map onto the surface. Use nodes like \"Mapping\" and \"Texture Coordinate\" to adjust the placement and orientation of your textures.
- Creating Bump and Displacement: Enhance surface detail without altering the mesh using \"Bump\" and \"Displacement\" nodes. Connect these to your material\"s normal or displacement inputs for realistic textures.
- Non-Destructive Workflow: Nodes allow for a non-destructive workflow, enabling you to adjust and fine-tune textures without permanently altering the base material or texture files.
Mastering the node system in Blender opens up a world of possibilities for creating detailed and realistic textures. Experimentation and practice are key to leveraging nodes for complex textures.
Exporting Your Textured Model
After meticulously texturing your 3D model in Blender, the next step is to export it for use in other projects or applications. This guide will walk you through the process of exporting your textured model, ensuring that all your hard work on textures and materials is preserved.
- Select Your Model: Ensure that your model is selected. You can do this by clicking on it in the 3D viewport or by selecting it from the Outliner.
- Choose the Export Format: Go to File > Export and choose the format that best suits your needs. Popular formats include FBX, OBJ, and GLTF. Each format has its own set of options and benefits, depending on the intended use of your model.
- Configure Export Settings: After choosing a format, a window will appear with several export options. For textured models, ensure that you include Textures and Materials in the export. This might involve ticking checkboxes or navigating through tabs to include these elements.
- Choose Export Location: Decide where you want to save the exported file on your computer. Give it a descriptive name to make it easily identifiable.
- Export: Click the Export button to export your model. Depending on the complexity of your model and the speed of your computer, this process may take a few moments.
Once the export is complete, your model, along with its textures and materials, is ready to be imported into other projects or game engines. Remember, different applications may have specific requirements for textures and materials, so you may need to adjust your model\"s settings accordingly.
Exporting your model from Blender is a straightforward process, but paying attention to the details of the export settings is crucial to ensure that your textured model appears as intended in other applications. By following these steps, you can confidently share your Blender creations with the world.
_HOOK_
READ MORE:
Resources for Free Textures and Materials
Finding high-quality free textures and materials can significantly enhance your projects in Blender. There are numerous resources available online where you can download textures and materials that can be used to bring your models to life. Here is a list of platforms offering free resources:
- CGTextures: One of the largest collections of textures available, offering a wide range of textures for various uses.
- Texture Haven: Offers 100% free, high-quality textures that are CC0 licensed, meaning you can use them for any purpose without restrictions.
- Textures.com: A comprehensive resource for textures, with a certain amount of free credits given each day to download textures.
- Poliigon: Provides a variety of textures, including some free options, that are tailored for photorealistic rendering in Blender.
- CC0 Textures: Offers a wide range of textures with a focus on public domain (CC0) licenses, allowing for unrestricted use.
- BlenderKit: Integrated directly within Blender, BlenderKit offers free models, materials, and brushes.
When using these resources, it\"s important to check the license of each texture or material to ensure it fits your project\"s needs. Most of these platforms offer textures that can be used for both personal and commercial projects, but it\"s always good to verify. Utilizing these resources can save you time and enhance the quality of your work, allowing you to focus more on the creative aspects of your projects.
Remember, the key to effective use of textures in Blender is not just in finding high-quality materials but also in knowing how to apply them to your models correctly. Experiment with different textures and materials to see how they affect the mood and realism of your scenes.
Embark on a creative journey with Blender, transforming your models from simple shapes to stunning, textured masterpieces. Unlock the full potential of your projects by leveraging these insights and resources, elevating your skills in the art of texturing.