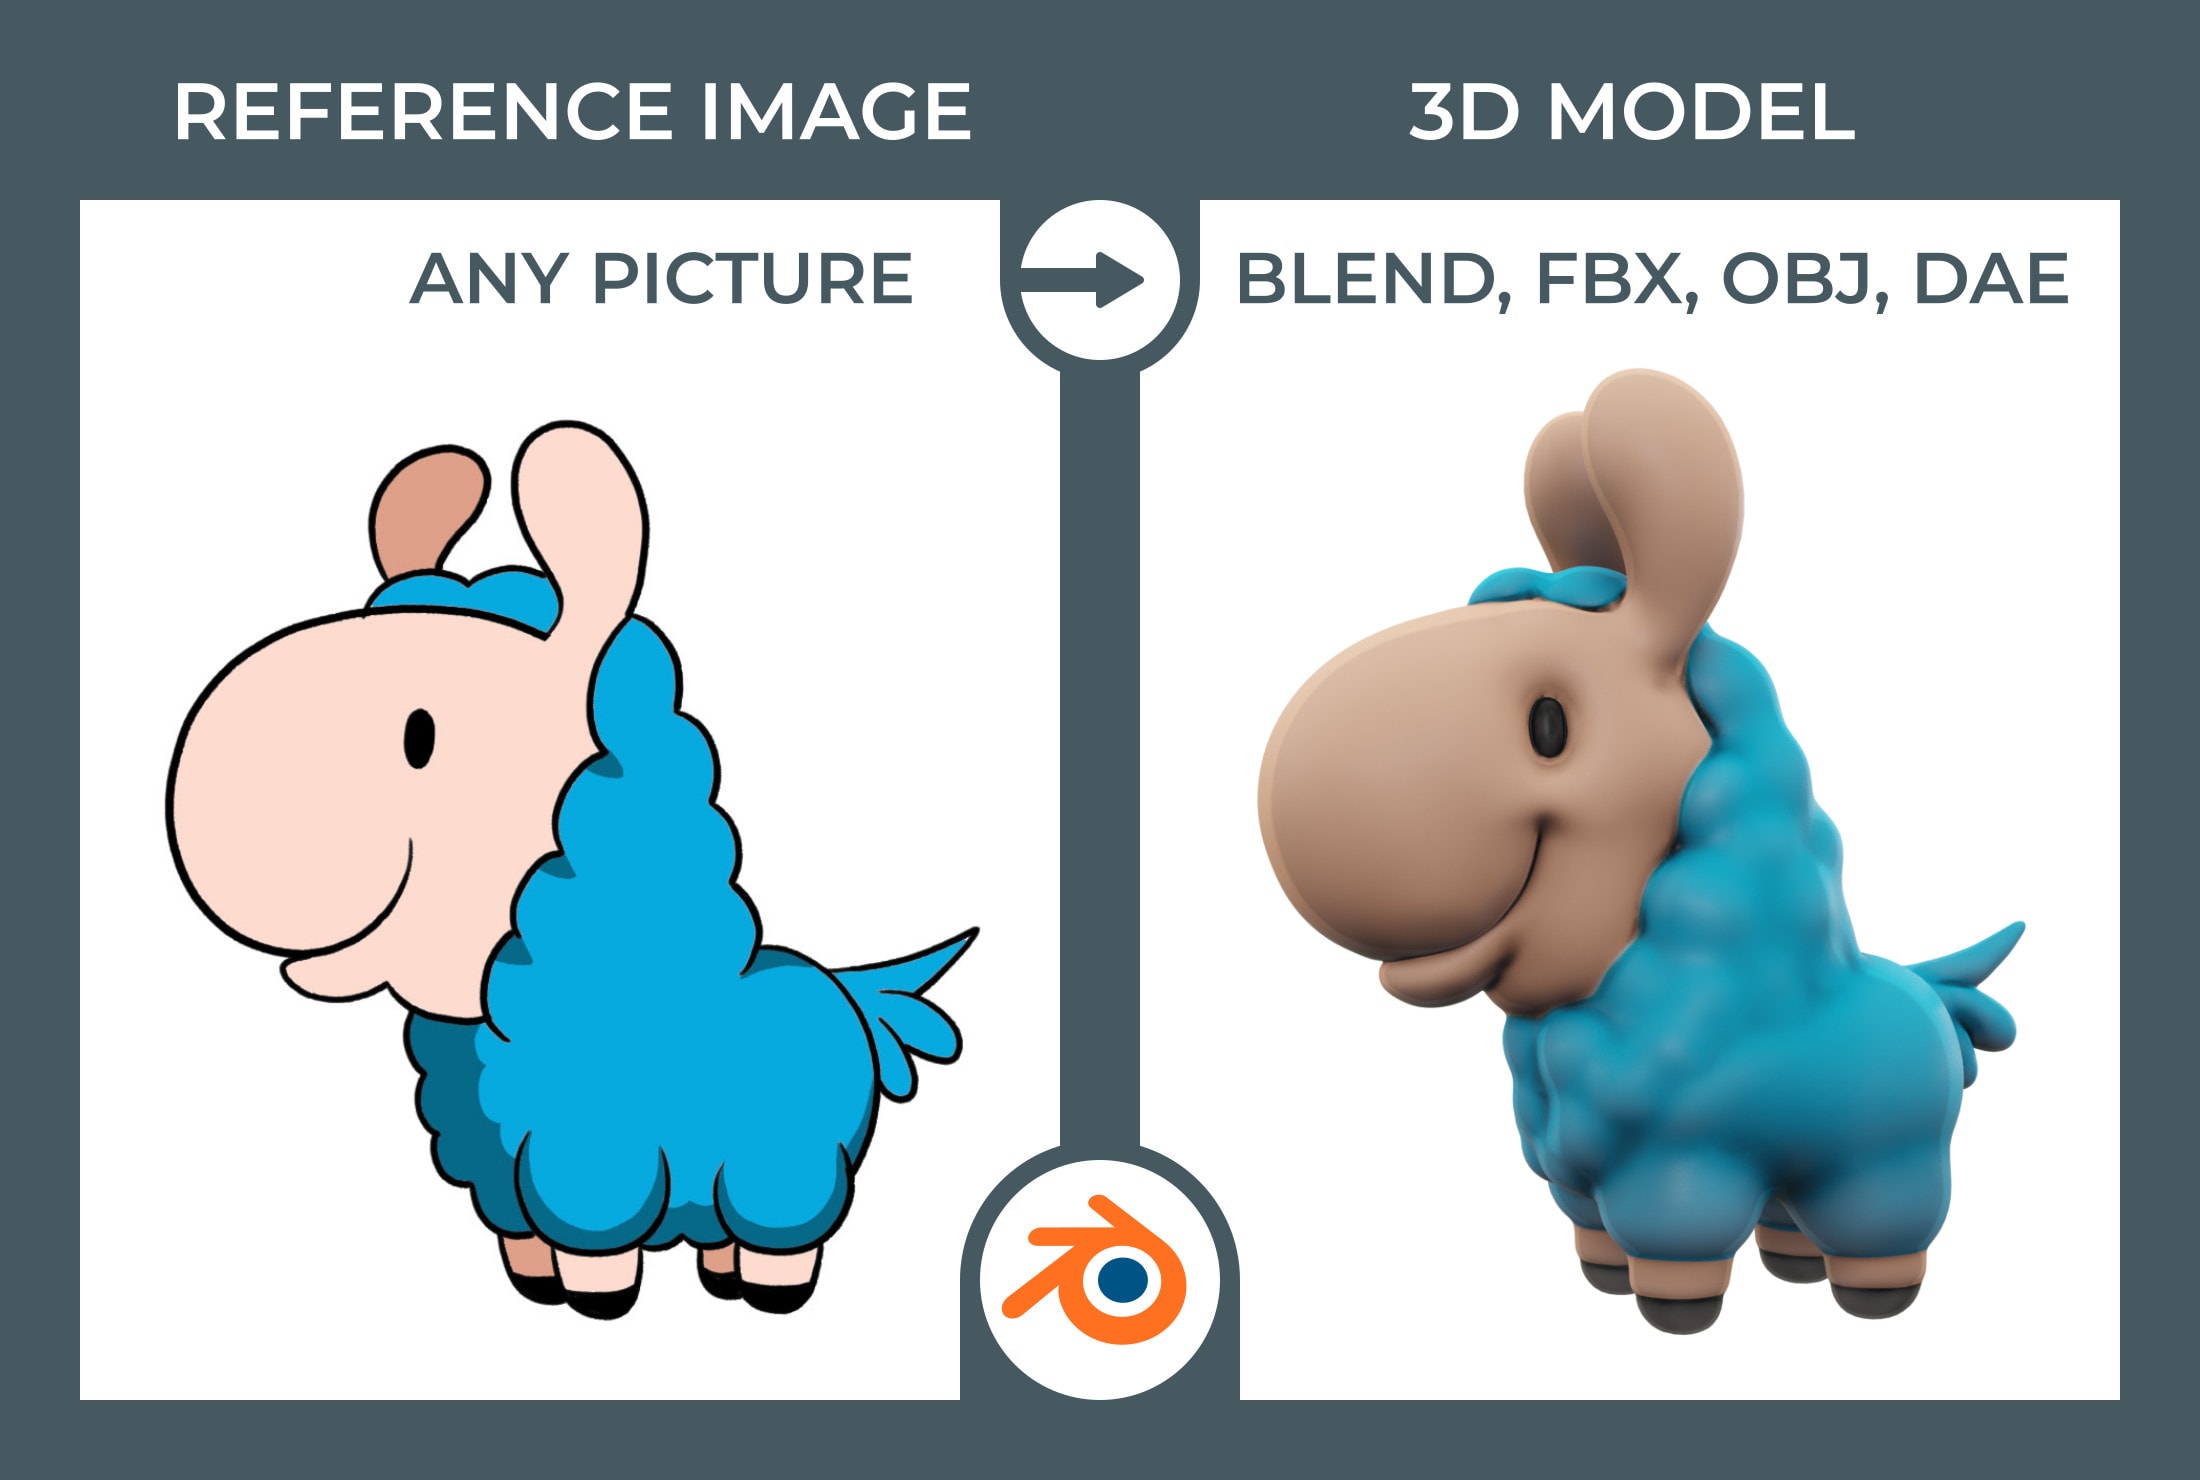
Topic how to model a person in blender: Embark on a creative journey to master 3D character creation in Blender, learning step-by-step how to model a person with precision and artistic flair.
Table of Content
- How can I model a person in Blender?
- Getting Started with Blender: Setting Up and Navigation Basics
- Understanding Blender\"s Interface and Tools for Character Modeling
- Step-by-Step Guide to Blocking Out the Basic Shape of a Human
- Refining Your Model: Adding Details to Your Character
- Sculpting Techniques: Enhancing Realism and Features
- Topology and Edge Flow: Ensuring a Clean, Animatable Mesh
- YOUTUBE: Blender Modelling Tutorial For Absolute Beginners - Simple Human
- Texturing and Shading: Bringing Your Character to Life with Colors and Materials
- Rigging and Weight Painting: Preparing Your Character for Animation
- Posing and Animation Basics for Your Modeled Character
- Rendering and Exporting: Finalizing Your Project
- Advanced Tips and Tricks for Character Modeling in Blender
- Resources and Community Support for Blender Artists
How can I model a person in Blender?
To model a person in Blender, you can follow the steps below:
- Before starting, gather reference images or sketches of the person you want to model. It\'s important to have front, side, and back views for accurate modeling.
- Open Blender and switch to the 3D Viewport.
- Select the default cube object and delete it by pressing the \"X\" key.
- On the toolbar on the left side of the viewport, click on the \"Add\" button and choose \"Mesh\" to add a new mesh object.
- Select \"Plane\" as the mesh type, which will create a flat surface.
- Go to the \"Object Data Properties\" panel in the right sidebar (press \"N\" to show it if not visible).
- In the \"Object\" tab, find the \"Display\" section and set the \"Maximum Draw Type\" to \"Wire\". This will make it easier to see and manipulate the model while modeling.
- Switch to Edit Mode by pressing the \"Tab\" key or selecting it from the mode dropdown menu on the bottom of the viewport.
- With the face of the plane selected, press the \"E\" key to extrude and create the basic shape of the body.
- Begin shaping and refining the model using various tools such as scaling, moving, rotating, and extruding vertices, edges, and faces. You can access these tools from the toolbar on the left or by pressing hotkeys (G, S, R, E) after selecting the desired elements.
- Use reference images and your artistic judgment to create the head, limbs, and other body parts. Remember to focus on anatomical proportions and details.
- Continue refining and sculpting the model until you achieve the desired result. Make use of the smoothing, sculpting, and subdivision surface modifiers to improve the quality and smoothness of the model.
- Once you are satisfied with the model, you can add textures, materials, and colors to the different parts of the character.
- Finally, you can render the model by setting up the camera, lighting, and other necessary settings.
Practice, experimentation, and patience are key elements in creating a realistic and detailed person model in Blender. Don\'t hesitate to refer to tutorials, online resources, or ask for help if needed. Enjoy the process and let your creativity shine!
READ MORE:
Getting Started with Blender: Setting Up and Navigation Basics
Welcome to the exciting world of 3D modeling with Blender! Before diving into character creation, let\"s set up your workspace and get familiar with navigation controls to ensure a smooth modeling process.
- Download and Install Blender: Visit the official Blender website to download the latest version of the software. Installation is straightforward, just follow the prompts.
- Explore the Interface: Upon launching Blender, you\"ll be greeted with the default screen. Familiarize yourself with the layout, including the 3D viewport, timeline, and toolbars.
- Basic Navigation: Learn the essentials of moving around in Blender:
- Rotate View: Hold the middle mouse button and move the mouse.
- Pan View: Hold Shift + middle mouse button and move the mouse.
- Zoom: Scroll the middle mouse wheel up or down.
- Customize Your Workspace: Blender allows you to customize the interface to suit your workflow. Try docking and undocking panels to see what works best for you.
- Setting Up a Project: Before starting your model, set your project\"s units and dimensions under the Scene Properties tab to match the scale of the person you\"ll be modeling.
- Save Your Project: Get into the habit of saving your work regularly. Use the File > Save option and choose a memorable location and file name.
With Blender set up and the basics of navigation under your belt, you\"re ready to start modeling. Patience and practice are key, so take your time exploring Blender\"s features and tools.

Understanding Blender\"s Interface and Tools for Character Modeling
Blender\"s comprehensive suite of tools and its versatile interface can be daunting at first, but with a focused approach, you\"ll soon be modeling characters like a pro. This section will guide you through the essential tools and features for character modeling.
- The 3D Viewport: This is your main window into the world of Blender, where you\"ll spend most of your time modeling, sculpting, and animating your characters.
- Mesh Modeling Tools: Blender offers a wide array of mesh editing tools essential for character modeling, including:
- Extrude: For extending faces or edges.
- Loop Cut: For adding more geometry to your mesh.
- Subdivide: For dividing faces into smaller ones, adding detail.
- Merge: For combining vertices, edges, or faces.
- Sculpting Tools: Once you have the basic shape of your character, Blender\"s sculpting tools let you add details like muscles, wrinkles, and expressions. The most used sculpting tools include the Grab, Clay Strips, Smooth, and Crease brushes.
- Modifiers: Modifiers are automatic operations that affect your object in non-destructive ways. Useful modifiers for character modeling include:
- Subdivision Surface: For smoothing your model.
- Mirror: For symmetric modeling.
- Armature: For rigging your model.
- Materials and Texturing: Bring your character to life with materials and textures. The Shader Editor in Blender allows for complex material setups, while UV unwrapping tools let you apply textures accurately.
- Lighting and Rendering: Understanding basic lighting and rendering techniques is essential for presenting your character. Play with different light types and settings in the Render Properties tab to achieve the desired mood and realism.
Mastering these tools and features is a journey of discovery and creativity. Experiment with each tool to understand its function and impact on your character models. Happy modeling!
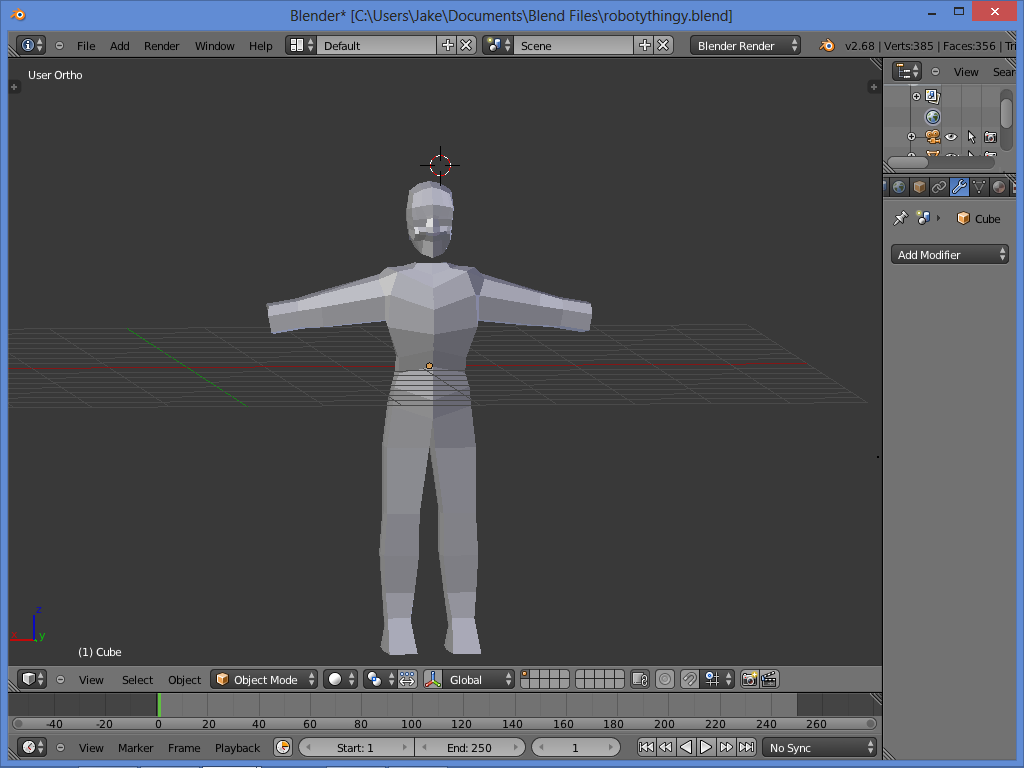
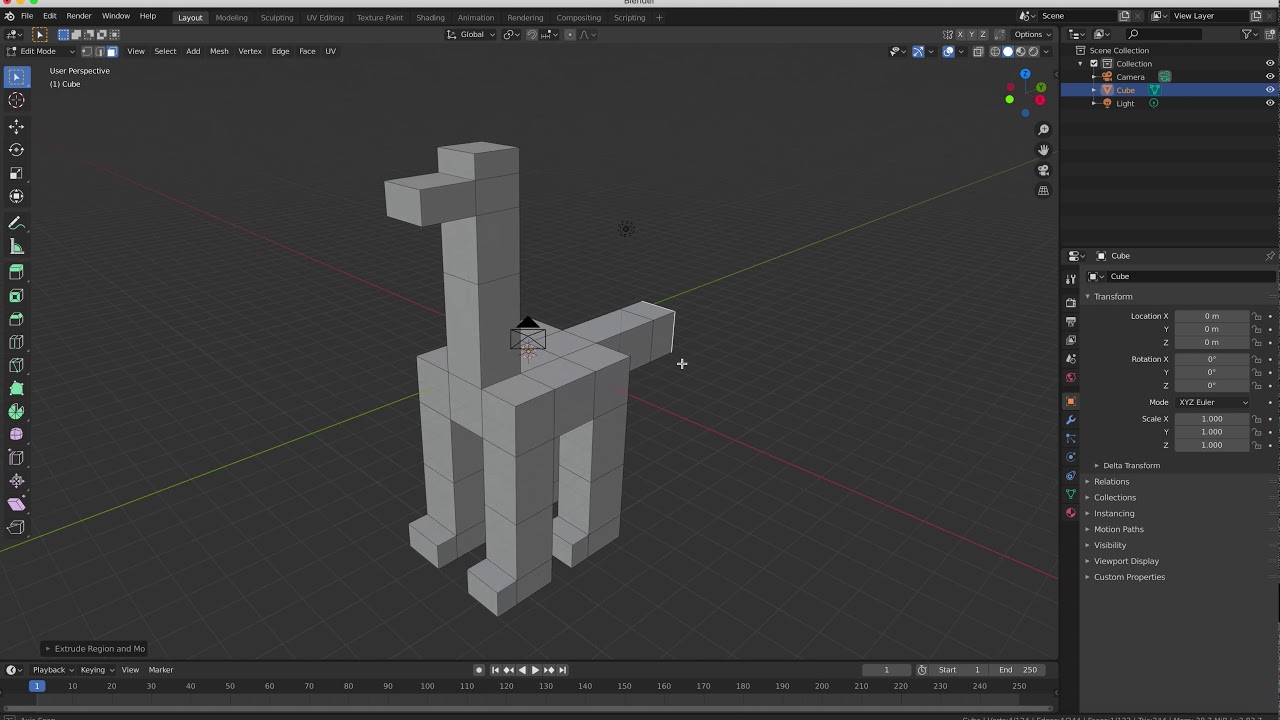
Step-by-Step Guide to Blocking Out the Basic Shape of a Human
Creating a human figure in Blender begins with blocking out basic shapes. This foundational step is crucial for establishing proportions and overall structure before adding details. Follow this guide to start your character modeling journey.
- Start with a Reference: Before you begin, gather reference images to guide your modeling. Front and side views are particularly helpful for understanding proportions.
- Create a Basic Mesh: Use a cube as your starting point. Enter Edit mode, and begin shaping it into the torso of your character.
- Extrude Limbs: Select faces where the arms and legs will be, and use the Extrude tool (E) to pull them out from the torso.
- Form the Head and Neck: Extrude upward from the torso to create the neck and head. Initially, keep the head shape simple, like a rounded cube or sphere.
- Define Basic Proportions: Adjust the mesh to align with your reference images. Use the Scale (S), Grab (G), and Rotate (R) tools to position and shape each part of the body.
- Block Out Hands and Feet: Simplify these complex parts into basic shapes. For instance, represent hands with a flat, paddle-like shape and feet with elongated cubes.
- Refine the Silhouette: Step back and review the overall silhouette of your model. Make broad adjustments to ensure the proportions match human anatomy.
Blocking out the basic shape is an iterative process. Don\"t be afraid to make significant changes at this stage. The goal is to create a strong foundation for detailed modeling in later steps.

Refining Your Model: Adding Details to Your Character
After establishing the basic shape of your human model, the next step is to refine your character by adding details. This phase is where your model starts to come to life, capturing the unique features that define its personality and realism.
- Subdivision Surface Modifier: Apply the Subdivision Surface modifier to smooth out the geometry and add more polygons for detailing.
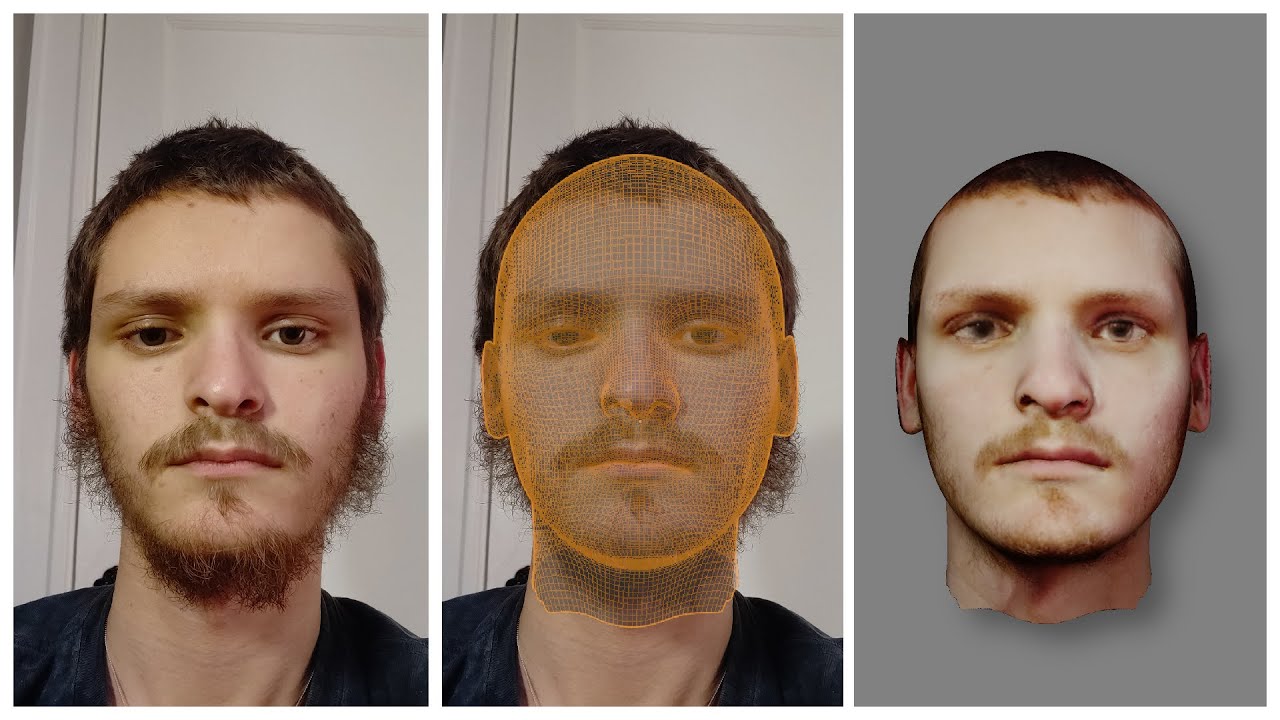
- Enhancing Facial Features: Focus on the face, using your references to model the eyes, nose, mouth, and ears. Remember, subtle changes can significantly affect the character\"s expression and mood.
- Defining Musculature: Use sculpting tools to add muscle definition and anatomical details. Pay attention to areas like the arms, legs, and torso, where muscle definition is prominent.
- Creating Clothes and Accessories: Model clothes and accessories as separate objects or by extruding parts of the existing mesh. Consider the character\"s role and personality when designing these elements.
- Texturing and Materials: Begin applying textures and materials to give your character color and realism. Use the UV Editing layout to unwrap your model and apply textures accurately.
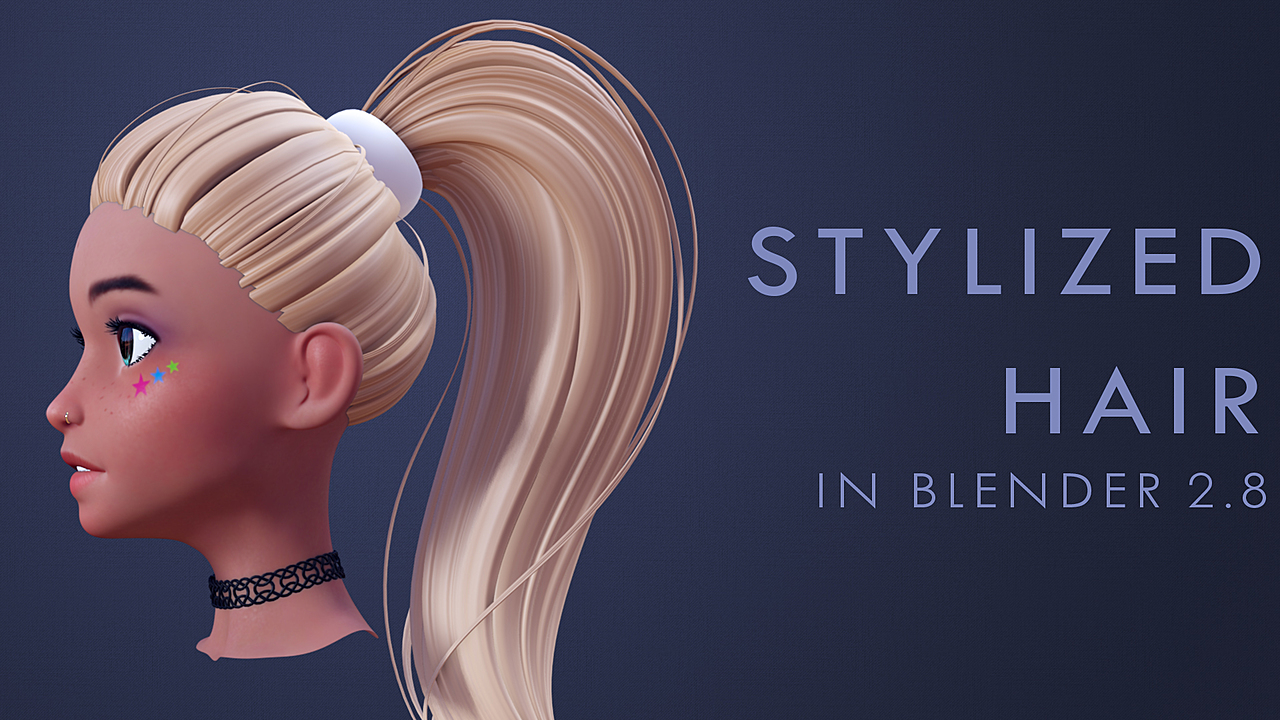
- Hair and Fur: Use Blender\"s particle system or hair objects to add hair, eyebrows, lashes, or fur. Experiment with different settings to achieve the desired look.
- Refining Hands and Feet: Return to the hands and feet to add fingers, toes, and finer details. These areas can be challenging, so use your references closely.
Detailing is a meticulous process that requires patience and iteration. Continuously compare your model to your reference images and make adjustments as needed. The goal is to capture the essence of your character, making it as detailed and lifelike as your skills and imagination allow.
_HOOK_
Sculpting Techniques: Enhancing Realism and Features
Sculpting in Blender is a powerful way to add realism and intricate details to your character models. This section will guide you through key sculpting techniques to enhance the features and realism of your character.
- Setting Up Your Sculpting Workspace: Switch to the Sculpting layout in Blender to access sculpting tools and brushes. Adjust your brush size and strength according to the detail level you\"re working on.
- Dyntopo (Dynamic Topology): Enable Dyntopo to dynamically adjust the mesh\"s topology as you sculpt, allowing for high-detail sculpting without pre-defining the mesh density.
- Basic Sculpting Brushes: Familiarize yourself with the essential brushes:
- Clay Strips: Great for adding volume and building up forms.
- Grab: Useful for adjusting large areas and overall shapes.
- Crease: Perfect for defining sharp edges and folds.
- Smooth: Essential for softening transitions and reducing brush strokes.
- Anatomy and Proportions: Keep reference images handy to accurately sculpt human anatomy. Pay attention to muscle groups, bone structure, and facial features.
- Detailing and Texturing: Use higher resolution and smaller brushes for detailing. Add skin textures, wrinkles, and scars to bring your character to life.
- Symmetry Mode: Use symmetry mode for consistent features on both sides of the character, especially useful when sculpting the face and body.
- Retopology: After sculpting, you may need to retopologize your mesh for animation or game asset creation, creating a cleaner, more efficient topology.
Sculpting is a blend of art and technique, requiring practice to master. Experiment with different brushes and settings to find what works best for your project. The goal is to create a character that feels lifelike and ready for the next steps in your workflow.

Topology and Edge Flow: Ensuring a Clean, Animatable Mesh
Good topology and edge flow are crucial for a model that deforms naturally during animation. This section explains how to achieve a clean, animatable mesh in Blender by focusing on topology and edge flow.
- Understand Topology Basics: Topology refers to how vertices, edges, and faces are arranged on your model. A good topology has a consistent flow of quads (four-sided polygons) that follows the natural lines of movement in the human body.
- Plan for Deformation: Areas of the body that deform significantly, like elbows, knees, and facial expressions, need extra attention to topology to ensure smooth animations. Add edge loops around these areas to allow for more flexibility.
- Use Quads for Flexibility: Quads are preferred because they deform more predictably under subdivision and rigging than triangles or n-gons. Aim to keep your mesh primarily composed of quads.
- Maintain an Even Mesh Density: Uniform mesh density helps in smoother deformation and texture application. Avoid very dense or very sparse areas unless necessary for detail.
- Edge Flow and Loops: Edge loops should follow the natural contours of muscles and skeletal structure. This makes rigging and skinning easier and more natural-looking.
- Retopology Tools: Blender offers tools for retopology, like the Shrinkwrap modifier and the Poly Build tool, which can help refine your topology after sculpting.
- Check for Poles and N-Gons: Poles (vertices where more than four edges meet) and n-gons (faces with more than four edges) can cause issues with subdivision and deformation. Try to minimize their use and place them strategically where deformation is minimal.
Investing time in creating a clean topology not only makes your model more animatable but also improves the overall quality and realism of your character. Practice and patience in this stage will pay off in your final animation.

Blender Modelling Tutorial For Absolute Beginners - Simple Human
Experience the incredible world of Blender modelling and unlock your creative potential! Dive into this video and learn step-by-step how to bring your imagination to life with advanced techniques and expert tips. Get ready to sculpt stunning 3D objects like never before!
Blender Character Modeling Tutorial For Absolute Beginners - Part 1
Get ready to embark on an exciting adventure into the realm of character modelling! In this captivating video, you\'ll learn the fundamentals of creating captivating characters from scratch. Gain valuable insights from industry professionals and watch your digital creations come to life in no time. Don\'t miss out on this opportunity to elevate your skills to the next level!
Texturing and Shading: Bringing Your Character to Life with Colors and Materials
Texturing and shading are pivotal in transforming your 3D model into a lifelike character. This process involves applying colors, materials, and textures to your model, adding realism and depth. Follow these steps to effectively texture and shade your character in Blender.
- UV Unwrapping: Begin by UV unwrapping your model, which involves projecting your 3D model onto a 2D plane to apply textures accurately. Use Blender\"s UV editing layout to adjust the unwrap and minimize stretching.
- Selecting Textures: Choose textures that match the look you\"re aiming for your character. Textures can include skin, fabric, metal, and more, contributing to the character\"s visual storytelling.
- Applying Base Colors: Use the Shader Editor to create and apply base color materials to different parts of your model. This step defines the primary colors of your character, such as skin tones and clothing colors.
- Adding Detail with Textures: Beyond base colors, apply detailed textures for skin imperfections, fabric patterns, or any specific details that enhance realism. Blender\"s texture painting tools can be very useful here.
- Shading and Material Properties: Experiment with Blender\"s Principled BSDF shader to adjust material properties like roughness, metallic, subsurface scattering (for skin), and more to achieve realistic effects.
- Lighting for Preview: Proper lighting is essential for accurately previewing and adjusting textures and materials. Use a three-point lighting setup to illuminate your character from different angles.
- Bump and Normal Maps: For added realism, use bump and normal maps to simulate surface irregularities without increasing the polygon count of your model.
Texturing and shading breathe life into your character, making it ready for animation or rendering. Take your time to tweak and refine materials and textures, as these details greatly contribute to the overall believability and appeal of your character.

Rigging and Weight Painting: Preparing Your Character for Animation
Rigging is the process of creating a skeleton for your character so it can move and pose. Weight painting is used to control how the mesh of the character deforms with the rig. Follow these steps to rig and weight paint your character in Blender.
- Create the Armature: Start by adding an armature (skeleton) to your character. Use bones to replicate the major joints and limbs. Ensure the armature matches your character\"s anatomy for accurate movement.
- Parent Mesh to Armature: Once your armature is complete, parent the character mesh to the armature using Automatic Weights. This automatically creates a basic weight painting that you can refine later.
- Edit Bone Weights: Enter Weight Paint mode to adjust the influence each bone has on the mesh. Areas painted red have the highest influence, while blue areas have none. Adjust the weights to ensure natural deformation during animation.
- Test the Rig: Pose your character by selecting bones in Pose mode and rotating or moving them. This helps identify any areas where weight painting needs adjustment for more natural movement.
- Add Inverse Kinematics (IK): For more advanced rigging, add IK constraints to simplify animation. IK allows you to animate a limb by moving the last bone in the chain, and the rest of the bones adjust accordingly.
- Customize Bone Controls: Create custom shapes for bone controls to make the rig user-friendly. This is especially helpful for facial rigging, where many small bones are involved.
- Organize and Name Bones: Keep your rig organized by naming bones logically and grouping them into layers. This makes animating complex characters much easier.
With a fully rigged and weight-painted character, you\"re now ready to animate. Rigging and weight painting are intricate processes that require patience and practice to master, but they are essential for bringing your character to life.

Posing and Animation Basics for Your Modeled Character
Posing and animating your character in Blender brings it to life and allows it to interact with its environment in a realistic or stylized manner. This section will guide you through the fundamentals of rigging, weight painting, posing, and basic animation techniques to give your character dynamic and engaging movements.
- Rigging Your Character: Rigging is the process of creating a skeleton for your model. Start by adding an armature in Blender, which serves as the internal skeleton. Adjust the armature to match your character’s anatomy, ensuring joints are correctly placed for natural movement.
- Weight Painting: Once the rig is in place, use weight painting to define how the mesh of your character deforms in relation to the movement of the bones. Areas painted with heavier weights will move more with the corresponding bone, allowing for realistic muscle and skin movement.
- Basic Posing: With your character rigged and weight painted, you can now pose it by selecting bones in pose mode and rotating them. Use the 3D viewport to adjust the view and select different bones to move parts of your character. Experiment with different poses to understand how the rig affects the mesh.
- Animation Basics: To animate your character, switch to the timeline view at the bottom of the screen. Create keyframes by moving your character into a starting pose, selecting all bones, and pressing ‘I’ to insert a keyframe for location, rotation, and scale. Move to another point in the timeline, adjust your character’s pose, and insert another keyframe. Blender will interpolate the movement between these keyframes, creating animation.
- Looping and Refining Animations: For walking or running cycles, make sure the start and end poses are identical to create a seamless loop. Use the graph editor to refine the movement curves for smoother animations.
- Exporting Animations: Once satisfied with your animation, you can export it for use in games, films, or other media. Blender supports various formats like FBX, which include both the mesh and the animation data.
Remember, the key to successful character animation is understanding the principles of movement and spending time refining your rig and animations. Practice with simple animations first and gradually move on to more complex sequences as you become more comfortable with the tools and processes.

_HOOK_
Rendering and Exporting: Finalizing Your Project
Rendering and exporting are the final steps in bringing your Blender project to life, allowing you to share your work with the world in a visual format. This process involves converting your 3D scene into a 2D image or animation that can be viewed on various devices. Follow these steps to successfully render and export your character model and animations.
- Setting Up Your Scene for Rendering: Before rendering, ensure your scene is set up correctly. This includes positioning the camera, setting up lighting, and applying any final textures or materials to your character. Check the environment and make sure it enhances your character’s appearance without overshadowing it.
- Choosing Render Settings: In Blender’s render settings, select the engine (e.g., Cycles or Eevee) that suits your project. Adjust the resolution, frame rate for animations, and sampling rates to balance between quality and rendering time. Higher sampling rates produce better quality but take longer to render.
- Rendering Still Images: For still images, after setting your camera’s viewpoint, simply press the Render button. You can then save the image in your desired format (e.g., PNG, JPEG) through the Image Editor’s save option.
- Rendering Animations: To render animations, define the start and end frames in the timeline. Choose the file format for the output, such as AVI or MPEG, and specify the output path where your animation will be saved. Hit the Render Animation button to start the process. Rendering animations can take a significant amount of time, depending on the complexity and length of the animation.
- Previewing Renders: Utilize Blender’s Render Preview feature to check your work before committing to a full render. This can save time and resources by allowing you to spot and correct any issues beforehand.
- Exporting Your Model: If you wish to use your model in other projects or applications, you can export it in various formats (e.g., OBJ, FBX). This is done by selecting your model and choosing the appropriate export option, ensuring you include any necessary data such as textures or armature.
After rendering and exporting, your project is ready to be presented or integrated into other media. Whether it’s for a portfolio, animation, game, or any other purpose, the final output represents your skill and creativity as a Blender artist. Remember, rendering and exporting are resource-intensive processes, so patience and careful planning of your render settings are crucial for achieving the best results.

Advanced Tips and Tricks for Character Modeling in Blender
Once you\"ve mastered the basics of character modeling in Blender, it\"s time to elevate your skills with advanced techniques that can add realism, efficiency, and artistry to your work. These tips and tricks will help you refine your characters, making them stand out with professional polish.
- Use Reference Images: Even experienced artists rely on reference images to ensure accuracy and realism. Set up front, side, and back views of your character as background images in Blender to guide your modeling process.
- Topology and Edge Flow: Paying attention to topology and edge flow is crucial for animation. Use quads instead of tris and n-gons to make deformation smoother. Ensure loops follow the muscle structure and facial expressions for more realistic movements.
- Modifiers for Efficiency: Learn to use modifiers like Mirror, Subdivision Surface, and Multiresolution to save time and add complexity to your model without manually editing every detail. Modifiers can drastically enhance your workflow and model quality.
- Sculpting for Details: Use Blender’s sculpting tools for adding fine details such as wrinkles, scars, and facial expressions. Start with a lower subdivision level and gradually increase the detail level to maintain control over the mesh.
- Custom Brushes and Textures: Create or import custom brushes and textures for sculpting and painting to add unique details that make your character stand out. This can include skin textures, hair details, or clothing patterns.
- Retopology for Clean Mesh: After sculpting, use retopology to create a cleaner, animation-ready mesh. Tools like the Shrinkwrap modifier or the QuadriFlow remesh can help in this process, ensuring your character has an optimal polygon count and topology.
- Realistic Materials and Textures: Spend time crafting realistic materials and textures. Use nodes in the Shader Editor to create complex materials that react naturally to lighting, such as subsurface scattering for skin.
- Rigging and Weight Painting Advanced Techniques: For characters that require detailed movements, explore advanced rigging techniques such as IK (inverse kinematics) chains, custom bone shapes, and constraints. Accurate weight painting is essential for realistic deformations.
- Use Add-ons and Tools: Blender’s community offers a vast array of add-ons and tools that can streamline character modeling. Explore add-ons for everything from hair and fur simulation to advanced sculpting tools.
- Continuous Learning: The world of 3D modeling and Blender evolves constantly. Stay updated with the latest features, tutorials, and best practices by engaging with the Blender community and exploring new techniques regularly.
Advanced character modeling in Blender is a blend of technical skill, creativity, and continuous learning. By incorporating these advanced tips and tricks into your workflow, you can create compelling, lifelike characters that are ready for animation, games, and other multimedia projects.
READ MORE:
Resources and Community Support for Blender Artists
The Blender community is vast and supportive, offering a wealth of resources for both beginners and advanced users. Whether you\"re looking for tutorials, assets, or advice, there\"s a platform or community ready to help. Below are key resources and types of community support available to Blender artists.
- Blender Official Website: The first stop for anyone interested in Blender. It offers downloads, updates, and detailed documentation on all aspects of the software.
- Blender Artists Community: An online forum where users share their work, ask questions, and provide feedback to one another. It\"s a great place to seek advice, collaborate, and learn new techniques.
- Tutorials and Online Courses: Platforms like YouTube, Udemy, and Blender Cloud offer a range of tutorials and courses for all skill levels. These resources cover everything from basic modeling to advanced animation techniques.
- BlenderNation: A news website that features articles, tutorials, and daily inspiration. It\"s an excellent source for staying updated on the latest Blender news and community projects.
- Blender Market: A marketplace for Blender assets, including models, textures, and plugins. Purchasing assets can save time in your projects, and the market also offers an opportunity for artists to sell their own creations.
- Blender Stack Exchange: A Q&A site for Blender users to ask and answer questions on a wide range of topics related to Blender and 3D modeling.
- Meetups and Conferences: Blender communities often organize local meetups, and the annual Blender Conference is held in Amsterdam. These events are fantastic opportunities to meet other artists, learn from experts, and share your work.
- Blender Foundation and Blender Institute: These organizations work on Blender development and offer training materials, workshops, and support Blender\"s open projects.
- Social Media Groups and Channels: Many social media platforms have active Blender groups where users share their work, tips, and tutorials. Facebook, Reddit, and Discord have particularly vibrant Blender communities.
Engaging with the Blender community can significantly enhance your skills, provide inspiration, and open up networking opportunities. Whether you\"re facing a specific challenge or just looking to improve, the community is an invaluable resource for artists at all levels.
Embark on a journey to master character modeling in Blender with our comprehensive guide. From basic setup to advanced techniques, we provide all the tools you need to bring your creative visions to life. Join the vibrant Blender community and start creating today!