Topic how to cut a model in blender: Discover the art of cutting models in Blender with our in-depth guide, designed to elevate your 3D modeling skills from beginner to expert. Master the knife tool, Boolean modifiers, and more to bring your creative visions to life.
Table of Content
- How to cut a model for 3D printing in Blender?
- Understanding the Knife Tool and Boolean Modifiers
- Step-by-Step Guide to Using the Knife Tool for Custom Cuts
- Utilizing Boolean Modifiers for Precise Shape Cuts
- Advanced Techniques: Loop Cut Tool for Adding Geometry
- Troubleshooting: Solving Common Issues with Cutting Tools
- Optimizing Your Workflow: Tips and Tricks for Efficient Model Cutting
- YOUTUBE: Blender Tutorial: How to Cut Through Objects
How to cut a model for 3D printing in Blender?
To cut a model for 3D printing in Blender, you can utilize the Knife Project tool. Follow these steps:
- Select the object you want to use as the cutting object in Object Mode.
- Hold down Shift and right-click to add the object you want to cut to the selection.
- Switch to Edit Mode by pressing Tab or selecting it from the mode dropdown in the top-left corner of the Blender interface.
- With both objects selected, go to the Mesh menu in the 3D Viewport header.
- Select Knife Project or use the keyboard shortcut Ctrl + F and choose Knife Project.
- A pop-up dialog box will appear, click OK to confirm.
- The cutting object will be used to cut the selected object(s). You can now delete or edit the separated parts as needed.
By following these steps, you can effectively cut a model for 3D printing in Blender. Enjoy exploring the possibilities of creating intricate designs with this technique!
READ MORE:
Understanding the Knife Tool and Boolean Modifiers
The Knife Tool and Boolean Modifiers are essential for precisely cutting and modifying models in Blender. Mastering these tools opens up new possibilities for your 3D projects, allowing you to create complex shapes and designs with ease.
- Using the Knife Tool:
- Activate the Knife Tool by pressing \"K\" in Edit Mode. Click on your mesh to start the cut, and press \"Enter\" to confirm.
- For precision, use \"Z\" to toggle cut-through mode, allowing the Knife to slice through the entire model.
- Utilize \"Ctrl\" for angle constraints, aiding in straight cuts.
- Employing Boolean Modifiers:
- Add a Boolean Modifier from the modifier panel in Object Mode. Choose your operation type: Union, Difference, or Intersection.
- Select the target object as the \"Cutter\". Position it where you want to cut or combine.
- Apply the modifier for a non-destructive edit, or use \"Ctrl + A\" to make it permanent.
Both tools have their unique advantages. The Knife Tool offers manual control for freeform cuts, while Boolean Modifiers automate the process, perfect for precise geometric operations. Experimenting with both will enhance your modeling toolkit, enabling the creation of intricate and detailed models.

Step-by-Step Guide to Using the Knife Tool for Custom Cuts
The Knife Tool in Blender is a powerful feature for making precise cuts in your models. Follow this step-by-step guide to utilize it effectively for custom modifications.
- Select Your Model: In Object Mode, select the model you wish to cut. Switch to Edit Mode by pressing \"Tab\".
- Activate the Knife Tool: Press \"K\" to activate the Knife Tool. Your cursor will change to indicate the tool is active.
- Make Your Cut: Click on the starting point of your cut on the mesh, and move your mouse to draw the cut. Click again to end the cut. You can make multiple segments by clicking multiple points.
- Confirm the Cut: Press \"Enter\" to confirm the cut. If you need to cancel the cut, press \"Esc\" before confirming.
- Refine Your Cut: After making the initial cut, you can refine it by adding more cuts or adjusting the vertices created by the Knife Tool.
- Use Cut-Through: Press \"Z\" while the Knife Tool is active to toggle cut-through mode, allowing the cut to go through the entire model.
- Constrain Angles: Hold \"Ctrl\" while making a cut to snap the knife to increments of 45 degrees for straighter cuts.
Mastering the Knife Tool requires practice. Start with simple cuts to understand how the tool behaves and gradually move on to more complex modifications. Remember, the Knife Tool is versatile and can be used for a variety of modeling tasks beyond simple cuts.
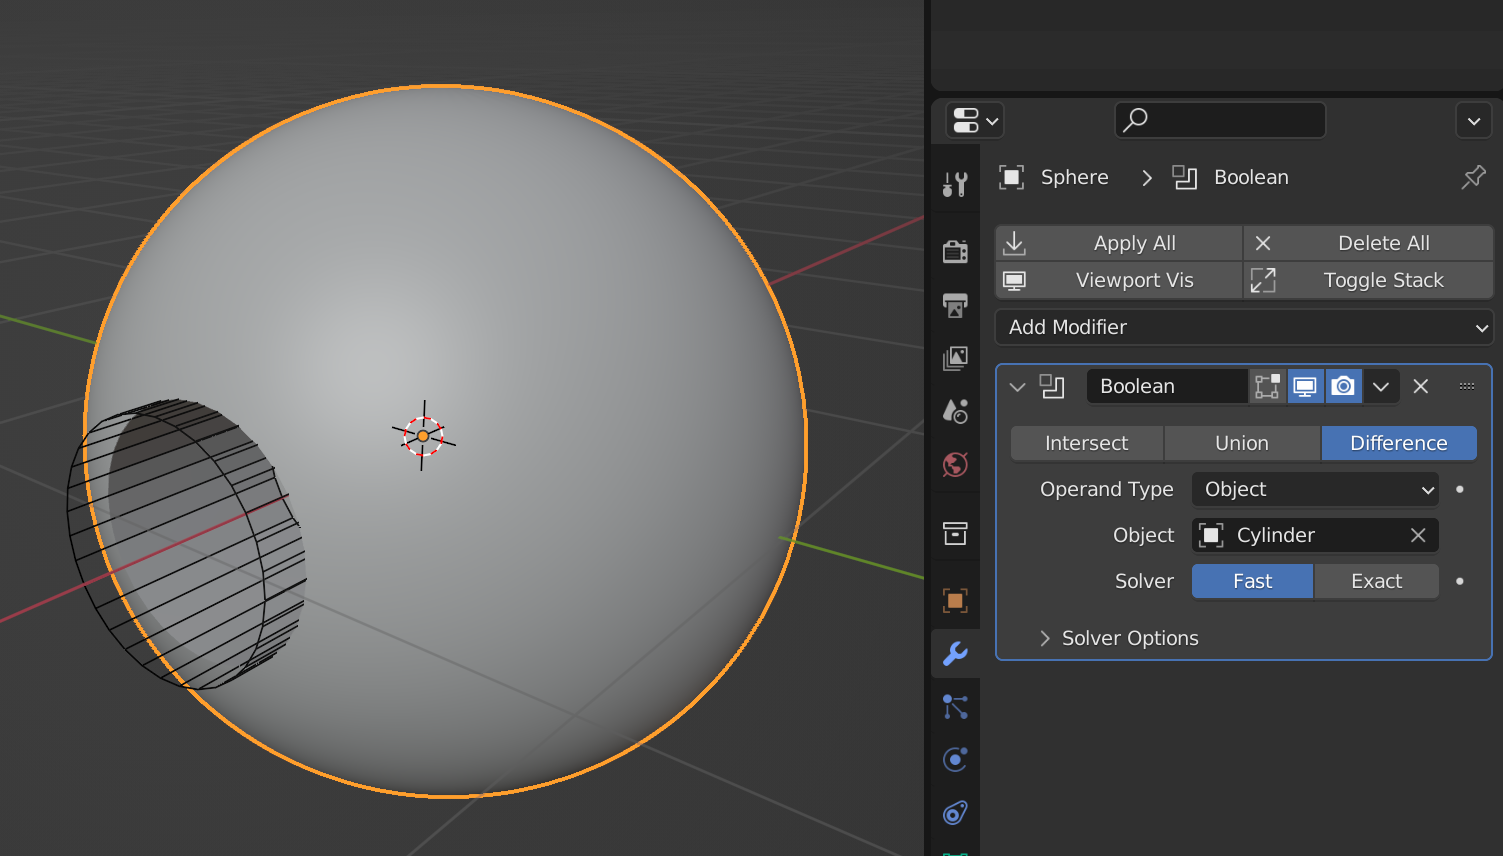
Utilizing Boolean Modifiers for Precise Shape Cuts
Boolean Modifiers in Blender are a powerful way to create precise cuts and combine different shapes. This section will guide you through the process of using Boolean Modifiers to achieve exact cuts, ideal for creating complex models and designs.
- Prepare Your Models: Start with two objects: the model you want to cut and the object to use as a cutter. Ensure both models are properly meshed and free of non-manifold edges.
- Select the Target Model: In Object Mode, select the model you wish to modify. This will be the base object that the Boolean operation will be applied to.
- Apply Boolean Modifier: With the base object selected, go to the Modifiers tab, click \"Add Modifier\", and select \"Boolean\" from the list. This will open the Boolean Modifier options.
- Configure Boolean Operation:
- For the \"Operation\" setting, choose \"Difference\" to subtract the cutter from the base model, \"Union\" to combine them, or \"Intersect\" to keep only the overlapping parts.
- Select the cutter object using the \"Object\" picker in the Boolean Modifier settings.
- Adjust Cutter Placement: Move or rotate the cutter object to the desired position where you want the cut or combination to happen. The changes will preview in real-time.
- Apply the Modifier: Once satisfied with the placement and effect, apply the Boolean Modifier to make the operation permanent. This can be done by clicking \"Apply\" in the Modifier panel.
- Clean Up the Mesh: After applying the Boolean operation, check the mesh for any anomalies or non-manifold edges and clean them up using edit mode tools.
Boolean Modifiers are ideal for operations requiring precision, like cutting holes, creating complex interlocking shapes, or merging objects seamlessly. Experimenting with different cutter shapes and operations can lead to unique and intricate designs.

Advanced Techniques: Loop Cut Tool for Adding Geometry
The Loop Cut Tool is an invaluable asset in Blender, enabling artists to add complexity and detail to their models through the addition of extra geometry. This section explores advanced techniques for leveraging the Loop Cut Tool effectively.
- Accessing the Loop Cut Tool: Enter Edit Mode (\"Tab\") and press \"Ctrl+R\" to activate the Loop Cut. A purple preview loop appears on your model, indicating where the cut will be made.
- Adjusting the Number of Cuts: Scroll your mouse wheel to increase or decrease the number of cuts. This is crucial for adding detail where needed or for creating subdivisions for further modeling.
- Placing the Cut: Move your mouse to position the loop cut. Left-click to place it. You can slide the loop along the mesh before clicking again to finalize its position.
- Loop Cut Options: After placing a cut, the tool\"s options allow for fine-tuning. You can adjust the cut\"s position or even out the spacing between edges for more uniform geometry.
- Creating Circular Loops: For cylindrical or spherical objects, loop cuts can help create edge loops that follow the object\"s curvature, enhancing the model\"s topology and facilitating smoother subdivisions.
- Using Loop Cuts for Detailing: Beyond adding geometry for the sake of structure, loop cuts can introduce specific areas of detail, allowing for intricate designs and patterns on your model\"s surface.
- Combining with Other Tools: Enhance loop cuts by combining them with other modeling tools like extrude, inset, or bevel to create complex shapes and details.
Mastering the Loop Cut Tool opens up a realm of possibilities for adding precision and intricacy to your models, making it a staple in the Blender artist\"s toolkit.
_HOOK_
Troubleshooting: Solving Common Issues with Cutting Tools
Even the most experienced Blender users can encounter issues when using cutting tools like the Knife, Boolean Modifiers, or the Loop Cut tool. This section aims to address some of these common problems and offer practical solutions.
- Knife Tool Not Cutting:
- Ensure you are in Edit Mode. The Knife Tool does not work in Object Mode.
- Verify that the mesh is visible and not hidden in Edit Mode. Press \"Alt+H\" to reveal any hidden geometry.
- Check if the Knife Tool is set to cut through by pressing \"Z\". Sometimes the tool is limited to visible geometry only.
- Boolean Modifier Producing Unexpected Results:
- Confirm that the cutter object is intersecting with the target mesh. If there\"s no intersection, the Boolean operation won\"t have any effect.
- Check the normals of your objects. Inconsistent normals can cause the Boolean Modifier to behave unpredictably. Use \"Shift+N\" to recalculate normals outside.
- Try changing the Boolean operation from \"Fast\" to \"Exact\" or vice versa to see if it resolves the issue.
- Loop Cut Tool Not Working:
- Loop Cuts only work on faces with four edges (quads). Ensure your mesh is primarily made of quads where you intend to use Loop Cuts.
- If the Loop Cut doesn\"t appear, you might be trying to apply it on a non-manifold edge. Check for and repair any mesh errors.
- Use the \"Ctrl+R\" shortcut to activate the Loop Cut tool and ensure your cursor is over a quad face.
- General Performance Tips:
- For complex models, consider simplifying the geometry before applying Boolean operations to improve performance and reduce calculation errors.
- Regularly save your work before using cutting tools to prevent loss of progress due to unexpected behavior or crashes.
By understanding these common issues and their solutions, you can minimize frustration and improve your workflow in Blender. Remember, practice and patience are key to mastering these tools and techniques.

Optimizing Your Workflow: Tips and Tricks for Efficient Model Cutting
Maximizing efficiency while cutting models in Blender not only saves time but also enhances the quality of your work. Here are some tips and tricks to streamline your modeling process and make the most out of Blender\"s cutting tools.
- Use Layers and Collections: Organize your project by separating different parts of your model into layers or collections. This simplifies the process of selecting and modifying specific sections without affecting the whole model.
- Shortcut Mastery: Familiarize yourself with Blender\"s keyboard shortcuts for the Knife, Boolean, and Loop Cut tools. Quick access to these functions can significantly speed up your workflow.
- Non-Destructive Editing: Utilize modifiers like Boolean for non-destructive editing, allowing you to make changes without permanently altering your base mesh. This approach offers flexibility to experiment and adjust your cuts.
- Mesh Cleanup: After cutting, use Blender\"s clean-up tools to remove unnecessary vertices, edges, and faces. Keeping your topology clean reduces file size and makes future edits more manageable.
- Boolean Solver Preferences: Experiment with different Boolean solvers (Exact and Fast) to see which one works best for your specific situation. Each solver has its strengths, depending on the complexity of the models involved.
- Custom Cutting Objects: For complex cuts, create custom cutter objects that match the exact shape you need. This method is particularly useful for intricate designs or patterns.
- Save Frequently: Always save your work before making significant changes or applying complex operations. This practice prevents data loss and allows you to revert to previous states if needed.
- Utilize Add-ons: Blender\"s community offers a variety of add-ons that can enhance the cutting process. Explore available tools that can introduce new functionalities or simplify existing processes.
Implementing these strategies can lead to a more efficient and enjoyable modeling experience in Blender. Remember, every project is different, so adapt these tips as needed to fit your workflow.
Unlock the full potential of Blender and transform your 3D modeling workflow with our comprehensive guide on cutting models. Master the art of precision and creativity, and start bringing your most ambitious designs to life today.
Blender Tutorial: How to Cut Through Objects
\"Discover the art of precision with our cutting techniques that promise to transform your ordinary hairstyle into a stunning masterpiece. Watch our video to learn how to cut like a pro and unleash your inner hairstylist!\"
READ MORE:
How to Split Models in Blender | Bisect Tool
\"Tired of long videos that leave you feeling overwhelmed? Look no further! Our video on splitting files into smaller, manageable parts is the ultimate time-saver. Check it out now and say goodbye to hassle and hello to efficiency!\"