Topic sims 4 blender tutorial: Unlock the magic of custom content creation for The Sims 4 with our Blender tutorial, designed to guide beginners and advanced users alike through the fascinating world of 3D modeling and animation.
Table of Content
- What is the best Sims 4 Blender tutorial for beginners?
- 1. Introduction to Blender for Sims 4: A Comprehensive Guide
- 2. Exporting Sims and Importing into Blender: Basic Material Setup
- 3. Creating Custom Content: Clothing, Hair, Accessories
- 4. Advanced Techniques: Sculpting, Texturing, and UV Mapping
- 5. Creating and Importing Poses and Animations into Sims 4
- YOUTUBE: BEGINNER Sims 4 Blender Render Tutorial by solitasims
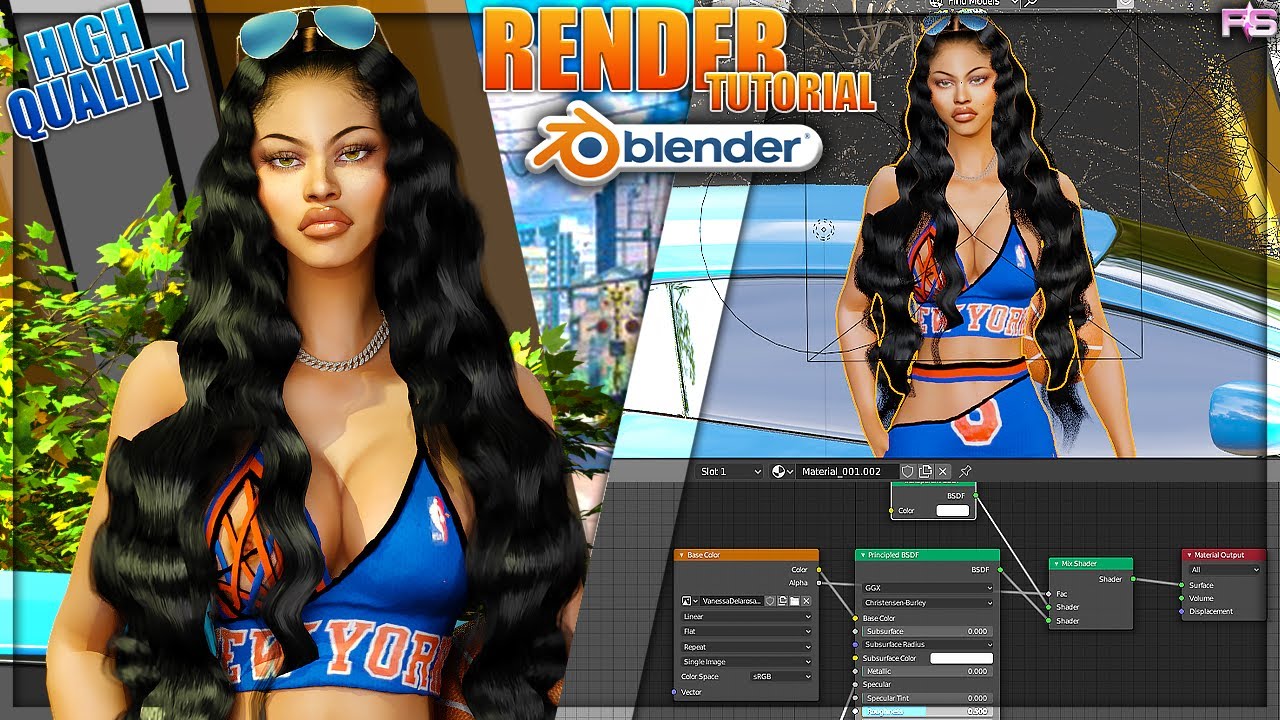
- 6. Rendering High-Quality Images with Blender: Tips and Tricks
- 7. Using Sims 4 Studio with Blender: A Step-by-Step Tutorial
- 8. Troubleshooting Common Issues: Overlapping Textures, Rigging Problems
- 9. Enhancing Your Projects: Lighting, Camera Controls, Rendering Settings
- 10. Community Resources and Support: Forums, Tutorials, and Downloadable Content
What is the best Sims 4 Blender tutorial for beginners?
Based on the search results and my knowledge, I recommend the following Sims 4 Blender tutorial for beginners:
- Start by opening Blender and importing your Sims 4 model into the program.
- Learn how to navigate the Blender interface, including viewport controls and menu options.
- Explore the basics of mesh editing in Blender, such as selecting vertices, edges, and faces.
- Understand how to apply textures and materials to your Sims 4 model within Blender.
- Practice using modifiers, such as Decimate, to optimize the mesh of your Sims 4 model.
- Follow along with tutorials from reputable sources like Blender Guru for step-by-step guidance.
By following these steps and resources, beginners can gain a solid foundation in using Blender for Sims 4 modding and customization.
READ MORE:
1. Introduction to Blender for Sims 4: A Comprehensive Guide
Welcome to the exciting world of custom content creation for The Sims 4 using Blender, the powerful open-source 3D graphics software. This guide is designed to introduce you to the basics of Blender, tailored specifically for Sims 4 content creators, and to provide you with the foundational skills needed to start your journey in 3D modeling and animation.
Blender offers a wide range of tools for modeling, texturing, rigging, animating, and rendering, making it an ideal choice for creating detailed custom content for Sims 4. Whether you\"re looking to design custom outfits, unique objects, or even animate your Sims in new and exciting ways, this guide will help you navigate through the initial learning curve of Blender and unlock your creative potential.
- Understanding Blender\"s Interface: Familiarize yourself with the Blender interface, including the 3D viewport, outliner, and properties panel, to efficiently navigate and utilize its features.
- Basic Modeling Techniques: Learn the basics of 3D modeling in Blender, from creating simple shapes to more complex structures, and how to apply these techniques to Sims 4 custom content creation.
- Texturing and Materials: Discover how to apply textures and materials to your models, a crucial step in bringing your Sims 4 creations to life with realism and detail.
- Rigging and Animation: Explore the process of rigging your models for animation, allowing you to create dynamic poses, movements, and expressions for your Sims.
- Exporting for Sims 4: Understand the steps required to properly export your creations from Blender to Sims 4, ensuring compatibility and functionality within the game.
By the end of this guide, you will have a solid understanding of the basic workflow in Blender for creating custom content for The Sims 4. You\"ll be equipped with the knowledge to start experimenting with your own designs, pushing the boundaries of your Sims 4 experience.
Let\"s embark on this creative journey together, transforming your imaginative concepts into reality within the Sims 4 universe.
2. Exporting Sims and Importing into Blender: Basic Material Setup
Creating custom Sims 4 content in Blender starts with exporting your Sims from the game and importing them into Blender for editing. This section guides you through the necessary steps for exporting your Sims and setting up basic materials in Blender, ensuring a smooth transition from Sims 4 to Blender.
- Preparing Your Sim in Sims 4: Before exporting your Sim, ensure they are wearing the outfit and pose you want to edit or use in Blender. Remove unnecessary accessories to simplify the import process.
- Using Sims 4 Studio for Export: Sims 4 Studio is an essential tool for exporting your Sim. Open the program, select \"Create 3D Mesh,\" and then \"Sims.\" Follow the prompts to export your Sim\"s model and textures.
- Importing into Blender: With the .blend file exported from Sims 4 Studio, open Blender and use the \"Import\" option to bring your Sim model into the 3D workspace.
- Setting Up Basic Materials: Once your Sim is in Blender, you\"ll need to apply basic materials to the model. This involves mapping the exported textures to the corresponding parts of the mesh in the \"Shader Editor\" window.
- Adjusting Texture Settings: Ensure that the textures are correctly aligned with your Sim\"s mesh. This might require adjusting the UV maps to match the textures perfectly with the model, especially for custom outfits or modifications.
After completing these steps, your Sim will be ready for further editing, modeling, or animation work in Blender. This foundational setup is critical for all types of custom content creation, from simple recolors to complex animations and new mesh designs.
Remember, the key to a successful import is attention to detail in both the export from Sims 4 and the material setup in Blender. With practice, this process will become a seamless part of your custom content creation workflow.

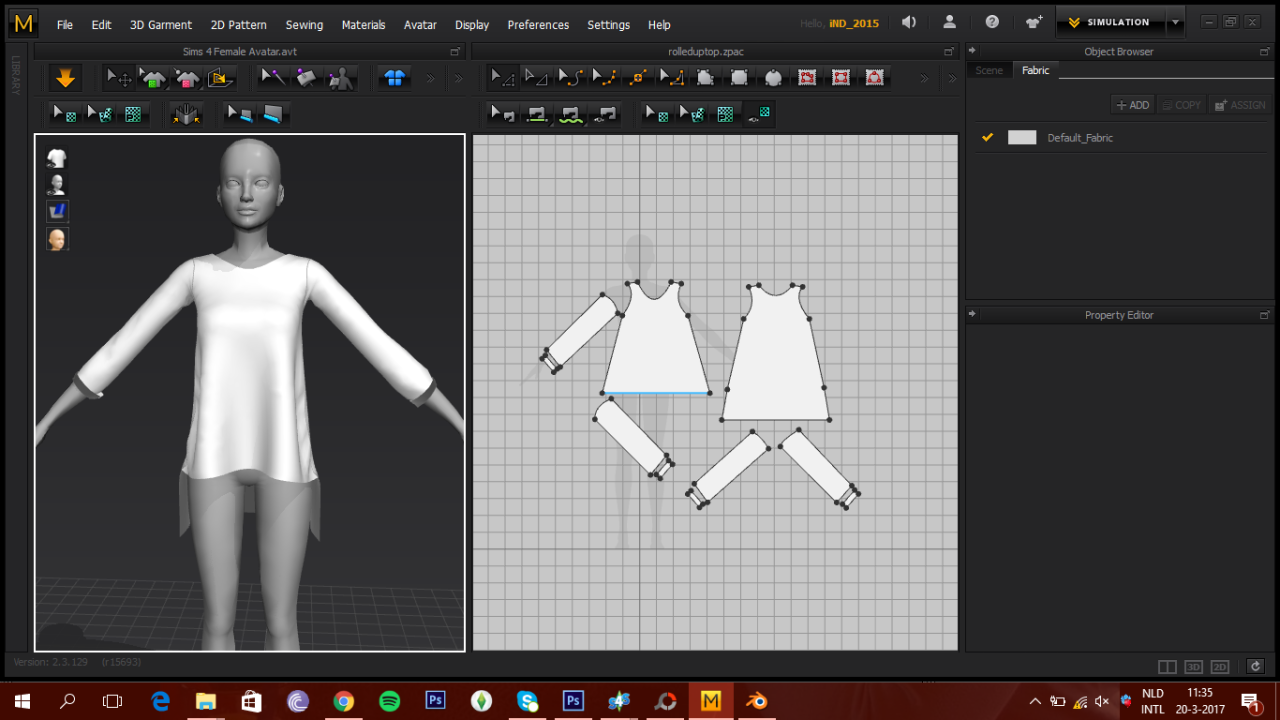
3. Creating Custom Content: Clothing, Hair, Accessories
Creating custom content (CC) for The Sims 4, such as clothing, hair, and accessories, is a rewarding way to add a personal touch to your game. Blender, with its versatile 3D modeling tools, offers a platform for creators to bring their visions to life. This section outlines the steps to create CC, focusing on clothing, hair, and accessories.
- Getting Started with Clothing:
- Select a base mesh from Sims 4 Studio to modify or start from scratch in Blender for unique designs.
- Utilize Blender\"s modeling tools to sculpt and shape your clothing item, paying close attention to the fit and drape on the Sim\"s body.
- Apply textures and materials to give your clothing color, pattern, and realism.
- Designing Hair:
- Begin with a basic shape that outlines the hairstyle you want to create. Use Blender\"s sculpting tools for detailed shaping.
- For realistic hair, consider using particle systems in Blender to simulate individual hair strands, though this can be complex and resource-intensive.
- Texture your hair model carefully to achieve a natural look, using photos or hand-painted textures.
- Creating Accessories:
- Accessories can range from simple to complex. Start with basic shapes and modify them to fit your design.
- Ensure that accessories are properly scaled and positioned on your Sim model to avoid clipping or other visual issues.
- Experiment with materials and textures to achieve the desired finish, whether it\"s metallic, fabric, or plastic.
Creating CC for The Sims 4 requires patience and practice, especially when learning to navigate Blender\"s comprehensive toolset. Remember to test your creations in-game to ensure they work as intended. With time and creativity, you can expand your Sims 4 library with unique, custom content that enhances your gameplay experience.

4. Advanced Techniques: Sculpting, Texturing, and UV Mapping
Mastering advanced techniques in Blender such as sculpting, texturing, and UV mapping is crucial for creating highly detailed and realistic custom content for The Sims 4. These skills elevate the quality of your creations, allowing for intricate designs and lifelike textures. This section delves into these complex techniques, providing a roadmap for enhancing your 3D modeling skills.
- Sculpting for Detailed Models:
- Begin with a basic mesh and use Blender\"s sculpting tools to add details like wrinkles, folds, and facial features.
- Utilize various brushes and sculpting techniques to achieve the desired level of detail, considering the performance impact on game play.
- Advanced Texturing Techniques:
- Explore the use of Blender\"s texture painting tools to add colors, patterns, and details directly onto your 3D model.
- Experiment with procedural textures for dynamic and complex surface details that can make your creations stand out.
- Efficient UV Mapping:
- Understand the importance of UV mapping for accurately applying textures to your models. Use Blender\"s UV editing tools to layout your model\"s texture coordinates effectively.
- Learn to minimize seams and distortion to ensure textures appear seamless and natural on the model.
By mastering these advanced techniques, you can push the boundaries of Sims 4 custom content creation, producing works that are not only beautiful but also highly immersive. Remember, practice and experimentation are key to developing your skills in these complex areas.

_HOOK_
5. Creating and Importing Poses and Animations into Sims 4
Creating and importing custom poses and animations into Sims 4 using Blender can enhance your gameplay and storytelling. This guide walks you through the process step by step, ensuring a smooth integration of your creations into the game.
- Preparing Your Tools:
- Download and install the latest version of Blender.
- Ensure you have Sims 4 Studio installed on your computer.
- Download any necessary plugins or addons for Blender that facilitate Sims 4 content creation.
- Exporting Your Sim:
- Use Sims 4 Studio to export the Sim or object you wish to animate. This will usually be in the form of a .blend file.
- Creating Poses in Blender:
- Open the exported .blend file in Blender.
- Use Blender\"s rigging and posing tools to manipulate your Sim into the desired pose.
- Save your pose as a new .blend file.
- Animating Your Sim:
- For animations, switch to Blender\"s Animation workspace.
- Create keyframes for your Sim\"s movements, ensuring a smooth transition between poses.
- Adjust the timing and flow of the animation using the timeline and dope sheet.
- Export your animation as a .blend file or in a format compatible with Sims 4 Studio.
- Importing Back into Sims 4:
- Open Sims 4 Studio and create a new project for a pose or animation.
- Import your .blend file or the exported animation file.
- Assign the pose or animation to an in-game action or create a custom content item for it.
- Save your project, and package it for use in Sims 4.
- Testing Your Creation:
- Place the packaged file into your Sims 4 Mods folder.
- Launch Sims 4 and enable custom content and mods in your game settings if you haven\"t already.
- Test your pose or animation in-game to ensure it works correctly.
Remember, creating custom poses and animations requires patience and practice. Don\"t be discouraged by initial challenges. With time, you\"ll be able to bring your unique visions to life in Sims 4.

BEGINNER Sims 4 Blender Render Tutorial by solitasims
Beginner: Are you new to the world of [keyword]? This video is perfect for beginners looking to learn the basics and build a strong foundation in [keyword]. Start your journey now! Render: Dive into the fascinating world of [keyword] with this captivating video on rendering. Watch as stunning visuals come to life right before your eyes. Experience the magic of rendering today!
Blender Tutorial - How I Render Sims In Blender - The Sims 4 by SaweetieSim
Thank you for watching! Please Like, subscribe and leave a comment ♡ Please don\'t be shy and leave a comment if there is any ...
6. Rendering High-Quality Images with Blender: Tips and Tricks
Rendering high-quality images in Blender for your Sims 4 projects can significantly improve the visual appeal of your custom content. This section provides essential tips and tricks to achieve photorealistic renders.
- Understanding Render Engines:
- Blender offers two main render engines - Eevee and Cycles. Eevee is faster but less realistic, while Cycles provides more photorealistic results but is more computationally intensive.
- Optimizing Light Settings:
- Good lighting is crucial for high-quality renders. Experiment with different lighting setups such as three-point lighting to enhance your scene\"s aesthetics.
- Improving Material Properties:
- Use high-resolution textures and tweak material properties like glossiness, reflectivity, and bump mapping to add realism to your Sims and objects.
- Adjusting Render Settings:
- Increase the render samples to reduce noise for a cleaner image. Be mindful that higher samples increase rendering time.
- Enable denoising to smooth out noise in the final render without increasing samples too much.
- Using Depth of Field:
- Depth of field adds a professional touch by blurring parts of the scene that are not in focus. Use it sparingly to draw attention to the subject of your image.
- Compositing and Post-Processing:
- Blender\"s compositing nodes can be used to add effects like glare, bloom, or color grading to enhance your final image.
- Consider additional post-processing in image editing software to adjust contrast, brightness, or add filters.
Experimentation and practice are key to mastering rendering in Blender. By applying these tips, you can create stunning, high-quality images for your Sims 4 custom content projects.
7. Using Sims 4 Studio with Blender: A Step-by-Step Tutorial
Combining Sims 4 Studio with Blender opens up a world of possibilities for custom content creation in The Sims 4. Follow this step-by-step guide to seamlessly integrate these powerful tools in your creative workflow.
- Installation and Setup:
- Ensure you have the latest versions of both Blender and Sims 4 Studio installed on your computer.
- Open Sims 4 Studio and go to the settings to link it with your Blender installation.
- Exporting Your Object from Sims 4 Studio:
- Launch Sims 4 Studio and choose the type of content you wish to create (e.g., clothing, accessory, object).
- Select the item you want to modify or use as a base and click \"Export\" to save it as a .blend file.
- Modifying Your Object in Blender:
- Open the exported .blend file in Blender. You\"ll see your object ready for editing.
- Use Blender\"s tools to modify the object. This can include sculpting, texturing, resizing, or any other changes you wish to apply.
- Importing Custom Content Back into Sims 4 Studio:
- After making your modifications in Blender, save your project as a .blend file.
- Return to Sims 4 Studio, click on the \"Import\" button, and select your modified .blend file to bring your changes into Sims 4 Studio.
- Finalizing Your Custom Content:
- In Sims 4 Studio, you can now assign categories, set colors, and make other adjustments to your custom content.
- Use the \"Create Package\" button to compile your work into a .package file that can be placed in the Mods folder of your Sims 4 installation.
This tutorial outlines the basic workflow for using Sims 4 Studio with Blender. Mastery of these tools will allow you to bring your unique creations to life in The Sims 4. Remember, the key to great custom content is creativity and experimentation.

8. Troubleshooting Common Issues: Overlapping Textures, Rigging Problems
When working on Sims 4 custom content in Blender, creators often encounter issues like overlapping textures and rigging problems. This section provides solutions to these common challenges, helping you to maintain the quality of your creations.
- Overlapping Textures:
- Identify the cause of the overlap by inspecting the UV maps in Blender. Overlaps often occur when two parts of a mesh share the same space on a UV map.
- To fix overlaps, adjust the UV map. Select the problematic vertices, edges, or faces in the UV Editor and move them to an unoccupied area of the UV map.
- Utilize texture painting tools in Blender to manually correct any discrepancies on the texture itself, ensuring that each part of the mesh receives the correct portion of the texture.
- Rigging Problems:
- Common rigging issues include improper deformation, parts of the mesh not moving as expected, or vertices assigned to the wrong bone.
- To correct these issues, go into Weight Paint mode in Blender. Here, you can adjust the weight of the vertices and their relationship to the bones.
- Ensure that each vertex is correctly weighted to the appropriate bones. Use the \"Normalize All\" option in weight painting to balance the weights.
- For complex rigging issues, consider clearing all weights and reassigning them manually to ensure accuracy.
- Testing and Validation:
- After making adjustments, always export a test version of your model and import it into Sims 4 Studio to check for errors.
- Use the Sims 4 Studio\"s built-in 3D viewer to inspect the model for any unexpected behavior during animations or interactions.
These troubleshooting steps should help you resolve the most common texture and rigging issues encountered while creating custom content for Sims 4 in Blender. Remember, patience and practice are key to mastering these techniques.
9. Enhancing Your Projects: Lighting, Camera Controls, Rendering Settings
Enhancing your Sims 4 projects in Blender involves mastering lighting, camera controls, and rendering settings to produce visually appealing results. This guide provides essential tips for elevating the quality of your renders.
- Mastering Lighting:
- Experiment with different lighting setups to highlight your subject. Consider using three-point lighting for a balanced and professional look.
- Utilize Blender\"s HDRi environments for natural-looking lighting and reflections.
- Adjust the strength and color of lights to set the mood and atmosphere of your scene.
- Optimizing Camera Controls:
- Familiarize yourself with Blender\"s camera settings, including focal length, depth of field, and composition rules like the rule of thirds to enhance visual interest.
- Use camera angles and perspectives creatively to tell a story or emphasize certain elements within your scene.
- Configuring Rendering Settings:
- Choose the right render engine for your project. Eevee is faster and suitable for real-time rendering, while Cycles offers more realistic results at the cost of longer render times.
- Increase samples for higher quality renders, reducing noise and improving clarity. Be mindful of render times, especially when using Cycles.
- Enable features like Ambient Occlusion, Bloom, and Subsurface Scattering to add depth and realism to your renders.
- Post-Processing Techniques:
- Utilize Blender\"s Compositor for final touches like color correction, vignetting, and glare to enhance the overall look of your render.
- Consider external software for more advanced post-processing options if needed.
By carefully adjusting lighting, camera settings, and rendering options, you can significantly improve the visual quality of your Sims 4 projects in Blender. Continuous experimentation and practice are key to mastering these aspects.
_HOOK_
READ MORE:
10. Community Resources and Support: Forums, Tutorials, and Downloadable Content
The Sims 4 and Blender communities are vibrant and supportive, offering a plethora of resources for creators at all levels. Whether you\"re seeking advice, tutorials, or downloadable content, there\"s a community resource for you.
- Forums and Online Communities:
- Join forums like Sims 4 Studio and Mod The Sims for discussions, tutorials, and a chance to connect with other creators.
- Reddit and Discord servers dedicated to Sims 4 modding and Blender art offer a space for real-time advice and feedback.
- Tutorials and Guides:
- Explore comprehensive tutorials on Sims 4 Studio and Blender\"s official websites for both beginners and advanced users.
- YouTube channels dedicated to Sims 4 CC creation and Blender modeling provide visual step-by-step guides.
- Downloadable Content:
- Websites like The Sims Resource and SimsDom offer a vast collection of custom content and assets to inspire or include in your projects.
- Look for Blender asset libraries and Sims 4 mod packs for ready-to-use models and textures.
- Supportive Networks:
- Participate in community challenges and collaborations to sharpen your skills and get your work noticed.
- Many creators offer Patreon accounts where you can support them and receive exclusive content, tutorials, or one-on-one mentoring.
Leveraging these community resources can significantly enhance your Sims 4 and Blender projects. Don\"t hesitate to ask for help, share your knowledge, and contribute to the community\"s growth.
Embark on a creative journey with our Sims 4 Blender tutorials, designed to empower your imagination and bring your virtual worlds to life. Join our community of passionate creators and transform your ideas into reality today.


