Topic how to use blender to edit videos: Unlock the full potential of your creativity by learning how to use Blender to edit videos. This comprehensive guide offers step-by-step instructions to master video editing from basic cuts to advanced visual effects.
Table of Content
- How can I get started with editing videos using Blender?
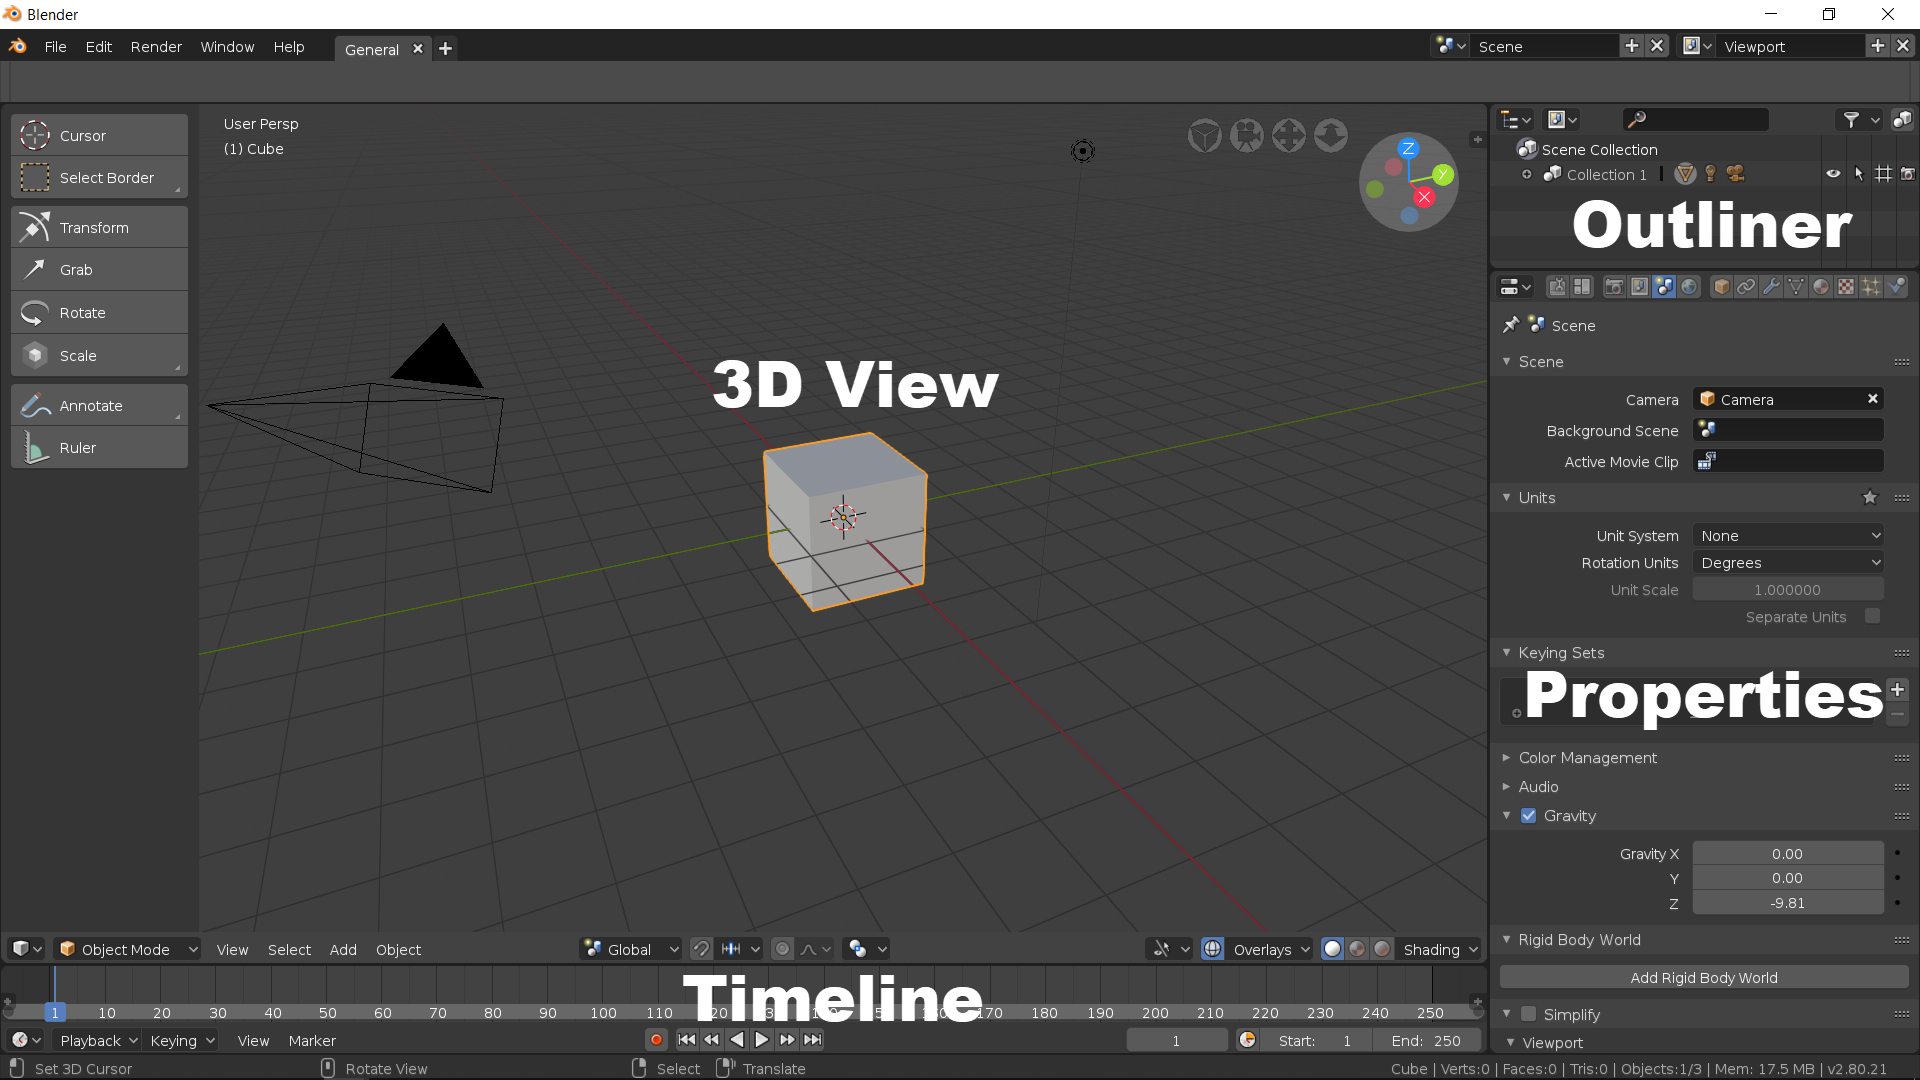
- Understanding Blender\"s Interface and Setup for Video Editing
- Importing Video and Audio Files into Blender
- Basic Video Editing Techniques: Cutting, Trimming, and Splicing
- Advanced Editing Features: Video Effects, Transitions, and Color Grading
- Working with Audio: Syncing, Mixing, and Adding Effects
- Using Blender\"s Video Sequence Editor (VSE) for Efficient Editing
- YOUTUBE: Video Editing with Blender for Complete Beginners - Part 1
- Animation and Keyframe Editing for Dynamic Video Content
- Rendering and Exporting Your Final Video Project from Blender
- Optimizing Workflow: Tips and Tricks for Faster Editing in Blender
- Learning Resources: Where to Find Blender Video Editing Tutorials and Community Support
How can I get started with editing videos using Blender?
To get started with editing videos using Blender, follow these steps:
- Open Blender and go to the main screen.
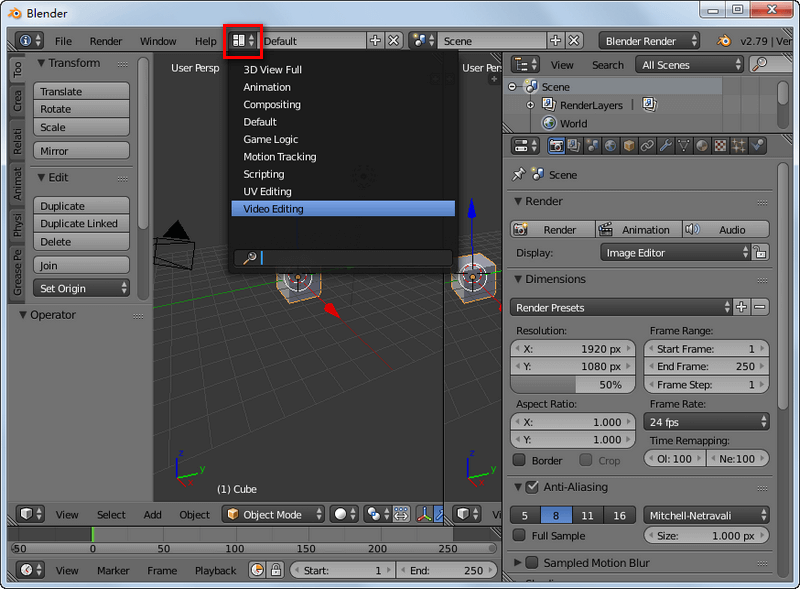
- Find the top taskbar and click on \"File\".
- Select \"File\" >> \"New\" >> \"Video Editing\". This will open up the video editor.
- Import your video footage into the video editor by clicking \"Add\" and selecting your video files.
- Arrange your video clips in the timeline by dragging and dropping them into the desired order.
- Trim, cut, and edit your video clips as needed using the editing tools available in Blender.
- Add transitions, effects, and titles to enhance your video.
- Preview your video by clicking the play button in the video editor.
- Once you are satisfied with your edits, export your video by going to \"File\" >> \"Export\" and selecting your desired export settings.
READ MORE:
Understanding Blender\"s Interface and Setup for Video Editing
Blender, while renowned for its 3D modeling and animation capabilities, also offers powerful tools for video editing. The first step to mastering video editing in Blender is familiarizing yourself with its interface and setup. This guide will walk you through the basics to get you started on your video editing journey.
- Opening Blender and Choosing the Video Editing Layout
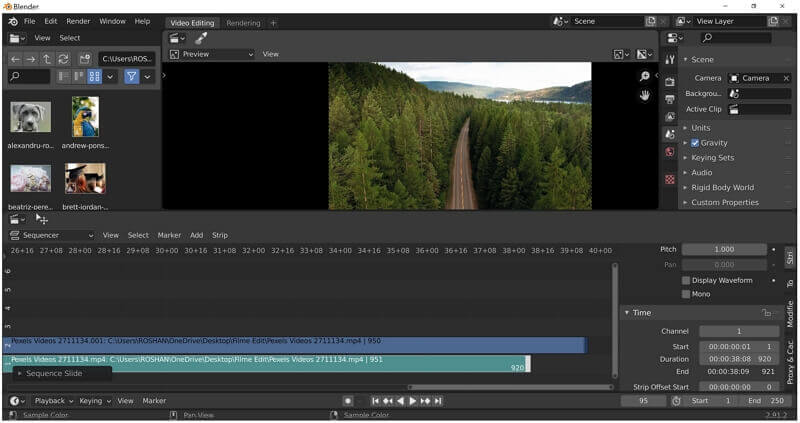
- When you first open Blender, you\"ll be greeted with the default layout designed for 3D modeling. To switch to the video editing workspace, click on the \"Layout\" dropdown menu at the top of the screen and select \"Video Editing\". This changes the interface to display the Video Sequence Editor (VSE), where you\"ll do most of your video editing work.
- Understanding the Video Sequence Editor (VSE)
- The VSE is Blender\"s non-linear video editor. It\"s split into several sections, including the Preview window, the Sequencer, and the Properties panel. The Preview window shows the current frame of the video you\"re editing. The Sequencer is where you\"ll arrange your video and audio clips, and the Properties panel allows you to adjust settings for the selected clips.
- Setting Up Your Project
- Before importing your video and audio files, it\"s a good idea to set up your project settings. Go to the Properties panel, and under the \"Output Properties\" tab, set your resolution, frame rate, and output format. These settings should match the specifications of your video files to ensure the best editing and playback performance.
- Importing Media
- To add video or audio files to your project, switch to the \"File Browser\" view from the Sequencer\"s \"+ Add\" menu. Navigate to your files, select them, and then drag and drop them into the Sequencer. You can also use the \"Shift+A\" shortcut to add media files directly into the Sequencer.
- Customizing the Interface
- Blender allows you to customize the interface to better suit your video editing workflow. You can adjust the size of the windows, add or remove panels, and save your layout for future projects. To do this, drag the corner of any window to resize it, or right-click on the window divider to split or join windows.
- Learning Keyboard Shortcuts
- Blender is known for its extensive use of keyboard shortcuts, which can significantly speed up your editing process. Familiarize yourself with shortcuts for common tasks like cutting clips (\"K\"), snapping (\"Shift+S\"), and changing the view (\"Numpad 0\" for the camera view, \"Home\" to fit the sequencer to the window). A comprehensive list of shortcuts can be found in the Blender manual or online tutorials.
Getting comfortable with Blender\"s interface and setup for video editing takes time and practice. Start by exploring the Video Sequence Editor, customizing your workspace, and learning the keyboard shortcuts. With patience and creativity, you\"ll soon be able to use Blender to edit videos with professional-looking results.

Importing Video and Audio Files into Blender
One of the initial steps in video editing with Blender is importing your media files into the project. This section provides a detailed guide on how to bring your video and audio files into Blender for editing.
- Switch to the Video Editing Workspace
- Ensure you are in the Video Editing layout. If not, switch to it by selecting \"Video Editing\" from the layout menu at the top of the screen. This workspace provides the tools and panels necessary for video editing.
- Access the Video Sequence Editor
- The Video Sequence Editor (VSE) is where you will import and manage your media files. You can see the VSE at the bottom of the screen, typically split into three sections: the Preview, the Sequencer, and the Properties panel.
- Importing Files
- To import video or audio files, go to the \"Add\" menu located in the Sequencer\"s header. From the dropdown, you can choose \"Movie\" to import video files, \"Sound\" to import audio files, or \"Image/Sequence\" if you\"re working with images or image sequences. Navigate to the location of your files, select them, and click \"Add Movie Strip\" or \"Add Sound Strip\" accordingly.
- Using the File Browser
- Alternatively, you can use the File Browser to import your files. Split your screen to open a File Browser view, navigate to your media files, then drag and drop them directly into the Sequencer. This method allows for a more visual selection of files, especially helpful when dealing with multiple assets.
- Adjusting Properties
- Once your files are imported, you can adjust their properties in the Properties panel. Select a clip in the Sequencer to display its properties, where you can adjust volume for audio, start and end frames, and other relevant settings to ensure your media plays as intended within your project.
- Synchronizing Video and Audio
- If you\"ve imported video and audio separately, you may need to synchronize them in the Sequencer. You can do this by moving the strips so that they start at the same frame. Use the waveform displayed on audio strips and the frame preview for video strips as guides to match them up precisely.
- Previewing Your Imported Media
- To preview your imported media, use the playback controls located below the Preview window. This allows you to check the synchronization of your video and audio, as well as the placement of your media within the timeline.
Importing video and audio files into Blender is a straightforward process that opens up the extensive editing capabilities of the software. By following these steps, you can efficiently prepare your project for the creative editing process that lies ahead.

Basic Video Editing Techniques: Cutting, Trimming, and Splicing
Mastering basic video editing techniques is essential for creating compelling video content. In Blender, cutting, trimming, and splicing are fundamental skills that allow you to control the narrative flow of your video. This section will guide you through these techniques step by step.
- Cutting Clips
- To cut a clip in Blender, first, ensure you\"re in the Video Editing workspace and have your clip selected in the Sequencer. Move the playhead to the frame where you want to make the cut. You can use the arrow keys to move frame by frame for precision. Press \"K\" to use the Blade tool, which cuts through the selected clip. If you need to cut all clips at a particular frame, use \"Shift+K\" to perform a soft cut, keeping everything aligned.
- Trimming Clips
- Trimming clips is the process of adjusting the start and end points of your clip without cutting it into pieces. To trim, select your clip in the Sequencer and hover over the beginning or end of the clip. The cursor will change to a double-sided arrow, indicating you can click and drag to extend or shorten the clip. This method is ideal for refining the timing of your clips without altering their content.
- Splicing Clips
- Splicing involves removing a segment from the middle of a clip and then joining the remaining parts. After cutting the clip at the start and end points of the unwanted section (using the \"K\" key), select the segment you wish to remove and press \"X\" or \"Delete\" to remove it. Then, select the two remaining clips, right-click and choose \"Merge Strips\" to splice them together seamlessly.
- Adjusting Clip Duration and Speed
- You can also adjust the duration and speed of your clips in Blender. Select a clip and open the Strip properties in the Properties panel. Here, you can find the \"Speed Control\" effect, which allows you to speed up or slow down the clip. Adjusting the speed will automatically change the clip\"s duration, helping you fit it into your project timeline precisely.
- Using the Snap Feature for Precise Editing
- Blender\"s snap feature helps align clips precisely in the timeline. To enable snapping, click the magnet icon in the Sequencer toolbar or press \"Shift+Tab\". This feature is particularly useful when splicing clips together, ensuring there are no gaps or overlaps between clips.
These basic video editing techniques in Blender are the building blocks for any video project. By practicing cutting, trimming, and splicing, you\"ll gain the flexibility and precision needed to craft your narrative effectively. With time and experimentation, these skills will become second nature, allowing you to focus on the creative aspects of your video editing projects.

Advanced Editing Features: Video Effects, Transitions, and Color Grading
Once you\"re comfortable with the basics of video editing in Blender, you can start exploring its advanced editing features. Blender offers a wide range of tools for adding video effects, transitions, and for performing color grading. These features can help elevate your video projects by adding polish and professionalism. Let\"s dive into how you can utilize these advanced editing capabilities.
- Adding Video Effects
- To add video effects, select your clip in the Sequencer and then navigate to the \"Add\" menu. Choose \"Effect Strip\" and then select the type of effect you want to add, such as Gaussian Blur, Glow, or Wipe. Each effect has its own set of properties that you can adjust in the Properties panel to achieve your desired outcome.
- Creating Transitions
- Transitions between clips can be created by overlapping them in the Sequencer. Blender automatically creates a crossfade transition. For more control or different types of transitions, use the \"Add\" menu to select \"Effect Strip\" and then choose a transition effect like Wipe or Cross. Adjust the properties of the transition effect to customize its appearance and duration.
- Color Grading
- Color grading is essential for giving your video a specific look or mood. In Blender, you can use the \"Color Balance\" effect under the \"Effect Strip\" menu to start color grading. This allows you to adjust the shadows, midtones, and highlights separately. For more advanced color grading, consider using Blender’s node-based compositor. Here, you can add nodes for color correction, curves, and more to fine-tune the color of your video.
- Using the Compositor for Advanced Effects
- For even more advanced video editing, switch to the Compositing workspace. Here, you can use Blender\"s powerful node-based system to create complex effects, composite video layers, or apply detailed color correction. The compositor offers a range of nodes that can be combined in limitless ways to create unique visual effects.
- Applying LUTs for Quick Color Grading
- Look-Up Tables (LUTs) are a quick way to apply color grading to your video. You can add a LUT in the Compositing workspace by using the \"Color\" node and selecting a LUT file. This method is great for achieving a professional look with minimal effort.
- Previewing Effects
- As you add effects, transitions, or color grading, regularly preview your work by using the playback controls in the Preview window. This helps ensure that the visual changes align with your vision for the project.
Blender\"s advanced editing features are powerful tools that can help you create visually stunning and emotionally compelling video content. By learning how to effectively use video effects, transitions, and color grading, you\"ll be able to bring a professional polish to your projects and fully realize your creative vision.

_HOOK_
Working with Audio: Syncing, Mixing, and Adding Effects
Audio plays a crucial role in video production, adding depth and emotion to your visual content. Blender\"s Video Sequence Editor (VSE) provides tools for syncing, mixing, and adding effects to your audio tracks. This section will guide you through the process of enhancing your video projects with high-quality audio.
- Syncing Audio and Video
- To sync audio with video, import both your video and audio files into the VSE. Place the audio strip underneath the corresponding video strip. Use the waveform displayed on the audio strip as a visual guide to align it with the video frames. For dialogue or music that needs to match specific video events, zoom in on the timeline for precise alignment.
- Mixing Multiple Audio Tracks
- Blender allows you to work with multiple audio tracks for background music, dialogue, and sound effects. To mix these tracks, adjust the volume of each strip in the Properties panel or use the VSE\"s built-in faders. Balance the levels to ensure that no single audio element overpowers the others, creating a harmonious sound mix.
- Adding Audio Effects
- To add effects to your audio, such as reverb or echo, you\"ll need to move to the Compositor. Here, you can use the \"Add\" menu to select \"Effect Strip\" and then choose \"Sound\". This allows you to apply and adjust audio effects. For more advanced audio editing capabilities, consider using dedicated audio software and then re-importing the enhanced audio back into Blender.
- Keyframing Volume Changes
- For dynamic audio effects, such as fading in or out, use keyframes to animate the volume of an audio strip. With the audio strip selected, hover over the volume slider in the Properties panel and press \"I\" to insert a keyframe. Move to another point in your timeline, adjust the volume to the desired level, and press \"I\" again. Blender will automatically create a smooth volume transition between these keyframes.
- Exporting Audio with Your Video
- When you\"re ready to render your project, ensure that your output settings include audio. In the \"Output Properties\" tab, select your desired audio codec and format. This ensures that your final video file will include both the visual and audio edits you\"ve made.
By effectively working with audio in Blender, you can significantly enhance the impact and professionalism of your video projects. Syncing, mixing, and adding effects to your audio tracks will help create a more immersive viewing experience for your audience.

Using Blender\"s Video Sequence Editor (VSE) for Efficient Editing
Blender\"s Video Sequence Editor (VSE) is a powerful tool for video editing that combines non-linear editing capabilities with Blender\"s robust suite of animation and effects tools. The VSE allows for efficient editing workflows, making it easier to assemble, cut, and refine your video projects. Here\"s how to make the most out of the VSE for your video editing needs.
- Navigating the VSE Interface
- Start by familiarizing yourself with the VSE layout. The main area is the sequencer, where you\"ll arrange your video clips, audio files, and effects. On the right, you\"ll find the Preview window to view your edits, and the Properties panel, where you can adjust settings for the selected strips.
- Assembling Clips
- Import your video and audio files into the sequencer. You can do this by dragging and dropping files directly into the sequencer or by using the \"Add\" menu. Arrange the clips in the desired order by clicking and dragging. Use the \"G\" key to grab and move strips more precisely.
- Applying Transitions and Effects
- For transitions between clips, place two clips close to each other for a simple crossfade or use the \"Add\" menu to insert more complex transition effects. You can also add video effects like color grading or blurs by selecting \"Add\" > \"Effect Strip\" and choosing the desired effect.
- Editing Audio
- Sync your audio by aligning the audio strips with your video. Adjust the volume and mix different audio tracks directly in the VSE. For more complex audio editing, consider using external software and then importing the finished audio back into Blender.
- Rendering Your Project
- Once your edits are complete, you\"ll need to render your project. Go to the Output Properties panel to set your video\"s resolution, frame rate, and output format. Click on \"Render\" > \"Render Animation\" to start the rendering process. Ensure you\"ve also set up the correct audio codec to include sound in your final video.
- Optimizing Your Workflow
- Make use of Blender\"s shortcuts and features to speed up your editing process. For example, pressing \"K\" allows you to cut clips directly in the sequencer, and \"Shift+R\" repeats your last action. Customize the VSE layout to better suit your workflow by dragging to resize panels or splitting the view to have multiple sequencers open.
Blender\"s VSE is a versatile tool that, once mastered, can significantly enhance your video editing efficiency. By integrating it into your workflow, you can leverage Blender\"s full potential to create professional-quality video content.

Video Editing with Blender for Complete Beginners - Part 1
Blender: Experience the amazing world of 3D animation and modeling with Blender! Create stunning visuals and bring your ideas to life in this powerful and versatile software. Watch the video now for some mind-blowing creations! Video Editor: Dive into the art of storytelling and visual expression with our comprehensive video editing guide. Learn essential techniques, tips, and tricks to elevate your video projects. Watch the video to unlock your editing potential!
Blender As A Video Editor? It\'s Actually Really Good!
Blender, which is free and open source software, is one of the best programs for creating professional-quality 3D animations.
Animation and Keyframe Editing for Dynamic Video Content
Integrating animation and keyframe editing can significantly enhance the dynamism and appeal of your video projects in Blender. This approach allows for the creation of smooth transitions, animated graphics, and custom effects that can elevate your content. Here\"s how you can utilize animation and keyframe editing to make your videos more engaging.
- Understanding Keyframes
- Keyframes are the cornerstone of animation in Blender. They mark the start and end points of any change in animation, effectively saving the state of an object at a specific frame. By setting keyframes at different frames, you can animate movement, scale, rotation, and other properties over time.
- Adding Keyframes
- To add a keyframe, first select the object or property you want to animate. Move to the frame where you want the animation to begin and make your adjustments (such as moving an object or changing its scale). Press \"I\" to insert a keyframe, and choose the property to animate (location, rotation, scale, etc.). Repeat this process at another frame to create the end point of your animation.
- Editing Keyframes
- Keyframes can be edited in the Timeline or the Graph Editor for more control over the animation\"s timing and easing. In the Timeline, you can move keyframes to adjust the timing. In the Graph Editor, you can manipulate the bezier handles of each keyframe to smooth or sharpen the acceleration and deceleration of the animation.
- Animating Effects and Transitions
- Use keyframes to animate video effects and transitions. For example, to create a fading effect, you could keyframe the opacity of a clip from 100% to 0%. Similarly, you can animate the position of a clip to slide it in or out of the frame, creating dynamic transitions between scenes.
- Using the Video Sequence Editor for Animation
- Blender\"s VSE allows you to apply keyframe animation to video strips and effects. Select a strip in the VSE, and in the Strip properties, you can insert keyframes for properties like opacity, volume, and position. This is useful for creating animated text, adjusting audio levels dynamically, or creating custom video transitions.
- Exporting Animated Content
- When your animation is complete, make sure to render your video with the animation settings enabled. Check your frame range and output settings to ensure that the entire animation is included in the final render. This process compiles your animated content into a smooth, dynamic video.
By mastering keyframe editing and animation in Blender, you can create highly dynamic and engaging video content. Whether it\"s for animated infographics, narrative storytelling, or visual effects, these techniques will allow you to bring your creative visions to life.
Rendering and Exporting Your Final Video Project from Blender
Completing your video project in Blender culminates with rendering and exporting it into a file format suitable for distribution or further processing. This process converts your edited sequences, animations, and effects into a single video file. Follow these steps to efficiently render and export your final video project from Blender.
- Setting Up Your Render Properties
- First, navigate to the Output Properties tab in the Properties panel. Here, you can set your desired output resolution, frame rate, and aspect ratio. Ensure these settings match your project\"s intended display medium for optimal playback quality.
- Choosing the Output Format
- In the Output Properties tab, locate the \"Output\" section. Click on the folder icon to choose the destination for your rendered file. Then, select your file format from the dropdown menu. Formats like FFmpeg video allow for a wide range of codecs and containers, suitable for various platforms.
- Configuring Encoding Settings
- After selecting FFmpeg video, adjust the encoding settings to suit your needs. You can choose the container (such as MPEG-4), codec (like H.264), and bitrate. These settings impact the quality and size of your final video, so choose based on your project\"s requirements and the balance between quality and file size.
- Audio Settings
- Don\"t forget to configure the audio codec if your project includes sound. In the Encoding section, set the audio codec to AAC for a good balance of quality and compatibility, and adjust the bitrate as needed.
- Rendering Your Video
- With all settings configured, go to the top menu and select \"Render\" > \"Render Animation\" or press \"Ctrl+F12\". Blender will begin processing your video, which may take some time depending on the complexity of your project and the capabilities of your computer.
- Monitoring the Render Process
- During rendering, Blender shows a progress bar and the current frame being processed. You can monitor this to estimate the remaining render time. Avoid using your computer for demanding tasks during this period to ensure the rendering process runs smoothly.
- Reviewing and Exporting
- Once rendering is complete, review the output video to ensure it meets your expectations. If additional edits are required, you can return to your project, make adjustments, and render again. If satisfied, your video is now ready for export. The file you specified in the Output section is your final project, ready for sharing or uploading to your chosen platform.
Rendering and exporting is the final step in bringing your video project from Blender to your audience. By carefully setting up your render properties and choosing the appropriate output format and encoding settings, you can achieve high-quality results that reflect your creative vision.
Optimizing Workflow: Tips and Tricks for Faster Editing in Blender
Efficient workflow practices can significantly reduce the time and effort required for video editing in Blender. By utilizing a series of tips and tricks, you can streamline your editing process, making it faster and more effective. Here are some key strategies to optimize your video editing workflow in Blender.
- Use Proxies for High-Resolution Footage
- Editing high-resolution video can be demanding on your system. To improve performance, use proxies. Proxies are lower-resolution copies of your footage that you can edit with, which are then replaced by the original high-resolution files during rendering. Enable proxies in the Properties panel under the Strip > Proxy & Timecode settings.
- Keyboard Shortcuts
- Mastering keyboard shortcuts can drastically reduce your editing time. Familiarize yourself with Blender\"s video editing shortcuts, such as \"K\" for cutting strips, \"G\" to grab and move strips, and \"B\" for box select. A comprehensive list can be found in Blender\"s documentation or by hovering over menu items in Blender.
- Batch Operations
- For repetitive tasks, like applying effects to multiple clips, use batch operations. Select multiple strips by holding Shift and then apply your desired operation, such as color grading or transformations, to all selected at once.
- Custom Layouts
- Customize Blender\"s layout to suit your video editing tasks. You can create a layout that puts all the tools you need within easy reach, reducing the need to switch between different panels or views. Save your custom layouts for future use to maintain a consistent and efficient workspace.
- Use Blender\"s Node Editor for Effects
- For complex effects and color grading, the Node Editor offers a powerful solution. Nodes allow for non-destructive editing and can be reused across multiple projects. Spend some time getting familiar with node-based compositing to unlock creative possibilities and efficient workflows.
- Render in Background
- To save time, render your projects in the background using Blender\"s command line interface. This allows you to continue working on other projects or tasks while Blender renders your video. Detailed instructions on how to do this can be found in Blender\"s manual or online tutorials.
- Keep Your Project Organized
- Maintain an organized project file by naming your strips, using color labels, and grouping related elements. This not only speeds up your workflow but also makes it easier to revisit projects in the future.
By implementing these tips and tricks, you can make your video editing process in Blender more efficient, giving you more time to focus on the creative aspects of your projects.
_HOOK_
READ MORE:
Learning Resources: Where to Find Blender Video Editing Tutorials and Community Support
Embarking on the journey of video editing with Blender can be both exciting and daunting. Fortunately, a wealth of learning resources and a supportive community can help you master this powerful tool. Whether you\"re a beginner or looking to refine your skills, here\"s where you can find helpful tutorials and community support.
- Blender Official Website
- The Blender Foundation offers comprehensive tutorials and documentation on their official website. These resources range from beginner to advanced levels, covering every aspect of Blender, including video editing.
- YouTube Tutorials
- YouTube is a treasure trove of Blender tutorials. Creators like Blender Guru, CG Geek, and Ducky 3D offer series ranging from introductory lessons to specific video editing techniques and tips.
- Blender Community Forums
- Blender Artists Forum and BlenderNation are great platforms for seeking advice, sharing your work, and learning from the experiences of other Blender users. These forums are active with experienced users who are often willing to help newcomers.
- Blender Stack Exchange
- For technical questions or troubleshooting, the Blender Stack Exchange is a Q&A site where you can ask specific questions and get detailed answers from the community.
- Online Courses and Workshops
- Websites like Udemy, Coursera, and Skillshare feature structured courses on Blender, including dedicated modules for video editing. These courses often provide a more structured learning path compared to individual tutorials.
- Blender Conference and Meetups
- Attending the Blender Conference or local Blender meetups can be a great way to learn directly from experienced users and professionals in the field. These events offer workshops, presentations, and the opportunity to network with other Blender enthusiasts.
- Social Media Groups and Channels
- Joining Blender-focused groups on platforms like Facebook, Reddit, and Discord can provide you with daily insights, tips, and the chance to engage with a community of like-minded individuals.
With these resources at your disposal, you can navigate the learning curve of Blender\"s video editing capabilities more smoothly. Engaging with the community and leveraging these learning materials will accelerate your growth as a video editor and animator.
Embark on your Blender video editing journey with confidence! Our comprehensive guide covers everything from basic editing techniques to advanced effects, ensuring you have the skills to bring your creative visions to life. Start creating stunning videos today!