Topic edit videos with blender: Discover the power of Blender for video editing: a free, open-source tool that transforms your creative visions into stunning visual stories. Start your journey to mastering video editing with Blender today!
Table of Content
- How to edit videos with Blender?
- Understanding Blender\"s Video Editing Capabilities
- Getting Started with Blender for Video Editing
- Navigating Blender\"s Interface for Video Editing
- Key Features of Blender\"s Video Sequence Editor
- Importing and Organizing Your Media in Blender
- Basic Video Editing Techniques in Blender
- YOUTUBE: Video Editing with Blender for Complete Beginners - Part 1
- Advanced Video Editing Tools and Effects
- Working with Audio in Blender
- Color Grading and Correction in Blender
- Rendering and Exporting Your Video from Blender
- Tips for Efficient Video Editing Workflows in Blender
- Learning Resources and Community Support for Blender
How to edit videos with Blender?
To edit videos with Blender, follow these steps:
- Open Blender and navigate to the video editing workspace.
- Import your video file by clicking on \"Add\" > \"Movie\" and selecting your video.
- Drag the video strip to the timeline at the bottom of the screen.
- To make cuts in the video, move the playhead to the desired point, then press \"K\" to cut the video strip.
- To delete a section, select the portion of the video strip and press \"X\".
- To add transitions, right-click between two clips and select \"Add\" > \"Effect Strip\" > \"Cross\" for a crossfade transition.
- Add audio by importing an audio file and aligning it with the video on the timeline.
- Adjust the volume levels by selecting the audio strip and pressing \"N\" to bring up the properties panel.
- Preview your edits by pressing play in the timeline.
- Once satisfied with your edits, export the video by going to \"File\" > \"Export\" > \"Save as\" and choosing your export settings.
READ MORE:
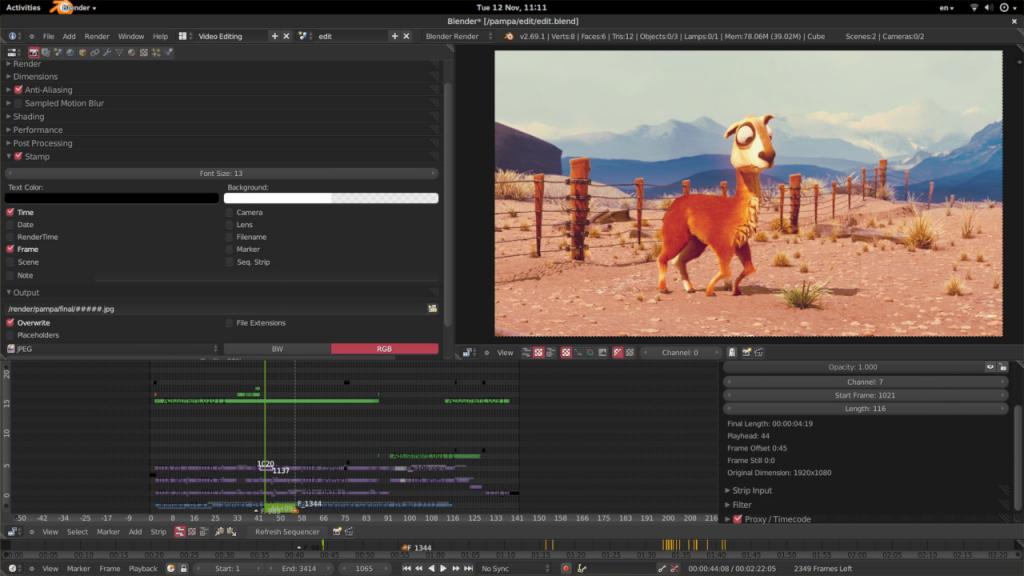
Understanding Blender\"s Video Editing Capabilities
Blender is not just a powerful 3D creation tool; it also offers robust video editing capabilities that cater to both beginners and advanced users. With its built-in Video Sequence Editor (VSE), Blender allows for a range of video editing tasks, from simple cuts and splicing to more complex procedures like video masking or color grading.
- Live Preview: Instantly view edits and changes without rendering, enhancing workflow efficiency.
- Luma Waveform, Chroma Vectorscope, and Histogram Displays: These tools provide detailed feedback on your video\"s color and lighting, crucial for professional-grade color correction and grading.
- Audio Mixing, Syncing, Scrubbing, and Waveform Visualization: Comprehensive audio editing tools ensure your video\"s sound is as polished as its visuals.
- Effects and Transitions: Blender includes a variety of effects and transitions to enhance your video, from simple crossfades to more intricate graphical overlays.
- Speed Control: Easily adjust the playback speed of your clips, allowing for dynamic slow-motion or fast-forward effects.
- Adjustment Layers and Filters: Non-destructive editing tools that enable color correction, brightness/contrast adjustments, and more without altering the original footage.
- Text and Titles: Add text overlays and title sequences directly within Blender, with extensive customization options.
- Rendering and Exporting: Blender supports a wide range of output formats, ensuring compatibility with other video editing software and platforms.
Whether you\"re looking to edit simple home videos or produce cinematic content, Blender\"s video editing suite offers a comprehensive set of tools to bring your vision to life. Its open-source nature also means a constant addition of new features and improvements by the community.

Getting Started with Blender for Video Editing
Embarking on your video editing journey with Blender begins with understanding its interface and functionalities tailored for video production. Here\"s a step-by-step guide to get you started:
- Download and Install Blender: Ensure you have the latest version of Blender installed on your computer for access to all the latest video editing features.
- Open Blender and Set Up the Video Editing Layout: When you launch Blender, choose \"Video Editing\" from the screen layout options. This configures Blender for video editing, displaying the Video Sequence Editor (VSE).
- Import Your Media: Use the \"Add\" menu in the VSE to import your video, audio, and image files. You can drag and drop files directly into the timeline or use the file browser to select your media.
- Learn Basic Navigation: Familiarize yourself with navigating the timeline, previewing your video, and using shortcut keys to streamline your workflow. Basic commands like cut (K), move (G), and delete (X) are essential.
- Edit Your Video: Begin editing by cutting your clips, arranging them on the timeline, and applying transitions between them. Use the preview window to monitor your progress.
- Add Effects and Adjustments: Explore Blender\"s array of effects and adjustments to enhance your video. This includes color grading, applying filters, and adding text overlays.
- Work with Audio: Import your audio files and synchronize them with your video. Blender allows you to adjust the volume, mix audio tracks, and even visualize audio waveforms on the timeline.
- Render and Export: Once your video is complete, select your desired output settings and render your project. Blender supports various file formats and resolutions, catering to different distribution platforms.
This foundational knowledge of Blender\"s video editing capabilities sets the stage for more advanced projects, enabling you to create professional-quality videos with a free and powerful tool.

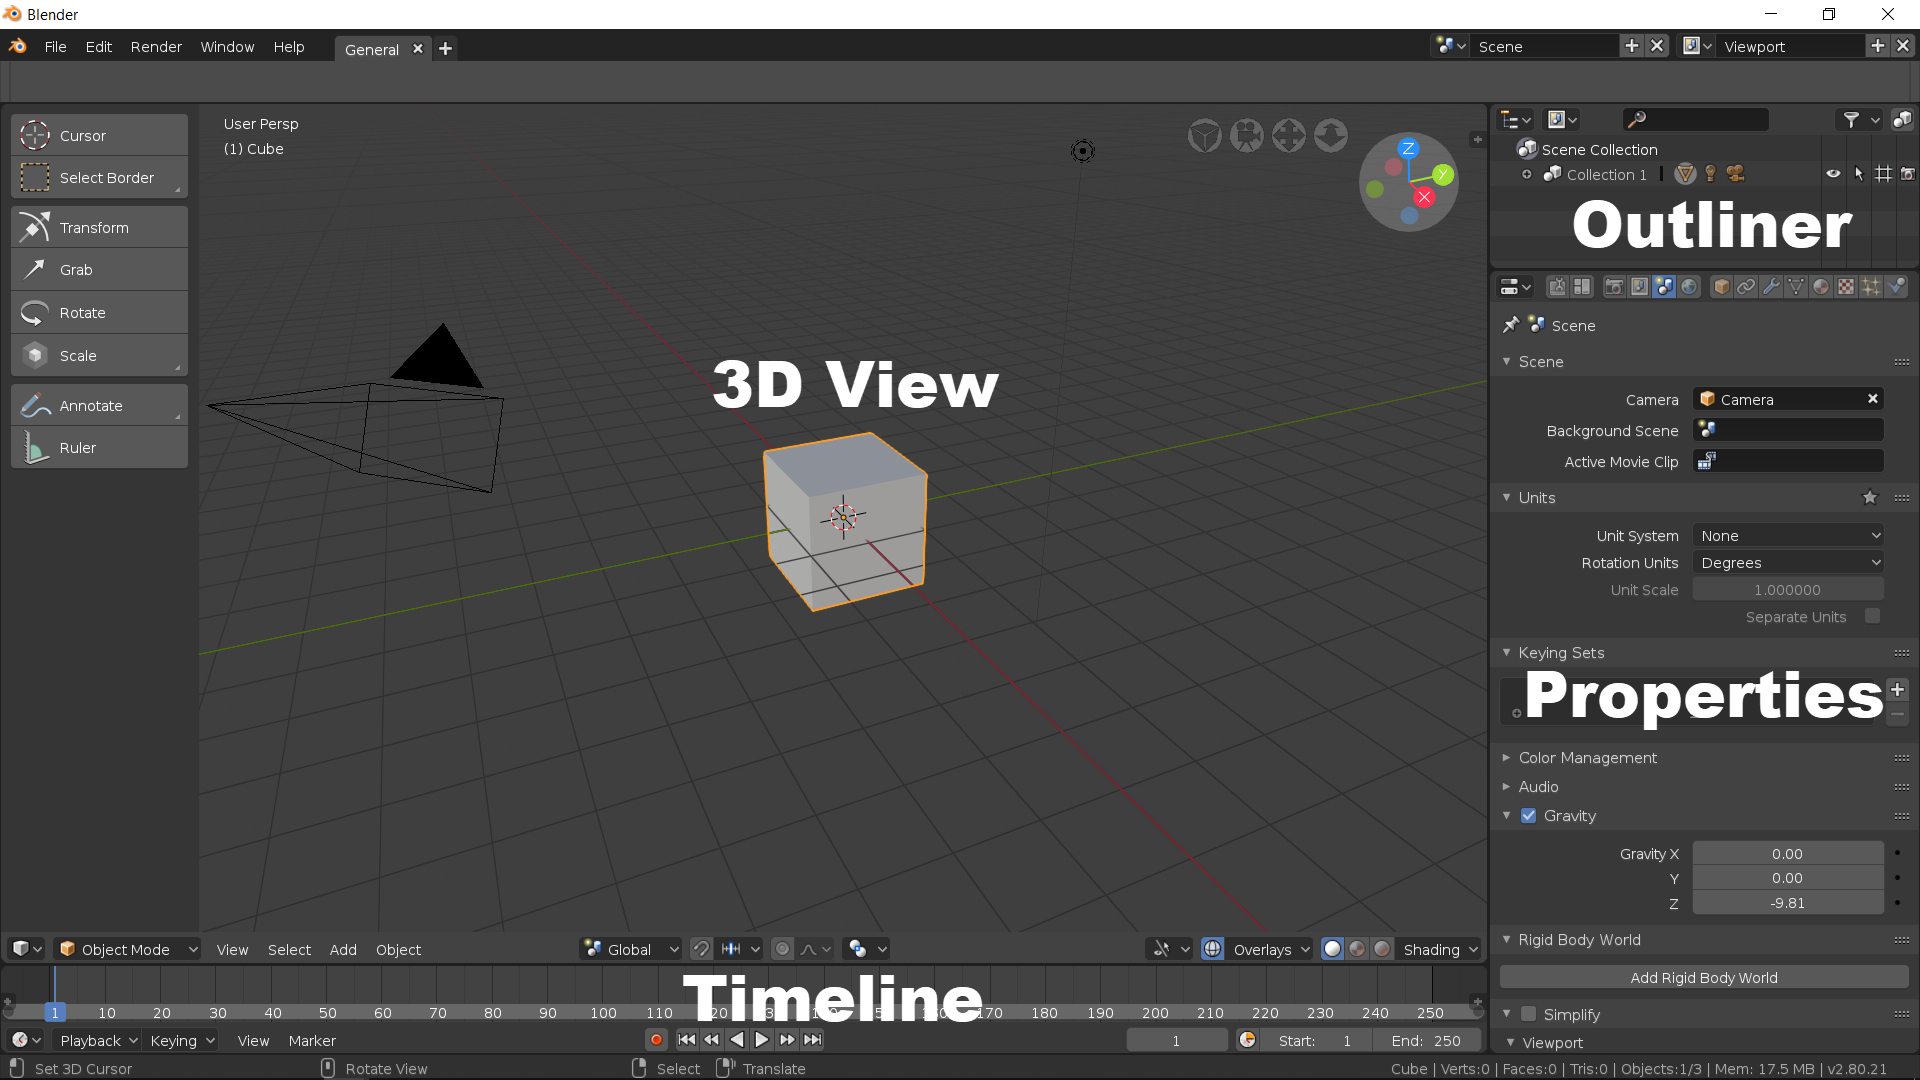
Navigating Blender\"s Interface for Video Editing
Blender\"s interface may seem daunting at first, but it\"s designed to offer a seamless video editing experience once you get familiar with it. Here\"s how to navigate the Video Sequence Editor (VSE) for video editing:
- Video Sequence Editor (VSE): The heart of Blender\"s video editing capabilities. Access it by changing the workspace to \"Video Editing\". This workspace is divided into several areas, including the preview window, the sequencer, and the properties panel.
- Preview Window: Displays the current frame of the video you\"re editing. You can play back your project here to see how your edits look in real-time.
- Sequencer: This is where you\"ll spend most of your time. It\"s a non-linear editor where you can arrange your video clips, audio files, and effects. You can cut, move, and delete clips here, as well as apply various effects.
- Properties Panel: Offers detailed control over the properties of the selected clips or effects in the sequencer. Adjust settings like opacity, blending modes, and modifiers from this panel.
- Toolbar: Contains tools for cutting, moving, and manipulating clips in the sequencer. Each tool can be selected and used with a click, providing a quick way to make adjustments to your project.
- Graph Editor, Dope Sheet, and NLA Editor: For more advanced animations and effects, these panels offer additional control over the timing and interpolation of movements within your video.
- Outliner: Provides a hierarchical view of all elements in your project, making it easier to manage complex projects with multiple clips, sounds, and effects.
By familiarizing yourself with these components of Blender\"s interface, you can efficiently navigate and utilize its full potential for video editing. Remember, practice and experimentation are key to mastering Blender\"s video editing workflow.

Key Features of Blender\"s Video Sequence Editor
Blender\"s Video Sequence Editor (VSE) is a fully-featured, non-linear editing system that provides a suite of tools for video editing and creation. Here are the key features that make it a powerful choice for video editors:
- Non-Linear Editing: Arrange video, audio, images, and effects in any order without altering the original files.
- Live Preview: View edits in real time without needing to render, speeding up the creative process.
- Comprehensive Audio Editing: Mix, synchronize, and edit audio tracks with waveform visualization, ensuring precise audio control.
- Effects and Transitions: From simple crossfades to complex visual effects, Blender offers a wide range of post-production tools.
- Color Grading: Advanced color correction and grading tools allow for professional-quality visual enhancements.
- Speed Control: Adjust the speed of video clips for slow motion or fast-forward effects seamlessly within your project.
- Text and Titles: Easily add dynamic text and title sequences to your videos for added professionalism.
- Animation Integration: Seamlessly integrate 3D animations or effects created within Blender, offering unique possibilities for video projects.
- Customizable Layout: Organize the VSE layout to suit your workflow, with adjustable windows and views for optimal editing.
- Proxy Editing: Edit large videos smoothly by using proxy clips, which are lower-resolution versions of your original files for faster processing.
- Extensive Format Support: Blender supports a wide array of video and audio formats, ensuring compatibility with various media types.
- Scripting and Extensions: Extend Blender\"s functionality through custom scripts or add-ons, tailored to your specific editing needs.
These features, combined with Blender\"s open-source nature, make it an invaluable tool for video editors looking to leverage powerful editing capabilities without the cost of commercial software.

_HOOK_
Importing and Organizing Your Media in Blender
Efficiently managing your media files is crucial for a smooth video editing workflow in Blender. Follow these steps to import and organize your media within Blender\"s Video Sequence Editor (VSE):
- Open the Video Editing Layout: When you start Blender, switch to the Video Editing layout from the top menu to access the VSE.
- Importing Media: To add your video, audio, or image files to the project, use the \"Add\" menu in the VSE or simply drag and drop the files into the sequencer. Blender supports a wide range of media formats, ensuring compatibility with most content types.
- Use the File Browser: For a more organized import process, use the File Browser to navigate to your media files. You can preview your files before adding them to ensure you\"re importing the correct ones.
- Arranging Your Media: Once imported, you can click and drag your media clips in the sequencer to arrange them in your desired order. Right-click to select a clip and use the \"G\" key to move it along the timeline.
- Creating Proxies for Large Files: For smoother editing of high-resolution video files, create proxies. Right-click on a clip, go to the \"Proxy/Timecode\" settings in the Sidebar (N key), and select your desired proxy resolution.
- Organizing with Meta Strips: Group related clips together into Meta Strips for easier management. Select the clips, then press Ctrl+G to group them. Double-click a Meta Strip to edit its contents.
- Using Markers for Organization: Add markers to your timeline to denote important points or sections in your video. Press M to add a marker at the current frame, and drag to move it.
- Color Coding: Right-click on a clip or a Meta Strip, go to the Strip menu, and use the Color Tags option to assign colors for better visual organization.
By following these steps, you can ensure your Blender project is well-organized, making the video editing process more efficient and less time-consuming.

Basic Video Editing Techniques in Blender
Blender\"s Video Sequence Editor (VSE) offers a variety of basic video editing techniques that are essential for creating polished videos. Master these foundational skills to start your video editing projects:
- Adding Clips: Import your video, audio, and image files into the VSE by using the \"Add\" menu or dragging and dropping files directly into the timeline.
- Cutting and Trimming: Use the cut tool (K) to split clips, and the grab tool (G) to reposition them. Trim unwanted parts of a clip by selecting and deleting them.
- Creating Transitions: Add transitions between clips by overlapping them and using the \"Add Transition\" menu. Common transitions include crossfade and wipe.
- Adding Audio: Sync your video with audio tracks by importing audio files and adjusting them on the timeline. Use the waveform display to match audio precisely with video scenes.
- Adjusting Clip Properties: Modify properties like brightness, contrast, and opacity by selecting a clip and accessing the \"Strip Properties\" panel.
- Using Effect Strips: Enhance your video with effects such as color correction, blur, or glow. Add an effect strip over your clips and adjust its settings in the properties panel.
- Rendering Your Video: Once your editing is complete, render your project by setting the output properties (format, codec, resolution) and clicking the \"Render\" button.
These basic techniques serve as the building blocks for more advanced video editing in Blender, allowing you to create visually compelling content with this powerful software.

Video Editing with Blender for Complete Beginners - Part 1
Experience the magic of creating stunning visual masterpieces with Blender. Learn how to bring your imagination to life through intricate 3D designs and animations in this captivating video tutorial.
Blender As A Video Editor? It\'s Actually Really Good
Dive into the world of video editing and unleash your creativity with this inspiring tutorial. Master the art of storytelling through captivating visual effects and seamless transitions, and bring your videos to life like never before.
Advanced Video Editing Tools and Effects
Blender\"s Video Sequence Editor (VSE) goes beyond basic editing capabilities, offering advanced tools and effects that allow for sophisticated video projects. Here\"s an overview of some of the advanced features that can elevate your video editing to the next level:
- Video Masking: Create complex masks to hide or reveal certain parts of your video. This is useful for creating effects like picture-in-picture or for removing unwanted elements from your footage.
- Color Grading: Utilize Blender\"s color grading tools to adjust the mood and style of your video. With options for color curves, levels, and more, you can fine-tune the color palette to perfection.
- Visual Effects (VFX): Blender allows for the integration of 3D animations and effects into your video, enabling the creation of stunning visual effects that enhance storytelling.
- Chroma Keying: Remove green screens or other colored backgrounds from your footage, allowing you to superimpose subjects onto different backgrounds or scenes.
- Speed Control: Dynamically adjust the speed of video clips, creating slow-motion or time-lapse effects that add drama or energy to your projects.
- Multi-Cam Editing: Edit footage from multiple cameras simultaneously, choosing the best angles and shots to tell your story effectively.
- Audio Synchronization: Automatically sync audio and video tracks, especially useful when working with footage from multiple sources.
- Text and Titles: Advanced text tools allow for the creation of animated titles and text effects, adding a professional touch to your videos.
- Node-Based Compositing: For more complex effects, Blender offers a node-based compositing system, enabling the creation of intricate visual effects and adjustments through a flexible and powerful interface.
These advanced tools and effects in Blender\"s VSE empower video editors to push the boundaries of creativity and produce high-quality, compelling video content.
Working with Audio in Blender
Blender\"s Video Sequence Editor (VSE) includes comprehensive tools for audio editing, making it possible to create videos with rich, well-synced soundscapes. Here\"s how to effectively work with audio in Blender:
- Importing Audio: Drag and drop audio files directly into the VSE or use the \"Add\" menu to import your tracks. Blender supports various audio formats, including WAV and MP3.
- Audio Strips: Once imported, audio files appear as strips in the VSE. These can be moved, cut, and aligned just like video strips, allowing for precise synchronization with your visuals.
- Volume Control: Adjust the volume of your audio strips from the strip properties panel. Keyframing the volume allows for dynamic changes over time.
- Audio Mixing: Combine multiple audio sources by simply layering them in the timeline. Use the VSE\"s built-in mixing capabilities to balance levels and create a cohesive sound mix.
- Sound Effects and Filters: Apply effects like reverb or low-pass filters to audio strips through the modifier properties, enhancing the audio quality and impact of your project.
- Audio Visualization: Blender provides waveform visualization for audio strips, making it easier to match audio cues with visual elements.
- Scrubbing: Enable audio scrubbing to hear sound while dragging the playhead, useful for precise editing and synchronization.
- Exporting with Audio: Ensure your final render settings include audio output to have your sound mix included in the exported video file.
By mastering these audio editing features in Blender, you can significantly enhance the overall quality and immersion of your video projects.

Color Grading and Correction in Blender
Color grading and correction are essential steps in video editing to enhance the visual appeal and convey the intended mood or atmosphere. Blender provides powerful tools for these processes within its Video Sequence Editor (VSE) and Compositor. Here\"s how to utilize Blender for color grading and correction:
- Accessing Color Tools: In the VSE, you can apply basic color corrections using the \"Strip Properties\" panel. For more advanced grading, switch to the \"Compositing\" workspace and use nodes for detailed adjustments.
- Basic Corrections: Start with basic adjustments such as brightness, contrast, and saturation. These can be found in the VSE under the \"Adjustment Layer\" or as nodes in the Compositor.
- Color Curves: Use color curves to fine-tune the luminance and color balance. This allows for precise control over the shadows, midtones, and highlights.
- Using the Scopes: Blender includes waveform, vectorscope, and histogram monitors to help accurately assess color and exposure levels, ensuring your adjustments are precise.
- Look-Up Tables (LUTs): Apply LUTs to achieve specific color looks or filmic tones. Blender allows you to import custom LUT files for quick color grading.
- Secondary Color Correction: Utilize the \"Color Balance\" node in the Compositor for selective color adjustments, targeting specific hues for modification without affecting the entire image.
- Grading for Mood: Experiment with color grading to enhance the emotional impact of your video. Warm tones can evoke feelings of happiness or nostalgia, while cool tones can convey sadness or tension.
- Exporting with Adjustments: Ensure all color adjustments are rendered correctly by double-checking your export settings, particularly the color depth and profile.
By mastering these color grading and correction techniques in Blender, you can significantly improve the visual quality of your videos, making them more engaging and visually appealing to your audience.
_HOOK_
Rendering and Exporting Your Video from Blender
Rendering and exporting are the final steps in video editing with Blender, turning your project into a viewable video file. Here\"s how to accomplish this:
- Choose Your Output Settings: In the Properties panel, go to the Output tab. Here, you can select the file format for your video, such as MPEG, AVI, or QuickTime. You can also set the resolution, frame rate, and output path for your video file.
- Configure Encoding Settings: Still in the Output tab, find the Encoding section. Choose your desired codec (e.g., H.264 for good compatibility and size), and adjust quality settings like bitrate or output quality according to your needs.
- Audio Settings: Don\"t forget to configure the audio codec if your project includes sound. Select an appropriate audio format (e.g., AAC, MP3) and adjust the bitrate to ensure your audio is clear without unnecessarily inflating the file size.
- Set Frame Range: Ensure the Start and End frames in the Dimensions section of the Output tab match the length of your video to render the entire project.
- Rendering: Once you\"re satisfied with your settings, go to the Render menu at the top of the screen and select \"Render Animation\" or press Ctrl+F12. Blender will start rendering your project into a video file.
- Monitor the Render Process: The rendering process can take some time, depending on the complexity of your project and the settings you\"ve chosen. You can monitor the progress in the Image Editor window where each frame is displayed as it\"s rendered.
- Exporting Your Video: After rendering is complete, your video will be saved to the location you specified in the output settings. You can now view and share your finished project!
By following these steps, you can render and export high-quality video projects from Blender, ready for distribution or further processing.

Tips for Efficient Video Editing Workflows in Blender
To enhance your video editing experience in Blender, it\"s essential to optimize your workflow for efficiency and effectiveness. Here are some expert tips:
- Use Keyboard Shortcuts: Familiarize yourself with Blender\"s keyboard shortcuts for common tasks. This can significantly speed up your editing process.
- Organize Your Assets: Keep your project files organized in folders, and use Blender\"s built-in file management tools to keep track of your media within the project.
- Create Proxies for High-Resolution Footage: Working with high-resolution footage can be taxing on your system. Use proxy editing to make the editing process smoother.
- Use the Blender Cloud: For collaboration and asset management, consider using the Blender Cloud. It\"s a great resource for sharing files and accessing a library of assets.
- Color Code Your Strips: Utilize color coding for your video and audio strips in the VSE to quickly identify different types of media and keep your timeline organized.
- Implement Version Control: Save different versions of your project as you make significant changes. This allows you to go back to previous versions if needed.
- Customize Your Layout: Blender allows you to customize the interface layout. Set up your workspace in a way that best suits your editing style for maximum efficiency.
- Utilize Blender\"s Community: If you encounter challenges, use Blender\"s extensive online community for support. Forums, tutorials, and user groups can be invaluable resources.
- Keep Learning: Blender is constantly evolving. Stay updated with the latest features and techniques by regularly checking Blender\"s official website and community forums.
By adopting these practices, you can streamline your video editing process in Blender, making it more enjoyable and productive.
READ MORE:
Learning Resources and Community Support for Blender
Blender boasts a robust set of learning resources and community support mechanisms that cater to users of all skill levels. Here\"s how to navigate these resources to enhance your video editing skills with Blender:
- Official Blender Tutorials: Start with the tutorials available on the Blender Foundation’s own website. These tutorials cover everything from the basics to more advanced topics.
- Blender Community Forums: Join the Blender Artists forum or the official Blender community forums to ask questions, share tips, and connect with other Blender users.
- Online Courses and Workshops: Platforms like Udemy, Coursera, and CG Cookie offer comprehensive courses that range from beginner to advanced levels.
- YouTube Tutorials: YouTube is an invaluable resource, with countless tutorials available for free. Channels like Blender Guru, CG Geek, and Ducky 3D specialize in Blender tutorials.
- Blender Network: For professional networking and finding Blender experts, the Blender Network connects you with professionals and trainers.
- Blender Stack Exchange: A Q&A site for Blender users to ask and answer questions on a wide range of topics related to Blender.
- Books and E-books: There are several detailed guides and textbooks available that cover Blender\"s video editing capabilities, such as \"Blender For Dummies\" and \"Learning Blender: A Hands-On Guide to Creating 3D Animated Characters\".
- Blender Conference: Attend the annual Blender Conference or watch the sessions online to learn from the developers and expert users.
Leveraging these resources effectively can significantly enhance your understanding and proficiency in video editing with Blender, allowing you to create more complex and polished video projects.
Embark on your journey to mastering video editing with Blender, and unlock the full potential of your creative visions. With endless possibilities, Blender is your gateway to producing stunning videos that captivate and inspire.