Topic blender video editing tutorial: Discover the power of Blender for video editing with our comprehensive tutorial, designed to take beginners to proficient editors in no time.
Table of Content
- What are some beginner-friendly tutorials for video editing using Blender?
- Understanding Blender\"s Video Editing Interface
- Setting Up Your Project in Blender
- Basic Video Editing Techniques: Cutting, Trimming, and Splicing
- Advanced Video Editing Features: Effects, Transitions, and Color Grading
- Working with Audio: Syncing, Mixing, and Adding Effects
- Animating Text and Incorporating Titles
- YOUTUBE: Blender 3.0 Video Editing Tutorial Ep.1 Interface Output Timeline Import Render
- Utilizing Blender\"s Video Sequence Editor for Complex Edits
- Rendering and Exporting Your Final Video
- Tips for Efficient Workflow in Blender
- Common Pitfalls to Avoid in Video Editing
- Resources for Further Learning and Community Support
What are some beginner-friendly tutorials for video editing using Blender?
Here are some beginner-friendly tutorials for video editing using Blender:
- Blender Video Editing Series: This series covers the basics of setting up Blender for video editing and provides a step-by-step guide for beginners.
- Video Editing in Blender for Complete Beginners: A 4-part tutorial series that walks you through the process of video editing using Blender from start to finish.
READ MORE:
Understanding Blender\"s Video Editing Interface
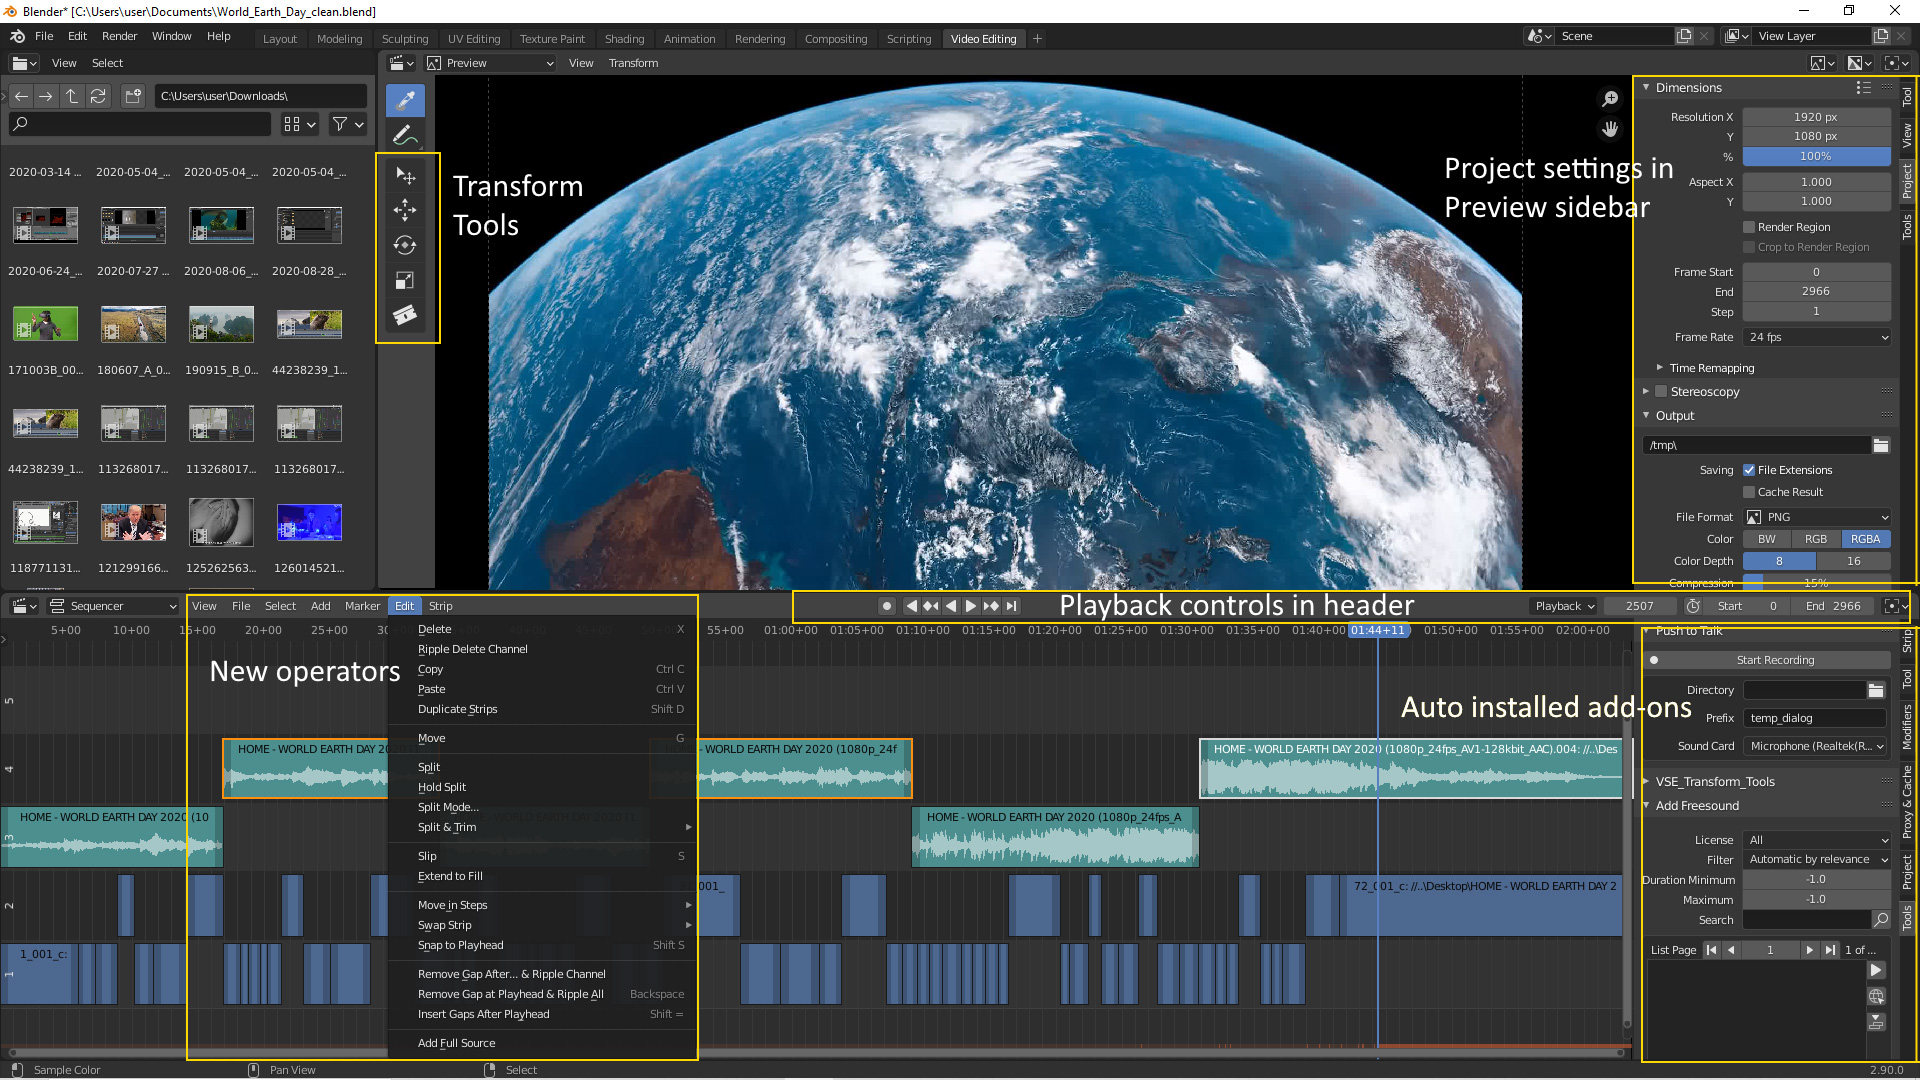
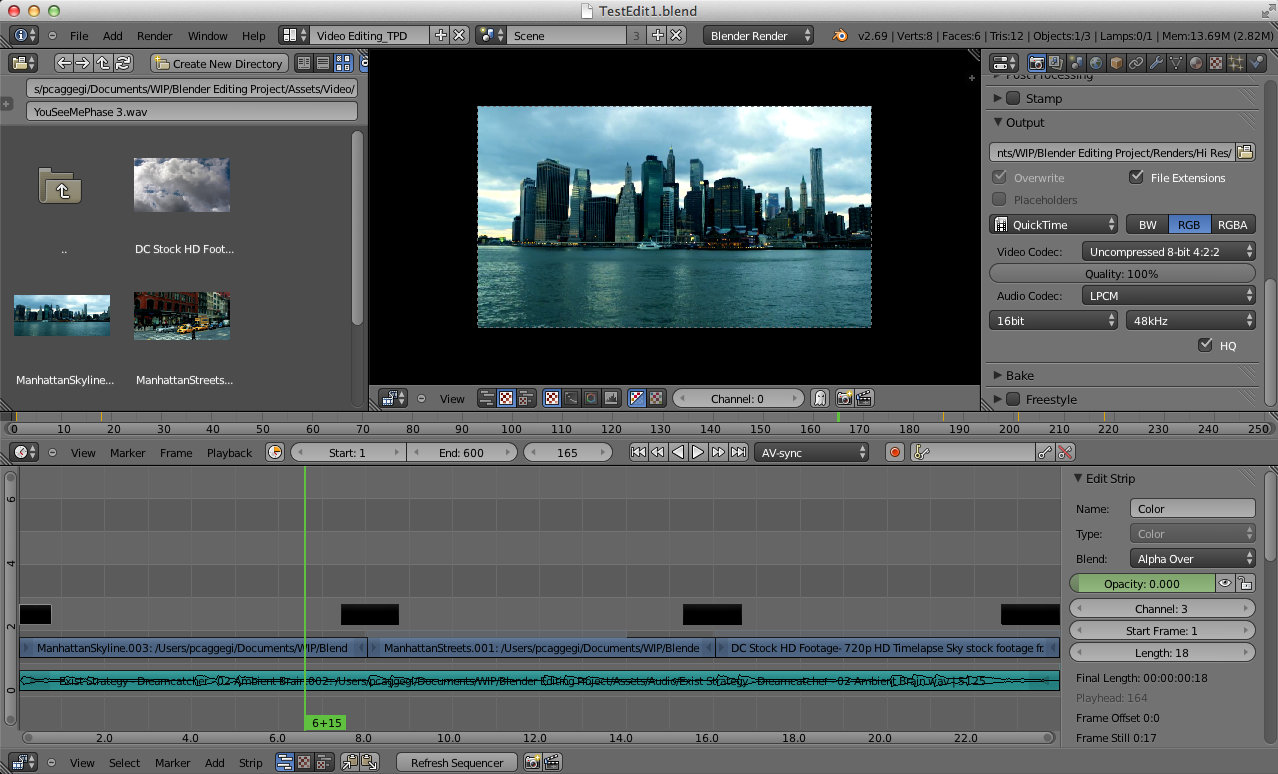
Blender\"s video editing interface is a comprehensive and powerful suite designed for non-linear video editing. It\"s part of Blender, a free and open-source 3D creation suite. The video editing layout provides various tools and panels necessary for video editing, all organized within Blender\"s unified interface. Here\"s a step-by-step guide to understanding the key components of Blender\"s video editing interface:
- Workspace Switching: Upon opening Blender, switch to the Video Editing workspace from the top menu to access the video editing tools.
- Sequencer: The Sequencer is the heart of Blender\"s video editing capabilities, where you add video clips, images, and sounds to assemble your project. It supports different types of strips for various media types and effects.
- Preview Window: This window shows the output of the sequence you\"re currently working on. You can play back your project in real-time to review edits, effects, and transitions.
- Properties Panel: Located to the right of the Sequencer, this panel allows you to adjust properties of the active strip or effect, including start and end frames, opacity, blend modes, and more.
- Toolbar: The toolbar provides quick access to tools for cutting, moving, and adjusting strips in the Sequencer. You can find tools for selection, cutting (blade), and moving strips.
- Graph Editor, Dope Sheet, and NLA Editor: These advanced tools are used for precise control over animation and effects timing, offering keyframe manipulation and non-linear animation capabilities.
To effectively utilize Blender\"s video editing interface, familiarize yourself with the Sequencer\"s layout, learn how to import media, and understand the basic operations like cutting, moving, and applying transitions and effects. As you become more comfortable, explore the advanced features such as color grading, audio mixing, and adding text animations to enhance your video projects. Remember, practice and experimentation are key to mastering Blender\"s video editing suite.

Setting Up Your Project in Blender
Before diving into the creative process of video editing with Blender, setting up your project correctly is crucial for a smooth and efficient workflow. This involves configuring the initial settings to match your video\"s requirements, ensuring that your final output meets your desired quality and format. Here\"s a step-by-step guide to help you set up your project in Blender:
- Choose the Video Editing Workspace: Start Blender and select the \"Video Editing\" workspace from the top menu to access the video editing interface.
- Set Up Your Scene: Before importing your media, adjust your scene settings to match your project\"s needs. This includes setting the frame rate, aspect ratio, and resolution in the \"Output Properties\" panel.
- Frame Rate: Match the frame rate to your video footage to ensure smooth playback. Common frame rates include 24, 30, and 60 fps.
- Resolution: Set the resolution to the desired size of your final video output. HD, Full HD, and 4K are common resolutions.
- Aspect Ratio: Choose an aspect ratio that fits your project\"s delivery platform, such as 16:9 for YouTube or 1:1 for Instagram.
- Configure Output Settings: In the \"Output Properties\" panel, specify your output format for both video and audio. You can choose from various file formats, codecs, and quality settings.
- Video Format: Select a file format like AVI, MPEG, or MOV based on your needs. Consider the codec that best balances quality and file size.
- Audio Codec: Ensure the audio codec is set if your project includes sound, selecting a format that matches your video\"s quality requirements.
- Import Your Media: Use the \"Add\" menu in the Sequencer to import your video clips, images, and audio files. You can drag and drop files directly into the Sequencer for ease of use.
- Organize Your Sequencer: Arrange your media on different channels in the Sequencer to keep your project organized. Use naming conventions for your strips to easily identify them as your project grows.
- Save Your Project: Regularly save your project to prevent data loss. Use a clear naming convention and save versions as you make significant changes or try new edits.
By carefully setting up your project in Blender, you\"ll create a strong foundation for your video editing process. This initial setup ensures that your workflow is efficient, your project is organized, and your final output meets your expectations. Always remember to experiment with Blender\"s settings to find the best configuration for your specific project needs.
Basic Video Editing Techniques: Cutting, Trimming, and Splicing
Mastering basic video editing techniques such as cutting, trimming, and splicing is essential for creating compelling video content. These fundamental skills allow you to control the narrative flow, adjust the pace, and remove unwanted segments from your footage. Here\"s how you can apply these techniques in Blender:
- Cutting Clips: Cutting allows you to split a video clip into two separate parts. This is useful for removing unwanted sections or isolating important footage.
- To cut a clip, select the strip in the Sequencer, move the playhead to the desired cut location, and then use the \"Cut\" tool (shortcut: K). This splits the strip into two parts, which you can move or delete as needed.
- Trimming Clips: Trimming enables you to adjust the start and end points of a clip without altering its content. It\"s perfect for fine-tuning the in and out points to ensure seamless transitions.
- To trim a clip, select it and drag the handles at either end to the new start or end point. This method allows you to shorten or extend the visible portion of the clip without cutting it.
- Splicing Clips: Splicing involves joining two or more clips together to create a continuous sequence. This technique is essential for stitching together different shots or scenes.
- To splice clips, simply place them next to each other in the Sequencer. Ensure there are no gaps between the clips for a smooth transition. You can use transitions like crossfades for a more seamless blend between clips.
These basic editing techniques are the building blocks of video editing. By practicing cutting, trimming, and splicing, you can craft engaging narratives, maintain your audience\"s attention, and convey your message effectively. Remember, the key to mastering these techniques in Blender is practice and experimentation, so don\"t hesitate to try different approaches to find what works best for your project.

Advanced Video Editing Features: Effects, Transitions, and Color Grading
Once you\"ve mastered basic editing techniques in Blender, you can elevate your video projects by incorporating advanced features such as effects, transitions, and color grading. These elements can significantly enhance the visual appeal and narrative impact of your work. Here\"s how to utilize these advanced features in Blender:
- Applying Effects: Blender offers a variety of effects to enhance your video, including speed control, reverse playback, and more.
- To apply an effect, first select the clip in the Sequencer. Then, use the \"Add\" menu to choose an effect strip, such as a Gaussian Blur, Color Correction, or Transform. Adjust the effect properties in the \"Effect Strip\" panel to achieve your desired outcome.
- Creating Transitions: Transitions between clips can smooth out the narrative flow and add dynamism to your video.
- For a basic crossfade, overlap two clips in the Sequencer and add a \"Cross\" effect from the \"Add\" menu. You can adjust the duration and type of transition in the \"Effect Strip\" properties.
- Experiment with other transitions, such as wipes or fades, to find the best fit for your project\"s tone and style.
- Color Grading: Color grading is the process of enhancing or altering the color of your video to convey a specific mood or atmosphere.
- In Blender, switch to the \"Color\" workspace to access advanced color grading tools. Use the \"Color Balance\" and \"Curves\" tools to adjust the shadows, midtones, and highlights of your video.
- Experiment with different looks and grading styles to enhance the visual storytelling of your project. Remember, subtle adjustments can significantly impact the final look of your video.
By incorporating these advanced video editing features into your Blender projects, you can create visually stunning and emotionally compelling content. Effects, transitions, and color grading not only enhance the aesthetic quality of your videos but also help to convey your narrative vision more effectively. As always, experimentation and practice are key to mastering these advanced techniques.

_HOOK_
Working with Audio: Syncing, Mixing, and Adding Effects
Audio is a crucial component of video production, enhancing the overall viewing experience by adding depth and emotion to your visual content. Blender provides comprehensive tools for audio editing, including syncing, mixing, and applying effects. Mastering these audio features will allow you to produce rich and immersive audiovisual projects. Here’s how to effectively work with audio in Blender:
- Syncing Audio and Video: Ensuring your audio and video are perfectly synchronized is essential for maintaining viewer engagement and credibility.
- Import your video and audio files into the Sequencer. You can visually align the audio waveform with the video clip to sync them manually.
- For more precise syncing, use the \"Synchronize Strips\" option under the \"Strip\" menu, which aligns selected audio and video strips based on their starting points.
- Mixing Audio Tracks: Blender allows you to layer multiple audio tracks, adjust their volume, and balance the mix to create a harmonious sound environment.
- In the Sequencer, add your audio tracks and adjust their position to layer them correctly. Use the \"Volume\" property in the strip\"s properties panel to control the loudness of each track.
- Use the \"Mute\" and \"Solo\" functions to focus on individual tracks or to exclude tracks from playback during editing.
- Adding Audio Effects: To enhance the quality or character of your audio, apply effects such as echo, reverb, or low-pass filters.
- Select the audio strip you wish to modify, then add an effect strip from the \"Add\" menu. Choose from various audio effects and adjust their properties to achieve the desired sound.
- Experiment with combining multiple effects to create unique soundscapes or to emphasize specific audio elements.
By paying careful attention to audio editing in Blender, you can significantly elevate the production value of your projects. Effective audio syncing ensures that your visuals and sound work in unison, while mixing and effects allow you to create a compelling auditory experience. Remember, the key to mastering audio in video editing is to experiment and to listen critically to the soundscape you are creating.

Animating Text and Incorporating Titles
Text animation and title incorporation are essential techniques in video editing that can significantly enhance the visual appeal and narrative clarity of your projects. Blender, with its powerful animation tools, allows for creative and dynamic text manipulation. Here\"s how you can animate text and incorporate titles into your video projects using Blender:
- Creating Text Objects: Start by adding a text object to your scene.
- In the 3D Viewport, press Shift + A to open the Add menu, and select Text to create a new text object.
- Enter Edit mode by pressing Tab, allowing you to type your desired text. Use the Object Data properties panel to adjust the font, size, and alignment.
- Incorporating Titles: Position your text object to serve as a title or subtitle within your scene.
- Use the 3D Viewport tools to move, rotate, and scale your text object, ensuring it fits well within your scene or video frame.
- For titles, consider using keyframes to animate the text\"s appearance and disappearance, enhancing the professional quality of your video.
- Animating Text: Blender\"s animation tools allow you to bring your text to life, making it more engaging for viewers.
- To animate your text, switch to the Animation workspace and use the Timeline to insert keyframes for the text object\"s properties, such as location, rotation, and scale.
- Explore different animation effects, such as fading in/out, bouncing, or sliding, by adjusting the keyframe interpolation types in the Graph Editor.
- Adding Effects to Text: Enhance your text with effects like shadows, outlines, or materials.
- For shadows or outlines, duplicate your text object and adjust its position or material to create the desired effect.
- Utilize Blender\"s material settings to apply colors, textures, or shaders to your text, giving it a unique appearance.
Animating text and incorporating titles in Blender can dramatically increase the impact and professionalism of your video projects. By following these steps, you can create visually captivating titles and text animations that engage your audience and convey your message effectively. Experimentation and creativity are key, as Blender offers a wide range of possibilities for text manipulation and animation.
Blender 3.0 Video Editing Tutorial Ep.1 Interface Output Timeline Import Render
Interface: Discover the sleek and user-friendly interface of our latest software update in this captivating video. Dive into a world of seamless navigation and interactive features that will enhance your digital experience. Beginner: Join us on an exciting journey for beginners in the world of photography in this inspiring video. Learn the basics, gain valuable tips, and kickstart your photography passion with easy-to-follow guidance.
Blender 3D Beginner Video Editing Tutorial FREE Video Editor
Get 50% OFF your first bag of coffee with Trade Coffee when you click here http://cen.yt/TradeSouthernShotty and enter code ...
Utilizing Blender\"s Video Sequence Editor for Complex Edits
Blender\"s Video Sequence Editor (VSE) is a powerful tool for non-linear editing, enabling you to perform complex video and audio editing tasks. It is ideal for assembling clips, adding transitions, and applying effects to create professional-grade video projects. Here’s a guide to making the most of the VSE for complex edits:
- Navigating the VSE: Familiarize yourself with the VSE interface, including the Sequencer area where you arrange your clips, the Preview window to view your edits, and the Properties panel for adjusting settings.
- Use the mouse scroll wheel to zoom in and out of the timeline, and click and drag the middle mouse button to pan across the timeline.
- Arranging Clips: Import your media files into the Sequencer and drag them onto the timeline to start assembling your project.
- Layer clips on different channels for better organization and to apply overlapping effects or transitions.
- Applying Transitions and Effects: Use the VSE to add transitions between clips or to overlay effects.
- Select two adjacent clips and add a transition from the Add menu, such as a Cross, Wipe, or Fade.
- For effects, add an adjustment layer or an effect strip above your clips and modify its properties to achieve the desired outcome.
- Color Grading and Correction: Perform color grading directly within the VSE to enhance the visual quality of your video.
- Add a color correction effect strip above your clips and use the properties panel to adjust the colors, contrast, brightness, and saturation.
- Syncing Audio: Ensure your video and audio tracks are in sync by aligning them on the timeline. Use the waveform display to match audio cues to visual elements accurately.
- Rendering Your Project: Once your edits are complete, adjust your rendering settings in the Properties panel, specifying the output format, resolution, and frame rate.
- Click on the Render menu and select \"Render Animation\" to output your final video project.
By leveraging the capabilities of Blender\"s Video Sequence Editor, you can execute complex edits with precision and creativity. Whether you\"re working on a short film, a music video, or any other multimedia project, the VSE provides the tools needed to bring your vision to life. Remember, practice and experimentation are key to unlocking the full potential of this powerful editing suite.

Rendering and Exporting Your Final Video
Rendering and exporting are the final steps in the video editing process, where your project is compiled into a single video file. This process can be complex, but Blender simplifies it with its powerful rendering engine. Here\"s how to render and export your final video in Blender:
- Choose the Correct Output Settings: Before rendering, ensure your output settings match your project\"s needs.
- Go to the \"Output Properties\" tab and select your desired file format (e.g., MPEG, AVI, MOV) and codec.
- Set the resolution and frame rate to match your video editing project for consistent playback quality.
- Configure Rendering Options: Blender offers various rendering options to optimize quality and rendering time.
- In the \"Render Properties\" tab, adjust the \"Sampling\" settings for animation to balance render quality and speed.
- Consider enabling \"Denoising\" to improve the final video\"s appearance, especially if you\"re working with 3D animations.
- Audio Settings: Don’t forget to configure the audio codec to ensure your video\"s sound is exported correctly.
- In the \"Output Properties\" tab, under the \"Encoding\" section, select an audio codec that matches your video\"s format and quality requirements.
- Render Your Project: Once you\"ve configured all settings, you\"re ready to render.
- Go to the \"Render\" menu and choose \"Render Animation\" or press Ctrl + F12. Blender will start processing your video, which may take some time depending on the project\"s complexity and length.
- Review and Export: After rendering, review your final video to ensure it meets your expectations.
- If adjustments are needed, return to your project, make the necessary changes, and re-render. If satisfied, your video is now ready for export and sharing.
Rendering and exporting in Blender might seem daunting at first, but by following these steps, you can achieve professional results. Remember, rendering times can vary greatly based on the complexity of your project and the power of your computer. Patience and practice are key to mastering the rendering and exporting process in Blender.
Tips for Efficient Workflow in Blender
Creating an efficient workflow in Blender not only saves time but also enhances the quality of your video projects. Whether you\"re a beginner or an experienced editor, adopting best practices can streamline your editing process. Here are some tips to achieve an efficient workflow in Blender:
- Use Keyboard Shortcuts: Familiarize yourself with Blender\"s keyboard shortcuts. This can significantly speed up your editing process by reducing reliance on mouse clicks for common actions.
- For example, G to grab (move) an item, S to scale, and I to insert a keyframe. There are many more shortcuts that can help you work faster.
- Organize Your Assets: Keep your project files organized. Use consistent naming conventions for your files and arrange them in folders based on their type or purpose (e.g., footage, audio, images).
- Proxy Editing: For high-resolution footage, use Blender\"s proxy editing feature to create lower-resolution clips for editing. This can dramatically improve playback speed during the editing process.
- Once editing is complete, you can switch back to the original high-resolution clips for rendering.
- Use Layers and Markers: Utilize layers to separate different elements of your project, such as video, audio, and effects. This helps in managing complex edits more efficiently.
- Markers can be used to denote important points in your timeline, like scene changes or sync points, making it easier to navigate complex projects.
- Customize Your Workspace: Blender allows you to customize your workspace to suit your editing style. Arrange the panels and windows in a way that optimizes your workflow.
- Regularly Save and Backup: Ensure you regularly save your project and keep backups. Blender\"s auto-save feature can be a lifesaver, but it\"s also a good practice to manually save versions as you progress.
- Learn and Experiment: Continuously learn new techniques and experiment with Blender\"s features. The software is regularly updated with new tools and improvements that can enhance your workflow.
By incorporating these tips into your Blender workflow, you can work more efficiently, allowing you more time to focus on the creative aspects of video editing. Remember, efficiency in Blender comes with practice and familiarity with the software\"s extensive features.

_HOOK_
Common Pitfalls to Avoid in Video Editing
Video editing is an art that requires attention to detail, creativity, and technical skill. However, even experienced editors can fall into common traps that affect the quality of their projects. Recognizing and avoiding these pitfalls can significantly improve your video editing outcomes. Here are some common mistakes to watch out for:
- Ignoring the Story: The most important aspect of any video is its story. Avoid getting so caught up in technical details or special effects that the narrative becomes secondary. Always ensure your edits serve the story first.
- Overusing Transitions and Effects: While transitions and effects can enhance your video, overusing them can be distracting and may make your project look unprofessional. Use them sparingly and only when they add to the storytelling.
- Poor Audio Quality: Audio is just as important as video. Neglecting audio quality can ruin even the most visually stunning video. Ensure your audio is clear, well-mixed, and appropriately balanced with the visuals.
- Inconsistent Pacing: Pacing keeps the audience engaged. Inconsistent pacing, with scenes that drag on too long or move too quickly, can confuse and lose viewers. Strive for a rhythm that matches the narrative flow.
- Failure to Color Correct: Color correction ensures visual consistency and mood across your video. Skipping this step can result in a patchwork of mismatched clips that distract from the content.
- Lack of Organization: Disorganization can lead to inefficiency and errors. Keep your project files well-organized and your workspace tidy to streamline your editing process.
- Ignoring Feedback: While it’s important to trust your creative instincts, ignoring feedback from others can be a mistake. Constructive criticism can offer valuable insights and help improve your work.
- Not Saving Regularly: Losing progress due to a crash or mistake is frustrating and time-consuming. Regularly save your work and keep backups to avoid this pitfall.
Avoiding these common pitfalls will help you create more engaging, professional-looking videos. Remember, every video is a learning opportunity, and each project can help you refine your skills and techniques. Stay open to learning, and don’t be afraid to experiment and adapt your approach as you grow as a video editor.
READ MORE:
Resources for Further Learning and Community Support
Continuing to learn and engaging with a community can significantly enhance your video editing skills in Blender. There are numerous resources available for both beginners and advanced users looking to deepen their knowledge and connect with others. Here are some valuable resources for further learning and community support:
- Official Blender Tutorials: The Blender Foundation offers extensive tutorials on their official website and YouTube channel, covering everything from basic operations to advanced techniques.
- Online Courses and Workshops: Platforms like Udemy, Coursera, and LinkedIn Learning provide comprehensive courses on Blender, including video editing, animation, and 3D modeling.
- Blender Community Forums: Participate in forums such as Blender Artists and the Blender Community on Reddit to ask questions, share your work, and receive feedback from fellow Blender users.
- Video Tutorials: YouTube is an invaluable resource, with countless tutorials available for free. Channels like Blender Guru, CG Geek, and Ducky 3D offer tutorials for all skill levels.
- Books and E-books: There are several detailed guides and textbooks on Blender that can serve as reference materials, such as \"Blender For Dummies\" and \"The Complete Guide to Blender Graphics.\"
- Meetups and User Groups: Joining a local Blender meetup or user group can provide opportunities to learn from more experienced users and to network with professionals in the field.
- Online Communities and Social Media: Engaging with Blender communities on platforms like Instagram, Twitter, and Facebook can provide inspiration, showcase creative ways to use Blender, and offer support.
By taking advantage of these resources, you can continue to grow your skills in Blender, stay up-to-date with the latest tools and techniques, and become part of a global community of creative professionals. Remember, the journey of learning is ongoing, and every project brings new opportunities to improve and innovate.
Embark on your Blender video editing journey with confidence! Whether you\"re a beginner or looking to refine your skills, our comprehensive guide and resources will empower you to unleash your creative potential and bring your visions to life.