Topic using blender to edit videos: Unlock the full potential of your creative projects with Blender, a powerful tool for video editing that combines flexibility with advanced features, making it the go-to choice for both beginners and professionals alike.
Table of Content
- How can I edit videos using Blender?
- Overview of Blender as a Video Editing Tool
- Getting Started with Blender for Video Editing
- Understanding Blender\"s Video Sequence Editor (VSE)
- Importing and Organizing Media in Blender
- Basic Video Editing Techniques with Blender
- Advanced Video Editing Features in Blender
- YOUTUBE: Video Editing with Blender for Complete Beginners - Part 1
- Audio Editing and Synchronization in Blender
- Adding Effects and Transitions in Blender
- Color Correction and Grading in Blender
- Exporting Your Final Video from Blender
- Resources and Communities for Blender Video Editors
How can I edit videos using Blender?
To edit videos using Blender, you can follow these steps:
- Open Blender and go to the Video Editing layout.
- Import your video footage by clicking on the \"Add\" menu and selecting \"Movie\".
- Drag and drop your video clips onto the timeline to arrange them in the order you want.
- Use the tools in the Video Sequence Editor to trim, cut, and splice your video clips as needed.
- Apply effects and transitions to enhance your video. Blender offers a range of effects that you can use creatively.
- Adjust the speed and timing of your video clips by manipulating keyframes.
- Add audio to your video by importing audio files and placing them on the timeline.
- Preview your edited video by playing it back in the preview window.
- Once you are satisfied with your edits, you can render the video by clicking on the \"Render\" button.
READ MORE:
Overview of Blender as a Video Editing Tool
Blender is not just a powerhouse for 3D modeling and animation but also offers a robust set of tools for video editing. This free, open-source software stands out for its versatility, catering to a wide range of video production needs. Whether you\"re looking to perform simple cuts and trims or dive into complex compositing and animation, Blender\"s Video Sequence Editor (VSE) provides a comprehensive environment for both novice and experienced editors.
- Video Sequence Editor (VSE): At the heart of Blender\"s video editing capabilities, the VSE allows for non-linear editing, layering, syncing, and previewing in real-time.
- Comprehensive Toolkit: Blender comes equipped with tools for video cuts, splicing, masking, color grading, and adding effects like transitions and filters.
- Audio Mixing and Syncing: Advanced audio mixing options are available, including syncing, scrubbing, and waveform visualization, making it easier to achieve professional-sounding audio tracks.
- Effects and Transitions: Add visual flair to your projects with a range of effects and transitions, from basic cuts to complex multi-layered composites.
- Animation Integration: Seamlessly integrate 3D animations with your video projects, leveraging Blender\"s leading animation tools.
- Customization and Extensibility: Thanks to its open-source nature, Blender is highly customizable, with a vast community contributing add-ons and scripts to extend its functionality.
Blender\"s adaptability makes it suitable for a variety of video editing projects, from simple video blogs to complex cinematic productions. Its interface might be daunting for beginners, but the wealth of tutorials and community support available online makes the learning curve manageable and well worth the effort. Overall, Blender represents a comprehensive, cost-effective solution for anyone looking to enhance their video editing capabilities.

Getting Started with Blender for Video Editing
Embarking on video editing with Blender begins with understanding its interface and capabilities. This guide will walk you through the initial steps to leverage Blender\"s Video Sequence Editor (VSE) for your video projects.
- Download and Install Blender: Ensure you have the latest version of Blender installed from the official website to take advantage of all video editing features.
- Familiarize Yourself with the Interface: Spend some time navigating Blender\"s layout. The default interface can be customized, but focus on locating the Video Sequence Editor.
- Switch to Video Editing Layout: Blender offers different layouts for various tasks. Select the Video Editing layout from the top to access the VSE.
- Import Your Media: Use the Add menu in the VSE to import video clips, images, and audio files. You can drag and drop files directly into the timeline.
- Edit Your Video: Blender allows for basic editing like cutting and trimming clips directly in the timeline. Advanced users can explore more complex features such as color grading, transitions, and effects.
- Add Audio: Import your audio files and sync them with your video using the waveform display for precise alignment.
- Export Your Project: Once you are satisfied with your edit, export your video by choosing the desired format and settings under the Render menu.
Getting started with Blender for video editing might seem daunting at first due to its extensive set of features and tools designed for 3D modeling and animation. However, with a bit of practice and exploration, you\"ll find that Blender is a powerful video editor capable of producing professional-quality videos. There are numerous tutorials and resources available online to help you master video editing with Blender.

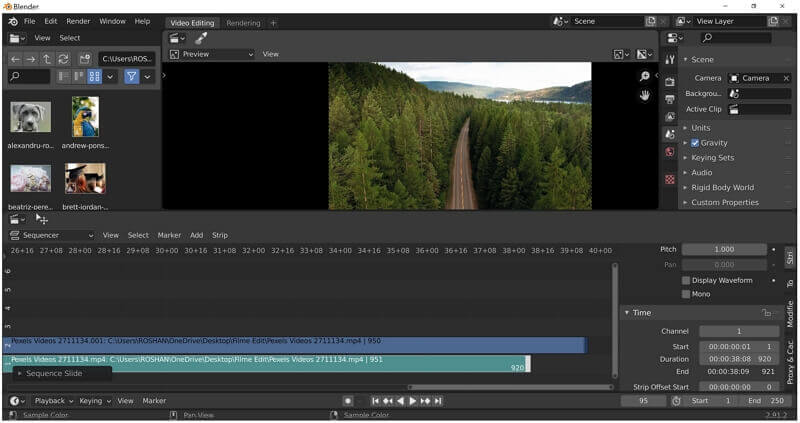
Understanding Blender\"s Video Sequence Editor (VSE)
Blender\"s Video Sequence Editor (VSE) is a comprehensive tool designed for both basic and complex video editing tasks. It allows users to perform video cuts, splicing, video masking, and color grading. The VSE includes features such as live preview, luma waveform, chroma vectorscope, and histogram displays, facilitating detailed editing work.
- Audio mixing, syncing, scrubbing, and waveform visualization support comprehensive audio editing.
- Offers up to 32 slots for adding videos, images, audio, scenes, masks, and effects, enabling layered editing.
- Includes tools for speed control, adjustment layers, transitions, keyframes, filters, and more, providing vast creative possibilities.
This robust suite of features makes Blender\"s VSE a versatile platform for video editors aiming to produce high-quality video content.

Importing and Organizing Media in Blender
Blender facilitates smooth importing and organization of various media types for video editing projects. Follow these steps for efficient workflow:
- Open Blender and switch to the Video Editing layout from the top menu to access the Video Sequence Editor (VSE).
- To import media, use the \"Add\" menu in the VSE or drag and drop files directly into the timeline. Blender supports a range of formats, including video files, images, and audio.
- Organize your media on different channels to keep your project tidy. Channels can represent video layers, audio tracks, or effects layers.
- Use the preview area to scrub through your media and arrange clips as needed. This helps in visualizing the final product during the editing process.
- Blender allows renaming and color-coding of your media strips for better organization and visibility.
These steps ensure a streamlined process for managing your video editing project within Blender, enhancing both productivity and creativity.

_HOOK_
Basic Video Editing Techniques with Blender
Mastering basic video editing techniques in Blender lays the foundation for more advanced projects. Here\"s a step-by-step guide:
- Cutting and Splicing: Use the cut tool to trim or split video clips at the desired points, essential for removing unwanted sections.
- Merging Clips: Combine multiple clips into a single track for seamless transitions and storytelling.
- Adding Transitions: Utilize Blender\"s transition effects, like crossfades or wipes, to smoothly move between clips.
- Applying Filters: Enhance your video\"s visual appeal with color correction, brightness, contrast adjustments, and more.
- Inserting Titles and Text: Add titles, captions, or any textual elements to provide context or enhance the narrative of your video.
These foundational techniques enable creators to begin crafting engaging and polished videos within Blender.

Advanced Video Editing Features in Blender
Blender is not just a 3D modeling and animation tool, it also offers a robust set of features for advanced video editing. These features allow users to create professional-level videos with intricate effects, animations, and editing techniques. Here’s a look at some of the advanced video editing features available in Blender:
- Masking and Compositing: Blender allows for sophisticated masking techniques, enabling users to create complex composite images. This feature is essential for adding special effects, performing color corrections on specific areas, and integrating various elements seamlessly into a video.
- Color Grading: With Blender’s comprehensive color grading tools, users can manipulate the mood and style of their videos. These tools include curves, color balance, and various other adjustments that can transform the visual appeal of any footage.
- Visual Effects (VFX): Blender’s powerful VFX capabilities allow for the creation of stunning visual effects, including smoke, fire, and particle simulations. These features are perfect for adding dramatic effects and enhancing the storytelling aspect of your videos.
- Tracking and Stabilization: Blender includes features for motion tracking and stabilization, which are crucial for integrating 3D elements into live-action footage or stabilizing shaky footage to produce a smoother final video.
- Animation: Beyond its capabilities for 3D animation, Blender can be used to animate video elements, including text and graphics, allowing for dynamic presentations and storytelling within your video projects.
- Advanced Audio Mixing: Blender’s Video Sequence Editor (VSE) includes tools for complex audio editing, enabling users to mix audio tracks, adjust volumes, and synchronize audio with video perfectly.
- Speed Control: Users can manipulate the speed of their video clips directly within Blender, creating slow-motion or time-lapse effects without needing external software.
- Multi-Camera Editing: For projects shot with multiple cameras, Blender facilitates multi-camera editing, allowing users to switch between different camera angles seamlessly to enhance the viewing experience.
These advanced features, combined with Blender’s user-friendly interface and extensive support resources, make it a compelling choice for video editors looking to push the boundaries of their creative work. Whether you’re working on a short film, a music video, or any other video project, Blender’s advanced editing features provide the tools you need to bring your vision to life.

Video Editing with Blender for Complete Beginners - Part 1
Beginners: \"Are you new to this topic and feeling overwhelmed? Fear not, this video is tailored just for beginners like you. Unlock the basics and kickstart your journey to success in no time!\" Quality: \"Don\'t settle for anything less than the best! Our video guarantees top-notch quality content that will provide you with valuable insights and information. Enhance your viewing experience with premium quality content now.\"
Blender As A Video Editor? It\'s Actually Really Good!
Blender, which is free and open source software, is one of the best programs for creating professional-quality 3D animations.
Audio Editing and Synchronization in Blender
Blender\"s Video Sequence Editor (VSE) is not only powerful for video editing but also offers robust tools for audio editing and synchronization. This ensures that users can manage both the visual and auditory aspects of their projects within a single platform. Here\"s how to leverage Blender for audio editing and synchronization:
- Importing Audio: You can easily import various audio formats into Blender, including WAV, MP3, and AAC. To add an audio clip, simply drag and drop the file into the VSE timeline or use the \"Add\" menu to select your audio files.
- Audio Strips: Once imported, audio files appear as strips in the VSE. These strips can be moved, cut, and aligned just like video strips, allowing for precise placement in relation to video content.
- Volume and Muting: For each audio strip, you can adjust the volume directly in the strip\"s properties. This includes the ability to mute individual strips, which is useful for editing dialogue or mixing music and sound effects.
- Keyframe Animation: Blender allows for the keyframing of audio properties, such as volume and pan. This enables dynamic audio mixing, where you can create fades, adjust audio levels over time, or pan audio between speakers for a more immersive sound experience.
- Synchronization: Synchronizing audio with video or animation is straightforward in Blender. You can use markers and snapping tools to align audio cues with specific frames or events in your video. This is essential for syncing dialogue, sound effects, or music with visual elements.
- Audio Effects: While Blender\"s built-in audio effects are somewhat limited, you can still apply basic effects like pitch adjustment. For more complex audio processing, it\"s recommended to use dedicated audio editing software and then import the processed tracks back into Blender.
- Audio Visualization: Blender includes features for visualizing audio waveforms directly on the audio strips. This visualization aids in precise editing and synchronization, as you can see the audio peaks and troughs in relation to the video content.
- Exporting with Audio: When you\"re ready to export your final video, Blender allows you to include the mixed audio in your rendered file. You can choose the audio codec and bit rate to ensure your audio quality meets your project\"s requirements.
By mastering these audio editing and synchronization features in Blender, you can create videos with high-quality sound that perfectly matches your visual content. Whether you\"re making a film, a YouTube video, or any other multimedia project, Blender\"s integrated audio tools provide a comprehensive solution for both visual and auditory storytelling.

Adding Effects and Transitions in Blender
Blender\"s Video Sequence Editor (VSE) offers a comprehensive suite of tools for adding effects and transitions, enhancing the visual storytelling of your video projects. This functionality can transform simple clips into engaging narratives with professional flair. Here\"s how to utilize these features in Blender:
- Transitions: Blender provides a variety of transitions, such as crossfade, wipe, and slide, to smoothly move between clips. To add a transition, place two clips on the timeline so they overlap, select them, and then choose the desired transition from the Add menu. This creates a seamless flow from one scene to another.
- Color Effects: You can adjust the color properties of your clips directly in the VSE. This includes brightness, contrast, saturation, and more. By modifying these properties, you can correct color issues or stylize your footage to match a specific mood or theme.
- Video Filters: Blender allows you to apply various video filters, such as blur, glow, and sharpen, to enhance or alter the appearance of your footage. These filters can be added to individual clips or entire sequences for creative effect.
- Adjustment Layers: For more complex effects, you can use adjustment layers. These layers affect all clips below them on the timeline, allowing you to apply global effects without altering the original clips. This is useful for applying consistent color grading or effects across multiple scenes.
- Custom Effects: With Blender\"s node-based compositing, you can create custom effects beyond the built-in options. This feature is especially powerful for users who wish to integrate advanced visual effects, such as chroma keying or digital compositing, into their video projects.
- Animating Effects: Effects and transitions can be animated over time using keyframes. This means you can have effects that intensify, diminish, or change in other ways as the video plays, adding dynamic visual interest to your projects.
- Text and Titles: Blender also supports the addition of text and titles, allowing you to incorporate captions, opening titles, and credits. These can be animated and styled with various fonts and effects to fit the theme of your video.
- 3D Integration: A unique feature of Blender is the ability to integrate 3D objects and animations directly into your video projects. This allows for the creation of complex visual effects and animations that can be seamlessly blended with your video footage.
By mastering these effects and transitions, you can elevate the quality of your video projects, creating compelling and visually appealing content. Blender\"s versatility in combining traditional video editing with advanced effects makes it a powerful tool for filmmakers, content creators, and video professionals alike.
Color Correction and Grading in Blender
Color correction and grading are essential steps in video production, allowing filmmakers and video editors to enhance the visual impact of their footage. Blender, with its powerful tools, offers extensive capabilities for both color correction and color grading. Here\"s a guide to utilizing these features effectively:
- Understanding Color Correction: Color correction is the process of adjusting the color balance and contrast of your footage to ensure that it looks consistent and natural. This includes correcting for lighting conditions, camera settings, or environmental factors that may have affected the footage.
- Accessing Color Tools: In Blender, color correction can be done using the Strip properties in the Video Sequence Editor (VSE) for basic adjustments, or more advanced color grading can be achieved using the Node Editor and the Compositor for a more layered approach.
- Basic Adjustments: Within the VSE, you can perform basic color adjustments such as brightness, contrast, saturation, and white balance. These adjustments are crucial for correcting any discrepancies in your footage and achieving a uniform look across your video.
- Using Curves: The Curves tool is a powerful feature for color grading, allowing for precise control over the luminance and color channels of your footage. By adjusting the curves, you can dramatically alter the mood and tone of your video, from creating high-contrast visuals to soft and dreamy looks.
- Color Grading: Color grading goes beyond correction, allowing you to stylize your footage to convey a specific atmosphere or emotion. Using Blender\"s Node Editor, you can apply color grading techniques such as selective color adjustments, cross-processing effects, and filmic looks.
- Look Up Tables (LUTs): Blender supports the use of LUTs, which are pre-defined color profiles that can quickly apply a specific look or style to your footage. LUTs are an efficient way to achieve professional color grading effects without the need for manual adjustments.
- Matching Shots: When working with multiple shots, it\"s important to match their color and lighting to ensure consistency throughout your video. Blender\"s color tools can be used to match shots, either by eye or using reference images for a cohesive visual narrative.
- Rendering and Output: After completing your color correction and grading, Blender allows you to render out your project, ensuring that the colors are accurately represented in the final video. It\"s important to monitor your work on calibrated displays to ensure that the colors translate correctly across different viewing platforms.
By leveraging Blender\"s comprehensive color correction and grading tools, you can enhance the visual quality of your videos, creating engaging and visually cohesive content that stands out. Whether you\"re aiming for a natural look or a stylized aesthetic, Blender provides the flexibility and control needed to achieve your vision.

_HOOK_
Exporting Your Final Video from Blender
After investing time in editing and perfecting your video in Blender, the final step is to export it for sharing or publishing. Blender provides a flexible and powerful export system that supports various formats and settings to suit different distribution needs. Here’s a step-by-step guide to exporting your final video from Blender:
- Open the Output Properties: Navigate to the Properties panel on the right side of the Blender interface and click on the Output Properties tab, symbolized by a printer icon.
- Set the Output Path: In the Output section, click on the folder icon to choose the destination folder for your exported video. You can also name your file in this step.
- Choose the File Format: Below the output path, you’ll find the File Format dropdown menu. Select your desired format, such as FFmpeg video, which is suitable for a wide range of uses including web and DVD.
- Configure Video Settings: After selecting FFmpeg video, additional settings will appear. Click on the Encoding section to expand it and adjust the video codec, quality, and bitrate. The H.264 codec is a good general-purpose choice for its balance between quality and file size.
- Adjust Audio Settings: If your project includes audio, ensure the Audio Codec is set appropriately. AAC is a widely supported format with good quality. You can also adjust the audio bitrate and volume here.
- Set the Resolution and Frame Rate: Ensure the resolution and frame rate in the Dimensions section match your project’s settings. This ensures that your video exports with the intended quality and smoothness.
- Render and Export: Once all settings are configured, go to the top menu, select Render, and then click on Render Animation or press Ctrl+F12. Blender will begin processing your video, which can take some time depending on the length and complexity of your project.
- Review the Exported Video: After the export process is complete, locate your video file in the chosen output folder. It’s a good practice to review the video to ensure that it exported correctly and meets your quality standards.
Exporting your video from Blender might seem complex due to the variety of settings available, but these options provide the flexibility to ensure your final product meets your needs, whether for online sharing, professional presentation, or personal archiving. With practice, the export process becomes a straightforward final step in your video production workflow.

READ MORE:
Resources and Communities for Blender Video Editors
Blender is not just a powerful software for video editing; it\"s also supported by a vibrant community of artists, creators, and educators. Whether you\"re a beginner looking to learn the basics or an experienced editor seeking to expand your skills, a wealth of resources and communities are available to support your journey. Here are some valuable resources and communities for Blender video editors:
- Blender Official Website: The official Blender website (blender.org) is the primary resource for downloading the software and accessing official tutorials, documentation, and news about the latest features and updates.
- Blender Artists Community: Blender Artists (blenderartists.org) is an online forum where users share their work, ask questions, and exchange tips and techniques. It\"s a great place to seek advice, receive feedback, and connect with other Blender users.
- Blender Network: The Blender Network (blendernetwork.org) connects Blender professionals and enthusiasts worldwide, offering a platform for networking, job opportunities, and collaboration on projects.
- Blender Stack Exchange: A Q&A site for people who use Blender to create 3D graphics, animations, or films. It\"s a useful resource for finding solutions to specific problems and learning through the challenges faced by others.
- Tutorials and Online Courses: There are numerous tutorials and online courses available, ranging from free YouTube tutorials to more structured courses on platforms like Udemy and Coursera. These resources cater to all skill levels, covering topics from basic editing to advanced visual effects.
- Blender Cloud: Blender Cloud offers subscription-based access to training, assets, and production tools. It\"s an excellent resource for supporting your learning journey while also contributing to Blender\"s development.
- Blender Conferences and Meetups: Participating in Blender conferences and local meetups can provide opportunities for learning, networking, and sharing experiences with other Blender users.
- Social Media Groups and Channels: Social media platforms like Facebook, Reddit, and Discord host active Blender communities where users share their work, discuss topics, and support each other\"s learning process.
Engaging with these resources and communities can significantly enhance your Blender video editing skills and knowledge. From tutorials and courses to forums and social media groups, the support and inspiration you need to master Blender and bring your creative visions to life are readily available.
Embark on your video editing journey with Blender and unlock the full potential of your creative visions. With its comprehensive tools, vibrant community, and extensive resources, Blender empowers you to bring your stories to life like never before.